Android Studio for NDK on Windows

The other day, I found that the version of Android Studio is steadily striving for unity, and therefore I thought about studying this tool. In order not to be bored, I decided to share my experience and the collected rake in the form of a tutorial article.
I want to make a reservation right away that I am not an Android development guru, so you will not find any revelations in the text. But there is a step-by-step instruction on installing and configuring Android Studio under Windows and creating a simple project using Android NDK.
I also warn you in advance: the article turned out to be large and very detailed (honestly, I didn’t expect it myself), even though I hid almost all the screenshots and some code listings under the spoilers.
At the time of writing, the latest version of Android Studio was 0.8.1, for subsequent versions the necessary actions may differ from those described below (I really hope that for the better).
For those who are only interested in NDK
For those who are only interested in Gradle settings for NDK
Install and configure Android Studio
1. You must install the JDK (Java Development Kit) and JRE (Java Runtime Environment).
Previously, the Android SDK only supported JDK version 6, but now it is in the past. 7 and even 8 are supported (at least it was the 8th version that I specified as JAVA_HOME and in the settings of Android Studio, and did not experience any problems).
JRE is needed to run the studio itself. She uses version 7 for me.
You can download JDK and JRE versions greater than 6 from the Oracle website .
The JAVA_HOME variable now, it seems, can not be set, since in Android Studio we will prescribe the path to the JDK in the settings. But I installed it. To do this, you need:
- Go to Control Panel \ System and Security \ System , select Advanced system parameters on the left , find the Environment Variables button in the dialog that opens .
- Create a system or user variable JAVA_HOME and specify the path to the JDK for it. I have this path indicated here: C: \ Program Files \ Java \ jdk1.8.0_05 .
If for any reason you need version 6 of the JDK
JDK 6 without registration can be obtained as follows:
- Download Java EE 6 from Oracle .
- Install it. Included is a JDK 6.
- In this case, you need to specify the JDK path from Java EE as JAVA_HOME , by default it is C: / glassfish3 / jdk .
2. If you have the Android SDK installed.
Comes with Android Studio comes with its Android SDK. And, if you want to use it, then in some cases a strange thing can happen. For example, when I updated the SDK via the SDK Manager, part of the files were written to the old folder, and there were problems when I deleted this folder. Most likely this happened because the registry key was stored with the path to the old folder. Therefore, it makes sense to clean the registry. To do this, run regedit.exe and find HKEY_LOCAL_MACHINE \ Software \ Android SDK Tools for 32-bit machines or HKEY_LOCAL_MACHINE \ Software \ Wow6432Node \ Android SDK Tools for 64-bit machines and remove the Android SDK Tools . If there are no such keys in the registry of your system, then everything is in order.
If you have an environment variable setANDROID_SDK_HOME and you want it to point to an old installation, then, in theory, this should not be a problem, since when setting up Android Studio we will show it the path to the SDK. Problems can arise if this variable is used by any of the applications included in the Android SDK.
3. Now we proceed to the installation of Android Studio.
You need to download Android Studio for your system from the official page and install it. By default, if you select "Install only for me" is placed in \ Users \
After installation, run Android Studio.
We see such a dialogue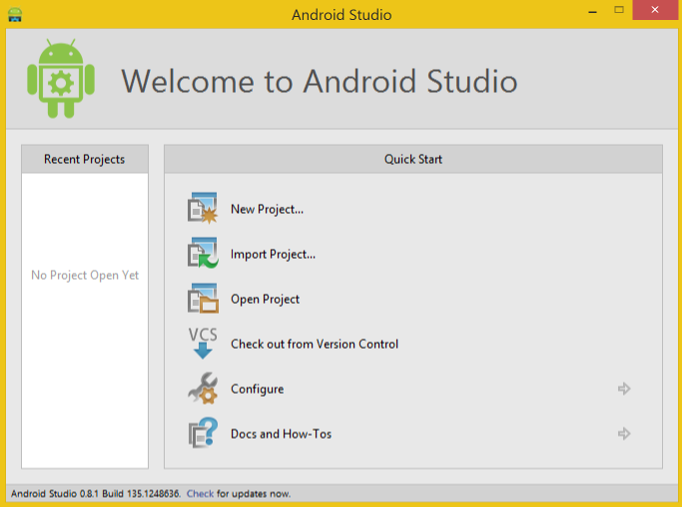
We do the following in it:
- We check for updates and, if necessary, update (for this, click on Check at the bottom of the window)
- Go to Configure-> SDK Manager (just in case: SDK Manager is not a part of Android Studio, but a utility from the Android SDK) and install what you need. If you do not know what is necessary, then it is better to install everything that he offers.That's what he installed with me


- Then I changed the theme to Darcula.How to do ityou need to go to Configure-> Settings-> Appearance :

- Next, go to Configure-> Project Defaults-> Project Structure and change the SDK Location to the path to your Android SDK, and JDK Location to the path to JDK.Screenshot

Project creation
1. New Project
Click New Project .
There is such a dialogue
In it you can configure:
- Project name (I left by default: My Application )
- Company domain by default
.example.com , in my case markedone.example.com - The package name can also be edited by clicking on Edit on the right. By default, it is generated from the project name and company domain and looks like com.example.
. <project name in lowercase without spaces>, I changed it to com.example.markedone.myapp . - The path where the project will be saved. I indicated my folder for all kinds of test projects.
When everything is entered, click Next .
2. Form Factors
In this dialog, select the target platforms and APIs.
The dialog looks like this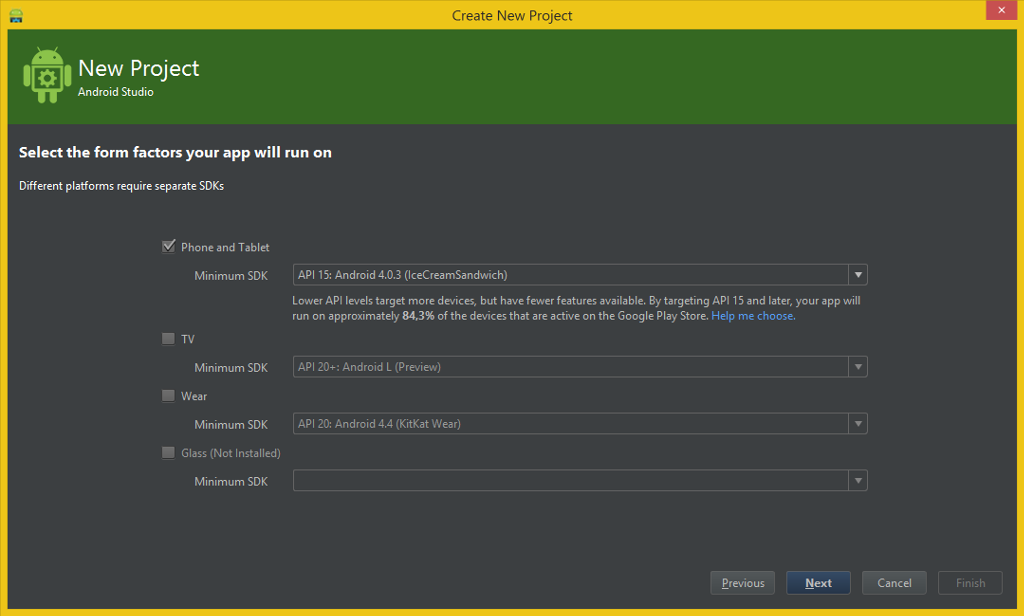
Here I left everything by default: Phone and Tablet and 4.0.3 IceCreamSandwich. If the API for some platforms is not installed, the message Not Insatlled is displayed. For example, as can be seen in the screenshot, I do not have libraries for Google Glass installed (this can be done through the SDK Manager).
Also pay attention to Help me choose, a cool thing
If you click Help me choose , such an interesting dialog will open.
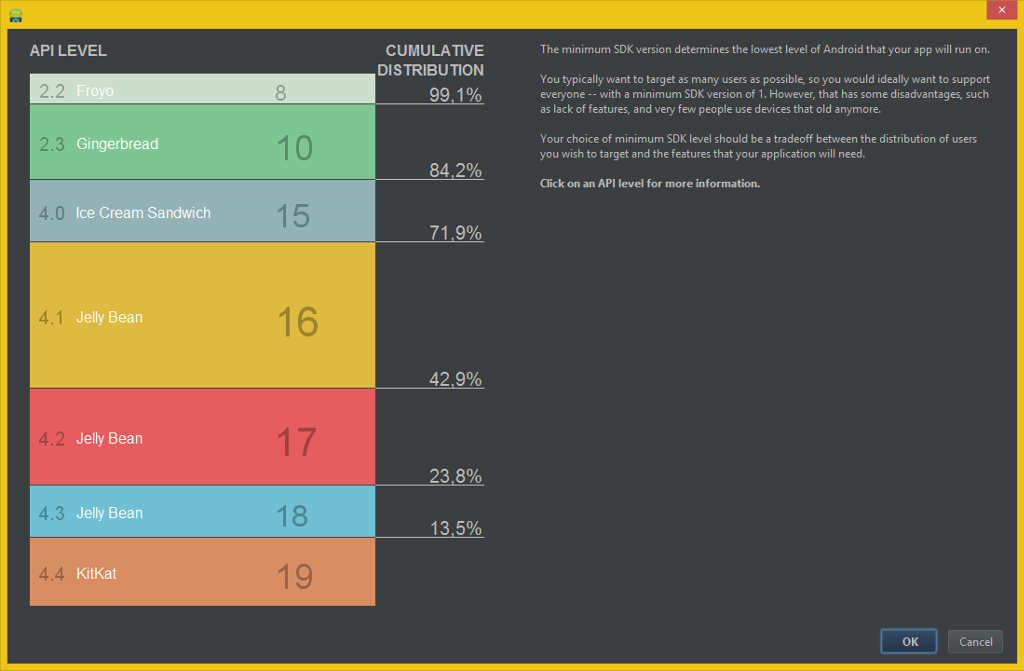
It contains information on the coverage of devices when choosing one or another version of the API. Rectangles of API versions are clickable; a list of the functionality available in them will be displayed on the right. For example, for the default Ice Cream Sandwich:

It contains information on the coverage of devices when choosing one or another version of the API. Rectangles of API versions are clickable; a list of the functionality available in them will be displayed on the right. For example, for the default Ice Cream Sandwich:
Click Next .
3. Add Activity
On the next screen, we are prompted to select Activity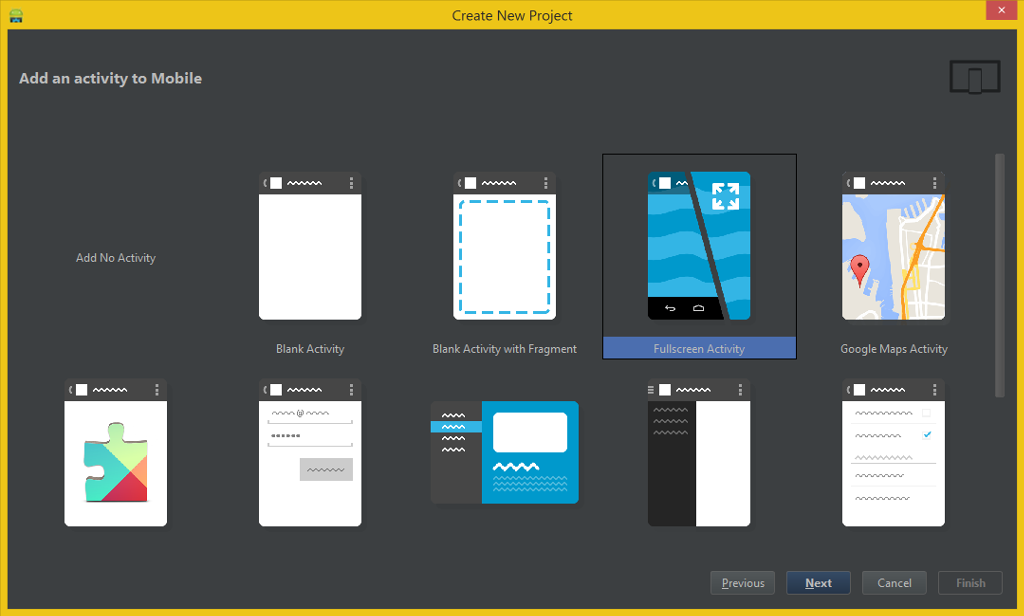
Naturally, I could not get past the Fullscreen Activity and chose it. You can choose another Activity, but in this case we will have different Java sources, and you will have to add the native method call from Java yourself (however, there is nothing complicated about it).
Make a choice, click Next .
The following dialog appears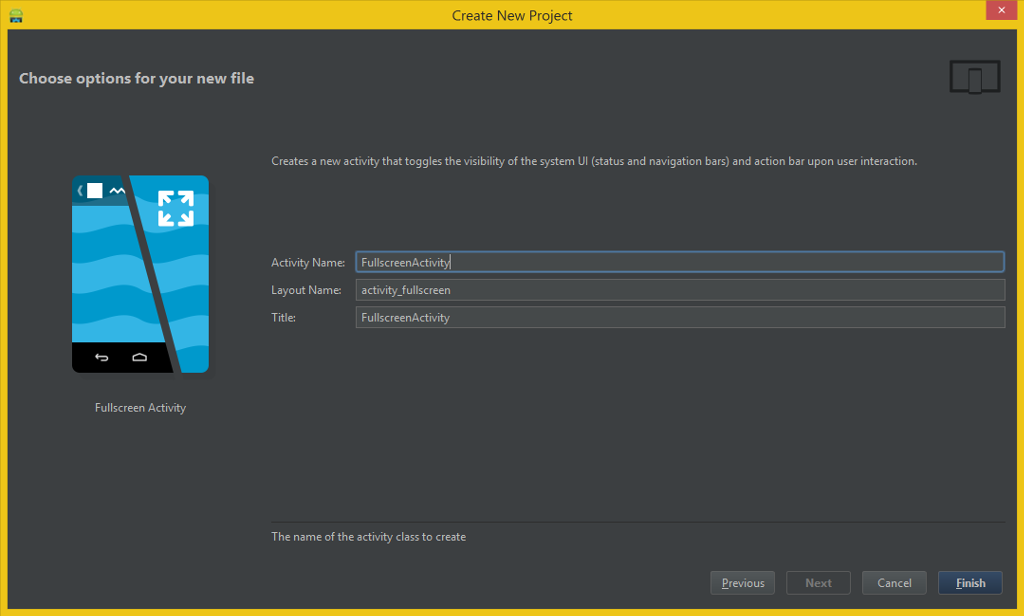
Here we are invited to configure the Activity.
- Activity Name - the name of the class, I left it by default: FullscreenActivity .
- Layout Name - the name of the layout, for the UI editor, we also leave it by default.
- Title - the default is FullscreenActivity, I set a space: Fullscreen Activity .
Click Finish .
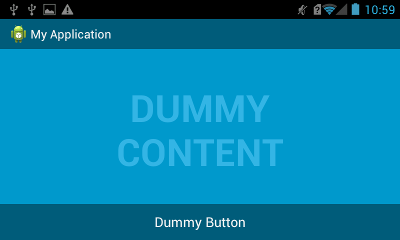
As a result, the project should open
Assembly and launch
1. Assembly of the project
We start the assembly via the menu: Build-> Make Project (icons and hot keys are indicated for the menu items, so it will be easy to deal with them).
I had an error during the first build: This

happened in the file MyApplication / app / build.gradle
In order to understand what’s the matter, just hover over the underlined line:

It's simple, version 19 is listed here, but we only have 20 installed, Yes, and in the project settings we specified 20 as the target. Just change the number:

As you can see, the studio did not calm down on this, and offers to install an even newer version. But we don’t need it now. Run Build-> Make Project
again . This time it all came together. I hope you do too.
2. Configure the virtual device
In order to run the program in the emulator, you need to configure the virtual device. Go to Tools-> Android-> AVD Manager (this, like the SDK Manager, is a utility from the Android SDK). We need the first tab, Android Virtual Device , and it is open by default. On the right we find the Create ... button and click it.
The virtual device setup dialog box appears.
- AVD Name - the name of the virtual device, I entered TestPhone . Further, I, however, chose a tablet, but did not begin to change the name.
- Device - various predefined device settings, the value is selected from the available in the drop-down list, I selected 7 '' WSVGA (Tablet) (1024 x 600: mdpi) .
- Target is the target version of the API, only those available in the SDK are available. You can install them through the SDK Manager.

W in the name means Wear, a version for wearable devices (watches, etc.). Since we are in the project settings, choose Tablet & Phone, then we need another point: All Android of L (the Preview) - the API Level of L . - CPU / ABI - platform, I chose ARM (armeabi-v7a) .
- Keyboard - here, I think, everything is clear.
- Skin - as I understand it, the appearance of the device, I chose a value that matches the set value of Device : WSVGA .
- Front Camera and Back Camera - the presence of cameras.
- Memory Options - RAM.
- Internal Storage - the device’s hard drive.
- SD Card - I think it’s clear.
- Emulation options : Snapshot - allows the emulator to maintain its state between starts, Use Host GPU - allows you to use the computer's graphics card for OpenGL ES. I turned on the last option, but OpenGL - the application subsequently crashed on this emulator at startup. Probably because of ARM vs x86_64.
The bottom of the dialog displays what error you made during setup. For example, you cannot enter spaces in the device name, and some fields are required. When there is no inscription at the bottom, everything is entered correctly. Click OK .
The device appeared in the list.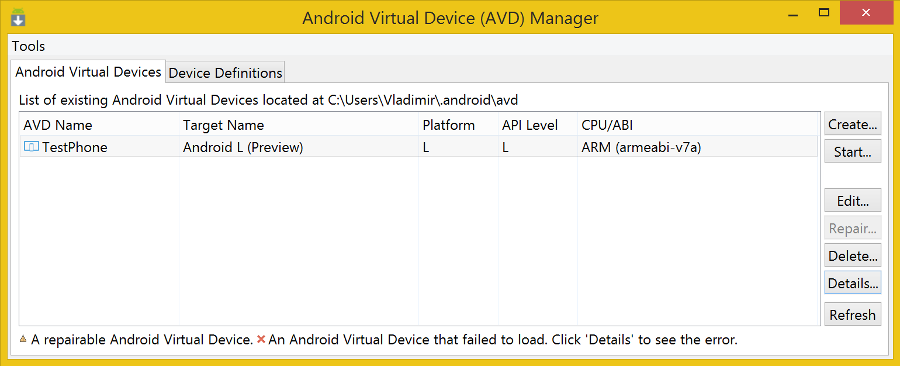
A few words about the Device Definitions tab
Available devices are defined on it (those that are then displayed in the Device drop-down list when creating a new virtual device). To create a new device, you need to click on the Create Device ... button and take care to fill in the following dialog:
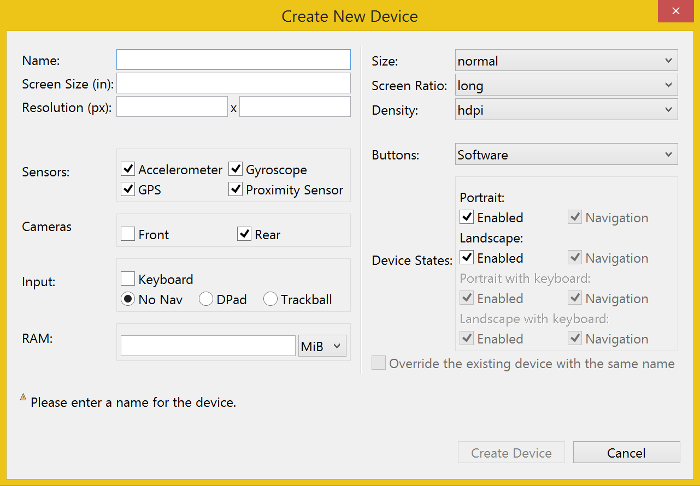
Available devices are defined on it (those that are then displayed in the Device drop-down list when creating a new virtual device). To create a new device, you need to click on the Create Device ... button and take care to fill in the following dialog:
Close AVD Manager and return to the main Android Studio window.
3. Run on the emulator
Perform Run-> the Run 'the app' .
We'll have to wait until the project is assembled for launch.
Finally, a device selection window will appear.
Here, the only available option to choose is our virtual device. He was immediately offered to us, so just click OK .The emulator starts, quite a while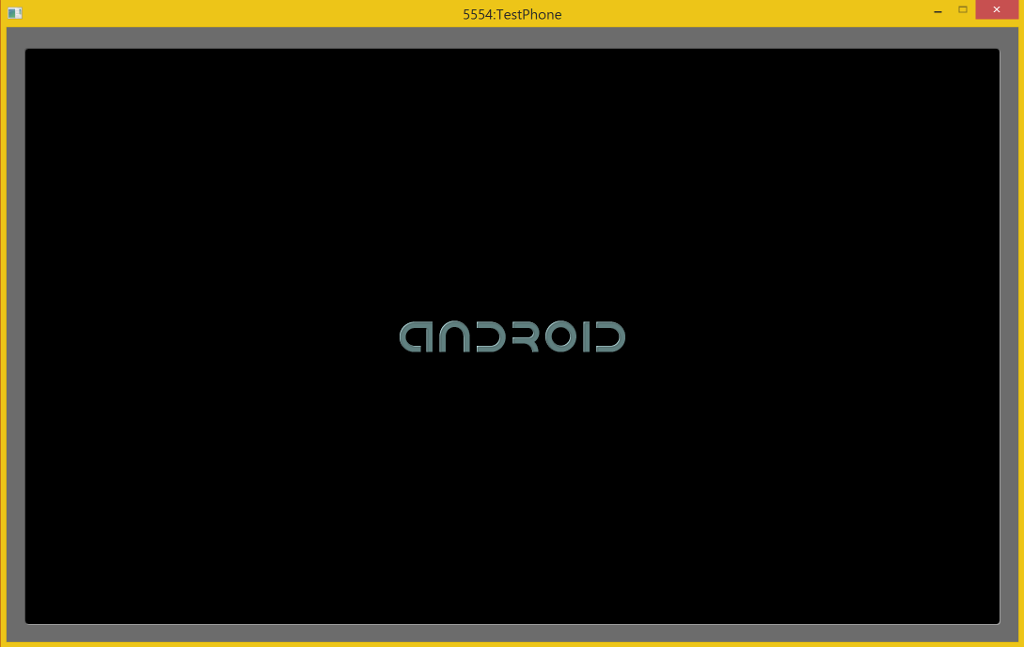
You can open Tools-> Android-> Android Device Monitor (utility from the Android SDK) to see the logs from the emulator. It should automatically pick up the virtual device and immediately start displaying the log.
Android Device Monitor
But the application after starting the emulator did not open the first time, I had to click Run-> Run 'app' again .
A slightly changed dialog appeared
Here, the device migrated from the list to start to the list of already running. In this list, of course, are real devices. After that, things went, and the application quickly installed and started.
Full screen mode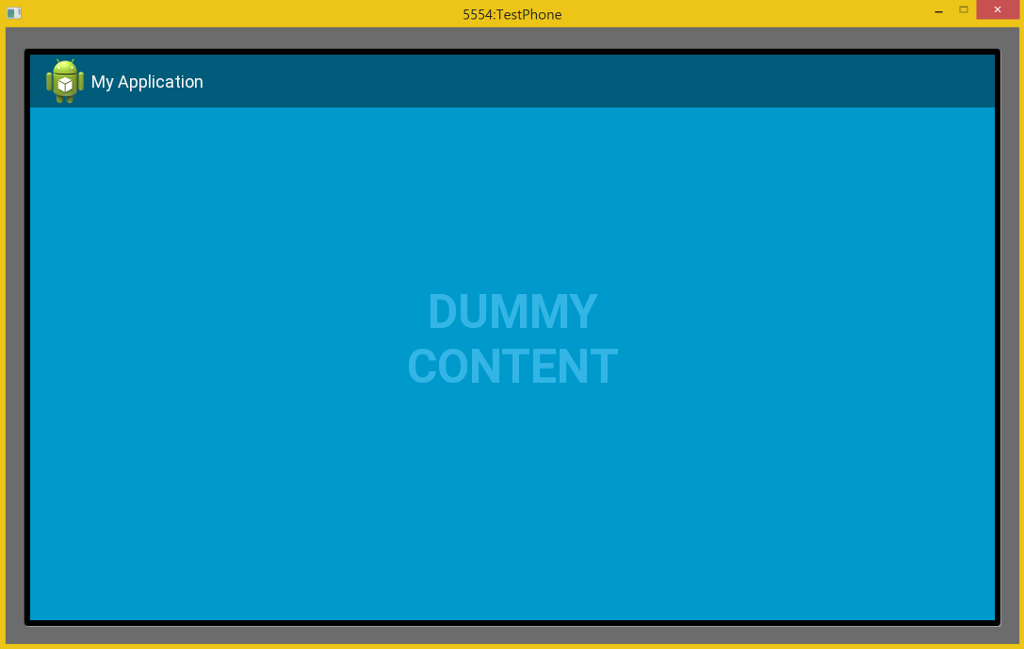
And if you tap on the application, then it looks like this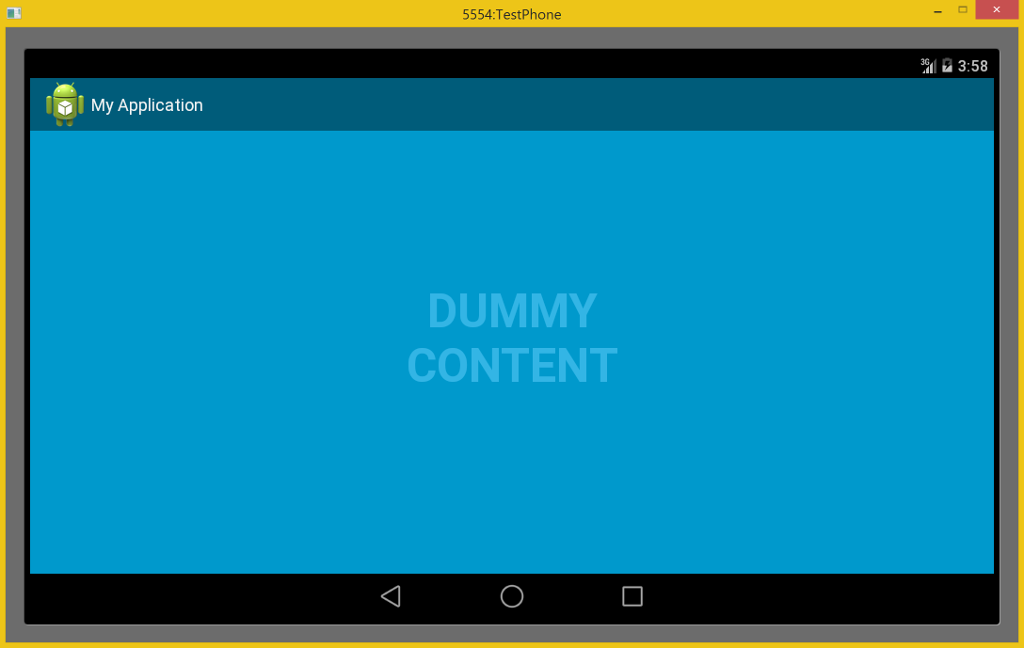
This is not a system behavior, click processing occurs in the application (FullscreenActivity.java file): // Set up the user interaction to manually show or hide the system UI.
contentView.setOnClickListener(new View.OnClickListener() {
@Override
public void onClick(View view) {
if (TOGGLE_ON_CLICK) {
mSystemUiHider.toggle();
} else {
mSystemUiHider.show();
}
}
});
Here's what the integration looks like
4. Run in Debug mode
Run-> Debug 'app'
The dialogue we already know again
Click OK. We wait until the application starts and the debugger connects. I set a breakpoint when I clicked on the Dummy Button.
Android Studio in debug
A little annoying is the lack of a panel with all sorts of Step Into, Step Out etc.
All this is in the Run menu.
5. Launch on 4.0.3
In the process of creating and launching the project, you probably noticed that we created an application compatible with version 4.0.3, but only started it on the latest version of Android. Now we will fix it. To do this, install version 4.0.3 through Tools-> Android-> SDK Manager .
Necessary marked with checkmarks in the screenshot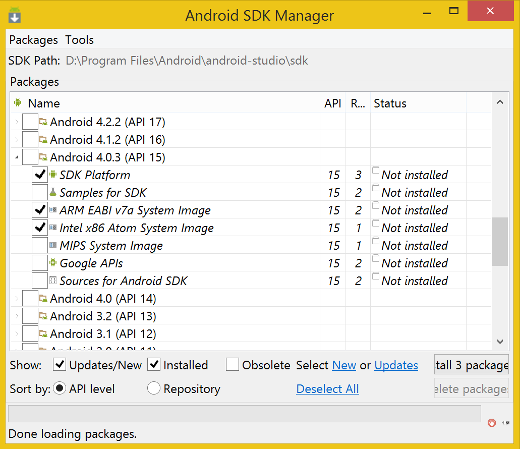
These are the SDK Platform , ARM EABI v7a System Image and Intel x86 Atom System Image . In fact, we launched the ARM emulator, and Intel is not necessary for us to install now. I installed it purely because it is installed for Android L.
Now we will create another device for the new old version of Android (or you can edit the old one).
New device settings
We start ( Run-> Run 'app' ).
In the dialog, select a new device to run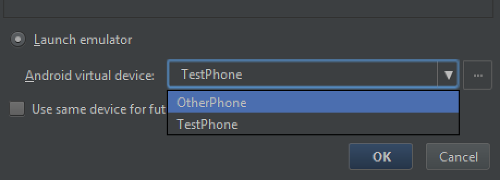
And look what the new emulator looks like - clearly more brutal.
Launch
Full screen mode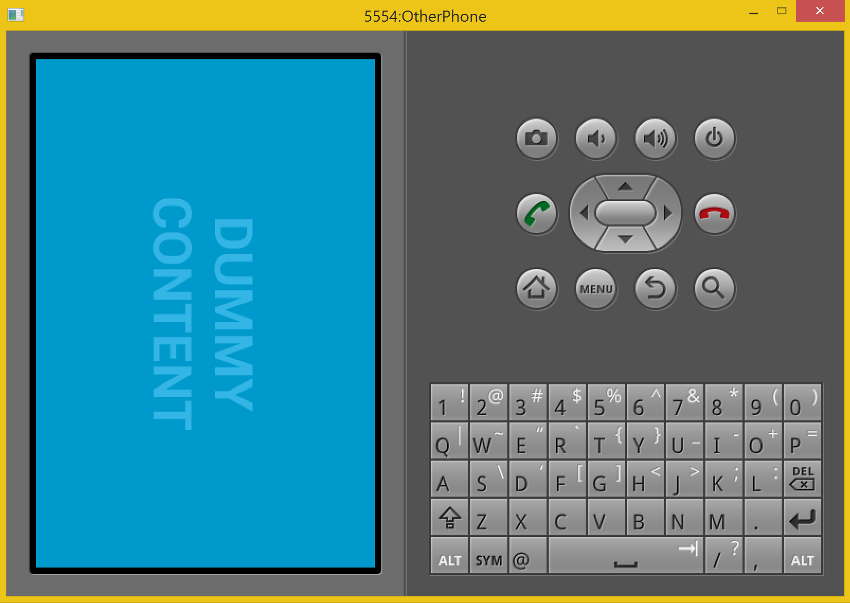
After pressing
5. Launch on the device
Before we get started with NDK, let's run the project on a real device. I will run on the phone
Huawei Ascend G300 with Android 4.0.3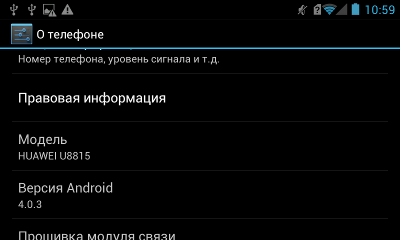
The first thing to do is install the adb driver. I'm pretty simple with this, the driver is right on the phone, the only thing to do is plug the cable into the computer, go into the mounted drive and run the executable file, which will install the adb driver. For other devices, things can be more complicated. For example, for the Prestigio tablet, I had to write the Vendor ID in a special file (in order to use the standard driver from Google), for Samsung I need their own Kies, there was a separate driver for HTC, and so on. In general, you will have to figure out how to install the driver for your device on your own.
After the driver has been installed, you need to enable USB debugging on the device. On my phone you need to go toSettings-> For Developers-> USB Debugging . But for different devices, as well as builds and versions of Android, the location of this menu item may vary.
Now the phone will have the Android SDK, and developed applications will be installed. However, this is not all for Huawei: logs do not go from the phone, you need to enable them.
How to enable logs on Huawei
Dial as the phone number: * # * # 2846579 # * # * The
service menu appears .
Go to ProjectMenu-> Background Setting-> Log Setting
Open the Log switch and set it to ON there .
Open the Log level setting and set the level of logging you need (I set verbose ).
Reboot the phone.
service menu appears .
Go to ProjectMenu-> Background Setting-> Log Setting
Open the Log switch and set it to ON there .
Open the Log level setting and set the level of logging you need (I set verbose ).
Reboot the phone.
Now you can run the application on the device: Run-> Run 'app'
The real device appeared in the device selection dialog
We start on the phone.
The result of the launch.
Application in portrait:
Application in the landscape:
- Full screen

- After pressing

Application in the landscape:
- Full screen

- After pressing
Install and configure Android NDK
1. Install NDK
The Android SDK, as we have already figured out, is included with Android Studio, but the NDK is not. Download the NDK suitable for your system from here . Unpack the archive and put it in some folder, for example, in D: \ ndk , so that the ndk-build.cmd file lies directly in it. Important : There must be no spaces in the path to the NDK.
2. Add the variable ANDROID_NDK_HOME
We go to the Control Panel \ System and Security \ System , select Additional system parameters on the left , in the dialog that opens, click the Environment Variables button . We create a variable with the name ANDROID_NDK_HOME and the value D: \ ndk (the path to your NDK).
Alternatively, instead of specifying a global variable, you can set the path to a file ndk local.properties your project (right in the root folder: MyApplication \ local.properties ). The contents of the file will look something like this (pay attention to double backslashes, since this is critical for Windows):
## This file is automatically generated by Android Studio.
# Do not modify this file -- YOUR CHANGES WILL BE ERASED!
#
# This file should *NOT* be checked into Version Control Systems,
# as it contains information specific to your local configuration.
#
# Location of the SDK. This is only used by Gradle.
# For customization when using a Version Control System, please read the
# header note.
sdk.dir=C:\\Users\\\\AppData\\Local\\Android\\android-studio\\sdk
ndk.dir=D:\\ndk
Do not believe the disclaimer about "your changes will be thrown out", in this case it is not. Please note that this file is recommended to be excluded from version control, since it contains only local information for the user. For a change in this we were not lied. Well, of course, this change will not affect your other projects. When ANDROID_NDK_HOME is set, it is not necessary to specify the path in local.properties.
3. Install the necessary version of the Android API
Go to NDK \ platforms (I have it D: \ ndk \ platforms ) and see the maximum version of the available APIs. In my case, the maximum version is 19. But at the same time, only versions 20 and 15 are installed in the SDK. So, go to the SDK Manager and download the SDK Platform version 19, otherwise nothing will work.
What to download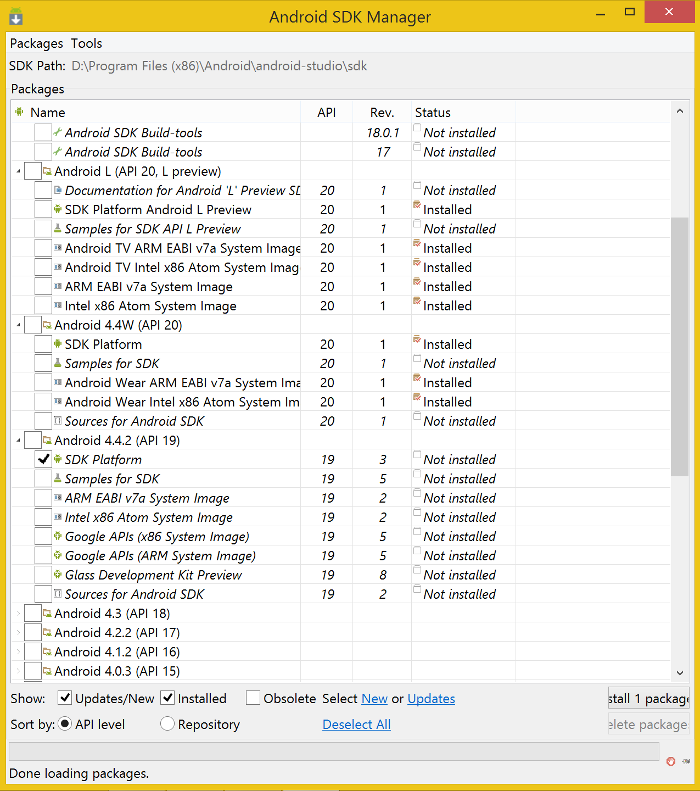
4. Set up gradle to work with NDK
I took information from samples, you can download them here, at the very bottom of the page . I downloaded samples for version 0.11. As a basic example, I took ndkSanAngeles.
How to run ndkSanAngeles
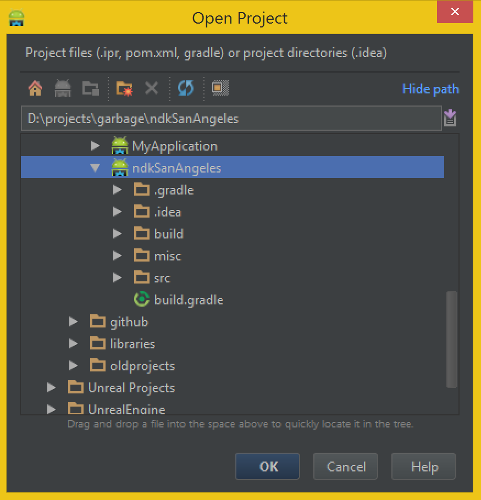
After the samples are downloaded, they need to be unpacked. Then you need to open the ndkSanAngeles project. For Android Studio, the project is a folder, so you need to open it exactly. To do this, do File-> Open , or, if you are in the Welcome dialog, Open Project . We are looking for the ndkSanAngeles folder through the file open dialog.
After opening the project, you should look at the build.gradle file . Here is its original:
And here is the modified version so that the project will be built from me:
The changes are as follows:
After that, ndkSanAngeles should get together. Be careful, check the versions installed with you.
After opening the project, you should look at the build.gradle file . Here is its original:
buildscript {
repositories {
mavenCentral()
}
dependencies {
classpath 'com.android.tools.build:gradle:0.11.0'
}
}
apply plugin: 'android'
android {
compileSdkVersion 19
buildToolsVersion '19.1.0'
defaultConfig {
ndk {
moduleName "sanangeles"
cFlags "-DANDROID_NDK -DDISABLE_IMPORTGL"
ldLibs "GLESv1_CM", "dl", "log"
stl "stlport_static"
}
// This actual the app version code. Giving ourselves 1,000,000 values
versionCode = 123
}
buildTypes.debug.jniDebugBuild true
productFlavors {
x86 {
ndk {
abiFilter "x86"
}
// this is the flavor part of the version code.
// It must be higher than the arm one for devices supporting
// both, as x86 is preferred.
versionCode = 3
}
arm {
ndk {
abiFilter "armeabi-v7a"
}
versionCode = 2
}
mips {
ndk {
abiFilter "mips"
}
versionCode = 1
}
fat {
// fat binary, lowest version code to be
// the last option
versionCode = 0
}
}
// make per-variant version code
applicationVariants.all { variant ->
// get the single flavor
def flavorVersion = variant.productFlavors.get(0).versionCode
// set the composite code
variant.mergedFlavor.versionCode = flavorVersion * 1000000 + defaultConfig.versionCode
}
}
And here is the modified version so that the project will be built from me:
buildscript {
repositories {
mavenCentral()
}
dependencies {
classpath 'com.android.tools.build:gradle:0.12.+'
}
}
apply plugin: 'android'
android {
compileSdkVersion 19
buildToolsVersion '20.0.0'
defaultConfig {
ndk {
moduleName "sanangeles"
cFlags "-DANDROID_NDK -DDISABLE_IMPORTGL"
ldLibs "GLESv1_CM", "dl", "log"
stl "stlport_static"
}
// This actual the app version code. Giving ourselves 1,000,000 values
versionCode = 123
}
buildTypes.debug.jniDebugBuild true
productFlavors {
x86 {
ndk {
abiFilter "x86"
}
// this is the flavor part of the version code.
// It must be higher than the arm one for devices supporting
// both, as x86 is preferred.
versionCode = 3
}
arm {
ndk {
abiFilter "armeabi-v7a"
}
versionCode = 2
}
mips {
ndk {
abiFilter "mips"
}
versionCode = 1
}
fat {
// fat binary, lowest version code to be
// the last option
versionCode = 0
}
}
// make per-variant version code
applicationVariants.all { variant ->
// get the single flavor
def flavorVersion = variant.productFlavors.get(0).versionCode
// set the composite code
variant.mergedFlavor.versionCode = flavorVersion * 1000000 + defaultConfig.versionCode
}
}
The changes are as follows:
- The gradle plugin version mismatch ( classpath 'com.android.tools.build:gradlemail.11.0' ) will be said when trying to build and the correct version number will be suggested. I have it 0.12. +.
- compileSdkVersion 19 remains, as this is the maximum version for the current NDK.
- buildToolsVersion has changed to 20. Installed versions can be viewed in the SDK Manager, others can also be installed there.
After that, ndkSanAngeles should get together. Be careful, check the versions installed with you.
In our project, you need to select the correct build.gradle file, since there are two of them. The fact is that MyApplication is a project, and app is a project module (or subproject), and they have build.gradle for each of them. First, consider the project file
MyApplication-> build.gradle
// Top-level build file where you can add configuration options common to all sub-projects/modules.
buildscript {
repositories {
jcenter()
}
dependencies {
classpath 'com.android.tools.build:gradle:0.12.+'
// NOTE: Do not place your application dependencies here; they belong
// in the individual module build.gradle files
}
}
allprojects {
repositories {
jcenter()
}
}
It clearly follows from the comments in the code that we need a module file
MyApplication-> app-> build.gradle
apply plugin: 'com.android.application'
android {
compileSdkVersion 20
buildToolsVersion "20.0.0"
defaultConfig {
applicationId "com.example.markedone.myapp"
minSdkVersion 15
targetSdkVersion 20
versionCode 1
versionName "1.0"
}
buildTypes {
release {
runProguard false
proguardFiles getDefaultProguardFile('proguard-android.txt'), 'proguard-rules.pro'
}
}
}
dependencies {
compile fileTree(dir: 'libs', include: ['*.jar'])
// You must install or update the Support Repository through the SDK manager to use this dependency.
//compile 'com.android.support:support-v4:19.+'
compile 'com.android.support:support-v4:20.+'
}
We will configure it to work with NDK using build.gradle from ndkSanAngeles as a “donor”.
For a start, we replace
compileSdkVersion 20on
compileSdkVersion 19as the limited version of the NDK 19.
The defaultConfig we add settings ndk , and replace targetSdkVersion 19:
defaultConfig {
applicationId "com.example.markedone.myapp"
minSdkVersion 15
targetSdkVersion 19
versionCode 1
versionName "1.0"
ndk {
moduleName "myapp"
cFlags "-DANDROID_NDK"
ldLibs "log"
stl "stlport_static"
}
}
- moduleName - the name of the module, will be used to name the * .so file
- cFlags - C flags
- ldLibs - libraries that you want to connect to native code
- stl - version of the STL library
In buildTypes, enable debug build of JNI for debug:
buildTypes {
release {
runProguard false
proguardFiles getDefaultProguardFile('proguard-android.txt'), 'proguard-rules.pro'
}
debug.jniDebugBuild true
}
Now add productFlavors . Here we indicate which libraries * .so compiled to include in the assembly for a specific architecture. Thus, * .apk compiled for arm will contain the library version only for arm, for x86 for x86, and so on. This piece is fully copied from ndkSanAngeles. Explanation of versionCode values from comments: for x86 we set the maximum value of versionCode , since if the device supports both x86 and arm, then the x86 assembly is preferable (apparently, since it has a large version, it will be installed), and the minimum versionCode is prescribed for fat (in theory this should be a “thick” * .apk containing all possible versions of libraries at once).
productFlavors {
x86 {
ndk {
abiFilter "x86"
}
// this is the flavor part of the version code.
// It must be higher than the arm one for devices supporting
// both, as x86 is preferred.
versionCode = 3
}
arm {
ndk {
abiFilter "armeabi-v7a"
}
versionCode = 2
}
mips {
ndk {
abiFilter "mips"
}
versionCode = 1
}
fat {
// fat binary, lowest version code to be
// the last option
versionCode = 0
}
}
We “ assemble ” the versionCode value for each of the assembly options:
// make per-variant version code
applicationVariants.all { variant ->
// get the single flavor
def flavorVersion = variant.productFlavors.get(0).versionCode
// set the composite code
variant.mergedFlavor.versionCode = flavorVersion * 1000000 + defaultConfig.versionCode
}
Finally, the last section, dependencies . If you remember, here we changed compile 'com.android.support:support-v4:19.+' to compile 'com.android.support:support-v4:20.+' to build with the only version of the library that we have installed. Now you have to change back to 19.
dependencies {
compile fileTree(dir: 'libs', include: ['*.jar'])
// You must install or update the Support Repository through the SDK manager to use this dependency.
compile 'com.android.support:support-v4:19.+'
}
Full listing of the modified build.gradle file
apply plugin: 'com.android.application'
android {
compileSdkVersion 19
buildToolsVersion "20.0.0"
defaultConfig {
applicationId "com.example.markedone.myapp"
minSdkVersion 15
targetSdkVersion 19
versionCode 1
versionName "1.0"
ndk {
moduleName "myapp"
cFlags "-DANDROID_NDK"
ldLibs "log"
stl "stlport_static"
}
}
buildTypes {
release {
runProguard false
proguardFiles getDefaultProguardFile('proguard-android.txt'), 'proguard-rules.pro'
}
debug.jniDebugBuild true
}
productFlavors {
x86 {
ndk {
abiFilter "x86"
}
// this is the flavor part of the version code.
// It must be higher than the arm one for devices supporting
// both, as x86 is preferred.
versionCode = 3
}
arm {
ndk {
abiFilter "armeabi-v7a"
}
versionCode = 2
}
mips {
ndk {
abiFilter "mips"
}
versionCode = 1
}
fat {
// fat binary, lowest version code to be
// the last option
versionCode = 0
}
}
// make per-variant version code
applicationVariants.all { variant ->
// get the single flavor
def flavorVersion = variant.productFlavors.get(0).versionCode
// set the composite code
variant.mergedFlavor.versionCode = flavorVersion * 1000000 + defaultConfig.versionCode
}
sourceSets { main { jni.srcDirs = ['src/main/jni', 'src/main/jni/'] } }
}
dependencies {
compile fileTree(dir: 'libs', include: ['*.jar'])
// You must install or update the Support Repository through the SDK manager to use this dependency.
compile 'com.android.support:support-v4:19.+'
}
5. Create the jni folder
In the jni folder we will save C / C ++ files. This is what NDK expects of us. We need to create the folder in MyApplication / app / src / main . This can be done directly from Android Studio, and in two ways.
Firstly, you can right-click on main and just create a folder through
New-> Directory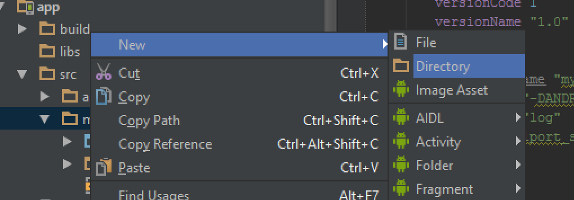
Secondly, you can use a special menu item
New-> Folder-> JNI Folder
It launches the folder creation wizard
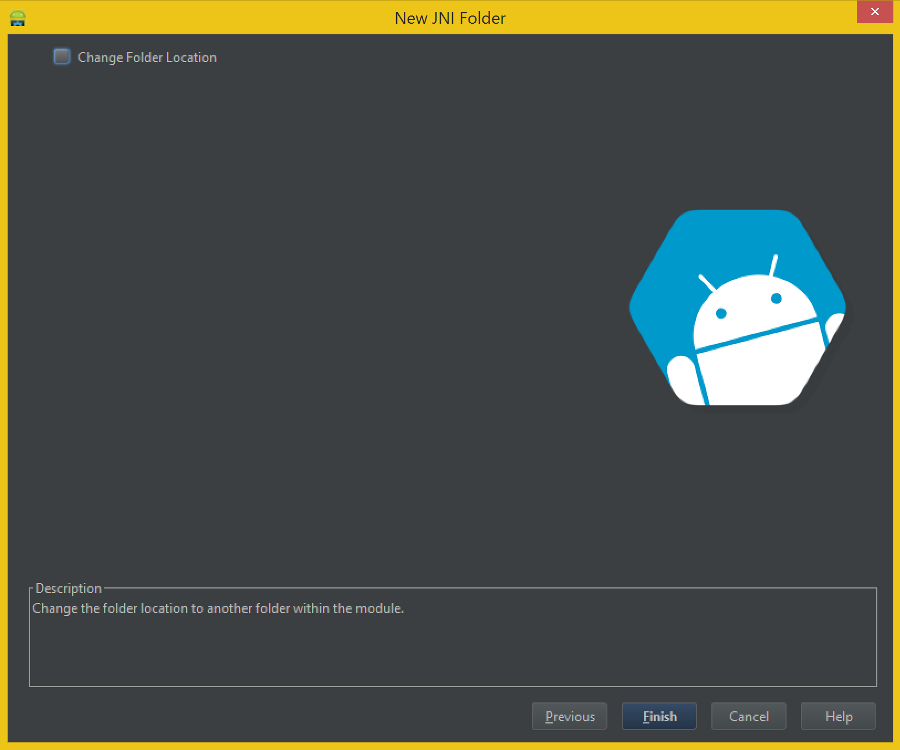
In the first dialog, we choose for which part of the module the jni folder will be created, and in the second you can change its location.
In the first dialog, we choose for which part of the module the jni folder will be created, and in the second you can change its location.
6. Add C ++ files
There is no wizard for C ++ files, therefore, to create a file, we right-click on the jni folder and select
New-> File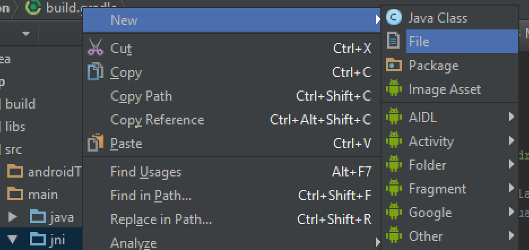
First, create the header file myapp.h :
#pragma once
#include
#ifdef __cplusplus
extern "C" {
#endif
JNIEXPORT jstring JNICALL Java_com_example_markedone_myapp_FullscreenActivity_stringFromJNI(JNIEnv* env, jclass clazz);
#ifdef __cplusplus
}
#endif
Description
#pragma once- instead of the standard (# ifndef / # define / # endif) protection against re-inclusion. Now#pragma onceunderstood by most C ++ compilers.#include- include the JNI header so that you can use the types declared there.#ifdef __cplusplus ... #endif- The code inside will be compiled only in C ++ (but not in C).extern "C" { ... }— избавляемся от name mangling (что это и почему, хорошо описано тут).JNIEXPORT jstring JNICALL Java_com_example_markedone_myapp_FullscreenActivity_stringFromJNI(JNIEnv* env, jclass clazz);— объявление функции, которую будем реализовывать.
Разберем это объявление подробнее.- JNIEXPORT необходимо для грамотной линковки.
- JNICALL для правильного соглашения о вызове.
- jstring — тип возвращаемого значения функции, в данном случае это строка, совместимая со строкой Java.
- Java_com_example_markedone_myapp_FullscreenActivity_stringFromJNI — имя функции, состоит из:
Java — язык, который вызывает.
com_example_markedone_myapp — это id приложения (com.example.markedone.myapp).
FullscreenActivity — имя класса Java, который содержит объявление метода, представляющего нативную функцию.
stringFromJNI — собственно, имя функции (таким оно будет в Java). JNIEnv* env, jclass clazz- required parameters passed from Java.JNIEnv* env- A pointer to an object representing a JNI environment.jclass clazz- The class that owns the native method declaration in Java. Here we must mention that jclass clazz - is native to the static ( static native ) method. For a non-static method, you will need to writejobject obj.
Now create an implementation file, myapp.cpp. In it we will write the following code:
#include
#include
#include "myapp.h"
JNIEXPORT jstring JNICALL Java_com_example_markedone_myapp_FullscreenActivity_stringFromJNI(JNIEnv* env, jclass clazz)
{
std::string tag("GREETING");
std::string message("Hello from C++!");
__android_log_print(ANDROID_LOG_INFO, tag.c_str(), "%s", message.c_str());
std::string jniMessage("Hello from JNI!");
return env->NewStringUTF(jniMessage.c_str());
} Description
А теперь мы создадим еще один файл: stub.cpp, и оставим его пустым. Дело в том, что если оставить только один *.cpp файл в папке jni, то ndk-build будет выдавать ошибку «no rule to make target».
Открываем файл MyApplication/app/src/main/java/com.example.markedone.myapp.FullscreenActivity. На самом деле, у него расширение java, а com, example, markedone и myapp — это папки, но Android Studio это скрывает.
Добавим следующий код в класс FullscreenActivity:
Теперь мы, в общем-то, уже можем вызвать нашу функцию. Если вы, как и я, выбрали FullscreenActivity, то у нас есть Dummy Button, который, по сути, ничего не делает. И даже уже есть touch listener, пусть и не самый лучший (он будет вызываться много раз, пока палец на экране), но, чтобы не плодить лишний код, используем его.
Для начала добавим в список импорта:
чтобы можно было нормально работать с кнопкой.
Найдем следующий код:
и добавим несколько строк перед
Сначала Build->Make Project. На этом этапе собирается Java-часть.
Затем Run->Run 'app'. А вот здесь, перед стартом приложения, будет происходить сборка C++ части. Если в ней будут какие-то ошибки, то об этом будет выведено сообщение. Если ошибок нет, то появится стандартный диалог выбора устройства, и, после нажатия OK приложение запустится.
In general, I liked Android Studio. The integration of the Android SDK is pretty tight, sometimes you even forget that it runs separate programs. There are all sorts of interesting buns, such as Help me choose. I liked the new build system, Gradle, but there was a drawback: there is very little information on it.
Also, it is clear that support for the NDK is still damp, but there is a movement in this direction. I really hope that they will nevertheless make full-fledged support for C ++ development.
PS No debug of C ++ code yet.
#include- connect the log, for which we even added a library ( ldLibs "log" )#include - для std::string, который мы используем для проверки наличия STL.#include "myapp.h"— подключаем наш заголовочный файл.JNIEXPORT jstring JNICALL Java_com_example_markedone_myapp_FullscreenActivity_stringFromJNI(JNIEnv* env, jclass clazz) { ... } - реализуем функцию, объявленную в "myapp.h".std::string tag("GREETING"); std::string message("Hello from C++!");— создаем строки для вывода в лог.__android_log_print(ANDROID_LOG_INFO, tag.c_str(), "%s", message.c_str());— вывод в лог. Обратите внимание, что необходимо указывать 4 параметра: тип сообщения в логе, тэг, формат строки, и, наконец, само сообщение.std::string jniMessage("Hello from JNI!");— строка, которую мы будем передавать в Java.return env->NewStringUTF(jniMessage.c_str());— возвращаемое значение, при помощи JNIEnv создаем jstring из C-строки. Обратите внимание, что нам не нужна конструкция вида(*env)->, так как мы пишем на C++, а не на C.
А теперь мы создадим еще один файл: stub.cpp, и оставим его пустым. Дело в том, что если оставить только один *.cpp файл в папке jni, то ndk-build будет выдавать ошибку «no rule to make target».
7. Добавим вызов нативной функции из Java
Открываем файл MyApplication/app/src/main/java/com.example.markedone.myapp.FullscreenActivity. На самом деле, у него расширение java, а com, example, markedone и myapp — это папки, но Android Studio это скрывает.
Содержимое файла
package com.example.markedone.myapp;
import com.example.markedone.myapp.util.SystemUiHider;
import android.annotation.TargetApi;
import android.app.Activity;
import android.os.Build;
import android.os.Bundle;
import android.os.Handler;
import android.view.MotionEvent;
import android.view.View;
/**
* An example full-screen activity that shows and hides the system UI (i.e.
* status bar and navigation/system bar) with user interaction.
*
* @see SystemUiHider
*/
public class FullscreenActivity extends Activity {
/**
* Whether or not the system UI should be auto-hidden after
* {@link #AUTO_HIDE_DELAY_MILLIS} milliseconds.
*/
private static final boolean AUTO_HIDE = true;
/**
* If {@link #AUTO_HIDE} is set, the number of milliseconds to wait after
* user interaction before hiding the system UI.
*/
private static final int AUTO_HIDE_DELAY_MILLIS = 3000;
/**
* If set, will toggle the system UI visibility upon interaction. Otherwise,
* will show the system UI visibility upon interaction.
*/
private static final boolean TOGGLE_ON_CLICK = true;
/**
* The flags to pass to {@link SystemUiHider#getInstance}.
*/
private static final int HIDER_FLAGS = SystemUiHider.FLAG_HIDE_NAVIGATION;
/**
* The instance of the {@link SystemUiHider} for this activity.
*/
private SystemUiHider mSystemUiHider;
@Override
protected void onCreate(Bundle savedInstanceState) {
super.onCreate(savedInstanceState);
setContentView(R.layout.activity_fullscreen);
final View controlsView = findViewById(R.id.fullscreen_content_controls);
final View contentView = findViewById(R.id.fullscreen_content);
// Set up an instance of SystemUiHider to control the system UI for
// this activity.
mSystemUiHider = SystemUiHider.getInstance(this, contentView, HIDER_FLAGS);
mSystemUiHider.setup();
mSystemUiHider
.setOnVisibilityChangeListener(new SystemUiHider.OnVisibilityChangeListener() {
// Cached values.
int mControlsHeight;
int mShortAnimTime;
@Override
@TargetApi(Build.VERSION_CODES.HONEYCOMB_MR2)
public void onVisibilityChange(boolean visible) {
if (Build.VERSION.SDK_INT >= Build.VERSION_CODES.HONEYCOMB_MR2) {
// If the ViewPropertyAnimator API is available
// (Honeycomb MR2 and later), use it to animate the
// in-layout UI controls at the bottom of the
// screen.
if (mControlsHeight == 0) {
mControlsHeight = controlsView.getHeight();
}
if (mShortAnimTime == 0) {
mShortAnimTime = getResources().getInteger(
android.R.integer.config_shortAnimTime);
}
controlsView.animate()
.translationY(visible ? 0 : mControlsHeight)
.setDuration(mShortAnimTime);
} else {
// If the ViewPropertyAnimator APIs aren't
// available, simply show or hide the in-layout UI
// controls.
controlsView.setVisibility(visible ? View.VISIBLE : View.GONE);
}
if (visible && AUTO_HIDE) {
// Schedule a hide().
delayedHide(AUTO_HIDE_DELAY_MILLIS);
}
}
});
        // Set up the user interaction to manually show or hide the system UI.
        contentView.setOnClickListener(new View.OnClickListener() {
            @Override
            public void onClick(View view) {
                if (TOGGLE_ON_CLICK) {
                    mSystemUiHider.toggle();
                } else {
                    mSystemUiHider.show();
                }
            }
        });
// Upon interacting with UI controls, delay any scheduled hide()
// operations to prevent the jarring behavior of controls going away
// while interacting with the UI.
findViewById(R.id.dummy_button).setOnTouchListener(mDelayHideTouchListener);
}
@Override
protected void onPostCreate(Bundle savedInstanceState) {
super.onPostCreate(savedInstanceState);
// Trigger the initial hide() shortly after the activity has been
// created, to briefly hint to the user that UI controls
// are available.
delayedHide(100);
}
/**
* Touch listener to use for in-layout UI controls to delay hiding the
* system UI. This is to prevent the jarring behavior of controls going away
* while interacting with activity UI.
*/
View.OnTouchListener mDelayHideTouchListener = new View.OnTouchListener() {
@Override
public boolean onTouch(View view, MotionEvent motionEvent) {
if (AUTO_HIDE) {
delayedHide(AUTO_HIDE_DELAY_MILLIS);
}
return false;
}
};
Handler mHideHandler = new Handler();
Runnable mHideRunnable = new Runnable() {
@Override
public void run() {
mSystemUiHider.hide();
}
};
/**
* Schedules a call to hide() in [delay] milliseconds, canceling any
* previously scheduled calls.
*/
private void delayedHide(int delayMillis) {
mHideHandler.removeCallbacks(mHideRunnable);
mHideHandler.postDelayed(mHideRunnable, delayMillis);
}
}
Добавим следующий код в класс FullscreenActivity:
    static {
        System.loadLibrary("myapp");
    }
    private static native String stringFromJNI();
Теперь мы, в общем-то, уже можем вызвать нашу функцию. Если вы, как и я, выбрали FullscreenActivity, то у нас есть Dummy Button, который, по сути, ничего не делает. И даже уже есть touch listener, пусть и не самый лучший (он будет вызываться много раз, пока палец на экране), но, чтобы не плодить лишний код, используем его.
Для начала добавим в список импорта:
import android.widget.Button;чтобы можно было нормально работать с кнопкой.
Найдем следующий код:
    View.OnTouchListener mDelayHideTouchListener = new View.OnTouchListener() {
        @Override
        public boolean onTouch(View view, MotionEvent motionEvent) {
            if (AUTO_HIDE) {
                delayedHide(AUTO_HIDE_DELAY_MILLIS);
            }
            return false;
        }
    };
и добавим несколько строк перед
return false. View.OnTouchListener mDelayHideTouchListener = new View.OnTouchListener() {
@Override
public boolean onTouch(View view, MotionEvent motionEvent) {
if (AUTO_HIDE) {
delayedHide(AUTO_HIDE_DELAY_MILLIS);
}
final String message = stringFromJNI();
final Button button = (Button)findViewById(R.id.dummy_button);
final String actualText = button.getText().toString();
if(message.equals(actualText)) {
button.setText("Dummy Button");
}
else {
button.setText(message);
}
return false;
}
};
Описание добавленного кода
final String message = stringFromJNI();— получаем строку из C++. Вызов нативного метода — то, ради чего все и затевалось.final Button button = (Button)findViewById(R.id.dummy_button);— находим объект кнопки.final String actualText = button.getText().toString();— вытаскиваем текущий текст кнопки.if(message.equals(actualText))— сравниваем строку, полученную из C++, с текстом кнопки.button.setText("Dummy Button");— если одинаковы, меняем текст кнопки на Dummy Button.button.setText(message);— если различаются, то меняем на текст, полученный из C++.
Полный листинг класса измененного класса
package com.example.markedone.myapp;
import com.example.markedone.myapp.util.SystemUiHider;
import android.annotation.TargetApi;
import android.app.Activity;
import android.os.Build;
import android.os.Bundle;
import android.os.Handler;
import android.view.MotionEvent;
import android.view.View;
import android.widget.Button;
/**
* An example full-screen activity that shows and hides the system UI (i.e.
* status bar and navigation/system bar) with user interaction.
*
* @see SystemUiHider
*/
public class FullscreenActivity extends Activity {
static {
System.loadLibrary("myapp");
}
private static native String stringFromJNI();
/**
* Whether or not the system UI should be auto-hidden after
* {@link #AUTO_HIDE_DELAY_MILLIS} milliseconds.
*/
private static final boolean AUTO_HIDE = true;
/**
* If {@link #AUTO_HIDE} is set, the number of milliseconds to wait after
* user interaction before hiding the system UI.
*/
private static final int AUTO_HIDE_DELAY_MILLIS = 3000;
/**
* If set, will toggle the system UI visibility upon interaction. Otherwise,
* will show the system UI visibility upon interaction.
*/
private static final boolean TOGGLE_ON_CLICK = true;
/**
* The flags to pass to {@link SystemUiHider#getInstance}.
*/
private static final int HIDER_FLAGS = SystemUiHider.FLAG_HIDE_NAVIGATION;
/**
* The instance of the {@link SystemUiHider} for this activity.
*/
private SystemUiHider mSystemUiHider;
@Override
protected void onCreate(Bundle savedInstanceState) {
super.onCreate(savedInstanceState);
setContentView(R.layout.activity_fullscreen);
final View controlsView = findViewById(R.id.fullscreen_content_controls);
final View contentView = findViewById(R.id.fullscreen_content);
// Set up an instance of SystemUiHider to control the system UI for
// this activity.
mSystemUiHider = SystemUiHider.getInstance(this, contentView, HIDER_FLAGS);
mSystemUiHider.setup();
mSystemUiHider
.setOnVisibilityChangeListener(new SystemUiHider.OnVisibilityChangeListener() {
// Cached values.
int mControlsHeight;
int mShortAnimTime;
@Override
@TargetApi(Build.VERSION_CODES.HONEYCOMB_MR2)
public void onVisibilityChange(boolean visible) {
if (Build.VERSION.SDK_INT >= Build.VERSION_CODES.HONEYCOMB_MR2) {
// If the ViewPropertyAnimator API is available
// (Honeycomb MR2 and later), use it to animate the
// in-layout UI controls at the bottom of the
// screen.
if (mControlsHeight == 0) {
mControlsHeight = controlsView.getHeight();
}
if (mShortAnimTime == 0) {
mShortAnimTime = getResources().getInteger(
android.R.integer.config_shortAnimTime);
}
controlsView.animate()
.translationY(visible ? 0 : mControlsHeight)
.setDuration(mShortAnimTime);
} else {
// If the ViewPropertyAnimator APIs aren't
// available, simply show or hide the in-layout UI
// controls.
controlsView.setVisibility(visible ? View.VISIBLE : View.GONE);
}
if (visible && AUTO_HIDE) {
// Schedule a hide().
delayedHide(AUTO_HIDE_DELAY_MILLIS);
}
}
});
// Set up the user interaction to manually show or hide the system UI.
contentView.setOnClickListener(new View.OnClickListener() {
@Override
public void onClick(View view) {
if (TOGGLE_ON_CLICK) {
mSystemUiHider.toggle();
} else {
mSystemUiHider.show();
}
}
});
// Upon interacting with UI controls, delay any scheduled hide()
// operations to prevent the jarring behavior of controls going away
// while interacting with the UI.
findViewById(R.id.dummy_button).setOnTouchListener(mDelayHideTouchListener);
}
@Override
protected void onPostCreate(Bundle savedInstanceState) {
super.onPostCreate(savedInstanceState);
// Trigger the initial hide() shortly after the activity has been
// created, to briefly hint to the user that UI controls
// are available.
delayedHide(100);
}
/**
* Touch listener to use for in-layout UI controls to delay hiding the
* system UI. This is to prevent the jarring behavior of controls going away
* while interacting with activity UI.
*/
    View.OnTouchListener mDelayHideTouchListener = new View.OnTouchListener() {
        @Override
        public boolean onTouch(View view, MotionEvent motionEvent) {
            if (AUTO_HIDE) {
                delayedHide(AUTO_HIDE_DELAY_MILLIS);
            }
            final String message = stringFromJNI();
            final Button button = (Button)findViewById(R.id.dummy_button);
            final String actualText = button.getText().toString();
            if(message.equals(actualText)) {
                button.setText("Dummy Button");
            }
            else {
                button.setText(message);
            }
            return false;
        }
    };
Handler mHideHandler = new Handler();
Runnable mHideRunnable = new Runnable() {
@Override
public void run() {
mSystemUiHider.hide();
}
};
/**
* Schedules a call to hide() in [delay] milliseconds, canceling any
* previously scheduled calls.
*/
private void delayedHide(int delayMillis) {
mHideHandler.removeCallbacks(mHideRunnable);
mHideHandler.postDelayed(mHideRunnable, delayMillis);
}
}
17. Собираем и запускаем проект
Сначала Build->Make Project. На этом этапе собирается Java-часть.
Затем Run->Run 'app'. А вот здесь, перед стартом приложения, будет происходить сборка C++ части. Если в ней будут какие-то ошибки, то об этом будет выведено сообщение. Если ошибок нет, то появится стандартный диалог выбора устройства, и, после нажатия OK приложение запустится.
Работа на реальном устройстве

Вывод сообщения в лог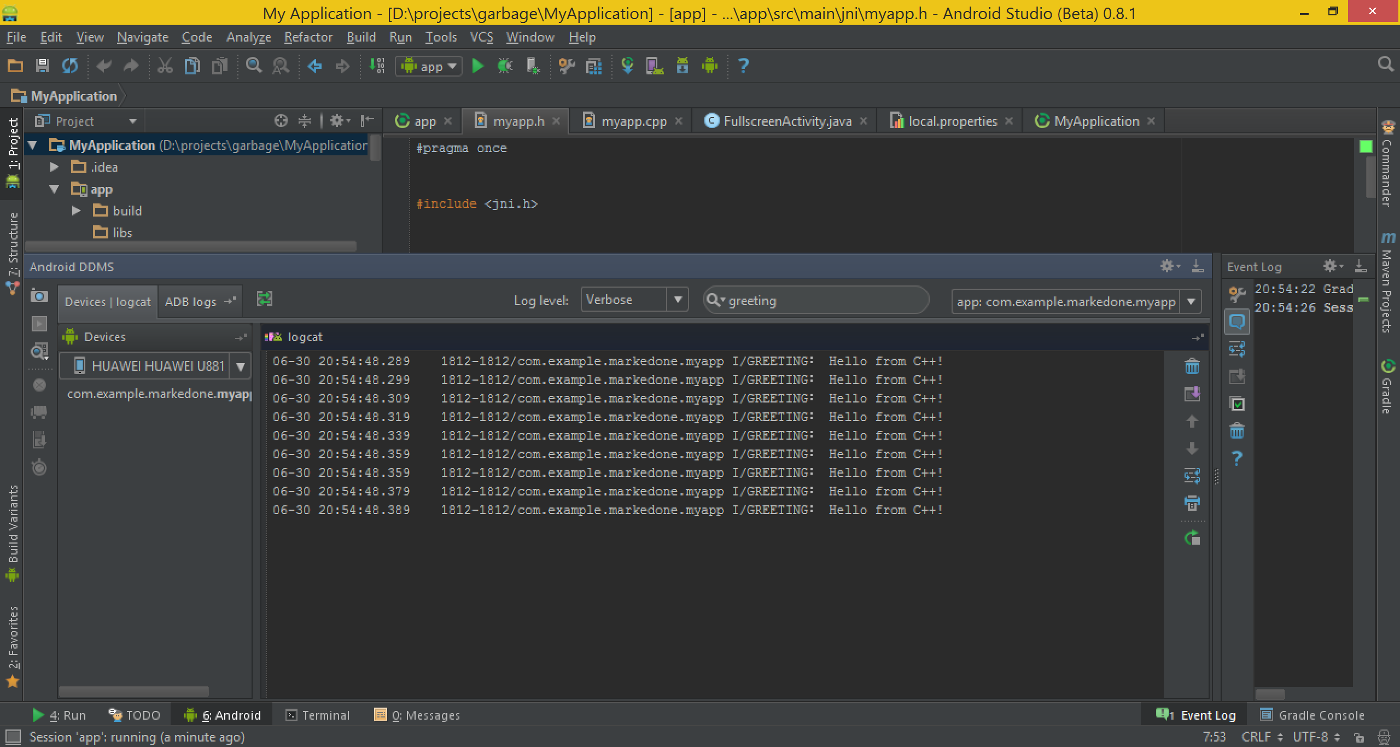
Заключение
In general, I liked Android Studio. The integration of the Android SDK is pretty tight, sometimes you even forget that it runs separate programs. There are all sorts of interesting buns, such as Help me choose. I liked the new build system, Gradle, but there was a drawback: there is very little information on it.
Also, it is clear that support for the NDK is still damp, but there is a movement in this direction. I really hope that they will nevertheless make full-fledged support for C ++ development.
PS No debug of C ++ code yet.