 June 7, 2014 at 19:34
Record video from Google Street View
Some time ago, the Hyperlapse / time-lapse video theme became popular. First of all, thanks to the notorious resource http://hyperlapse.tllabs.io/
The opportunity itself, of course, is wonderful, but the site does not allow you to save the results of experiments in the form of videos. It was decided to fix this annoying nuisance, and not just fix it, but implement it as an iOS program, thereby helping to turn the iPhone or iPad into a device for creating, rather than consuming, content.
How it works
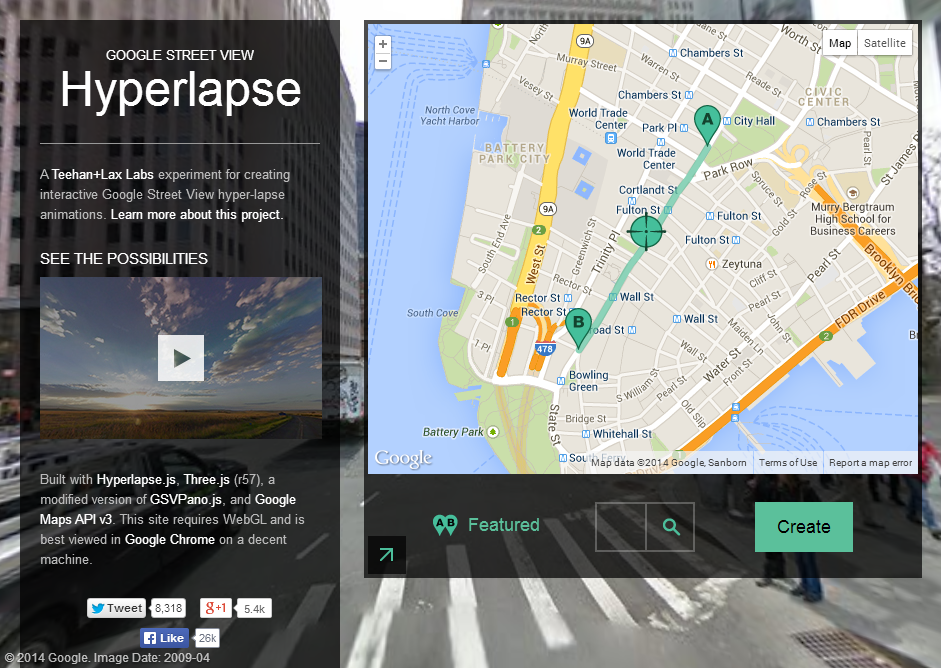
So, today we have several resources that allow you to shoot Street Video. First of all, this is hyperlapse.tllabs.io , which allows you to mark 2 points, draw a route between them and enjoy looping animation.
The second site that allows you to watch street video is http://track-kit.net
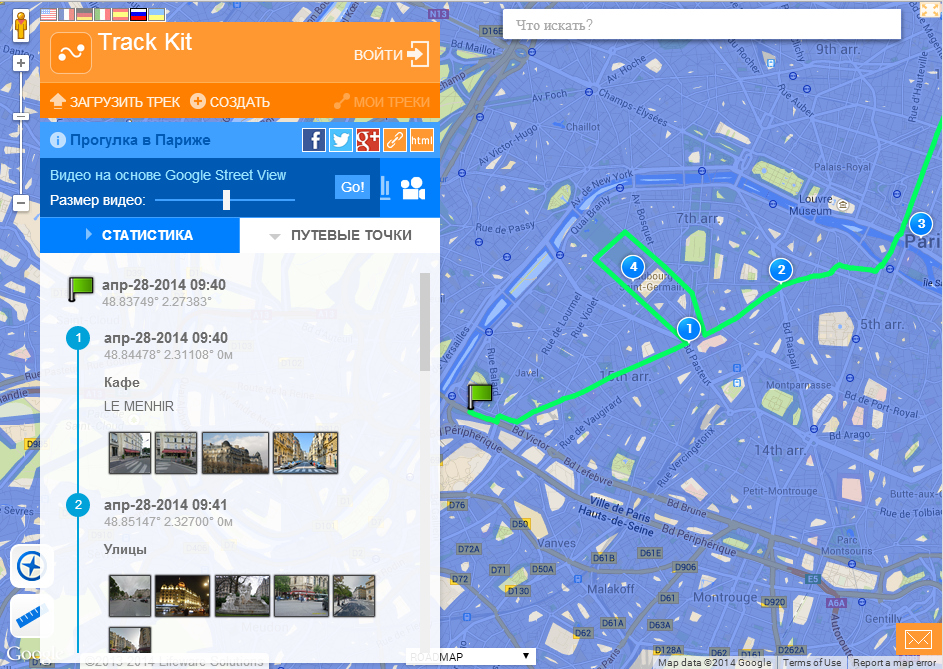
This site allows you to view videos for created or imported tracks. Despite the fact that Street Video is not the main function here, you can generate a direct link to the video for the tech. For example, this:
http://track-kit.net/maps_s3/index.php?track=8821.gpx&svv=134
True, it works more or less on my Mac only in Chrome.
However, none of these resources allows you to save video. We will solve this problem now.
To prepare the video, we need to solve several problems.
To do this, we use the Google Maps SDK for iOS and the Google direction API.
Using the Google direction API, we request from Google a set of points between the starting and end points of the path in encoded form.
The Google Maps SDK for iOS (GMSPath class) will be needed to translate the encoded list of points that Google received in latitude and longitude.
To communicate with Google, AFNetworking is used.
If the download was successful in the coordinatesArr list, we store the set of coordinates of points on our path.
PS The Google direction API has 1 nuance - if you need to route not through 2, but, say, through 20 points, you will have to make several requests for the intervals of waypoints, because if you pass a large number of intermediate points into the request through "& waypoints", Google can return an error.
To load a panorama, you can use a request of the form cbk0.google.com/cbk?output=json&ll=latitude , longitude
It will return to us information about the panorama closest to the point with latitude, longitude coordinates.
The most important thing that we can get is “panoId” - the id of the panorama we need (in addition to panoID, we can also get information about the panorama's offset angles, which can be useful if you need to rotate the panorama in a certain direction):
Further, using the obtained panorama ID, we can through the request:
cbk0.google.com/cbk?output=tile&panoid=panoid&zoom=zoom&x=x&y=y
get the panorama tiles we already need, where panoId is the panorama identifier obtained earlier, zoom is the scale panoramas (its size), x and y are the numbers of the panorama tile vertically and horizontally, while the number of panorama tiles depends on the zoom we entered. For example, if we choose zoom = 3, then the panorama will consist of 7 tiles in width and 3 in height.
That is, to get the whole panorama we need to download all the tiles:
Thus, after going through all the points of the route received from Google, we can download panoramas for them and then display them to the user in the form of video.
To do this, we need the AVFoundation library:
From there we take only 3 classes:
AVAssetWriter - write media data to an
AVAssetWriterInput file - Adds a media package to AVAssetWriter to write to an
AVAssetWriterInputPixelBufferAdaptor file - provides a video data package (CVPixelBuffer) for AVAssetWriterInput
Accordingly, we need to define them somewhere
Further initialization:
After that, everything is ready for video recording.
There is a function in AVAssetWriterInput:
(void) requestMediaDataWhenReadyOnQueue: (dispatch_queue_t) queue usingBlock: (void (^) (void)) block
Which calls Block every time a new piece of data is needed.
The video playback speed is controlled using the presentationTime variable, which indicates the frame time in the output file.
UIImage * image is the current frame
When all frames are recorded in the video, we tell videoWriter and writerInput to stop recording video:
The function to get CVPixelBufferRef from an image:
In order for the video to continue to be generated when our application is in the background, you can use the long-running background task, for this I advise you to use a good class
https://github.com/vaskravchuk/VideoMaker/
Adding a little options, we get such a software product.
itunes.apple.com/us/app/street-video-maker-free-create/id788610126?mt=8
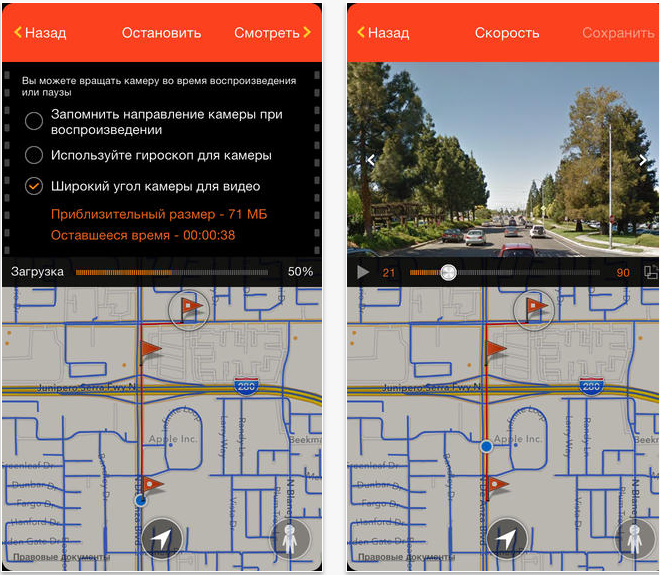
Here is an example of a video created using such a program:
One of the interesting uses of street video was the late 360 ° Langstrasse site. From which the rest is just a video:
Using this technology, you can create interesting augmented reality projects, conduct geographic surveys and, of course. Have fun. Lastly, a bit of professional Time-lapse by Gunther Wegner
The opportunity itself, of course, is wonderful, but the site does not allow you to save the results of experiments in the form of videos. It was decided to fix this annoying nuisance, and not just fix it, but implement it as an iOS program, thereby helping to turn the iPhone or iPad into a device for creating, rather than consuming, content.
How it works
So, today we have several resources that allow you to shoot Street Video. First of all, this is hyperlapse.tllabs.io , which allows you to mark 2 points, draw a route between them and enjoy looping animation.
The second site that allows you to watch street video is http://track-kit.net
This site allows you to view videos for created or imported tracks. Despite the fact that Street Video is not the main function here, you can generate a direct link to the video for the tech. For example, this:
http://track-kit.net/maps_s3/index.php?track=8821.gpx&svv=134
True, it works more or less on my Mac only in Chrome.
However, none of these resources allows you to save video. We will solve this problem now.
To prepare the video, we need to solve several problems.
- Get directions from point A to point B. It’s advisable to display the availability of Google Street View.
- Download panorama frames
- Allow the user to edit panoramas, for example, by pointing the camera at an object.
- Generate frame video
- Solve a number of typical iOS problems.
Get directions
To do this, we use the Google Maps SDK for iOS and the Google direction API.
Using the Google direction API, we request from Google a set of points between the starting and end points of the path in encoded form.
The Google Maps SDK for iOS (GMSPath class) will be needed to translate the encoded list of points that Google received in latitude and longitude.
To communicate with Google, AFNetworking is used.
static NSString *kLWSDirectionsURL = @"http://maps.googleapis.com/maps/api/directions/json?";
- (void)loadDirectionsForWaypoints:(NSArray *)waypoints{
        NSString *origin = [waypoints objectAtIndex:0];
        int waypointCount = [waypoints count];
        int destinationPos = waypointCount -1;
        NSString *destination = [waypoints objectAtIndex:destinationPos];
        NSString *sensor = @"false";
        NSMutableString *url = [NSMutableString stringWithFormat:@"%@&origin=%@&destination=%@&sensor=%@",
        kLWSDirectionsURL,origin,destination, sensor];
        if(waypointCount>2) {
            [url appendString:@"&waypoints=optimize:true"];
            int wpCount = waypointCount-2;
            for(int i=1;i 0) {
                    NSDictionary *routes = [responseObject objectForKey:@"routes"][0];
                    NSDictionary *route = [routes objectForKey:@"overview_polyline"];
                    NSString *overview_route = [route objectForKey:@"points"];
                    GMSPath *path = [GMSPath pathFromEncodedPath:overview_route];
                    coordinatesArr = [NSMutableArray array];
                    for (int i = 0; i < [path count]; ++i) {
                        CLLocationCoordinate2D coord = [path coordinateAtIndex:i];
                        [coordinatesArr addObject:[NSValue valueWithMKCoordinate:coord]];
                    }
            }
        } failure:^(AFHTTPRequestOperation *operation, NSError *error) {
        }];
}
If the download was successful in the coordinatesArr list, we store the set of coordinates of points on our path.
PS The Google direction API has 1 nuance - if you need to route not through 2, but, say, through 20 points, you will have to make several requests for the intervals of waypoints, because if you pass a large number of intermediate points into the request through "& waypoints", Google can return an error.
Download panoramas
To load a panorama, you can use a request of the form cbk0.google.com/cbk?output=json&ll=latitude , longitude
It will return to us information about the panorama closest to the point with latitude, longitude coordinates.
The most important thing that we can get is “panoId” - the id of the panorama we need (in addition to panoID, we can also get information about the panorama's offset angles, which can be useful if you need to rotate the panorama in a certain direction):
NSString* panoID;
-(void)loadMyWebViewForCoord:(CLLocationCoordinate2D)arg{
    @try {
        if (!manager) {
            manager = [AFHTTPRequestOperationManager manager];
        }
        NSString* urlStr = [NSString stringWithFormat:@"http://cbk0.google.com/cbk?output=json&ll=%f,%f",arg.latitude,arg.longitude];
        request = [manager GET:urlStr parameters:nil success:^(AFHTTPRequestOperation *operation, id responseObject) {
            id location = [responseObject objectForKey:@"Location"];
            id projection = [responseObject objectForKey:@"Projection"];
            if (location && projection) {
                panoID = [location objectForKey:@«panoId»];
}
        } failure:^(AFHTTPRequestOperation *operation, NSError *error) {
        }];
}
Further, using the obtained panorama ID, we can through the request:
cbk0.google.com/cbk?output=tile&panoid=panoid&zoom=zoom&x=x&y=y
get the panorama tiles we already need, where panoId is the panorama identifier obtained earlier, zoom is the scale panoramas (its size), x and y are the numbers of the panorama tile vertically and horizontally, while the number of panorama tiles depends on the zoom we entered. For example, if we choose zoom = 3, then the panorama will consist of 7 tiles in width and 3 in height.
That is, to get the whole panorama we need to download all the tiles:
-(void)loadImagesForPanoPoint:(PanoPoint*)currentPanoPointArg {
    @try {
        int zoom;
        int maxX;
        int maxY;
        if ([StreetViewSettings instance].hiQualityPano) {
            zoom = 3;
            maxX = 7;
            maxY = 3;
        }
        else {
            zoom = 2;
            maxX = 4;
            maxY = 2;
        }
        __block int allImages = maxX;
        for (int x = 0; x < maxX; ++x) {
            dispatch_async(dispatch_get_global_queue(DISPATCH_QUEUE_PRIORITY_HIGH, 0), ^{
                NSMutableArray* imForCurrentCoodY = [NSMutableArray array];
                for (int y = 0; y < maxY; ++y) {
                    @autoreleasepool {
                        NSString* pathStr = [NSString stringWithFormat:@"http://cbk0.google.com/cbk?output=tile&panoid=%@&zoom=%d&x=%d&y=%d",currentPanoPointArg.panoID,zoom,x,y];
                        NSString* tempDirectory = NSTemporaryDirectory();
                        NSString* imPath = [NSString stringWithFormat:@"%@/panoLoadCash/%@zoom=%dx=%dy=%d_%d",tempDirectory,currentPanoPointArg.panoID,zoom,x,y,currentCoordArrIndex];
                        NSData* im = nil;
                        NSFileManager* fM = [NSFileManager defaultManager];
                        BOOL isD;
                        if (![fM fileExistsAtPath:imPath isDirectory:&isD]) {
                            im = [self imgByPath:pathStr];
                        }
                        else {
                            [imForCurrentCoodY addObject:imPath];
                        }
                        if (im) {
                            pakSize += im.length;
                            if (![fM fileExistsAtPath:[NSTemporaryDirectory() stringByAppendingString:@"panoLoadCash"] isDirectory:&isD]) {
                                NSError* err;
                                [fM createDirectoryAtPath:[NSTemporaryDirectory() stringByAppendingString:@"panoLoadCash"] withIntermediateDirectories:YES attributes:[NSDictionary dictionary] error:&err];
                            }
                            [im writeToFile:imPath atomically:YES];
                            [imForCurrentCoodY addObject:imPath];
                        }
                    }
                }
                [imForCurrentCoordV addObject:@(x)];
                [imForCurrentCoordTemp addObject:imForCurrentCoodY];
                --allImages;
            });
        }
}
Thus, after going through all the points of the route received from Google, we can download panoramas for them and then display them to the user in the form of video.
We generate video
To do this, we need the AVFoundation library:
#import From there we take only 3 classes:
AVAssetWriter - write media data to an
AVAssetWriterInput file - Adds a media package to AVAssetWriter to write to an
AVAssetWriterInputPixelBufferAdaptor file - provides a video data package (CVPixelBuffer) for AVAssetWriterInput
Accordingly, we need to define them somewhere
    AVAssetWriter* videoWriter;
    AVAssetWriterInput* writerInput;
    AVAssetWriterInputPixelBufferAdaptor* adaptor;
Further initialization:
NSError *error = nil;
    videoWriter = [[AVAssetWriter alloc] initWithURL:[NSURL fileURLWithPath:videoPath]
                                            fileType:AVFileTypeQuickTimeMovie
                                               error:&error];
    NSDictionary *videoSettings = [[NSDictionary alloc] initWithObjectsAndKeys:
                                   AVVideoCodecH264, AVVideoCodecKey,
                                   [NSNumber numberWithInt:videoSize.width], AVVideoWidthKey,
                                   [NSNumber numberWithInt:videoSize.height], AVVideoHeightKey,
                                   nil];
    writerInput = [AVAssetWriterInput assetWriterInputWithMediaType:AVMediaTypeVideo outputSettings:videoSettings];
    adaptor = [AVAssetWriterInputPixelBufferAdaptor assetWriterInputPixelBufferAdaptorWithAssetWriterInput:writerInput sourcePixelBufferAttributes:nil];
    [videoWriter addInput:writerInput];
    [videoWriter startWriting];
    [videoWriter startSessionAtSourceTime:kCMTimeZero]
After that, everything is ready for video recording.
There is a function in AVAssetWriterInput:
(void) requestMediaDataWhenReadyOnQueue: (dispatch_queue_t) queue usingBlock: (void (^) (void)) block
Which calls Block every time a new piece of data is needed.
[writerInput requestMediaDataWhenReadyOnQueue:assetWriterQueue usingBlock:^
            if (buffer == NULL)
            {
                CVPixelBufferPoolCreatePixelBuffer (NULL, adaptor.pixelBufferPool, &buffer);
            }
            UIImage *image = [self imageForIndex:currentIndexForBuff];
            if (image) {
                buffer = [self pixelBufferFromCGImage:image.CGImage];
                CMTime presentationTime= CMTimeMakeWithSeconds(speed*currentIndexForBuff, 33);
                if (![adaptor appendPixelBuffer:buffer withPresentationTime:presentationTime]) {
                    [self finishVideo];
                    return;
                }
                CVPixelBufferRelease(buffer);
                if (currentIndexForBuff < imagesPathsForVideo.count) {
                }
                else {
                    [self finishVideo];
                }
            }
            else {
                if (currentIndexForBuff < imagesPathsForVideo.count) {
                }
                else {
                    [self finishVideo];
                }
                return;
            }
            ++currentIndexForBuff;
}];
The video playback speed is controlled using the presentationTime variable, which indicates the frame time in the output file.
UIImage * image is the current frame
When all frames are recorded in the video, we tell videoWriter and writerInput to stop recording video:
-(void)finishVideo {
    [writerInput markAsFinished];
    [videoWriter finishWritingWithCompletionHandler:^(){}];
}
The function to get CVPixelBufferRef from an image:
- (CVPixelBufferRef) pixelBufferFromCGImage: (CGImageRef) image
{
    if (image) {
        NSDictionary *options = [[NSDictionary alloc] initWithObjectsAndKeys:
                             [NSNumber numberWithBool:YES], kCVPixelBufferCGImageCompatibilityKey,
                             [NSNumber numberWithBool:YES], kCVPixelBufferCGBitmapContextCompatibilityKey,
                                 nil];
        CVPixelBufferRef pxbuffer = NULL;
        CVPixelBufferCreate(kCFAllocatorDefault, CGImageGetWidth(image),
                            CGImageGetHeight(image), kCVPixelFormatType_32ARGB, (__bridge CFDictionaryRef) options,
                            &pxbuffer);
        CVPixelBufferLockBaseAddress(pxbuffer, 0);
        void *pxdata = CVPixelBufferGetBaseAddress(pxbuffer);
        CGColorSpaceRef rgbColorSpace = CGColorSpaceCreateDeviceRGB();
        CGContextRef context = CGBitmapContextCreate(pxdata, CGImageGetWidth(image), CGImageGetHeight(image), 8, 4*CGImageGetWidth(image), rgbColorSpace, kCGImageAlphaNoneSkipFirst);
        CGContextDrawImage(context, CGRectMake(0, 0, CGImageGetWidth(image), CGImageGetHeight(image)), image);
        CGColorSpaceRelease(rgbColorSpace);
        CGContextRelease(context);
        CVPixelBufferUnlockBaseAddress(pxbuffer, 0);
        return pxbuffer;
    }
    else {
        return nil;
    }
}
Work in the background
In order for the video to continue to be generated when our application is in the background, you can use the long-running background task, for this I advise you to use a good class
https://github.com/vaskravchuk/VideoMaker/
Adding a little options, we get such a software product.
itunes.apple.com/us/app/street-video-maker-free-create/id788610126?mt=8
Here is an example of a video created using such a program:
One of the interesting uses of street video was the late 360 ° Langstrasse site. From which the rest is just a video:
Using this technology, you can create interesting augmented reality projects, conduct geographic surveys and, of course. Have fun. Lastly, a bit of professional Time-lapse by Gunther Wegner









