April 17, 2014 at 18:34
Advantage of the new DELL PE R920 configuration with SSDs on NVME EXPRESS FLASH PCIE
- Transfer
- Recovery mode

Performance is the most important quality for companies working with Oracle-based programs, which requires low latency and maximum I / O per second from storage subsystems. Thus, it is important to choose a server not only with the latest processor technology and a large amount of RAM, but also with the ability to upgrade to provide a high level of service. The new Dell PowerEdge R920 server with Intel® Xeon processor E7 v2 family delivers the performance you need for mission-critical applications. Using NVMe Express Flash PCIe SSDs, you can take server performance to the next level.
In our test lab, we tested two Dell PowerEdge R920 servers with an Oracle Database 12c database with OLTP TPC-C workloads, the first with standard serial SCSI (SAS) hard drives and the second with NVMe Express Flash PCIe SSDs. The updated configuration with PCIe SSDs has increased database performance by 14.9 times compared to hard drives. While the basic configuration provides good server performance, NVMe Express Flash PCIe SSDs can significantly increase it, becoming a profitable investment for businesses seeking to meet the requirements of Oracle database users.
UPDATE DATABASE PRODUCTIVITY SHARPLY GROWS
The Dell PowerEdge R920 with Intel Xeon processor E7 v2 family is Dell's fastest 4-socket server with a 4U form factor. Dell designed it to handle mission-critical workloads such as enterprise resource planning (ERP), e-commerce, full-blown virtualization, and large databases. The standard configuration includes 24 2.5-inch drive bays and supports up to 24 SAS hard drives. NVMe Express Flash PCIe SSD Configuration Supports up to eight PCIe SSDs and up to 16 SAS HDDs in the remaining bays. This provides a maximum speed of eight high-performance disks and high storage capacity on 16 SAS disks.
Although the Dell PowerEdge ServerThe R920 in its standard configuration supports the Oracle database well, we wanted to know how to change performance when using NVMe Express Flash PCIe SSDs. For this, we used a performance appraisal program that tests the performance of many leading databases. As shown in Fig. 1, in the second configuration, the Oracle database performance improves dramatically, the Dell PowerEdge R920 server with NVMe Express Flash PCIe SSDs is almost 15 times more efficient than the first configuration with SAS hard drives It should be noted that in the updated configuration, high efficiency was achieved using only one third of the disks (eight SSDs versus 24 SAS disks in the basic configuration).
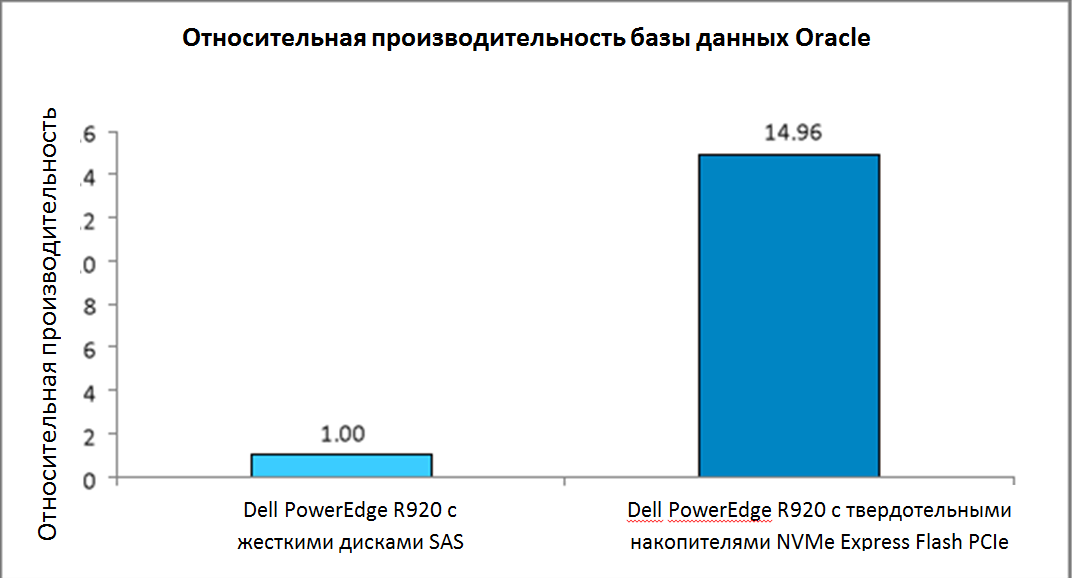
Fig. 1 A significant difference in performance was detected between the two server configurations.
We have given only comparative results, since Oracle does not allow publishing specific results of comparative testing. However, even in the basic configuration, the server showed good results.
In fig. 2HammerDB performance improvements are shown for various I / O workloads. To demonstrate performance under various workloads of I / O operations, we changed the fast_start_mttr_target parameter in Oracle to use three different parameter options - 60 seconds, 120 seconds and 180 seconds, and then conducted a comparative test with each parameter. The fast_start_mttr_target parameter settings allow you to specify the number of seconds that the database will spend on recovering from a failure. The faster this happens, the earlier the database will be restored and made available to users. With shorter recovery times, such as 60 seconds, the database instance should flush the contents of the buffer to disk more often, creating a high load of input-output operations on the storage subsystem. With a longer recovery time, for example, 180 seconds, the storage subsystem is less loaded with I / O.
As shown in Figure 2, the Dell PowerEdge R920 server configured with PCIe SSDs is better at handling I / O loads in all three cases. With shorter recovery times, the performance advantage of NVMe Express Flash PCIe SSDs over SAS drives increases. While the PowerEdge R920 server in the basic configuration with SAS hard drives showed good results, higher performance was recorded in the configuration with NVMe Express Flash PCIe SSDs.
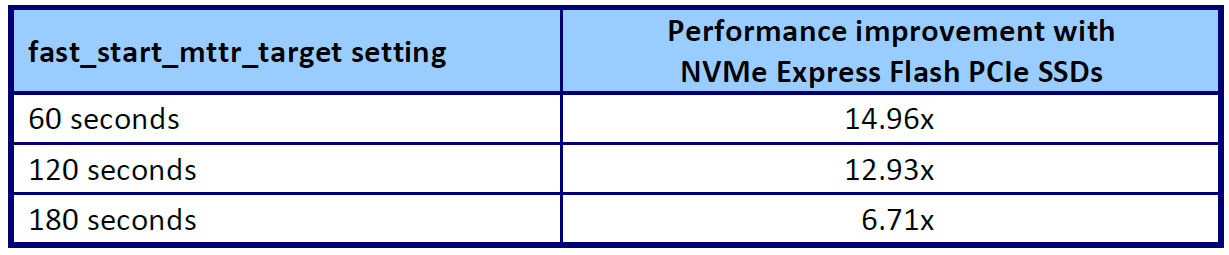
Fig. 2 Relative results of the advantage of the configuration with PCIe SSDs over the basic configuration, recorded with HammerDB
In both test configurations, we used the Oracle recommended approach to Automatic Storage Management (ASM). On each server, we configured the main storage for redundancy, which would be required in almost any environment. Oracle ASM provides three levels of redundancy: Normal with two-channel copying, High with three-channel copying and External without copying, but with redundancy using hardware RAID controllers. In the basic configuration with the Dell PowerEdge RAID Controller (PERC) H730P, we used RAID 1 and 1 External Redundancy disk groups. In the configuration with PCIe SSDs in the absence of a RAID controller, we used the normal level of redundancy of Oracle ASM with two-channel copying.
I / O Acceleration Value
Improved storage performance after upgrading an Oracle database with NVMe Express PCIe SSDs can provide company benefits in a number of cases:
- Improved service agreement terms by reducing database response time and / or supporting more users.
- Faster recovery time in the event of a failure
- Decrease database maintenance time
- Increase User Satisfaction
- Lower cost by eliminating poor performance hardware
I / O OPERATION PRODUCTIVITY ALSO SHARP INCREASES
In addition to database performance, we analyzed the I / O performance of NVMe Express Flash PCIe SSDs compared to SAS drives. To measure I / O in two server configurations, we used Flexible I / O, also known as Fio. Figure 3 shows the results: in both tests, the Dell PowerEdge R920 server with NVMe Express Flash PCIe SSDs significantly outperformed the basic configuration with SAS hard drives.
Please note that random write of 313,687 I / O operations per second approximately reflects the configuration being copied. The total number of output operations of the combined devices was doubled, then we divided it into two to reflect the ASM configuration at the normal level of two-channel copying that we used in testing. We ran the Fio tests in a no-copy configuration because the PCIe bus does not have RAID capabilities. We divided the results, 627,374 I / O operations per second, by two, to get the approximate results of copying the record in the RAID 1. For a detailed configuration description, see Appendix B.
Unlike database performance, which includes loads created by applications, queues, and software level, the performance of I / O operations shows the storage subsystem's ability to process data, and often it is many times higher than database performance.

Fig. 3. Fio benchmarking results. A large number of I / O operations per second is preferred. The number of write operations for NVMe was 627,374; we divided the result by two in order to mathematically bring it closer to the copy result.
ABOUT TESTED COMPONENTS
About Dell PowerEdge R920
The Dell PowerEdge R920 is Dell's fastest 4-socket 4U server.
The server is designed to increase productivity for large enterprises, it supports:
- Up to 96 DIMMs
- 24 internal drives
- 8 NVMe Express Flash drives (with optional PCIe backplane)
- 10 PCIe Gen3 / Gen2
- SAS 12Gb / s drives
Server configuration also offers a Dual PERC option controller, PERC9 (H730P), Fluid Cache for SAN environments and many RAS features (reliability, availability, usability), such as Fault Resilient Memory and Intel Run Sure technology.
Using the Intel Xeon processor E7 v2 family
The PowerEdge R920 server uses the new Intel Xeon processor E7 v2 family, developed by Intel to maintain high-performance mission-critical tasks by adding 50% more cores / threads and 25% more cache memory, which provides a significant jump in performance compared to previous models . The Intel Xeon processor E7 v2 family supports up to 6TB of DDR3 memory, up to 24 DDR3 DIMMs per socket and speeds up to 1,600 MHz for improved performance and increased scalability.
The Intel Xeon processor E7 v2 family supports all the reliability, availability, and usability features found in previous models to support mission-critical workloads. With Intel Run Sure Technology, this processor has got new features including eMCA Gen 1, MCA Recovery Execution Path, MCA I / O and PCIe Live Error Recovery.
Maintain labor-intensive workloads
The PowerEdge R920 server can handle time-consuming, mission-critical workloads, enterprise resource planning (ERP), e-commerce, full-scale virtualization, and very large databases. It is especially suitable for the following workloads and environments:
- Acceleration of large corporate programs ((ERP, CRM, Business Intelligence)
- Introducing large traditional databases or in-memory databases
- Combining enterprise workloads with full-blown virtualization
- Switching from expensive and outdated RISC hardware to a promising data center
For more information on the Dell PowerEdge R920 server, see www.dell.com/us/business/p/poweredge-r920/pd .
About the Dell PowerEdge Server with NVMe Express Flash PCIe SSDs
The Dell PowerEdge Server with NVMe Express Flash PCIe SSDs is the ideal high-performance storage for solutions requiring low latency, maximum I / O per second, and enterprise-class storage reliability. PCIe Gen3 compatible NVMe Express Flash PCIe SSD can be used as a cache or main storage device in a labor-intensive corporate environment, such as blade and rack servers , video on demand servers, web accelerators, virtualization devices.
NVM Express is an optimized, highly efficient, scalable main controller interface with an advanced register interface and instruction set for processing non-volatile memory (NVM). It is designed for enterprises, data centers, client systems using PCIe SSDs.
According to the NVMHCI Work Group, a group of more than 90 storage companies, “NVM Express significantly improves random and sequential performance by reducing latency, providing high levels of duplication and optimizing the instruction set, while maintaining security, continuous data protection and other functions in which user needs. NVM Express guarantees a standards-based approach by providing ecosystem support and PCIe SSD compatibility.
For information on the Dell PowerEdge server with NVMe Express Flash PCIe SSDs, see www.dell.com/learn/us/en/04/campaigns/poweredge-express-flash .
For details on the NVM Express interface, see www.nvmexpress.org .
CONCLUSION
High server performance is a prerequisite for companies working with Oracle Database. The new Dell PowerEdge R920 server delivers high performance in its basic configuration with 24 SAS hard drives, but its performance is significantly increased when NVMe Express Flash PCIe SSDs are connected. During testing, the updated configuration of the Dell PowerEdge R920 increased the performance of the base configuration by 14.9 times. In addition, when testing the performance of I / O operations, the configuration with NVMe Express Flash PCIe SSDs exceeded the performance of the basic configuration by 192.8 times. Given that the storage subsystem is critical in servers and in particular database applications,
APPENDIX A - SERVER CONFIGURATION INFORMATION
In Fig. 4 provides information on the configuration of the systems under test.
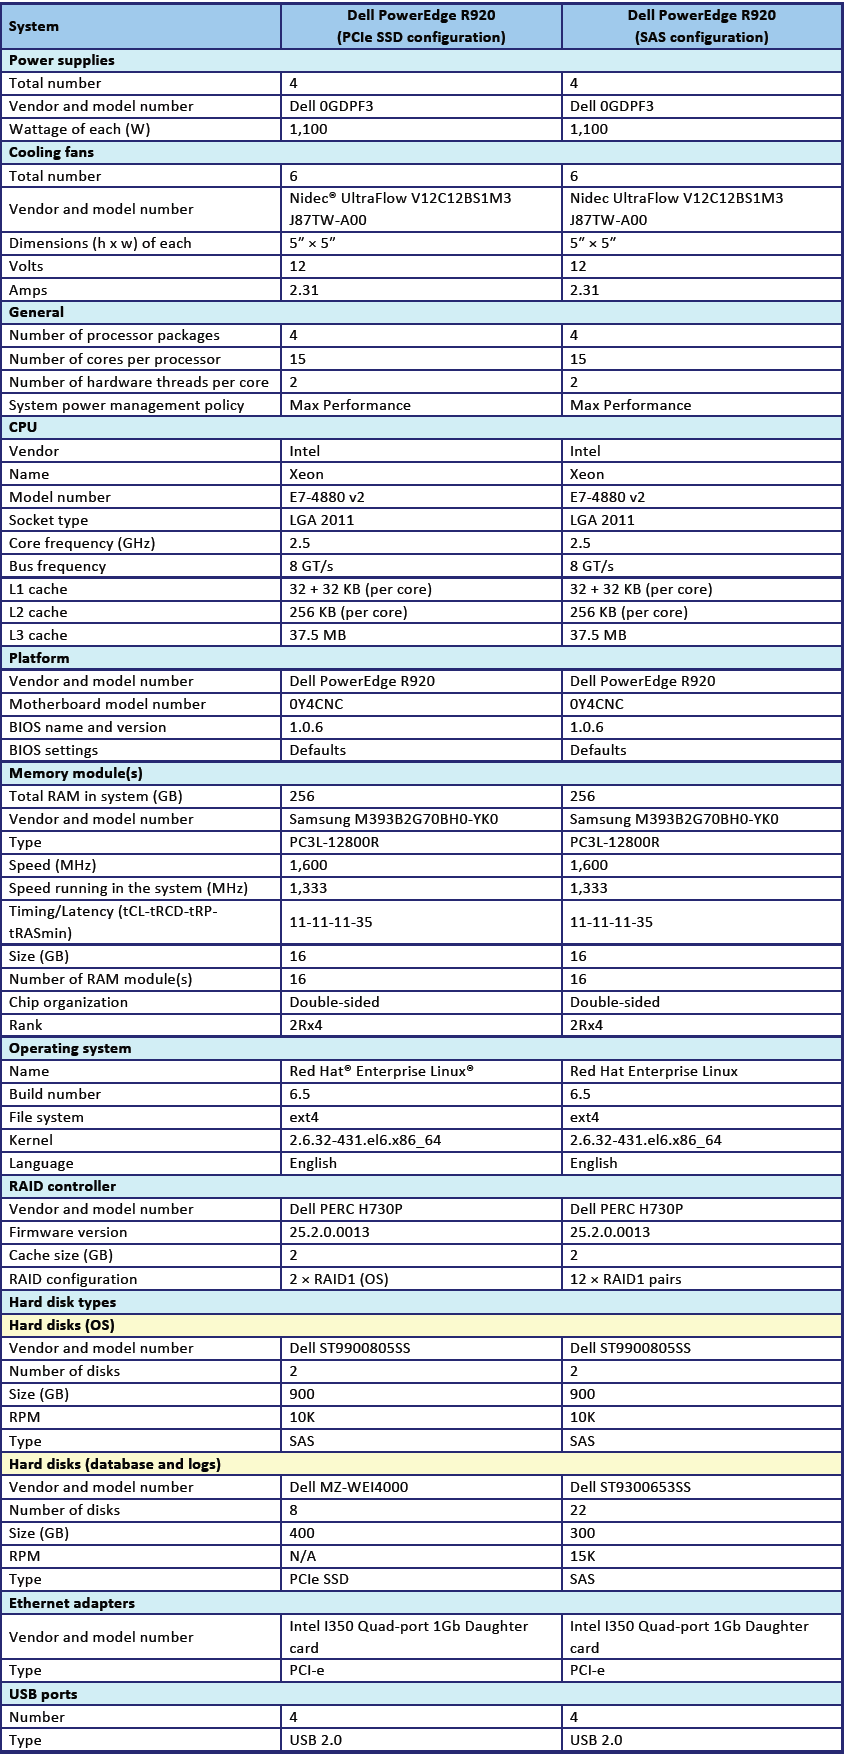
In Fig. 4 provides information on the configuration of the systems under test.
ANNEX B - TEST METHODOLOGY
About Testing Tools
Hammer db
HammerDB is a publicly available benchmarking tool for many leading databases, including Oracle Database, Microsoft® SL Server®, PostgreS-L, MyS-L ™ and others. Evaluation includes two built-in workloads derived from ratings accepted as an industry standard: transactional (TPC-C) workload and (TPCH) data warehouse workload. For this testing, we used a transactional workload. Our tests are not official TPC results and cannot be compared. For more information about HammerDB, see hammerora.sourceforge.net.
Flexible I / O (Fio) 2.1.4
Fio is a publicly available I / O tool used to load hardware and get results in IOPS (number of I / O operations per second). We downloaded and used Fio 2.1.4 for testing (pkgs.repoforge.org/fio/fio-2.1.4-1.el6.rf.x86_64.rpm).
Configuration Overview
We used all eight disks in the SSD configuration for random read and write and 20 SAS disks in 10 double-disk RAID configurations 1. Thus, the SAS configuration includes 10 double-disk groups, while the SSD configuration includes eight groups with one disk. The reason for this configuration is that SSDs do not have a RAID controller, unlike SAS drives. For Oracle testing, we defined these configurations in Automatic Storage Management, so we ran Fio to reflect the Oracle configuration. This allowed us to simulate a disk configuration with a database for testing. For Fio, we used an 8k block size to simulate the Oracle database configuration.
Configuring Red Hat Enterprise Linux and Oracle Database 12c
We installed Red Hat Enterprise Linux on both Dell PowerEdge R920 servers and configured the settings as shown below. The data displayed on the screen is displayed on a gray background.
Install Red Hat Enterprise Linux
We installed Red Hat Enterprise Linux on the Intel server, and then configured the settings as shown below.
- Insert the Red Hat Enterprise Linux 6.5 DVD into the server and load it.
- Select Install or upgrade your existing system.
- If in doubt about the quality of the installation disc, select OK to check the installation media, otherwise select Skip.
- In the window that opens, click Next.
- Select the desired language, click Next.
- Select a keyboard layout, click Next.
- Select your primary storage devices, click Next.
- Click Yes, reset any data in the storage device warning window.
- Enter the host name, click Next.
- Select the nearest city by time zone and click Next.
- Enter the root password, click Next.
- Select Create Custom Layout, click Next.
- Select the installation disk and click Create. (Create the following arrays: Root = 300GB, Home = 500GB, Boot = 200MB, SWAP = 20GB).
- Click Next.
- In the pop-up window, click Write changes to disk.
- Select the appropriate storage devices and the directory for the bootloader, click Next.
- Select the main software server, click Next. Linux installation begins.
- After installation is complete, select Reboot to reboot the server.
Initial Configuration
Follow these steps to provide the basic functionality required by Oracle Database. We completed all these tasks as root.
Disable SELINUX
vi / etc / selinux / config
SELINUX = disabled
SELINUX = disabled
Set the type of CPU speed controller
vi / etc / sysconfig / cpuspeed
GOVERNOR = performance
GOVERNOR = performance
Disable the firewall for IPv4 and IPv6.
chkconfig iptables off
chkconfig ip6tables off
chkconfig ip6tables off
To update operating system packages, enter the following:
yum update –y
To install additional packages, specify the following commands:
yum install -y acpid cpuspeed wget vim nfs-utils openssh-clients man
lsscsi unzip smartmontools numactl ipmitool OpenIPMI
lsscsi unzip smartmontools numactl ipmitool OpenIPMI
To install additional packages, specify the following commands:
yum install -y acpid cpuspeed wget vim nfs-utils openssh-clients man
lsscsi unzip smartmontools numactl ipmitool OpenIPMI
lsscsi unzip smartmontools numactl ipmitool OpenIPMI
Reboot the server.
Reboot
Install additional packages using the following commands:
yum install -y \
binutils \
compat-libcap1 \
compat-libstdc ++ - 33 \
compat-libstdc ++ - 33.i686 \
gcc \
gcc-c ++ \
glibc \
glibc.i686 \
glibc-devel \
glibc-devel.i686 \
ksh \
libgcc \
libgcc.i686 \
libstdc ++ \
libstdc ++. i686 \
libstdc ++ - devel \
libstdc ++ - devel.i686 \
libaio \
libaio.i686 \
libaio-devel \
libaio-devel.i686 \
libXext \
libXext.i686 \
libXtst \
libXt6
lib6 \
libX11.i686 \
libXau \
libXau.i686 \
libxcb \
libxcb.i686 \
libXi \
libXi.i686 \
make \
sysstat \
unixODBC \
unixODBC-devel \
xorg-x11-xauth \
xorg-x11-utils
binutils \
compat-libcap1 \
compat-libstdc ++ - 33 \
compat-libstdc ++ - 33.i686 \
gcc \
gcc-c ++ \
glibc \
glibc.i686 \
glibc-devel \
glibc-devel.i686 \
ksh \
libgcc \
libgcc.i686 \
libstdc ++ \
libstdc ++. i686 \
libstdc ++ - devel \
libstdc ++ - devel.i686 \
libaio \
libaio.i686 \
libaio-devel \
libaio-devel.i686 \
libXext \
libXext.i686 \
libXtst \
libXt6
lib6 \
libX11.i686 \
libXau \
libXau.i686 \
libxcb \
libxcb.i686 \
libXi \
libXi.i686 \
make \
sysstat \
unixODBC \
unixODBC-devel \
xorg-x11-xauth \
xorg-x11-utils
Edit the sysctl file.
vim /etc/sysctl.conf
fs.file-max = 6815744
kernel.sem = 250 32000 100 128
kernel.shmmni = 4096
kernel.shmall = 1073741824
kernel.shmmax = 4398046511104
net.core.rmem_default = 262144
net.core.rmem_max = 4194304
net.core.wmem_default = 262144
net.core.wmem_max = 1048576
fs.aio-max-nr = 1048576
net.ipv4.ip_local_port_range = 9000 65500
vm.nr_hugepages = 262144
vm.hugetlb_shm_group = 54321
fs.file-max = 6815744
kernel.sem = 250 32000 100 128
kernel.shmmni = 4096
kernel.shmall = 1073741824
kernel.shmmax = 4398046511104
net.core.rmem_default = 262144
net.core.rmem_max = 4194304
net.core.wmem_default = 262144
net.core.wmem_max = 1048576
fs.aio-max-nr = 1048576
net.ipv4.ip_local_port_range = 9000 65500
vm.nr_hugepages = 262144
vm.hugetlb_shm_group = 54321
Apply the changes with the following command:
sysctl -p
Edit the configuration of the security restrictions:
vim /etc/security/limits.conf
oracle soft nofile 1024
oracle hard nofile 65536
oracle soft nproc 2047
oracle hard nproc 16384
oracle soft stack 10240
oracle hard stack 32768
oracle soft memlock 536870912
oracle hard memlock 536870912
oracle soft nofile 1024
oracle hard nofile 65536
oracle soft nproc 2047
oracle hard nproc 16384
oracle soft stack 10240
oracle hard stack 32768
oracle soft memlock 536870912
oracle hard memlock 536870912
Add the necessary groups and users:
groupadd -g 54321 oinstall
groupadd -g 54322 dba
groupadd -g 54323 oper
useradd -u 54321 -g oinstall -G dba, oper oracle
groupadd -g 54322 dba
groupadd -g 54323 oper
useradd -u 54321 -g oinstall -G dba, oper oracle
Change the password for the Oracle user:
passwd oracle
Changing password for user oracle.
New password:
Retype new password:
passwd: all authentication tokens updated successfully.
Changing password for user oracle.
New password:
Retype new password:
passwd: all authentication tokens updated successfully.
Edit the hosts file:
vim / etc / hosts
127.0.0.1 R920 R920.localhost.localdomain localhost
localhost.localdomain localhost4 localhost4.localdomain4
:: 1 R920 R920.localhost.localdomain localhost
localhost.localdomain localhost6 localhost6.localdomain6
127.0.0.1 R920 R920.localhost.localdomain localhost
localhost.localdomain localhost4 localhost4.localdomain4
:: 1 R920 R920.localhost.localdomain localhost
localhost.localdomain localhost6 localhost6.localdomain6
Edit the 90-nproc.conf file:
vim /etc/security/limits.d/90-nproc.conf
Change the line:
* soft nproc 1024
to:
* - nproc 16384
Change the line:
* soft nproc 1024
to:
* - nproc 16384
Edit the parameter file to set the environment variables:
vim /home/oracle/.bash_profile
# Oracle Settings
export TMP = / tmp
export TMPDIR = TMP
export ORACLE_HOSTNAME = R920.localhost.localdomain
export ORACLE_BASE = / home / oracle / app / oracle
export GRID_HOME = ORACLE_BASE / product / 12.1.0 / grid
export DB_HOME = ORACLE_BASE / product / 12.1.0 / dbhome_1
export ORACLE_HOME = DB_HOME
export ORACLE_SID = orcl
export ORACLE_TERM = xterm
export BASE_PATH = / usr / sbin: PATH
export PATH = ORACLE_HOME / bin: BASE_PATH
export LD_LIBR Libhl_ libr lib: / usr / lib
export CLASSPATH = ORACLE_HOME / JRE: ORACLE_HOME / jlib: ORACLE_HOME / rdbms / jlib
alias grid_env = '. / home / oracle / grid_env '
alias db_env ='. / home / oracle / db_env '
# Oracle Settings
export TMP = / tmp
export TMPDIR = TMP
export ORACLE_HOSTNAME = R920.localhost.localdomain
export ORACLE_BASE = / home / oracle / app / oracle
export GRID_HOME = ORACLE_BASE / product / 12.1.0 / grid
export DB_HOME = ORACLE_BASE / product / 12.1.0 / dbhome_1
export ORACLE_HOME = DB_HOME
export ORACLE_SID = orcl
export ORACLE_TERM = xterm
export BASE_PATH = / usr / sbin: PATH
export PATH = ORACLE_HOME / bin: BASE_PATH
export LD_LIBR Libhl_ libr lib: / usr / lib
export CLASSPATH = ORACLE_HOME / JRE: ORACLE_HOME / jlib: ORACLE_HOME / rdbms / jlib
alias grid_env = '. / home / oracle / grid_env '
alias db_env ='. / home / oracle / db_env '
Отредактируйте файл grid_env и задайте дополнительные переменные:
vim /home/oracle/grid_env
export ORACLE_SID=+ASM
export ORACLE_HOME= GRID_HOME
export PATH= ORACLE_HOME/bin: BASE_PATH
export LD_LIBRARY_PATH= ORACLE_HOME/lib:/lib:/usr/lib
export CLASSPATH= ORACLE_HOME/JRE: ORACLE_HOME/jlib: ORACLE_HOME/rdbms/jlib
export ORACLE_SID=+ASM
export ORACLE_HOME= GRID_HOME
export PATH= ORACLE_HOME/bin: BASE_PATH
export LD_LIBRARY_PATH= ORACLE_HOME/lib:/lib:/usr/lib
export CLASSPATH= ORACLE_HOME/JRE: ORACLE_HOME/jlib: ORACLE_HOME/rdbms/jlib
Отредактируйте файл db_env и задайте дополнительные переменные:
vim /home/oracle/db_env
export ORACLE_SID=orcl
export ORACLE_HOME= DB_HOME
export PATH= ORACLE_HOME/bin: BASE_PATH
export LD_LIBRARY_PATH= ORACLE_HOME/lib:/lib:/usr/lib
export CLASSPATH= ORACLE_HOME/JRE: ORACLE_HOME/jlib: ORACLE_HOME/rdbms/jlib
export ORACLE_SID=orcl
export ORACLE_HOME= DB_HOME
export PATH= ORACLE_HOME/bin: BASE_PATH
export LD_LIBRARY_PATH= ORACLE_HOME/lib:/lib:/usr/lib
export CLASSPATH= ORACLE_HOME/JRE: ORACLE_HOME/jlib: ORACLE_HOME/rdbms/jlib
Отредактируйте файл scsi_id:
echo «options=-g» > /etc/scsi_id.config
Настройка хранилища SAS
We completed the following steps to configure the SAS storage before configuring ASM:
Edit the 99-oracle-asmdevices rules file:
vim /etc/udev/rules.d/99-oracle-asmdevices.rules
KERNEL==«sd?1», ENV{DEVTYPE}==«partition»,
ENV{ID_SERIAL}==«36c81f660d8d581001a9a10580658268a»,
SYMLINK+=«oracleasm/mirror01», OWNER=«oracle», GROUP=«dba», MODE=«0660»
KERNEL==«sd?1», ENV{DEVTYPE}==«partition»,
ENV{ID_SERIAL}==«36c81f660d8d581001a9a106c07885c76»,
SYMLINK+=«oracleasm/mirror02», OWNER=«oracle», GROUP=«dba», MODE=«0660»
KERNEL==«sd?1», ENV{DEVTYPE}==«partition»,
ENV{ID_SERIAL}==«36c81f660d8d581001a9a108f09a3aecc»,
SYMLINK+=«oracleasm/mirror03», OWNER=«oracle», GROUP=«dba», MODE=«0660»
KERNEL==«sd?1», ENV{DEVTYPE}==«partition»,
ENV{ID_SERIAL}==«36c81f660d8d581001a9a10ad0b720998»,
SYMLINK+=«oracleasm/mirror04», OWNER=«oracle», GROUP=«dba», MODE=«0660»
KERNEL==«sd?1», ENV{DEVTYPE}==«partition»,
ENV{ID_SERIAL}==«36c81f660d8d581001a9a10c00c8d5153»,
SYMLINK+=«oracleasm/mirror05», OWNER=«oracle», GROUP=«dba», MODE=«0660»
KERNEL==«sd?1», ENV{DEVTYPE}==«partition»,
ENV{ID_SERIAL}==«36c81f660d8d581001a9a10d20da90647»,
SYMLINK+=«oracleasm/mirror06», OWNER=«oracle», GROUP=«dba», MODE=«0660»
KERNEL==«sd?1», ENV{DEVTYPE}==«partition»,
ENV{ID_SERIAL}==«36c81f660d8d581001a9a110c1118728c»,
SYMLINK+=«oracleasm/mirror07», OWNER=«oracle», GROUP=«dba», MODE=«0660»
KERNEL==«sd?1», ENV{DEVTYPE}==«partition»,
ENV{ID_SERIAL}==«36c81f660d8d581001a9a111e1229ba5a»,
SYMLINK+=«oracleasm/mirror08», OWNER=«oracle», GROUP=«dba», MODE=«0660»
KERNEL==«sd?1», ENV{DEVTYPE}==«partition»,
ENV{ID_SERIAL}==«36c81f660d8d581001a9a1132135878df»,
SYMLINK+=«oracleasm/mirror09», OWNER=«oracle», GROUP=«dba», MODE=«0660»
KERNEL==«sd?1», ENV{DEVTYPE}==«partition»,
ENV{ID_SERIAL}==«36c81f660d8d581001a9a114814ac573a»,
SYMLINK+=«oracleasm/mirror10», OWNER=«oracle», GROUP=«dba», MODE=«0660»
KERNEL==«sd?1», ENV{DEVTYPE}==«partition»,
ENV{ID_SERIAL}==«36c81f660d8d581001a9a115c15d5b8ce»,
SYMLINK+=«oracleasm/mirror11», OWNER=«oracle», GROUP=«dba», MODE=«0660»
KERNEL==«sd?1», ENV{DEVTYPE}==«partition»,
ENV{ID_SERIAL}==«36c81f660d8d581001a9a10580658268a»,
SYMLINK+=«oracleasm/mirror01», OWNER=«oracle», GROUP=«dba», MODE=«0660»
KERNEL==«sd?1», ENV{DEVTYPE}==«partition»,
ENV{ID_SERIAL}==«36c81f660d8d581001a9a106c07885c76»,
SYMLINK+=«oracleasm/mirror02», OWNER=«oracle», GROUP=«dba», MODE=«0660»
KERNEL==«sd?1», ENV{DEVTYPE}==«partition»,
ENV{ID_SERIAL}==«36c81f660d8d581001a9a108f09a3aecc»,
SYMLINK+=«oracleasm/mirror03», OWNER=«oracle», GROUP=«dba», MODE=«0660»
KERNEL==«sd?1», ENV{DEVTYPE}==«partition»,
ENV{ID_SERIAL}==«36c81f660d8d581001a9a10ad0b720998»,
SYMLINK+=«oracleasm/mirror04», OWNER=«oracle», GROUP=«dba», MODE=«0660»
KERNEL==«sd?1», ENV{DEVTYPE}==«partition»,
ENV{ID_SERIAL}==«36c81f660d8d581001a9a10c00c8d5153»,
SYMLINK+=«oracleasm/mirror05», OWNER=«oracle», GROUP=«dba», MODE=«0660»
KERNEL==«sd?1», ENV{DEVTYPE}==«partition»,
ENV{ID_SERIAL}==«36c81f660d8d581001a9a10d20da90647»,
SYMLINK+=«oracleasm/mirror06», OWNER=«oracle», GROUP=«dba», MODE=«0660»
KERNEL==«sd?1», ENV{DEVTYPE}==«partition»,
ENV{ID_SERIAL}==«36c81f660d8d581001a9a110c1118728c»,
SYMLINK+=«oracleasm/mirror07», OWNER=«oracle», GROUP=«dba», MODE=«0660»
KERNEL==«sd?1», ENV{DEVTYPE}==«partition»,
ENV{ID_SERIAL}==«36c81f660d8d581001a9a111e1229ba5a»,
SYMLINK+=«oracleasm/mirror08», OWNER=«oracle», GROUP=«dba», MODE=«0660»
KERNEL==«sd?1», ENV{DEVTYPE}==«partition»,
ENV{ID_SERIAL}==«36c81f660d8d581001a9a1132135878df»,
SYMLINK+=«oracleasm/mirror09», OWNER=«oracle», GROUP=«dba», MODE=«0660»
KERNEL==«sd?1», ENV{DEVTYPE}==«partition»,
ENV{ID_SERIAL}==«36c81f660d8d581001a9a114814ac573a»,
SYMLINK+=«oracleasm/mirror10», OWNER=«oracle», GROUP=«dba», MODE=«0660»
KERNEL==«sd?1», ENV{DEVTYPE}==«partition»,
ENV{ID_SERIAL}==«36c81f660d8d581001a9a115c15d5b8ce»,
SYMLINK+=«oracleasm/mirror11», OWNER=«oracle», GROUP=«dba», MODE=«0660»
Выполните udevadm и запустите udev:
udevadm control --reload-rules
start_udev
start_udev
Перечислите устройства ASM:
ls -l /dev/oracleasm/
lrwxrwxrwx 1 root root 7 Feb 24 19:17 mirror01 -> ../sdb1
lrwxrwxrwx 1 root root 7 Feb 24 19:17 mirror02 -> ../sdc1
lrwxrwxrwx 1 root root 7 Feb 24 19:17 mirror03 -> ../sdd1
lrwxrwxrwx 1 root root 7 Feb 24 19:17 mirror04 -> ../sde1
lrwxrwxrwx 1 root root 7 Feb 24 19:17 mirror05 -> ../sdf1
lrwxrwxrwx 1 root root 7 Feb 24 19:17 mirror06 -> ../sdg1
lrwxrwxrwx 1 root root 7 Feb 24 19:17 mirror07 -> ../sdh1
lrwxrwxrwx 1 root root 7 Feb 24 19:17 mirror08 -> ../sdi1
lrwxrwxrwx 1 root root 7 Feb 24 19:17 mirror09 -> ../sdj1
lrwxrwxrwx 1 root root 7 Feb 24 19:17 mirror10 -> ../sdk1
lrwxrwxrwx 1 root root 7 Feb 24 19:17 mirror11 -> ../sdl1
lrwxrwxrwx 1 root root 7 Feb 24 19:17 mirror01 -> ../sdb1
lrwxrwxrwx 1 root root 7 Feb 24 19:17 mirror02 -> ../sdc1
lrwxrwxrwx 1 root root 7 Feb 24 19:17 mirror03 -> ../sdd1
lrwxrwxrwx 1 root root 7 Feb 24 19:17 mirror04 -> ../sde1
lrwxrwxrwx 1 root root 7 Feb 24 19:17 mirror05 -> ../sdf1
lrwxrwxrwx 1 root root 7 Feb 24 19:17 mirror06 -> ../sdg1
lrwxrwxrwx 1 root root 7 Feb 24 19:17 mirror07 -> ../sdh1
lrwxrwxrwx 1 root root 7 Feb 24 19:17 mirror08 -> ../sdi1
lrwxrwxrwx 1 root root 7 Feb 24 19:17 mirror09 -> ../sdj1
lrwxrwxrwx 1 root root 7 Feb 24 19:17 mirror10 -> ../sdk1
lrwxrwxrwx 1 root root 7 Feb 24 19:17 mirror11 -> ../sdl1
Настройка хранилища PCIe SSD
We have completed the following steps to configure PCIe SSD storage before configuring ASM:
Run the following command to create the SCSI names:
for i in `se- 0 7`; do scsi_id --export -d / dev / nvme {i} n1 | grep
ID_SCSI_SERIAL; done
ID_SCSI_SERIAL = S1J0NYADC00150
ID_SCSI_SERIAL = S1J0NYADC00033
ID_SCSI_SERIAL = S1J0NYADC00111
ID_SCSI_SERIAL = S1J0NYADC00146
ID_SCSI_SERIAL = S1J0NYADC00136
ID_SCSI_SERIAL = S1J0NYADC00104
ID_SCSI_SERIAL = S1J0NYADC00076
ID_SCSI_SERIAL = S1J0NYADC00048
ID_SCSI_SERIAL; done
ID_SCSI_SERIAL = S1J0NYADC00150
ID_SCSI_SERIAL = S1J0NYADC00033
ID_SCSI_SERIAL = S1J0NYADC00111
ID_SCSI_SERIAL = S1J0NYADC00146
ID_SCSI_SERIAL = S1J0NYADC00136
ID_SCSI_SERIAL = S1J0NYADC00104
ID_SCSI_SERIAL = S1J0NYADC00076
ID_SCSI_SERIAL = S1J0NYADC00048
Edit the 99-oracle-asmdevices rules file:
vim /etc/udev/rules.d/99-oracle-asmdevices.rules
KERNEL==«nvme?n?», ENV{ID_SCSI_SERIAL} ="?*", IMPORT{program}=«scsi_id — export --whitelisted -d tempnode», ENV{ID_BUS}=«scsi»
KERNEL==«nvme?n?p1», ENV{DEVTYPE}==«partition»,
ENV{ID_SCSI_SERIAL}==«S1J0NYADC00150», SYMLINK+=«oracleasm/ssd0»,
OWNER=«oracle», GROUP=«dba», MODE=«0660»
KERNEL==«nvme?n?p1», ENV{DEVTYPE}==«partition»,
ENV{ID_SCSI_SERIAL}==«S1J0NYADC00033», SYMLINK+=«oracleasm/ssd1»,
OWNER=«oracle», GROUP=«dba», MODE=«0660»
KERNEL==«nvme?n?p1», ENV{DEVTYPE}==«partition»,
ENV{ID_SCSI_SERIAL}==«S1J0NYADC00111», SYMLINK+=«oracleasm/ssd2»,
OWNER=«oracle», GROUP=«dba», MODE=«0660»
KERNEL==«nvme?n?p1», ENV{DEVTYPE}==«partition»,
ENV{ID_SCSI_SERIAL}==«S1J0NYADC00146», SYMLINK+=«oracleasm/ssd3»,
OWNER=«oracle», GROUP=«dba», MODE=«0660»
KERNEL==«nvme?n?p1», ENV{DEVTYPE}==«partition»,
ENV{ID_SCSI_SERIAL}==«S1J0NYADC00136», SYMLINK+=«oracleasm/ssd4»,
OWNER=«oracle», GROUP=«dba», MODE=«0660»
KERNEL==«nvme?n?p1», ENV{DEVTYPE}==«partition»,
ENV{ID_SCSI_SERIAL}==«S1J0NYADC00104», SYMLINK+=«oracleasm/ssd5»,
OWNER=«oracle», GROUP=«dba», MODE=«0660»
KERNEL==«nvme?n?p1», ENV{DEVTYPE}==«partition»,
ENV{ID_SCSI_SERIAL}==«S1J0NYADC00076», SYMLINK+=«oracleasm/ssd6»,
OWNER=«oracle», GROUP=«dba», MODE=«0660»
KERNEL==«nvme?n?p1», ENV{DEVTYPE}==«partition»,
ENV{ID_SCSI_SERIAL}==«S1J0NYADC00048», SYMLINK+=«oracleasm/ssd7»,
OWNER=«oracle», GROUP=«dba», MODE=“0660"
KERNEL==«nvme?n?», ENV{ID_SCSI_SERIAL} ="?*", IMPORT{program}=«scsi_id — export --whitelisted -d tempnode», ENV{ID_BUS}=«scsi»
KERNEL==«nvme?n?p1», ENV{DEVTYPE}==«partition»,
ENV{ID_SCSI_SERIAL}==«S1J0NYADC00150», SYMLINK+=«oracleasm/ssd0»,
OWNER=«oracle», GROUP=«dba», MODE=«0660»
KERNEL==«nvme?n?p1», ENV{DEVTYPE}==«partition»,
ENV{ID_SCSI_SERIAL}==«S1J0NYADC00033», SYMLINK+=«oracleasm/ssd1»,
OWNER=«oracle», GROUP=«dba», MODE=«0660»
KERNEL==«nvme?n?p1», ENV{DEVTYPE}==«partition»,
ENV{ID_SCSI_SERIAL}==«S1J0NYADC00111», SYMLINK+=«oracleasm/ssd2»,
OWNER=«oracle», GROUP=«dba», MODE=«0660»
KERNEL==«nvme?n?p1», ENV{DEVTYPE}==«partition»,
ENV{ID_SCSI_SERIAL}==«S1J0NYADC00146», SYMLINK+=«oracleasm/ssd3»,
OWNER=«oracle», GROUP=«dba», MODE=«0660»
KERNEL==«nvme?n?p1», ENV{DEVTYPE}==«partition»,
ENV{ID_SCSI_SERIAL}==«S1J0NYADC00136», SYMLINK+=«oracleasm/ssd4»,
OWNER=«oracle», GROUP=«dba», MODE=«0660»
KERNEL==«nvme?n?p1», ENV{DEVTYPE}==«partition»,
ENV{ID_SCSI_SERIAL}==«S1J0NYADC00104», SYMLINK+=«oracleasm/ssd5»,
OWNER=«oracle», GROUP=«dba», MODE=«0660»
KERNEL==«nvme?n?p1», ENV{DEVTYPE}==«partition»,
ENV{ID_SCSI_SERIAL}==«S1J0NYADC00076», SYMLINK+=«oracleasm/ssd6»,
OWNER=«oracle», GROUP=«dba», MODE=«0660»
KERNEL==«nvme?n?p1», ENV{DEVTYPE}==«partition»,
ENV{ID_SCSI_SERIAL}==«S1J0NYADC00048», SYMLINK+=«oracleasm/ssd7»,
OWNER=«oracle», GROUP=«dba», MODE=“0660"
Выполните udevadm и запустите udev:
udevadm control --reload-rules
start_udev
start_udev
Перечислите устройства ASM:
ls -l /dev/oracleasm/
lrwxrwxrwx 1 root root 12 Feb 19 16:46 ssd0 -> ../nvme0n1p1
lrwxrwxrwx 1 root root 12 Feb 19 16:46 ssd1 -> ../nvme1n1p1
lrwxrwxrwx 1 root root 12 Feb 19 16:46 ssd2 -> ../nvme2n1p1
lrwxrwxrwx 1 root root 12 Feb 19 16:46 ssd3 -> ../nvme3n1p1
lrwxrwxrwx 1 root root 12 Feb 19 16:46 ssd4 -> ../nvme4n1p1
lrwxrwxrwx 1 root root 12 Feb 19 16:46 ssd5 -> ../nvme5n1p1
lrwxrwxrwx 1 root root 12 Feb 19 16:46 ssd6 -> ../nvme6n1p1
lrwxrwxrwx 1 root root 12 Feb 19 16:46 ssd7 -> ../nvme7n1p1
lrwxrwxrwx 1 root root 12 Feb 19 16:46 ssd0 -> ../nvme0n1p1
lrwxrwxrwx 1 root root 12 Feb 19 16:46 ssd1 -> ../nvme1n1p1
lrwxrwxrwx 1 root root 12 Feb 19 16:46 ssd2 -> ../nvme2n1p1
lrwxrwxrwx 1 root root 12 Feb 19 16:46 ssd3 -> ../nvme3n1p1
lrwxrwxrwx 1 root root 12 Feb 19 16:46 ssd4 -> ../nvme4n1p1
lrwxrwxrwx 1 root root 12 Feb 19 16:46 ssd5 -> ../nvme5n1p1
lrwxrwxrwx 1 root root 12 Feb 19 16:46 ssd6 -> ../nvme6n1p1
lrwxrwxrwx 1 root root 12 Feb 19 16:46 ssd7 -> ../nvme7n1p1
Install Oracle Grid Infrastructure on a standalone 12c server "
Before performing the following steps, we downloaded the Oracle 12 Grid installation file and extracted it to the / home / grid directory.
1.
Run the GUI installation file for Oracle Database using the following commands:
ssh –Y oracle @ R920_IP_address
db_env
cd / home / grid
./runInstaller
db_env
cd / home / grid
./runInstaller
2. Run the Oracle Grid Infrastructure Installation Wizard.
3. In Software Updates, select Skip software updates and click Next.
4. In the Installation Options, select Install and Configure Oracle Grid Infrastructure for a Standalone Server and click Next.
5. In Product Languages, select English and click on the right arrow to add a language to the selected languages panel. Click Next.
6. In Create ASM Disk Group, select Change Discovery Path.
7. Enter / dev / nvme * for Disk Discovery Path and click OK (We left the default value for SAS configuration).
8. Check all disks and click Next (In the SAS configuration, we did not mark the last disk. We configured the last disk for protocols in the SAS configuration).
9. In ASM Password, select Use same passwords for these accounts. Enter and confirm the password. Click Next.
10. In the Operating System Groups, set all the groups to dba. Click Next.
11. Click Yes to confirm the notifications and continue.
12. In the Installation Location, leave the defaults and click Next.
13. In Create Inventory, leave the defaults and click Next.
14. In Root Script Execution, check the “Automatically run configuration scripts” box.
15. Select Use “root” user credential and enter the root password. Click Next.
16. In the Summary, check the information and click Install to start the installation.
17. Click Yes to confirm the privileged user is used for installation.
18. In the Finish window, click Close to exit the installer.
Install Oracle Database 12c
1.
Run the GUI installation file for Oracle Database using the following commands:
ssh –Y oracle @ R920_IP_address
db_env
cd / home / database
./runInstaller
db_env
cd / home / database
./runInstaller
2. Run the Oracle Database 12c Release 1 setup wizard.
3. In the Configure Security Updates window, clear the “check box” from I wish to receive security updates. Click Next.
4. Click Yes to confirm no email and continue.
5. In Software Updates, select Skip software updates and click Next.
6. In the Installation Options, select Install database software only and click Next.
7. In the Grid Installation Options, select Single instance database installation and click Next.
8. In Product Languages, select English and click on the right arrow to add a language to the panel of selected languages. Click Next.
9. In the Database Edition, select Enterprise Edition and click Next.
10. In Installation Location, leave the defaults and click Next.
11. In the Operating System Groups, leave the defaults and click Next.
12. In the Summary, check the information and click Install to start the installation.
13. Follow the instructions to execute the scripts. After running the scripts, click OK.
14. In the Finish window, click Close to exit the installer.
15. When the appropriate system request is received in the GUI installer, run the shell root script to complete the installation.
/home/oracle/app/oracle/product/12.1.0/dbhome_1/root.sh
Creating an Oracle Database (using DBCA)
1. Launch the Database Configuration Assistant (DBCA)
2. In Database Operations, select Create Database and click Next.
3. In Creation Mode, select Advanced Mode and click Next.
4. In the Database Template, select Template for General Purpose or Transaction Processing and click Next.
5. In Database Identification, enter orcl in the Global Database Name field.
6. Enter orcl in the SID field. Click Next.
7. In the Management Options, select Configure Enterprise Manager (EM) Database Express. Click Next.
8. In the Database Credentials, select Use the Same Administrative Password for All Accounts.
9. Enter and confirm the administrator password and click Next.
10. In Network Configuration, select the checkbox for all receivers and click Next.
11. In Storage Locations, select User Common Location for All Database Files. Type + DATA in the Database Files Location field.
12. Select the Specify Fast Recovery Area. Enter (ORACLE_BASE) / fast_recovery_area in the Fast Recovery Area field.
13. Set the Fast Recovery Area size to 400 GB and click Next.
14. In Database Options, leave the defaults and click Next.
15. In the Initialization Parameters and under the standard settings, set the memory size to 80% and click Next.
16. In Creation Options, select Create Database. Click Customize Storage Locations.
17. In the Customize Storage panel and under Redo Log Groups, select 1.
18. Set the file size to 51,200 MB. Click Apply.
19. Under Redo Log Groups, select 2.
20. Set the file size to 51,200 MB. Click Apply.
21. Under Redo Log Groups, select 3.
22. Click Remove, then click Yes.
23. To exit the Customize Storage panel, click Ok.
24. Click Next.
25. Check Summary. To finish creating the database, click Finish.
26. Check the information on the screen and click Exit.
27. To exit DBCA, click Close.
Configure Oracle Tablespaces and redo protocol
Change the table areas of both systems as shown below:
ALTER DATABASE ADD LOGFILE GROUP 11 ( '/tmp/temp1.log' ) SIZE 50M;
ALTER DATABASE ADD LOGFILE GROUP 12 ( '/tmp/temp2.log' ) SIZE 50M;
ALTER SYSTEM SWITCH LOGFILE;
ALTER SYSTEM SWITCH LOGFILE;
ALTER SYSTEM CHECKPOINT;
ALTER DATABASE DROP LOGFILE GROUP 1;
ALTER DATABASE DROP LOGFILE GROUP 2;
ALTER DATABASE DROP LOGFILE GROUP 3;
ALTER SYSTEM SWITCH LOGFILE;
ALTER SYSTEM SWITCH LOGFILE;
ALTER SYSTEM CHECKPOINT;
ALTER DATABASE DROP LOGFILE GROUP 1;
ALTER DATABASE DROP LOGFILE GROUP 2;
ALTER DATABASE DROP LOGFILE GROUP 3;
— DELETE OLD REDO LOG FILES IN ASM MANUALLY USING ASMCMD HERE — alter system set "_disk_sector_size_override"=TRUE scope=both;
— BEGIN: SSD REDO LOGS — ALTER DATABASE ADD LOGFILE GROUP 1 ( '+DATA/orcl/redo01.log' ) SIZE 50G
BLOCKSIZE 4k;
ALTER DATABASE ADD LOGFILE GROUP 2 ( '+DATA/orcl/redo02.log' ) SIZE 50G
BLOCKSIZE 4k;
— END: SSD REDO LOGS — -- BEGIN: SAS REDO LOGS — ALTER DATABASE ADD LOGFILE GROUP 1 ( '+REDO/orcl/redo01.log' ) SIZE 50G;
ALTER DATABASE ADD LOGFILE GROUP 2 ( '+REDO/orcl/redo02.log' ) SIZE 50G;
— END: SAS REDO LOGS — ALTER SYSTEM SWITCH LOGFILE;
ALTER SYSTEM SWITCH LOGFILE;
ALTER SYSTEM CHECKPOINT;
ALTER DATABASE DROP LOGFILE GROUP 11;
ALTER DATABASE DROP LOGFILE GROUP 12;
ALTER SYSTEM SWITCH LOGFILE;
ALTER SYSTEM SWITCH LOGFILE;
ALTER SYSTEM CHECKPOINT;
ALTER DATABASE DROP LOGFILE GROUP 11;
ALTER DATABASE DROP LOGFILE GROUP 12;
HOST rm -f /tmp/temp*.log
SET SERVEROUTPUT ON
DECLARE
lat INTEGER;
iops INTEGER;
mbps INTEGER;
BEGIN
— DBMS_RESOURCE_MANAGER.CALIBRATE_IO (,, iops, mbps,
lat);
DBMS_RESOURCE_MANAGER.CALIBRATE_IO (2000, 10, iops, mbps, lat);
DBMS_OUTPUT.PUT_LINE ('max_iops = ' || iops);
DBMS_OUTPUT.PUT_LINE ('latency = ' || lat);
dbms_output.put_line('max_mbps = ' || mbps);
end;
/
CREATE BIGFILE TABLESPACE «TPCC»
DATAFILE '+DATA/orcl/tpcc.dbf' SIZE 400G AUTOEXTEND ON NEXT 1G
BLOCKSIZE 8K
EXTENT MANAGEMENT LOCAL AUTOALLOCATE
SEGMENT SPACE MANAGEMENT AUTO;
CREATE BIGFILE TABLESPACE «TPCC_OL»
DATAFILE '+DATA/orcl/tpcc_ol.dbf' SIZE 150G AUTOEXTEND ON NEXT 1G
BLOCKSIZE 16K
EXTENT MANAGEMENT LOCAL AUTOALLOCATE
SEGMENT SPACE MANAGEMENT AUTO;
ALTER DATABASE DATAFILE '+DATA/tpcc1/undotbs01.dbf' RESIZE 32760M;
ALTER DATABASE ADD LOGFILE GROUP 12 ( '/tmp/temp2.log' ) SIZE 50M;
ALTER SYSTEM SWITCH LOGFILE;
ALTER SYSTEM SWITCH LOGFILE;
ALTER SYSTEM CHECKPOINT;
ALTER DATABASE DROP LOGFILE GROUP 1;
ALTER DATABASE DROP LOGFILE GROUP 2;
ALTER DATABASE DROP LOGFILE GROUP 3;
ALTER SYSTEM SWITCH LOGFILE;
ALTER SYSTEM SWITCH LOGFILE;
ALTER SYSTEM CHECKPOINT;
ALTER DATABASE DROP LOGFILE GROUP 1;
ALTER DATABASE DROP LOGFILE GROUP 2;
ALTER DATABASE DROP LOGFILE GROUP 3;
— DELETE OLD REDO LOG FILES IN ASM MANUALLY USING ASMCMD HERE — alter system set "_disk_sector_size_override"=TRUE scope=both;
— BEGIN: SSD REDO LOGS — ALTER DATABASE ADD LOGFILE GROUP 1 ( '+DATA/orcl/redo01.log' ) SIZE 50G
BLOCKSIZE 4k;
ALTER DATABASE ADD LOGFILE GROUP 2 ( '+DATA/orcl/redo02.log' ) SIZE 50G
BLOCKSIZE 4k;
— END: SSD REDO LOGS — -- BEGIN: SAS REDO LOGS — ALTER DATABASE ADD LOGFILE GROUP 1 ( '+REDO/orcl/redo01.log' ) SIZE 50G;
ALTER DATABASE ADD LOGFILE GROUP 2 ( '+REDO/orcl/redo02.log' ) SIZE 50G;
— END: SAS REDO LOGS — ALTER SYSTEM SWITCH LOGFILE;
ALTER SYSTEM SWITCH LOGFILE;
ALTER SYSTEM CHECKPOINT;
ALTER DATABASE DROP LOGFILE GROUP 11;
ALTER DATABASE DROP LOGFILE GROUP 12;
ALTER SYSTEM SWITCH LOGFILE;
ALTER SYSTEM SWITCH LOGFILE;
ALTER SYSTEM CHECKPOINT;
ALTER DATABASE DROP LOGFILE GROUP 11;
ALTER DATABASE DROP LOGFILE GROUP 12;
HOST rm -f /tmp/temp*.log
SET SERVEROUTPUT ON
DECLARE
lat INTEGER;
iops INTEGER;
mbps INTEGER;
BEGIN
— DBMS_RESOURCE_MANAGER.CALIBRATE_IO (,
lat);
DBMS_RESOURCE_MANAGER.CALIBRATE_IO (2000, 10, iops, mbps, lat);
DBMS_OUTPUT.PUT_LINE ('max_iops = ' || iops);
DBMS_OUTPUT.PUT_LINE ('latency = ' || lat);
dbms_output.put_line('max_mbps = ' || mbps);
end;
/
CREATE BIGFILE TABLESPACE «TPCC»
DATAFILE '+DATA/orcl/tpcc.dbf' SIZE 400G AUTOEXTEND ON NEXT 1G
BLOCKSIZE 8K
EXTENT MANAGEMENT LOCAL AUTOALLOCATE
SEGMENT SPACE MANAGEMENT AUTO;
CREATE BIGFILE TABLESPACE «TPCC_OL»
DATAFILE '+DATA/orcl/tpcc_ol.dbf' SIZE 150G AUTOEXTEND ON NEXT 1G
BLOCKSIZE 16K
EXTENT MANAGEMENT LOCAL AUTOALLOCATE
SEGMENT SPACE MANAGEMENT AUTO;
ALTER DATABASE DATAFILE '+DATA/tpcc1/undotbs01.dbf' RESIZE 32760M;
Настройка Oracle pfile
Измените Oracle pfile обеих систем, как показано ниже. Мы изменили fast_start_mttr_target в трех конфигурациях, изменив на 60, 120 и 180.
orcl.__oracle_base='/home/oracle/app/oracle'#ORACLE_BASE set from
environment
_disk_sector_size_override=TRUE
_enable_NUMA_support=TRUE
_kgl_hot_object_copies=4
_shared_io_pool_size=512m
aq_tm_processes=0
audit_file_dest='/home/oracle/app/oracle/admin/orcl/adump'
audit_trail='NONE'
compatible='12.1.0.0.0'
control_files='+DATA/orcl/control01.ctl','+DATA/orcl/control02.ctl'
db_16k_cache_size=32g
db_block_size=8192
db_cache_size=128g
db_create_file_dest='+DATA'
db_domain=''
db_name='orcl'
db_recovery_file_dest_size=500g
db_recovery_file_dest='/home/oracle/app/oracle/fast_recovery_area'
db_writer_processes=4
diagnostic_dest='/home/oracle/app/oracle'
disk_asynch_io=TRUE
dispatchers='(PROTOCOL=TCP) (SERVICE=orclXDB)'
dml_locks=500
fast_start_mttr_target=60
java_pool_size=4g
job_queue_processes=0
large_pool_size=4g
local_listener='LISTENER_ORCL'
lock_sga=TRUE
log_buffer=402653184
log_checkpoint_interval=0
log_checkpoint_timeout=0
log_checkpoints_to_alert=TRUE
open_cursors=2000
parallel_max_servers=0
parallel_min_servers=0
pga_aggregate_target=5g
plsql_code_type='NATIVE'
plsql_optimize_level=3
processes=1000
recovery_parallelism=30
remote_login_passwordfile='EXCLUSIVE'
replication_dependency_tracking=FALSE
result_cache_max_size=0
sessions=1500
shared_pool_size=9g
statistics_level='BASIC'
timed_statistics=FALSE
trace_enabled=FALSE
transactions=2000
transactions_per_rollback_segment=1
undo_management='AUTO'
undo_retention=1
undo_tablespace='UNDOTBS1'
use_large_pages='ONLY'
+DATA/orcl/spfileorcl.ora
environment
_disk_sector_size_override=TRUE
_enable_NUMA_support=TRUE
_kgl_hot_object_copies=4
_shared_io_pool_size=512m
aq_tm_processes=0
audit_file_dest='/home/oracle/app/oracle/admin/orcl/adump'
audit_trail='NONE'
compatible='12.1.0.0.0'
control_files='+DATA/orcl/control01.ctl','+DATA/orcl/control02.ctl'
db_16k_cache_size=32g
db_block_size=8192
db_cache_size=128g
db_create_file_dest='+DATA'
db_domain=''
db_name='orcl'
db_recovery_file_dest_size=500g
db_recovery_file_dest='/home/oracle/app/oracle/fast_recovery_area'
db_writer_processes=4
diagnostic_dest='/home/oracle/app/oracle'
disk_asynch_io=TRUE
dispatchers='(PROTOCOL=TCP) (SERVICE=orclXDB)'
dml_locks=500
fast_start_mttr_target=60
java_pool_size=4g
job_queue_processes=0
large_pool_size=4g
local_listener='LISTENER_ORCL'
lock_sga=TRUE
log_buffer=402653184
log_checkpoint_interval=0
log_checkpoint_timeout=0
log_checkpoints_to_alert=TRUE
open_cursors=2000
parallel_max_servers=0
parallel_min_servers=0
pga_aggregate_target=5g
plsql_code_type='NATIVE'
plsql_optimize_level=3
processes=1000
recovery_parallelism=30
remote_login_passwordfile='EXCLUSIVE'
replication_dependency_tracking=FALSE
result_cache_max_size=0
sessions=1500
shared_pool_size=9g
statistics_level='BASIC'
timed_statistics=FALSE
trace_enabled=FALSE
transactions=2000
transactions_per_rollback_segment=1
undo_management='AUTO'
undo_retention=1
undo_tablespace='UNDOTBS1'
use_large_pages='ONLY'
+DATA/orcl/spfileorcl.ora
Настройка клиента HammerDB
We used a dual-processor server with Red Hat Enterprise Linux 6.5 for the HammerDB client. We followed the installation procedures at the beginning of this application to install Red Hat Enterprise Linux, but installed the GUI. Then we installed the HammerDB client software.
Install HammerDB
Download and install version 2.16 on the Red Hat client. We downloaded HammerDB from hammerora.sourceforge.net/download.html. We installed HammerDB in accordance with the installation instructions (hammerora.sourceforge.net/hammerdb_install_guide.pdf).
Installing HammerDB Oracle Libraries
Follow these steps on both systems.
1. Launch Oracle Client Installer.
2. In the Select Installation Type, select Administrator (1.8 GB) as the installation type and click Next.
3. In Software Updates, select Skip software updates and click Next.
4. In Product Languages, select English and click on the arrow pointing to the right to add a language to the panel of selected languages. Click Next.
5. In Specify Installation Location, leave the defaults and click Next.
6. In Create Inventory, leave the defaults and click Next.
7. In the Summary, check the information and click Install to start the installation.
8. In the Install Product, follow the instructions for running the scripts. Click OK after running the scripts.
9. In the Finish window, click Close to exit the installer.
Database setup
We used the built-in options for Oracle in HammerDB to create the database. In the configuration diagram, we set the following:
Oracle Service Name = R920_IP_addres / orcl
System user = system
System User Password = Password1
TPC-C User = tpcc
TPC-C User Password = tpcc
TPC-C Default Tablespace = tpcc
Order Line Tablespace = tpcc_ol
TPC-C Temporary Tablespace = temp
TimesTen Database Commatible = unchecked
Partition Order Line Table = checked
Number of Warehouses = 5000
Virtual Users to Build Schema = 60
Use PL / SL Server Side Load = unchecked
Server Side Log Directory = / tmp
System user = system
System User Password = Password1
TPC-C User = tpcc
TPC-C User Password = tpcc
TPC-C Default Tablespace = tpcc
Order Line Tablespace = tpcc_ol
TPC-C Temporary Tablespace = temp
TimesTen Database Commatible = unchecked
Partition Order Line Table = checked
Number of Warehouses = 5000
Virtual Users to Build Schema = 60
Use PL / SL Server Side Load = unchecked
Server Side Log Directory = / tmp
Launch HammerDB
We launched HammerDB by filling in the relevant information in the disk options. We tested for 5 minutes of gradual increase in load and 5 minutes of testing. We used 101 virtual users with a user delay of 500 milliseconds and repeated delays. We used rman to restore the database between trials.