Interesting and informative: flight to the ISS at PTK NP
- Tutorial
We continue the cycle of posts about Orbiter. What pleased me very much, according to statistics from orbithangar.com, after the publication of the second article, materials were downloaded both to it and to the first article. And today, we, gradually increasing the complexity of the tasks, will go to the ISS on a promising new generation transport ship (aka PTS and PTK NP).
This post has the following tasks:
- Talk about the Angara launch vehicle and the Vostochny spaceport.
- To give an idea of the physics of maneuvers for docking.
- Provide a simple guide for a virtual flight to the ISS and docking with it.
A warning
This Orbiter post series starts with the idea of incrementally increasing complexity. Before proceeding with this instruction, I recommend that you familiarize yourself with previous posts: the history of astronautics , Breeze-M .
Introduction
We will talk about the PTK NP ship in the next post, in which we will learn to return from the ISS. And here we’ll talk about the Angara rocket and the Vostochny spaceport, because it is from the Vostochny and the Angara that we will start.
A bit of history and theory
Docking is a rather complicated maneuver, the first dockings occurred five years after the first manned space flight and nine years after the start of the space age: the first docking in manual mode was made by the Americans on March 16, 1966 (Gemini-8 is the target of Agen) , the first fully automatic docking was conducted by the USSR on October 30, 1967 (two unmanned “Soyuz”).
Why is it so hard? From the point of view of ballistics, a brief description of the docking process seems simple: you need to get to a point close to the target, reset the mutual speed, then come up and dock. However, implementing this is a tricky thing. The earth rotates, so you need to start in a very short period (often less than a second). The booster should launch the ship very accurately into orbit with the given parameters. The docking ships must have a delta-V reserve for maneuvers and docking, and there must also be a developed mathematical apparatus for calculations and equipment for measuring motion parameters.
It was the docking that made flying to the moon available without monstrous shipsdirect landing - a fairly light lunar module was separated from the command in orbit of the moon, sat down, took off and docked again.
Two interesting stories are worth noting:
In 1962, the USSR, using highly qualified ballistics and high accuracy of the launch vehicle, launched Vostok-3 and Vostok-4 into very close orbits. The maximum rapprochement between the ships was only 6.5 km. There were no orbital maneuvering engines on the Vostoks, they could not dock, but such precision of withdrawal made a splash at that time.
In 1966, during the flight of the Gemini 12, the radar, which was used to measure distance and relative speed, refused. But the crew was Buzz Aldrin, who was extremely interested in issues of orbital maneuvering and shortly before that he defended his thesis on the topic of manual rapprochement. Using just a sextant, Aldrin successfully docked.
LV "Angara"
Angara has a rather complicated story. The first project was created in the early 90s, when Baikonur found itself in an independent state, and the prospects for launching missiles from it were unclear. The cooperation of factories was also disrupted. In the absence of money, a very unusual scheme was chosen that would allow the use of an almost ready start in Plesetsk:
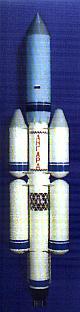
However, after some time, the severity of the problems was somewhat smoothed out. We managed to come to an agreement with Kazakhstan more or less, missiles, even toxic Protons, could be launched. But there was no money to create a new rocket. Therefore, design in the 1997 area began virtually anew. On the one hand, the lack of rush made it possible to think about how to make a good rocket. On the other hand, the lack of money meant that for many years the rocket would not leave the level of drawings, pictures and layouts. The rocket concept has shifted towards the so-called universal missile modules (URM), from which you can make a light, medium, or heavy rocket.
Until the mid-zero years there was no money for full-fledged development, and work was carried out at the initiative of the developer (GKNPTs named after Khrunichev), of course, very slowly and again without going beyond the framework of sketches and layouts. Things were gradually getting better in the economy, the state became stronger, solved primary problems, and money began to appear for the space program. Full-fledged work on the rocket began somewhere in the second half of the zero years.
The development was also helped by a contract with South Korea, for which the first stage of the KSLV-1 rocket was made, which is actually the URM of the future Angara. The tests at the Koreans were successful, in all three launches the first stage worked fine. In the first launch in 2009, an accident occurred due to incomplete separation of the fairing of the head part of Korean production. In the second launch, the Korean missile undermined a missile system during an accident that blew up a “healthy” missile. The third launch in December 2012 was completely successful. I watched that launch live, I remember I was very scared - the rocket was very active in maneuvering, moving away from the launch, it seemed that it had lost stability.
Creepy third launch video
Currently, work is being actively carried out - workshops have been built, a start has been built in Plesetsk, tests are underway. The first launch of the light Angara will almost certainly be this year. If everything goes smoothly, then perhaps a heavy rocket will fly for the first time this year. On the state of affairs, you can watch TV programs of Roscosmos and the Zvezda channel:
And the latest news with photos from the site "Made with us."
The need for a "hangar"
A new rocket is needed for the following reasons:
- It is strategically necessary to be able to launch payloads from your territory.
- Proton uses toxic fuel components, which is inconvenient and expensive, including Kazakhstan has to pay for decontamination of fall fields.
- A new rocket can implement new technologies at a level that is not available for the modernization of old missiles, and will allow launching cargo into space cheaper, more reliable and, in general, more efficient. For example, for a new rocket it is easier to make a hydrogen upper stage than to try to put such a stage on the Proton.
- A new missile may become more powerful than the Proton (A7 variants), which will make available qualitatively new types of payloads.
Cosmodrome "East"
The history of the Vostochny spaceport is somewhat reminiscent of the history of the Angara rocket. In exactly the same way, in the early nineties, the need for a cosmodrome arises, on the basis of the positional area of ICBMs the Svobodny cosmodrome is created, which makes five launches from 1996 to 2006, and in 2007 it practically ceases to exist. But already in 2009, the Vostochny spaceport began to be built in the same area. Positive experience in the implementation of large projects (a bridge to Russky Island, the Olympics) suggests that the spaceport will be successfully built, especially since this is now a priority for the development of the country:
The need for "East"
- The strategic need to have a spaceport on its territory. Plesetsk, due to its very northern location, is mainly suitable for launches into polar orbit.
- The fall fields will be located, firstly, on their own, and secondly, non-populated territory, which should increase the efficiency of launch vehicles limited to existing fall fields.
- A secondary goal is the development of the economy of the Far East.
Flight preparation
In order to go on this flight, we need:
- Orbiter itself , if you still haven’t downloaded it.
- Addon RN "Angara" .
- Addons Spacecraft3 and Multistage2 from here .
- Addon "PTK NP" .
- New DLL for Orbiter 2010.
Flight plan
The flight to the ISS can be divided into the following stages:
- Launch and launch.
- Combination of the planes of the orbits.
- Rise of the apocenter to the intersection with the ISS orbit.
- Orbit synchronization
- Rapprochement and docking.
Stage 1. Launch and launch
This phase lasts from preparation for launch to entering the reference orbit.
Scenario PTK NP - 1. Launch to ISS

Welcome to the Vostochny Cosmodrome! In the scenario, the Angara-3P with three URMs is used to launch the PTK NP on the ISS, but this is most likely outdated information, the PTK has become heavier and already requires the Angara-5P with five URMs. After loading the script, you must press the P button to start, at 20:00:00 (20 seconds of simulation). If you press the button sooner or later, it will increase the difference in inclination of the orbits due to the rotation of the Earth.

Further withdrawal occurs automatically. I do not recommend increasing the speed of the simulator, because the derivation algorithm has no feedback, and with increasing speed of the simulator its accuracy decreases.
Pay attention to how the thrust of the central unit changes. This is also the assumption of the simulator, in reality, it is planned to transfer fuel from the side blocks to the central one using excess pressure.
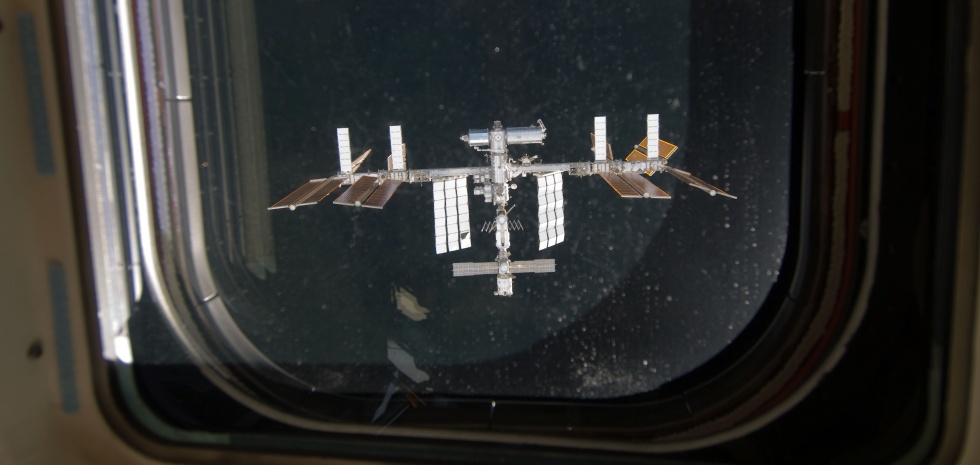
After the launch, we find ourselves in orbit about 250x400 km with an inclination of 51.6 degrees. After separation, you can press G to open the antennas and solar panels, for beauty, this will not affect the flight.

Stage 2. Combining orbits
Если вы стартовали вовремя, угол между орбитами будет близким к 0, но в этом тьюториале я намеренно допустил небольшую ошибку для наглядности маневра по совмещению орбит. Переключим левый МФД в режим совмещения орбит: Левый Shift+F1, Левый Shilt+A. Выберем МКС в качестве цели: Левый Shift+T, в появившемся окне Spacecraft -> ISS. В нашем случае угол между орбитами составляет полградуса:

Из схемы становится понятным алгоритм действий:
- Маневр по совмещению плоскостей орбит надо проводить в районе линии узлов.
- В восходящем узле надо давать импульс «вниз» (Nml-) от плоскости орбиты.
- В нисходящем узле надо давать импульс «вверх» (Nml+) от плоскости орбиты.
- If, during the maneuver, the line of knots has moved strongly to the side, the maneuver must be continued when we again find ourselves at the line of nodes.
- You can use auto-positioning - Nml + - key w , Nml- - e .
- The MFD has a hint about what to do, but if you know the physics of the process, it’s more likely to interfere, and it could be wrong.
Also, PTK NP differs from Breeze-M in a more developed propulsion system. Firstly, there is no need to precipitate fuel - the engine starts to work instantly at the touch of a button. Secondly, in addition to the acceleration mode with the marching engine ( Num + ), there is a braking mode with shunting engines ( Num - ). And thirdly, in addition to turning with standard keys, there is a mode of displacement along the axes (translational controls), it will be described below.
Beginning of maneuver:

There remain seven hundredths of a degree, the maneuver must be repeated in the next node.

The finale of the second maneuver, the planes of the orbits practically coincide.

Stage 3. Raising the apocenter to the intersection with the ISS orbit
For this we need a new MFD - Transfer MFD. Turn it on in the left panel ( Left Shift - F1 , Left Shift - X ). Select the ISS target - Left Shift + T , in the appeared Spacecraft -> ISS window . It should turn out something like:

Turn on the HTO mode (HTO button on the MFD). A dashed radius appears, indicating the start point of the maneuver. Move it using the Left Shift - < and Left Shift -> keys to the pericenter area (indicated by a filled dot on the right MFD). Since we are in orbit “inside” the orbit of the ISS, we need to accelerate. Change the hypothetical delta-V with the keys Left Shift - '' - '' and Left Shift - '' + ''to the intersection with the ISS orbit (two new radii will appear). These radii show the position of the intersection point (gray) and the target when the ship is at the intersection point.

We are behind the ISS, however, since our orbit is lower, we are catching it. Therefore, you need to wait until the estimated position of the ISS is near the intersection point of the orbits, something like this:

We are waiting for the maneuver point and give an impulse. Delta-V is positive, so you need to accelerate. Do not forget that it takes time to navigate for maneuver, take a position on the vector of orbital speed in advance - 200-300 seconds before the point of maneuver, press [for automatic orientation of the ship. Note that the line Dv on the MFD shows the approximate maneuver time in seconds, and the line above - DTe - the time remaining to the point of maneuver. Simply put, start overclocking when DTe is equal to Dv or half of it. If you did everything right, then the result of the maneuver will be approximately the following:

Stage 4. Orbit synchronization
Задачей этого этапа будет оказаться в одной точке космоса в одно время с МКС. Для этого мы произведем грубую синхронизацию с помощью Transfer MFD и тонкую синхронизацию с помощью Sync Orbit MFD.
Поскольку мы, согласно показаниям МФД, на следующем витке окажемся впереди МКС, нам надо поднять перицентр, чтобы увеличить период нашей орбиты. Запланируем маневр в Transfer MFD — переместим маркер маневра в район пересечения орбит и установим delta-V такую, чтобы маркеры МКС и пересечения были максимально близко друг к другу. Также, заранее, переведем правый МФД в режим Sync Orbit — правый Shift — F1, правый Shift — Y. Выглядеть это будет так:

По достижении точки запланированного маневра поднимаем перицентр маршевым двигателем. Должно получиться что-то вроде

Now we switch to the mode of movement by shunting engines. To do this, either click on the LIN button from left to top, or press Num / . The difference between the modes is clear:

In this mode, we begin to maneuver, focusing on the value of the DTmin line on the right MFD. Our goal is to make it as close to zero as possible. The correct result looks like this:

Stage 5. Rapprochement and docking
Prepare for the dock. Switch left MFD in docking mode - Left Shift - F1 , Left Shift - D . We select the first docking node of the ISS - Left Shift - T , in the window that appears - ISS -> dock 1 . Display the docking parameters on the HUD - click on the HUD button on the MFD. It should look something like: the

ISS accidentally right in front of us, at a distance of 700 km. In less than a turn it will catch up with us “behind”, and it will be necessary to maneuver so that it does not crash into us. A few hundred seconds before the meeting, we need to focus on braking (relative to the ISS, from the point of view of orbital mechanics this is acceleration) - switching to rotation mode, we find the marker -V [ISS]. In this case, we will maneuver most effectively - with the most powerful, marching engines.

PTK NP has quite powerful engines, it can be braked at a distance of 3-5 km from the ISS. The distance to the ISS and the direction to it are displayed by the marker D [ISS], the relative speed - by the markers V [ISS] and -V [ISS]. Having extinguished speed, we turn around with our nose on the ISS and begin the approach. our task is to place the marker of our motion on the ISS and hold it there, working with shunting engines in shift mode. Maneuver carefully, do not allow large values of speed, then you will have to extinguish it. Illustration of the approach process:

Pay attention to the line of markers that are designed to facilitate the approach process. At a distance of less than one kilometer, move the direction marker on the “corridor” of the dock:

Our task is to brake inside this corridor and take the correct position for docking. It will look like this:

Consider in more detail MFD docking:
A triangle on the outer circle is the position of the device. When it is on top, it glows white and means that our top coincides with the top of the ISS docking station.
The oblique cross is an indicator of orientation, i.e. how much we are turned regarding the correct docking position.
The straight cross is the docking axis, i.e. how much we are offset relative to the correct docking axis.
If you do everything correctly, then the oblique and straight crosses will be on the MFD axis, and the triangle will be white and on top, as shown in the figure above. After orienting the ship, we begin to approach each other, holding the motion marker on the ISS and tracking the MFD indicators.
Some music just for docking
"Crosses assembled" is a slang designation of the correct orientation for docking .
"Crosses assembled" is a slang designation of the correct orientation for docking .
Getting closer. Finally out of the shadows.

Left just a little bit.

There is a dock!

Epilogue
I recommend saving the state of the simulator - exit by pressing Ctrl-Q and click the Save Current button . In the window that appears, specify the name and description of the file.
If docking seemed simple to you, you can turn on orbit distortions ( Parameters -> Perturbations ), and also train in fuel economy.
Russian-language manual for in-depth study.