December 10, 2013 at 06:58
TeamCity setup for beginners
- Tutorial
This article is primarily useful to those who use the same technology stack as our team, namely: ASP.NET, C #, NUnit, Selenium 2, git, MSBuild. Such tasks as integration with git, assembly of C # projects, NUnit tests (both unit and UI tests), as well as deployment to the server will be considered. However, for sure there will be interesting for other users, except perhaps eating a dog on this issue. But they will again be able to pay attention to errors in the article or advise something: for example, how to optimize the deployment phase.
What is “continuous integration”, perfectly described here and here , it is hardly necessary to repeat this topic for the hundredth time.
Well, for starters - what can TeamCity do (hereinafter simply TC)? Or maybe it is the following: when changes occur in the specified repository branch (or other event), execute a script that includes, for example, building the application, running tests, executing other scripts, uploading files to a remote server, etc.
The important point is that the “integration server” and “the machine on which this process will take place” are usually (not necessarily) different servers. Moreover, there can be several, even many, machines on which assemblies and tests are launched, and all on different OSs - in general, there is where to deploy.
To start the build process, an agent program is used that accepts commands from the TC server, you can run it on any of the main OS (the glory of Java multi-platform). You can install several agents on one computer and run them in parallel, but it is important to remember that one agent can only process one project at a time. When a task starts, TC selects the first suitable unoccupied agent, and you can set “filters”, for example, select an agent only with Windows or only with .NET version installed at least 4.0, etc.
Now you need to come up with a work scenario. We use the following branches in our work:
In general, almost standard git-flow, which can be read in more detail, for example, here .
In this regard, our script will look like this:
For the release branch, we do the same thing, but while filling in new data, we pause the server and show the stub.
Now go ahead - implement the script!
It all starts with the simple creation of a project.

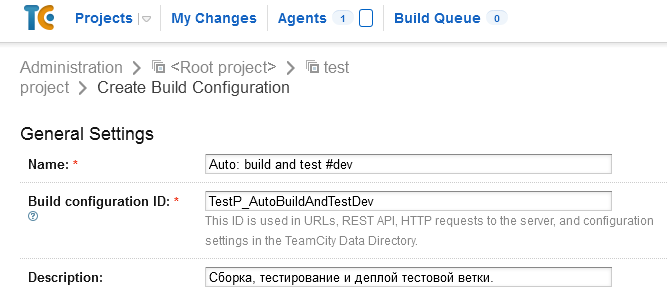
After - creating a “ build configuration ”. The configuration defines the build script.
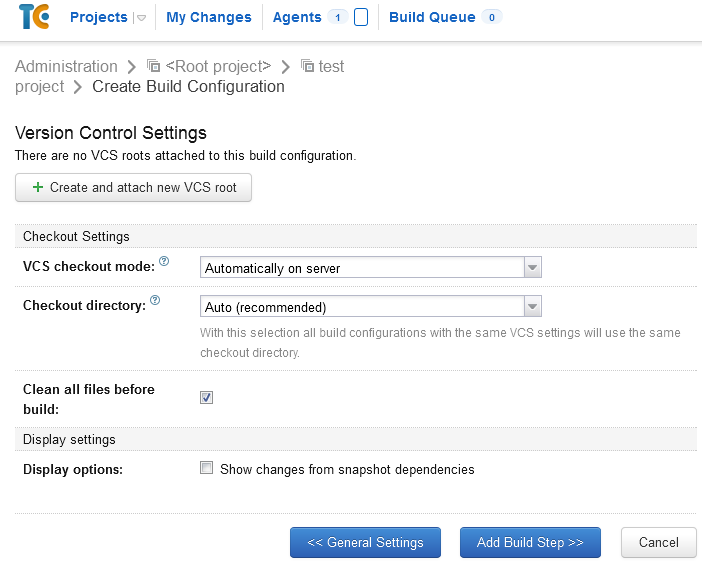
At the second step of creating the configuration, we will be asked about the used VCS, so we answer honestly that we have git here. You may have another VCS - don't get lost. Adding a new repository is done with the Create and attach new VCS root button .
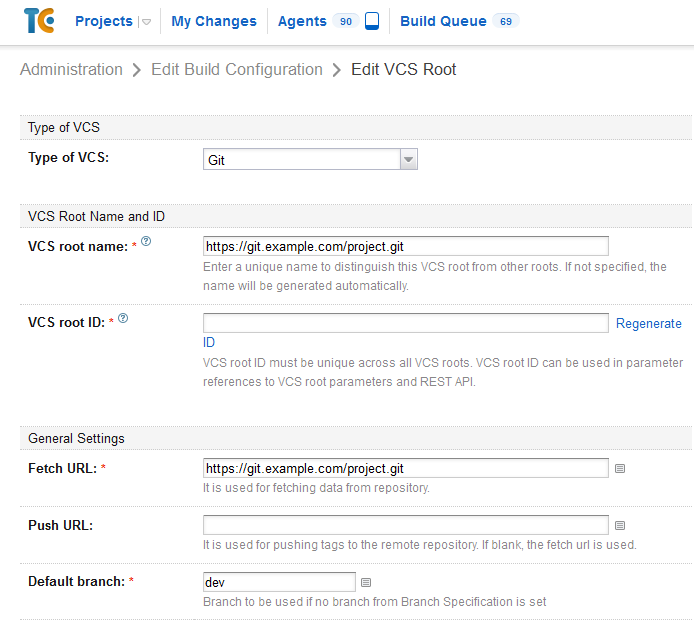
So, the key settings:
The remaining variety of options is to your taste and color.
Next, you need to configure the job to run automatically. We go to the Build Triggers (build conditions) and select the VCS Trigger condition - with the default settings, he will check once a minute for new commits in the repository, and if there are any, he will start the task for execution.

Since we had an ASP.NET project in the form of a Solution from Visual Studio, everything was simple here too.
We go to the Build Steps menu , select the runner type (and there are really a lot of them) and stop at MSBuild . Why exactly on it? It provides a fairly simple way to describe the build process, even quite complex by adding or removing various steps in a simple XML file.
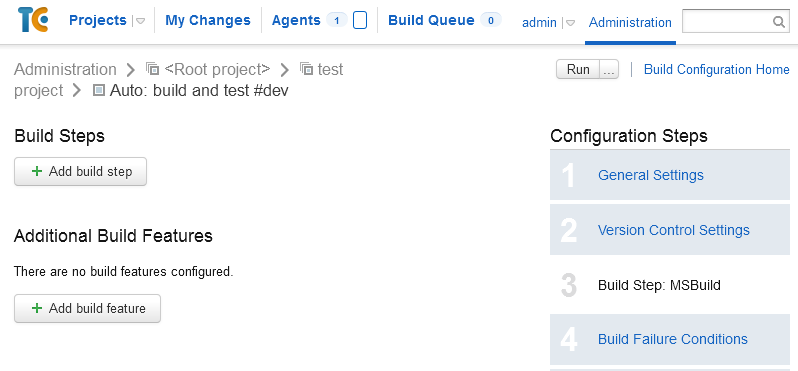
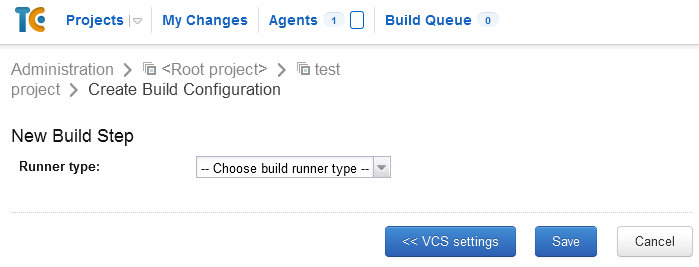
Further, everything is elementary.

Build file path - path to the sln file. We select
MSBuild version , MSBuild ToolsVersion and Run platform for the requirements of your project.
If the project has several configurations, then you can use the optionCommand line parameters to enter something like this key:
where Production is replaced with the desired config.
An important point if you use NuGet packages; if not, you can go directly to the next item.
Since NuGet packages weigh a lot, and you don’t want to store library binaries in the repository, you can use the wonderful NuGet Package Restore option :
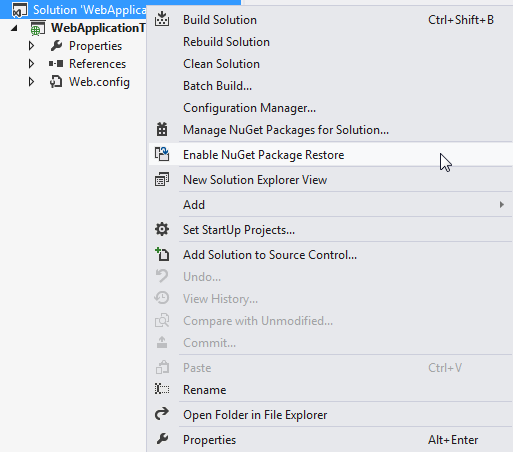
In this situation, library binaries are not included in the repository, but are downloaded as needed during the build process.
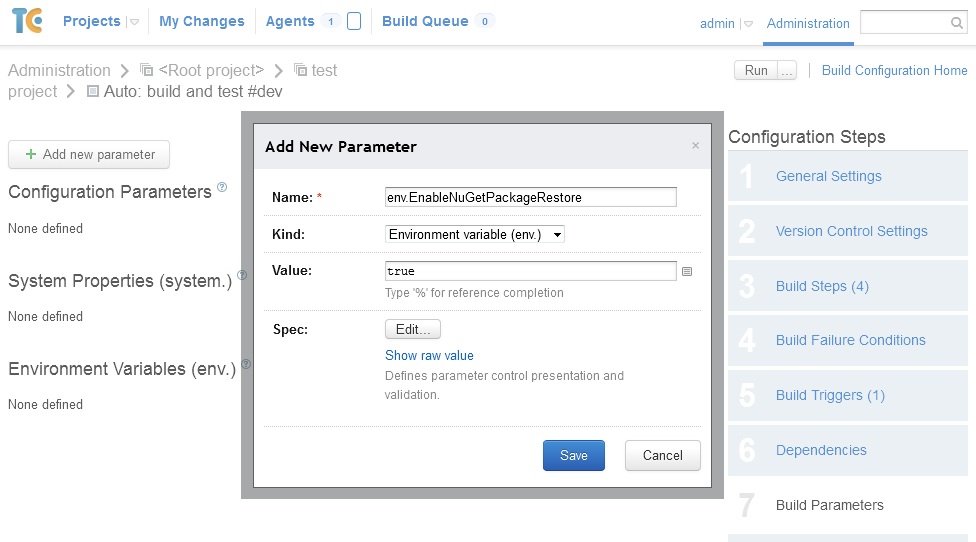
But MSBuild is a real gentleman and will not do unnecessary gestures without permission, so it won’t be able to download packages just like that - he needs to allow this process. To do this, you either have to set the Enable NuGet Package Restore environment variable to true on the clientOr go to the Build Parameters menu and set it there.
Our unit tests are a separate project within the solution. So in the previous step they are already compiled - it remains to run them.
Add a new step, only now Runner is NUnit . Pay attention to the Execute step parameter : it indicates the conditions under which the step should be performed, and has 4 values:
The most important thing here is to indicate the correct path to the assembly with tests inside the project in the Run tests from column. Here, for example, it looks like this:
% teamcity.build.checkoutDir% is a variable that points to the folder where data from the repository is downloaded. In principle, it is not required to indicate, as by default, the path goes exactly with this directory, so the path could be shortened to:
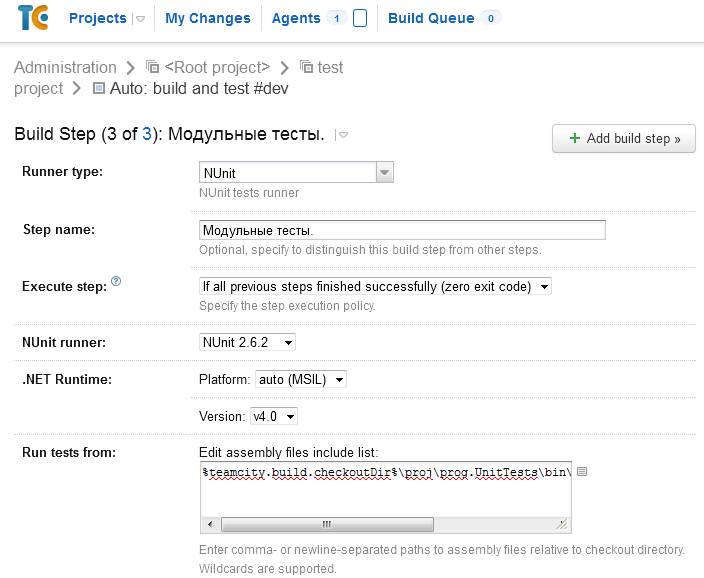
I’ll separately note the Run recently failed test first option - if in the previous run some tests fell, then in the next run they will be the first to be launched, and you will quickly find out about the success of the latest changes.

Everything here is much more interesting than with unit tests. Cap here suggests that in order to test a project in a browser, it, i.e. project needs to be launched. But here we cheated, starting the web server directly from the Selenium test code:
And the launch itself looks exactly the same as at the step with unit tests.

The server on which the TC agent is located and the server on which IIS is installed are different servers, moreover, they are located on different networks. Therefore, the files must somehow be delivered to the destination server. And here the solution is chosen, maybe not very elegant, but extremely simple. We use upload via FTP, and MSBuild does this for us .
The scheme is as follows:
And so - the task of calling it:
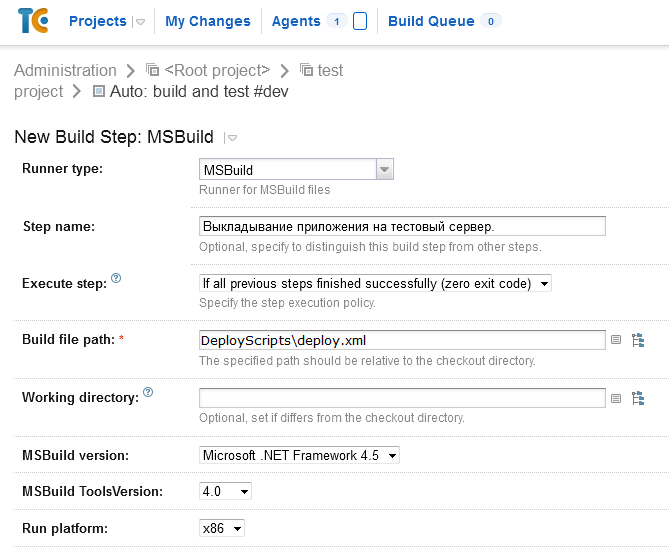
The lack of a solution - ALL files are uploaded, not just new ones that have changed. On a project with a bunch of layout files or a lot of modules, this can be a problem due to the time taken to fill the time.
Another drawback noticed - when a file encounters non-Latin characters in the name, it falls with an error. Latin and letters / numbers are processed normally. The legs of this problem seem to grow out of the specifics of the FTP protocol: it is based on ASCII, but it does not describe how to encode non-ASCII characters, suggesting "do as your server understands." Accordingly, in order to cure the problem without changing the scheme, you need to patch MSBuild Community Tasks, since the sources are open . Well, or use an alternative way to upload files, for example through WinSCP.
We solve it in a slightly wild, but cute way. IIS has a peculiarity: if you put a file with the name app_offline.html in the root of the site , the site is cut off, when accessing all files, the contents of this file will be displayed .
Minus - the appeal is exactly that TO ALL files, including static ones. So, if you want to make a stub with design, CSS and images, use inline styles and data: url, well, or as an option - put them on a separate server.
We turn on / off the server through the WinSCP script and such files here:
That is, initially the file lies in the root and is called _app_offline.html . When you need to block access during the update, we rename it to app_offline.html . When uploading files, the new _app_offline.html file is uploaded , and after the end, the app_offline.html file is deleted . And we get exactly what was originally.
In the text of the stub page, I highly recommend using the refresh meta tag , which will periodically refresh the page. If the update process is completed by this time, the user will return to the service, which will certainly be incredibly happy.
Calling the script to enable the stub (disabling the stub is similar):
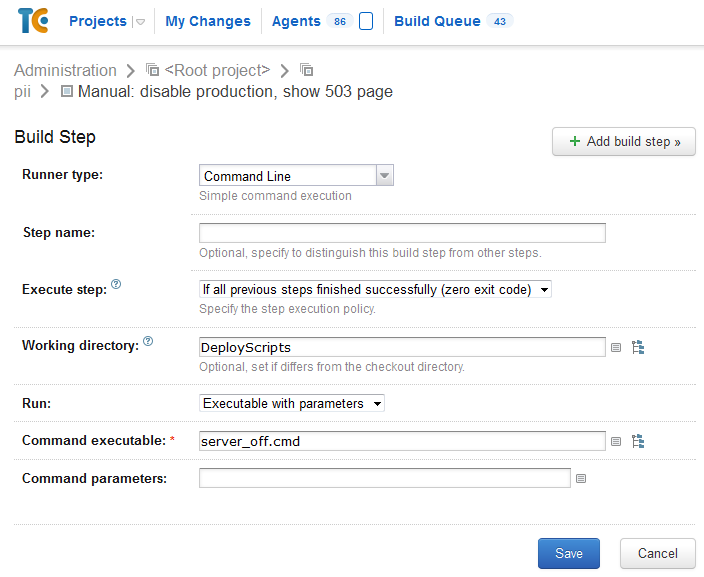
Yes, WinCSPlies as a result right in the repository. Yes, passwords in clear text are in the file. Yes, not the most elegant solution, but since only the developers from our team have access to the repository and to the virtual machine with the agent, why not? Yes, it would be possible to store a file with passwords, for example, directly on the agent, but fundamentally this would not increase security, but the deployment of a new agent, for example, would slow down.
We have been using these settings for about six months, and so far there has not been a single problem - everything works like a clock, which is good news.
That's all. I am pleased to hear comments and advice on improving these steps, as well as your stories about what TC features you use at home.
Update of November 3, 2014.
Choosing the Runner Type “Command line” does not require any way to escape the spaces - Team City will take care of this on its own.
What is “continuous integration”, perfectly described here and here , it is hardly necessary to repeat this topic for the hundredth time.
Well, for starters - what can TeamCity do (hereinafter simply TC)? Or maybe it is the following: when changes occur in the specified repository branch (or other event), execute a script that includes, for example, building the application, running tests, executing other scripts, uploading files to a remote server, etc.
The important point is that the “integration server” and “the machine on which this process will take place” are usually (not necessarily) different servers. Moreover, there can be several, even many, machines on which assemblies and tests are launched, and all on different OSs - in general, there is where to deploy.
To start the build process, an agent program is used that accepts commands from the TC server, you can run it on any of the main OS (the glory of Java multi-platform). You can install several agents on one computer and run them in parallel, but it is important to remember that one agent can only process one project at a time. When a task starts, TC selects the first suitable unoccupied agent, and you can set “filters”, for example, select an agent only with Windows or only with .NET version installed at least 4.0, etc.
Now you need to come up with a work scenario. We use the following branches in our work:
- release - contains the current code, the working version, which is located on the combat server;
- dev - all new features go into it, later merges into release;
- A separate branch for each feature that is split off from dev and returns to it.
In general, almost standard git-flow, which can be read in more detail, for example, here .
In this regard, our script will look like this:
- pick up the latest changes from the dev branch repository;
- compile the project;
- if everything went well in the previous step - run unit tests;
- if everything went well in the previous step - run the functional tests;
- if everything went well in the previous step - upload the changes to the test server.
For the release branch, we do the same thing, but while filling in new data, we pause the server and show the stub.
Now go ahead - implement the script!
Pull the latest changes from the repository
It all starts with the simple creation of a project.
After - creating a “ build configuration ”. The configuration defines the build script.
At the second step of creating the configuration, we will be asked about the used VCS, so we answer honestly that we have git here. You may have another VCS - don't get lost. Adding a new repository is done with the Create and attach new VCS root button .
So, the key settings:
- You can not touch VCS root ID - a unique code, anyway. If left blank, generated automatically;
- Fetch URL - the address from which we will pick up the contents of the repository;
- Default branch - the branch from which information will be taken;
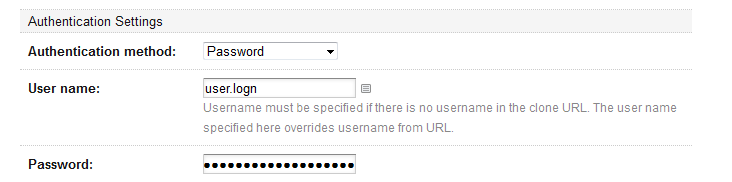
- Authentication method - the most interesting is the authentication method. There may be access without authorization (if the data is on an internal server, for example), both by key and by password. For each option, additional fields will be their own, you understand.
The remaining variety of options is to your taste and color.
Next, you need to configure the job to run automatically. We go to the Build Triggers (build conditions) and select the VCS Trigger condition - with the default settings, he will check once a minute for new commits in the repository, and if there are any, he will start the task for execution.
Compile project
Since we had an ASP.NET project in the form of a Solution from Visual Studio, everything was simple here too.
We go to the Build Steps menu , select the runner type (and there are really a lot of them) and stop at MSBuild . Why exactly on it? It provides a fairly simple way to describe the build process, even quite complex by adding or removing various steps in a simple XML file.
Further, everything is elementary.
Build file path - path to the sln file. We select
MSBuild version , MSBuild ToolsVersion and Run platform for the requirements of your project.
If the project has several configurations, then you can use the optionCommand line parameters to enter something like this key:
/p:Configuration=Productionwhere Production is replaced with the desired config.
Enable Download NuGet Packages
An important point if you use NuGet packages; if not, you can go directly to the next item.
Since NuGet packages weigh a lot, and you don’t want to store library binaries in the repository, you can use the wonderful NuGet Package Restore option :
In this situation, library binaries are not included in the repository, but are downloaded as needed during the build process.
But MSBuild is a real gentleman and will not do unnecessary gestures without permission, so it won’t be able to download packages just like that - he needs to allow this process. To do this, you either have to set the Enable NuGet Package Restore environment variable to true on the clientOr go to the Build Parameters menu and set it there.
Drive Unit Tests
Our unit tests are a separate project within the solution. So in the previous step they are already compiled - it remains to run them.
Add a new step, only now Runner is NUnit . Pay attention to the Execute step parameter : it indicates the conditions under which the step should be performed, and has 4 values:
- If all previous steps finished successfully (zero exit code) - if all previous steps completed without errors. In this case, the check is performed purely on the agent;
- Only if build status is successful - similar to the previous one, but at the same time, the agent also clarifies the build status on the TC server. It is necessary for finer control over the logic of the task, for example, if a zero return code for a specific step is an error for us;
- Even if some of the previous steps failed - even if any of the previous steps failed ;
- Always, even if build stop command was issued - execute a step even if a command is issued to cancel the assembly.
The most important thing here is to indicate the correct path to the assembly with tests inside the project in the Run tests from column. Here, for example, it looks like this:
%teamcity.build.checkoutDir%\project\project.FuncTests\bin\Dev\project.FuncTests.dll% teamcity.build.checkoutDir% is a variable that points to the folder where data from the repository is downloaded. In principle, it is not required to indicate, as by default, the path goes exactly with this directory, so the path could be shortened to:
project\project.FuncTests\bin\Dev\project.FuncTests.dllI’ll separately note the Run recently failed test first option - if in the previous run some tests fell, then in the next run they will be the first to be launched, and you will quickly find out about the success of the latest changes.
Run interface tests (functional tests)
Everything here is much more interesting than with unit tests. Cap here suggests that in order to test a project in a browser, it, i.e. project needs to be launched. But here we cheated, starting the web server directly from the Selenium test code:
	[SetUpFixture]
	class ServerInit
	{
		private const string ApplicationName = "justtest";
		private Process _iisProcess;
		private string GetApplicationPath(string applicationName) {
			var tmpDirName=AppDomain.CurrentDomain.BaseDirectory.TrimEnd('\\');
			var solutionFolder = Path.GetDirectoryName(Path.GetDirectoryName(Path.GetDirectoryName(tmpDirName)));
			string result = Path.Combine(solutionFolder, applicationName);
			return result;
		}
		[SetUp]
		public void RunBeforeAnyTests()
		{
			[…]
			var applicationPath = GetApplicationPath(ApplicationName);
			var programFiles = Environment.GetFolderPath(Environment.SpecialFolder.ProgramFiles);
			_iisProcess = new Process
			{
				StartInfo =
				{
					FileName = string.Format("{0}/IIS Express/iisexpress.exe", programFiles),
					Arguments = string.Format("/path:\"{0}\" /port:{1}", applicationPath, UrlProvider.Port)
				}
			};
			_iisProcess.Start();
		}
		[TearDown]
		public void RunAfterAnyTests()
		{
			[…]
			if (_iisProcess.HasExited == false)
			{
				_iisProcess.Kill();
			}
		}
	}]
And the launch itself looks exactly the same as at the step with unit tests.
Upload changes to the test server
The server on which the TC agent is located and the server on which IIS is installed are different servers, moreover, they are located on different networks. Therefore, the files must somehow be delivered to the destination server. And here the solution is chosen, maybe not very elegant, but extremely simple. We use upload via FTP, and MSBuild does this for us .
The scheme is as follows:
- set up an account on the FTP server for uploading files. For added security, you can prohibit filling for all IPs except the internal one if the TC server is on the internal network, of course;
- install on the agent MSBuild Community Tasks in order to be able to use the FTP upload task. Download here ;
- prepare a script file for MSBuild, which will perform the following actions:
- Build the application in a temporary folder
- spoofing a configuration file;
- upload files via FTP.
This is what this file will look like (deploy.xml)
bin ../output Dev ..\project\project\Web.template.config ..\project\project\Web.$(Configuration).config ..\project\output\Web.config False WebProjectOutputDir=$(PublishDir);OutputPath=$(OutputDir);Configuration=Dev dev.example.com ЛОГИН ПАРОЛЬ ..\project\output And so - the task of calling it:
The lack of a solution - ALL files are uploaded, not just new ones that have changed. On a project with a bunch of layout files or a lot of modules, this can be a problem due to the time taken to fill the time.
Another drawback noticed - when a file encounters non-Latin characters in the name, it falls with an error. Latin and letters / numbers are processed normally. The legs of this problem seem to grow out of the specifics of the FTP protocol: it is based on ASCII, but it does not describe how to encode non-ASCII characters, suggesting "do as your server understands." Accordingly, in order to cure the problem without changing the scheme, you need to patch MSBuild Community Tasks, since the sources are open . Well, or use an alternative way to upload files, for example through WinSCP.
Stop and start the server for the release script
We solve it in a slightly wild, but cute way. IIS has a peculiarity: if you put a file with the name app_offline.html in the root of the site , the site is cut off, when accessing all files, the contents of this file will be displayed .
Minus - the appeal is exactly that TO ALL files, including static ones. So, if you want to make a stub with design, CSS and images, use inline styles and data: url, well, or as an option - put them on a separate server.
We turn on / off the server through the WinSCP script and such files here:
server_off.cmd
winscp.exe /console /script=server_off.txtserver_on.cmd
winscp.exe /console /script=server_on.txtserver_off.txt
option batch abort
option confirm off
open ftp://ЛОГИН:ПАРОЛЬ@dev.example.com
mv _app_offline.htm app_offline.htm
close
exit
server_on.txt
option batch abort
option confirm off
open ftp://ЛОГИН:ПАРОЛЬ@dev.example.com
rm app_offline.htm
close
exit
That is, initially the file lies in the root and is called _app_offline.html . When you need to block access during the update, we rename it to app_offline.html . When uploading files, the new _app_offline.html file is uploaded , and after the end, the app_offline.html file is deleted . And we get exactly what was originally.
In the text of the stub page, I highly recommend using the refresh meta tag , which will periodically refresh the page. If the update process is completed by this time, the user will return to the service, which will certainly be incredibly happy.
Calling the script to enable the stub (disabling the stub is similar):
Yes, WinCSPlies as a result right in the repository. Yes, passwords in clear text are in the file. Yes, not the most elegant solution, but since only the developers from our team have access to the repository and to the virtual machine with the agent, why not? Yes, it would be possible to store a file with passwords, for example, directly on the agent, but fundamentally this would not increase security, but the deployment of a new agent, for example, would slow down.
We have been using these settings for about six months, and so far there has not been a single problem - everything works like a clock, which is good news.
That's all. I am pleased to hear comments and advice on improving these steps, as well as your stories about what TC features you use at home.
Update of November 3, 2014.
Choosing the Runner Type “Command line” does not require any way to escape the spaces - Team City will take care of this on its own.