How I Overcome the 4GB Limit on Windows XP 32bit
Immediately make a reservation, “overcame” in the name reflects only the fact that now my XP sees all the memory installed on the system board. I didn’t come up with a way, I just used it and now I want to share it.
The question of four gigabytes of memory in Windows XP (here and hereinafter 32 bits) has been raised on the Internet for several times. And it was also repeatedly concluded that it is impossible to see more than four in principle, and since the equipment also requires an address space, even less. Usually 3.25 GB or so. A very detailed and convincing story is covered here: Four gigabytes of memory - an unattainable goal?
This question worried me too. Although it would seem that you can install a 64-bit system, or even Windows Server (as you know, even in the 32-bit version it sees all the memory), but I wanted to use Windows XP. Twice in the last 3 years I switched to Windows 7, the first time to 64-bit, the second time to 32-bit, but in the end both times I went back to XP, which I have been living with without reinstalling since 2007.
The last time I abandoned the seven in favor of the old woman just two weeks ago. Moreover, it should be noted that although the seven was 32-bit, the ability to see all available memory was unlocked in it. Unlock method is available on the Internet. And now I wanted to solve this issue with XP with renewed vigor.
Searches led to this site:Patch Vista's Kernel to Address more than 4 GB of Memory The
article is about unlocking Windows Vista, but in the comments, a couple of people describe a similar method for Windows XP. I decided to follow their advice and try out this technique in practice.
First you need the Windows XP SP1 distribution. Perhaps the first service pack is also suitable, I don’t know, I don’t have it. In general, only one file is needed there. Namely, the library file Hardware Abstraction Layer. Starting from the second service pack, this library works with PAE “fictitiously”, i.e. even if the extended address translation mode is turned on, it does nothing and does not go beyond four gigabytes. But the library from the first service pack works fully and can be addressed to all available memory, similar to the way 32-bit Windows Server works with memory. In installed Windows XP, this file is called hal.dll, but the distribution contains several HAL files, and only one of them is installed on a system called hal.dll during installation. It was necessary to find out which of the files should be used on my specific equipment. This is done simply, you need to call Properties in the context menu of the explorer on the hal.dll file in the installed Windows. The file is located in the% systemroot% \ system32 folder, and this is what I saw:
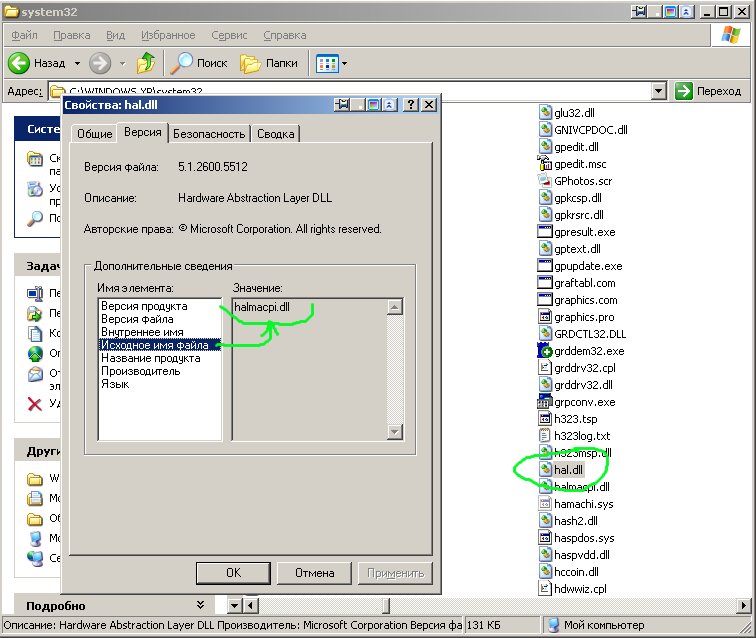
In the Windows XP SP1 distribution in the I386 folder, I took the HALMACPI.DL_ file. This is the archive in which there is one file that I searched for halmacpi.dll. I extracted it with WinRAR, but you can get by with the command line:
expand HALMACPI.DL_ HALMACPI.DLL
The resulting file must be placed in the% systemroot% \ system32 folder, which I did. I want to once again draw attention to the fact that if someone wants to repeat my steps, the file must be taken with the name specified in the "Original file name" property in the hal.dll properties from installed Windows XP.
The second thing you need to do is get the patched version of the Windows kernel. As you know, there are 4 kernel versions:
The instructions that I used talked about the ntkrnlpa.exe kernel and it is exactly what it is in my Windows installation. What to do if another kernel comes across - I honestly don’t know.
First of all, I made a copy of the kernel, named it krnl16.exe, in principle, the name doesn’t matter. Next, with the HEX editor (I used DOS-Navigator, from the old memory) you need to find the sequence
Here 1000h = 4096 Mb, replace with 4000h = 16384 Mb. Those. raise the limit to 16GB. In principle, you can enter a larger number. The patched file should also be located in system32.
Now it remains to edit boot.ini. You need to copy the existing line and add a couple of parameters. I had a line:
multi (0) disk (0) rdisk (0) partition (1) \ WINDOWS.XP = "Microsoft Windows XP Professional RU" / FASTDETECT / USEPMTIMER / NOSERIALMICE / NOEXECUTE = OPTIN
I added / KERNEL = to it KRNL16.EXE /HAL=HALMACPI.DLL / PAE and as a result it turned out:
multi (0) disk (0) rdisk (0) partition (1) \ WINDOWS.XP = "Microsoft Windows XP Professional RU 16Gb" / FASTDETECT / USEPMTIMER / NOSERIALMICE / NOEXECUTE = OPTIN /KERNEL=KRNL16.EXE /HAL=HALMACPI.DLL / PAE
Now it is possible to boot into standard Windows with its inherent memory limit, and into patched one, since I did not replace any system files, but only added two, which are included in the work using the boot.ini parameters described above
Reboot!
And ... BSOD.
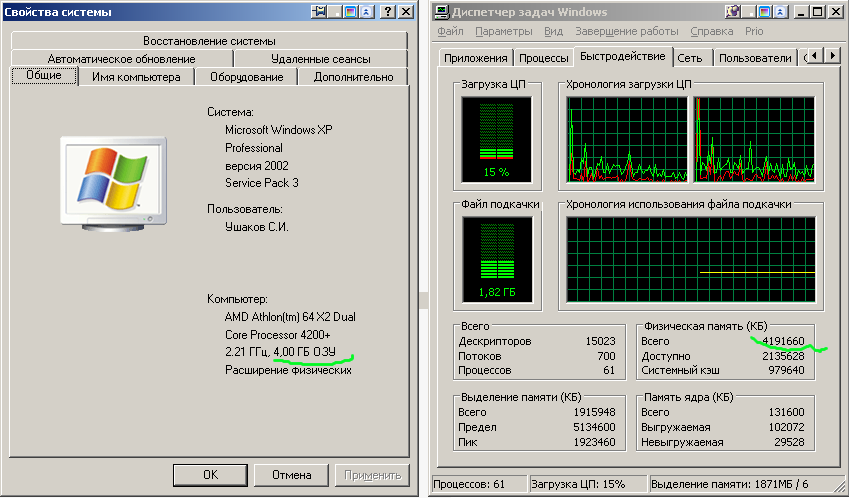
In principle, this can be. As follows from a review of the history of the problem on ixbt, the reason Microsoft turned off the addressing of the upper memory was the existence of curved drivers for various equipment, the curvature of which, however, manifested itself only in the full PAE mode. It is likely that one of them will fail, for 6 years a lot of things have accumulated in the system, but which one? I try to start in safe mode, and Hurray! Here they are, my gigabytes:
But how to identify a failed module? Googling, I found a technique for this, which consists in analyzing a small memory dump created by Windows with BSOD. The analysis is performed by the Blue Screen View program, but all the methods I found for turning on the dump recording mode did not succeed: the dump was not created, so I had to use the scientific poke method. To start, I uninstalled the unnecessary that was found in the system. Namely, the Guardant protection driver and the ATI driver from the old video card.
Reboot
The result exceeded my expectations. Honestly, I did not expect the poke method to give such results, and tried it just to do at least something. Which of the drivers was causing the problem, I do not know for sure, but I think that most likely Guardant.
But the main thing: the goal is achieved, and now I'm thinking about expanding the memory to 8 GB.
The question of four gigabytes of memory in Windows XP (here and hereinafter 32 bits) has been raised on the Internet for several times. And it was also repeatedly concluded that it is impossible to see more than four in principle, and since the equipment also requires an address space, even less. Usually 3.25 GB or so. A very detailed and convincing story is covered here: Four gigabytes of memory - an unattainable goal?
This question worried me too. Although it would seem that you can install a 64-bit system, or even Windows Server (as you know, even in the 32-bit version it sees all the memory), but I wanted to use Windows XP. Twice in the last 3 years I switched to Windows 7, the first time to 64-bit, the second time to 32-bit, but in the end both times I went back to XP, which I have been living with without reinstalling since 2007.
The last time I abandoned the seven in favor of the old woman just two weeks ago. Moreover, it should be noted that although the seven was 32-bit, the ability to see all available memory was unlocked in it. Unlock method is available on the Internet. And now I wanted to solve this issue with XP with renewed vigor.
Searches led to this site:Patch Vista's Kernel to Address more than 4 GB of Memory The
article is about unlocking Windows Vista, but in the comments, a couple of people describe a similar method for Windows XP. I decided to follow their advice and try out this technique in practice.
First you need the Windows XP SP1 distribution. Perhaps the first service pack is also suitable, I don’t know, I don’t have it. In general, only one file is needed there. Namely, the library file Hardware Abstraction Layer. Starting from the second service pack, this library works with PAE “fictitiously”, i.e. even if the extended address translation mode is turned on, it does nothing and does not go beyond four gigabytes. But the library from the first service pack works fully and can be addressed to all available memory, similar to the way 32-bit Windows Server works with memory. In installed Windows XP, this file is called hal.dll, but the distribution contains several HAL files, and only one of them is installed on a system called hal.dll during installation. It was necessary to find out which of the files should be used on my specific equipment. This is done simply, you need to call Properties in the context menu of the explorer on the hal.dll file in the installed Windows. The file is located in the% systemroot% \ system32 folder, and this is what I saw:
In the Windows XP SP1 distribution in the I386 folder, I took the HALMACPI.DL_ file. This is the archive in which there is one file that I searched for halmacpi.dll. I extracted it with WinRAR, but you can get by with the command line:
expand HALMACPI.DL_ HALMACPI.DLL
The resulting file must be placed in the% systemroot% \ system32 folder, which I did. I want to once again draw attention to the fact that if someone wants to repeat my steps, the file must be taken with the name specified in the "Original file name" property in the hal.dll properties from installed Windows XP.
The second thing you need to do is get the patched version of the Windows kernel. As you know, there are 4 kernel versions:
- ntoskrnl.exe is a uniprocessor Windows kernel.
- ntkrnlmp.exe is a multiprocessor Windows kernel.
- ntkrnlpa.exe is a single-processor Windows kernel with more than 3 GB of RAM.
- ntkrpamp.exe is a multiprocessor Windows kernel with more than 3 GB of RAM.
The instructions that I used talked about the ntkrnlpa.exe kernel and it is exactly what it is in my Windows installation. What to do if another kernel comes across - I honestly don’t know.
First of all, I made a copy of the kernel, named it krnl16.exe, in principle, the name doesn’t matter. Next, with the HEX editor (I used DOS-Navigator, from the old memory) you need to find the sequence
- BB 00 00 10 00 33 FF 6A 07 8B F0 and replace it with
- BB 00 00 40 00 33 FF 6A 07 8B F0
Here 1000h = 4096 Mb, replace with 4000h = 16384 Mb. Those. raise the limit to 16GB. In principle, you can enter a larger number. The patched file should also be located in system32.
Now it remains to edit boot.ini. You need to copy the existing line and add a couple of parameters. I had a line:
multi (0) disk (0) rdisk (0) partition (1) \ WINDOWS.XP = "Microsoft Windows XP Professional RU" / FASTDETECT / USEPMTIMER / NOSERIALMICE / NOEXECUTE = OPTIN
I added / KERNEL = to it KRNL16.EXE /HAL=HALMACPI.DLL / PAE and as a result it turned out:
multi (0) disk (0) rdisk (0) partition (1) \ WINDOWS.XP = "Microsoft Windows XP Professional RU 16Gb" / FASTDETECT / USEPMTIMER / NOSERIALMICE / NOEXECUTE = OPTIN /KERNEL=KRNL16.EXE /HAL=HALMACPI.DLL / PAE
Now it is possible to boot into standard Windows with its inherent memory limit, and into patched one, since I did not replace any system files, but only added two, which are included in the work using the boot.ini parameters described above
Reboot!
And ... BSOD.
In principle, this can be. As follows from a review of the history of the problem on ixbt, the reason Microsoft turned off the addressing of the upper memory was the existence of curved drivers for various equipment, the curvature of which, however, manifested itself only in the full PAE mode. It is likely that one of them will fail, for 6 years a lot of things have accumulated in the system, but which one? I try to start in safe mode, and Hurray! Here they are, my gigabytes:
But how to identify a failed module? Googling, I found a technique for this, which consists in analyzing a small memory dump created by Windows with BSOD. The analysis is performed by the Blue Screen View program, but all the methods I found for turning on the dump recording mode did not succeed: the dump was not created, so I had to use the scientific poke method. To start, I uninstalled the unnecessary that was found in the system. Namely, the Guardant protection driver and the ATI driver from the old video card.
Reboot
The result exceeded my expectations. Honestly, I did not expect the poke method to give such results, and tried it just to do at least something. Which of the drivers was causing the problem, I do not know for sure, but I think that most likely Guardant.
But the main thing: the goal is achieved, and now I'm thinking about expanding the memory to 8 GB.
- Note 1. Since the technique uses the dll from the first service pack, it is likely that there are any vulnerabilities in it that are closed by subsequent service packs. I have not studied this question.
- Note 2. Some drivers in patched Windows XP may cause BSOD. However, they are extremely few in nature.
- Note 3. The primary source of valuable knowledge reports that on some systems there are problems with USB when using this technique. I have no problems so far. At least keyboards, mice and flash drives work as normal.