October 7, 2013 at 22:13
Instead of reviewing IBM ThinkPad 755CD - notes from a restorer
Today I would like to tell you, dear readers, about another unusual and interesting piece of iron. But I won’t tell ... instead, I will talk about how these old, rare and unusual pieces of iron help to break one's head and, optionally, hands.
So, back in 2001. One frosty day, my friend Andrei, whose hobby and job is trading in second-hand iron at Juno (a large multi-assortment market in St. Petersburg), came to visit me and pulled me out ofwide trousersa huge van with a small black brick - IBM ThinkPad 755CD. Of course, he knew about my love in black bricks (I collect them, I work for them and even ride ... I don’t ride on the fincpads, of course) and decided to please me. He did it - the machine is in excellent appearance, a rare model and in excellent configuration. Only one thing overshadowed - when trying to boot, the machine gave out “Levyke ei kelpaa” and reinstalling the Finnish Windows into Russian did not have a fundamental effect on this inscription, only me had a terrible language of abuse ... tests (let's say thanks to the good diagnostic system in ThinkPad BIOS) showed an error RAM, and digging inside allowed to clarify a bleak diagnosis - a failure in the memory soldered to the motherboard. So the laptop went on the shelf for several months.
The first attempt at revitalization was made a couple of months later, when I found out that on this model the memory does not live on the motherboard, but on a small daughter board. A small daughter’s handkerchief located at the very bottom of the sandwich of the boards that make up the laptop. Unfortunately, the laptop did not want to come to life either without this scarf, or with a 4 megabyte motherboard (it was native to 8) from 755Cs. After that there was a move, a large expansion of the collection and much more - it was not up to him.
But, on October 6 this year, a potential donor was discovered on one of the announcement sites, moreover in the best configuration. A few hours later, I already had a laptop. And now, let's digress a bit from thisboring fascinating story and see what I'm chatting about ...

So, here is the top model of 1994, the IBM ThinkPad 755CD - the first laptop with built-in CD-ROM, and possibly the first laptop with an analog video input and a hardware video encoder board. Inside it has the fastest Intel 486 processor - as much as 100 MHz, 8 megabytes of RAM (looking ahead, I’ll say that our hero will have 16 megabytes), an 810 megabyte hard drive (there were versions with a 540 MB disk). A two-speed CD-ROM can be replaced with a floppod. Serious car.
Outside is a classic black-brick ThinkPad. Then there were no ultrabooks and other thin devices, so 56 mm of thickness was not something beyond. The case is finished with soft-touch coating, the keyboard rises to access the interchangeable components - memory, battery, disk and drive. And now, having got acquainted with the laptop closer, we will climb into its gut!
Why do we do this? We start in the morning of October 7th. I took both laptops to the office, it was convenient there to do a bulkhead. There were no global things planned - just toss the lid with the matrix and the daughter board with the slots for RAM into a new laptop - his lid was badly scratched. And here the difficulties began. After the assembly, the screen went into purple hues (one of the image channels disappeared). It turned out that the connector for connecting the matrix was damaged. It doesn’t matter - we take off the lid, remove the screen (and so, on both machines) and throw the top plate out of the sandwich. It worked! We leave the laptop to work for a couple of hours ...
And then what happens is that because of what today's review from the "review" of the laptop became "notes of the restorer" ... the laptop freezes. After repeated inclusion - sees only 4 megabytes of memory. After removing the bar, no changes occurred - again the trouble with the pre-installed memory ... we disassemble to the bottom. I did not guess to capture this process, despite the fact that I repeated it several times.
Frankly, it was very disappointing. But the desire to revive the laptop was stronger. I tried several combinations of boards, but all to no avail - one is seen at half the volume, the other gives an error when loading the OS. In one of the attempts - I forgot to connect a CMOS battery and a daughter board with memory. In this embodiment, the machine booted without other errors and stably worked for more than an hour. Success.
We disassemble the boards assembled on the knee and begin the assembly process "as it should." That's just the internal structure and the assembly process, and I want to devote the bulk of today's story.
All modern laptops have one main motherboard, and is often limited to it. In some cases, daughterboards are used to place connectors or optional controllers. Sometimes there are on a separate board a video controller is taken out. But earlier, 15-20 years ago it was different: placing everything on one board was difficult, there were a lot of chips, strapping was more difficult. And if you still had to do something functionally rich ... As a result, for most laptops, the filling was located in several layers. This is also done in this device. The boards are located in a separate compartment formed by a metal screen, consisting of two parts - this also achieves the required structural strength - the case itself is made of plastic. The compartment with the boards occupies about a third of the internal volume of the case, the rest is allocated to replaceable components.
Inside the screen is a sandwich of circuit boards. We will consider them in the process of assembling the laptop. Dismantling, although it requires painstaking work, is trivial.
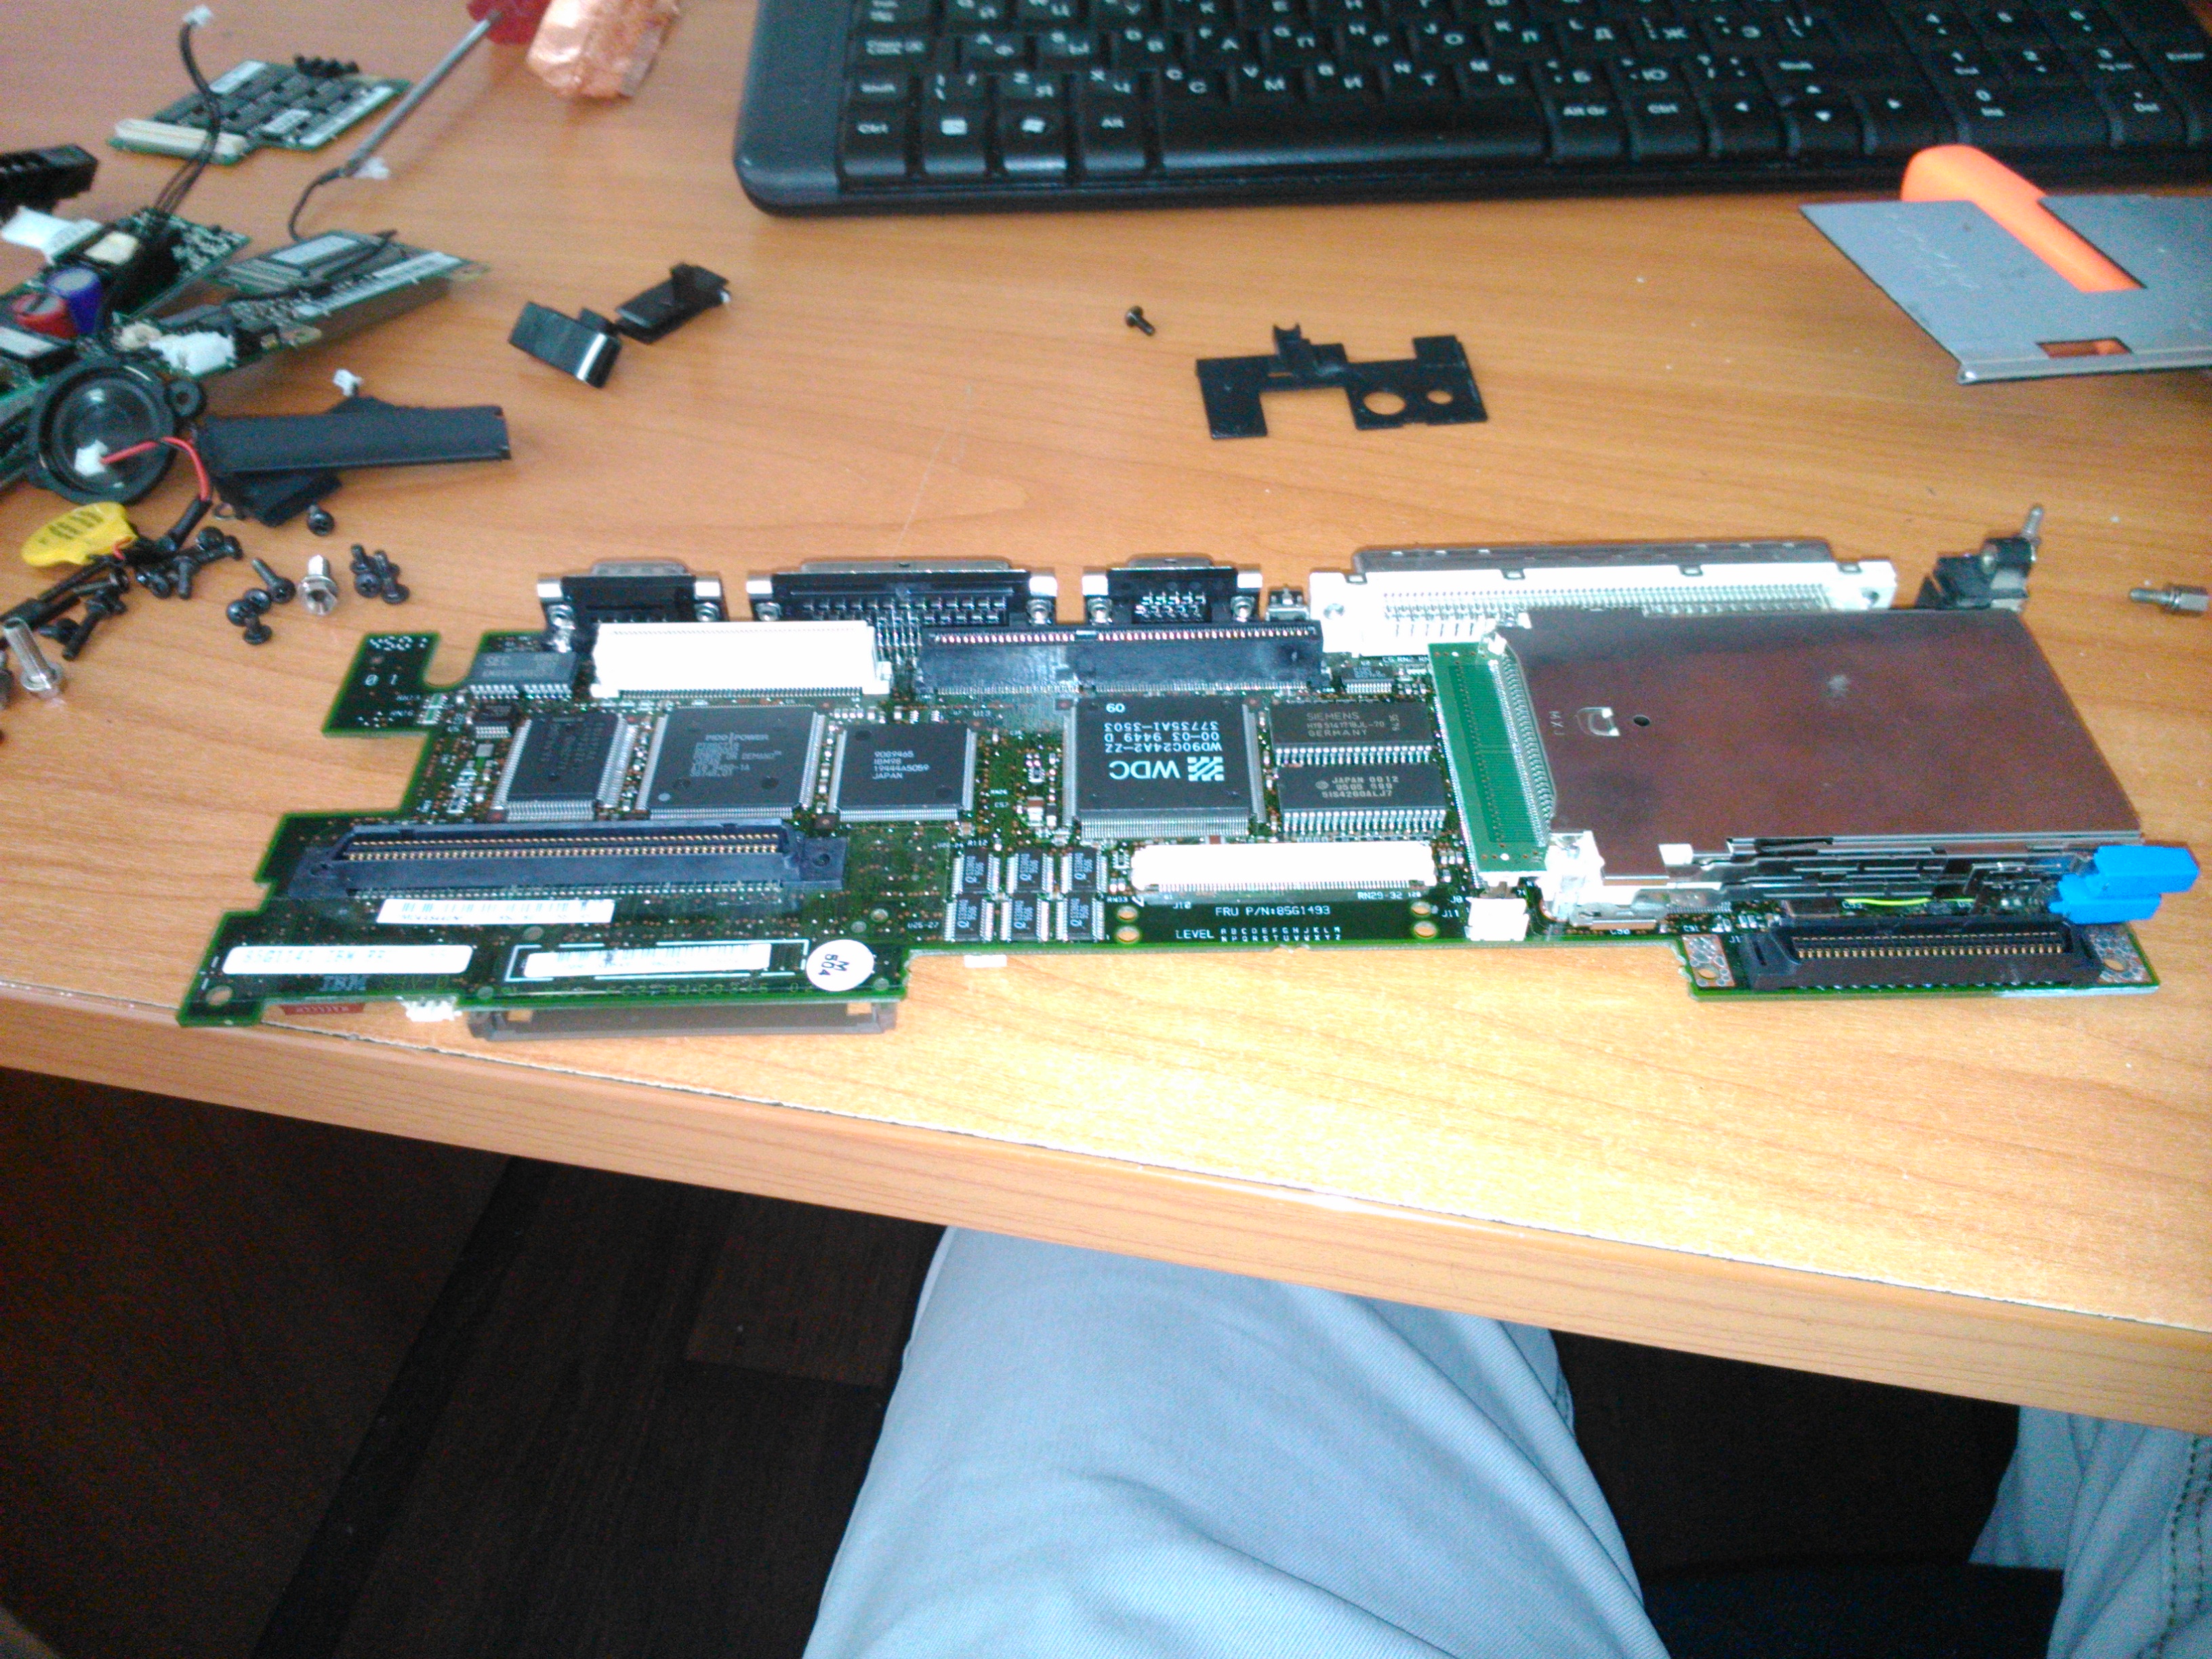
Let's get started. We take the main board in our hands - it has a chipset (Pico Power), a video controller (Western Digital with 1 MB of memory. Not on magnetic plates) and connectors for connecting other components. From the bottom, the ill-fated memory

board is attached to it on the connector ... We insert the board into the lower half of the screen. It is attached to it with two screws, simultaneously fixing the PCMCIA slot block and external port spacer screws. We connect the processor board from below (there is almost nothing there) - it completes the bottom of the screen with a heat sink plate. Also, the processor heat sink is used to preheat the hard drive in the cold winter months.
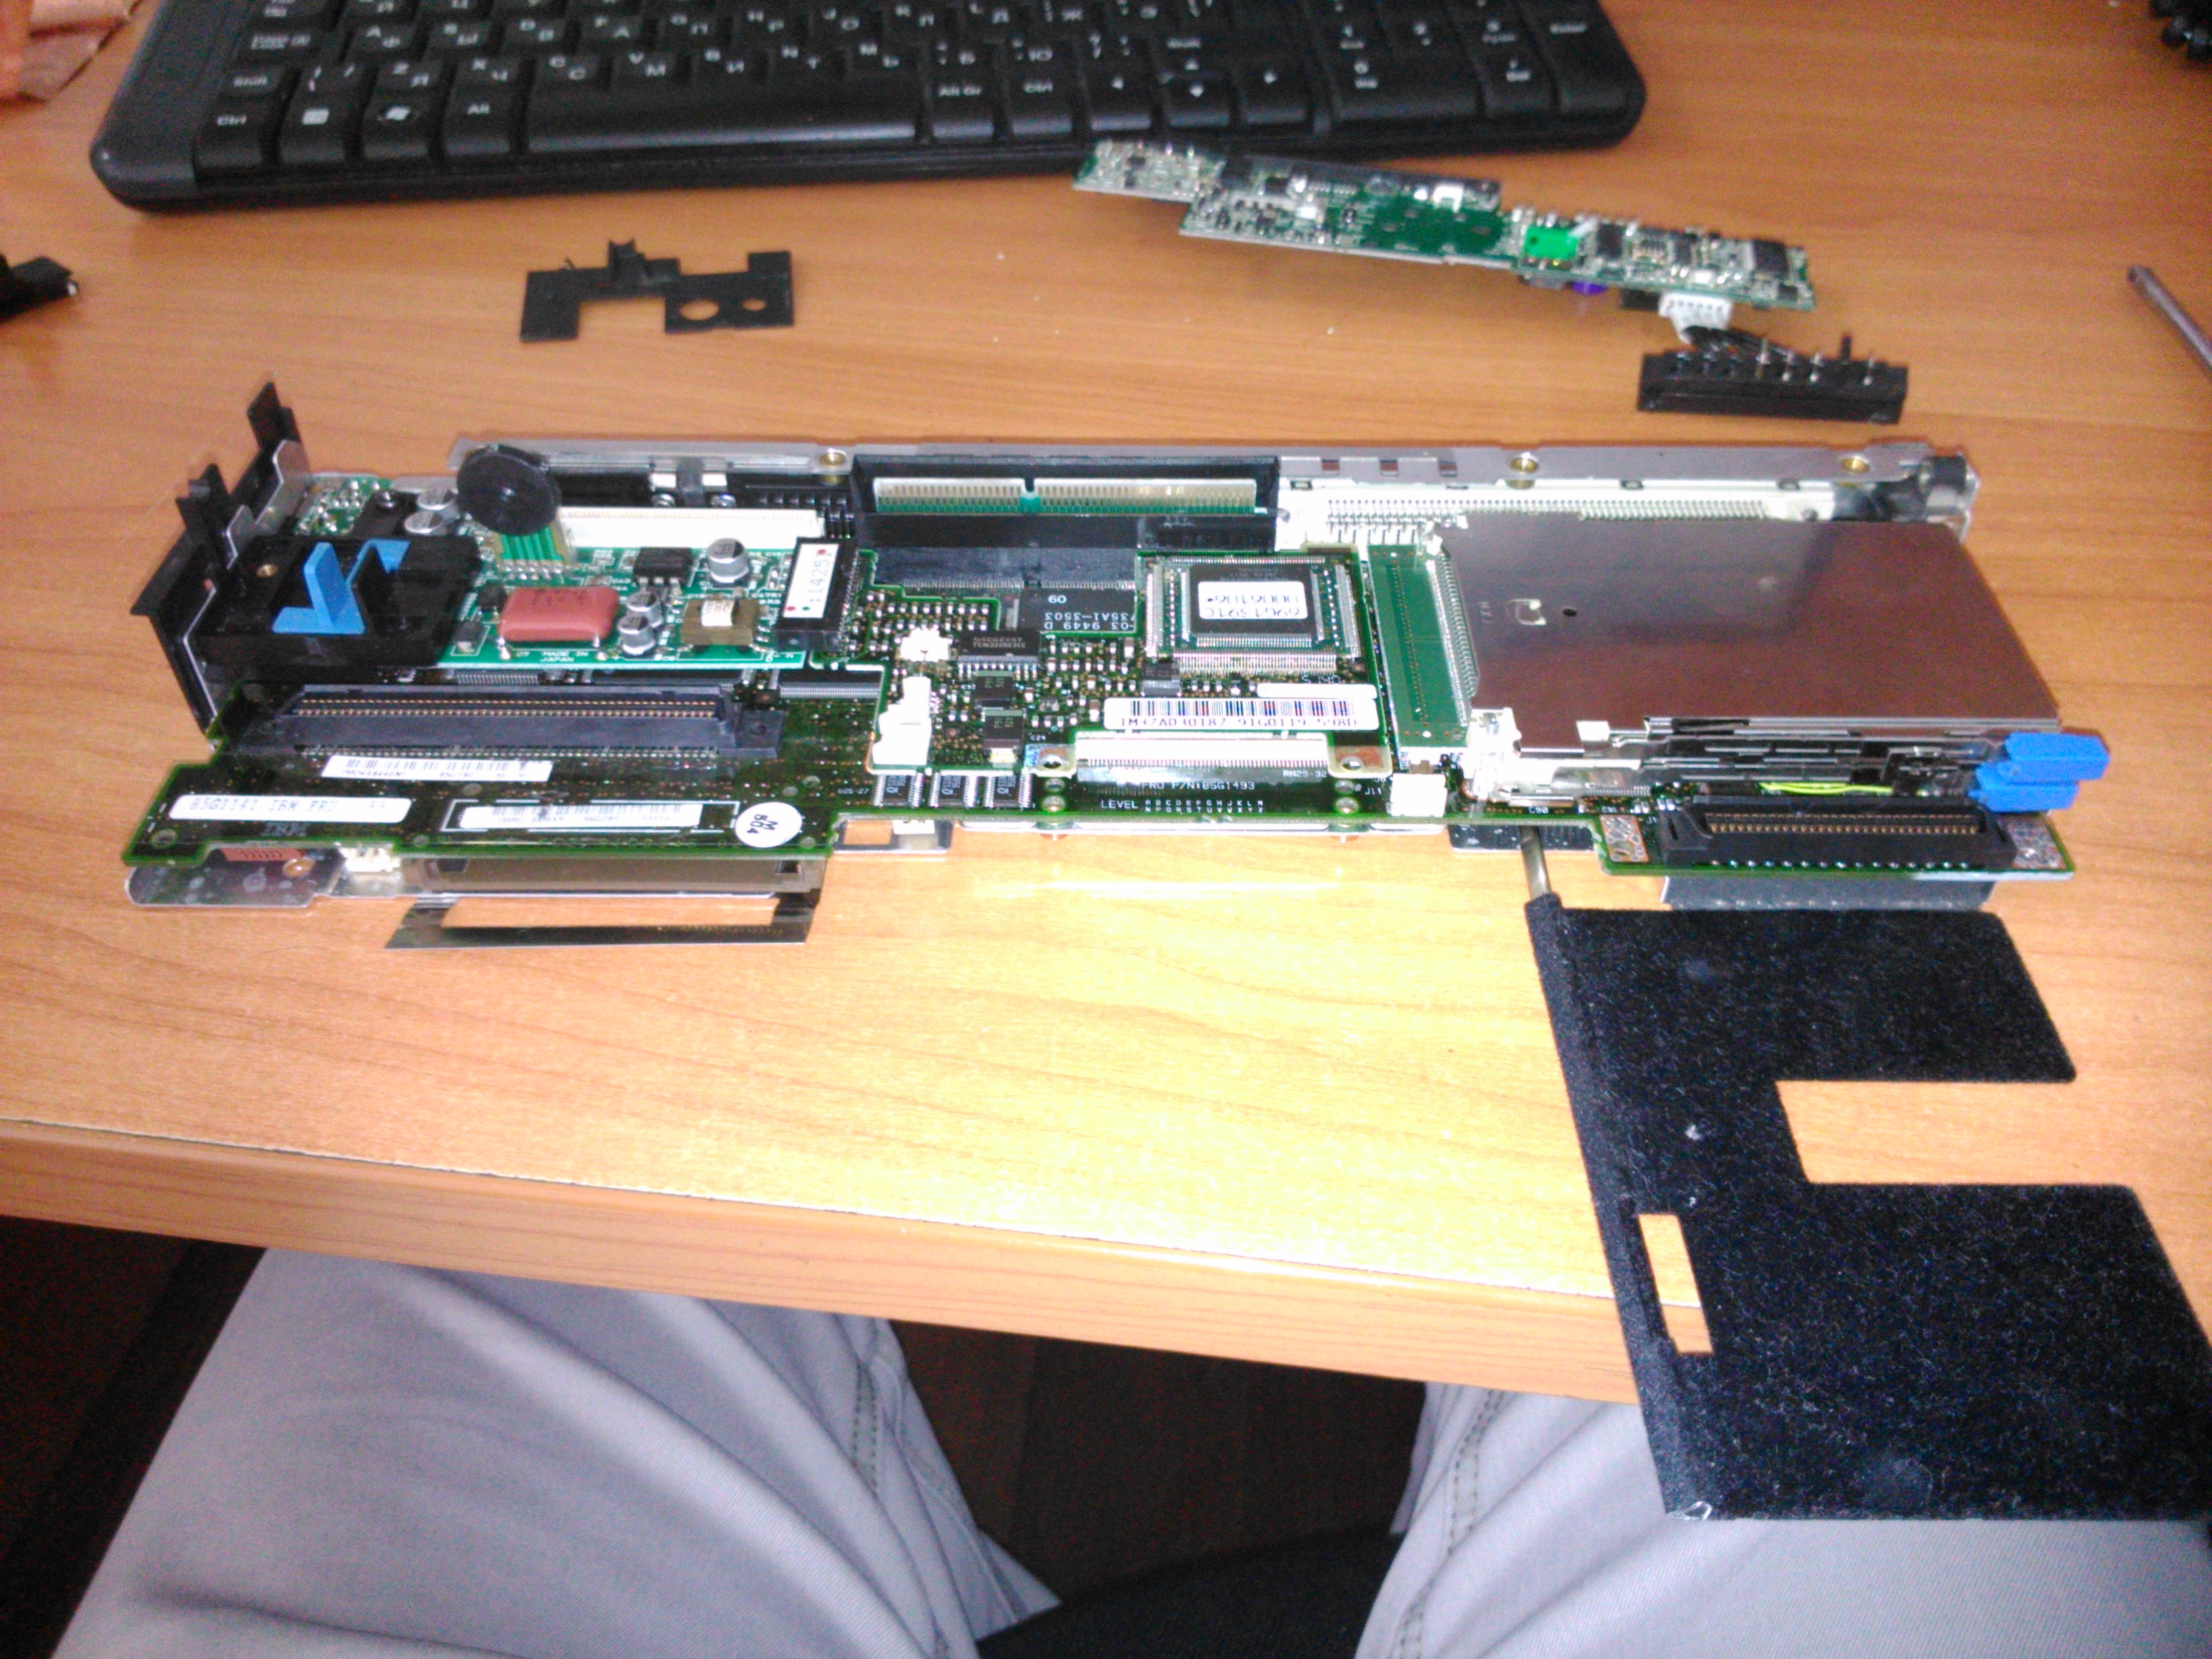
Now install the communication board. It is soldered to the IBM M-Wave - DSP controller, which is responsible for outputting sound and working with the telephone line. It connects to the cover with a microphone cable and to the video processing board with an audio cable for the speakers.
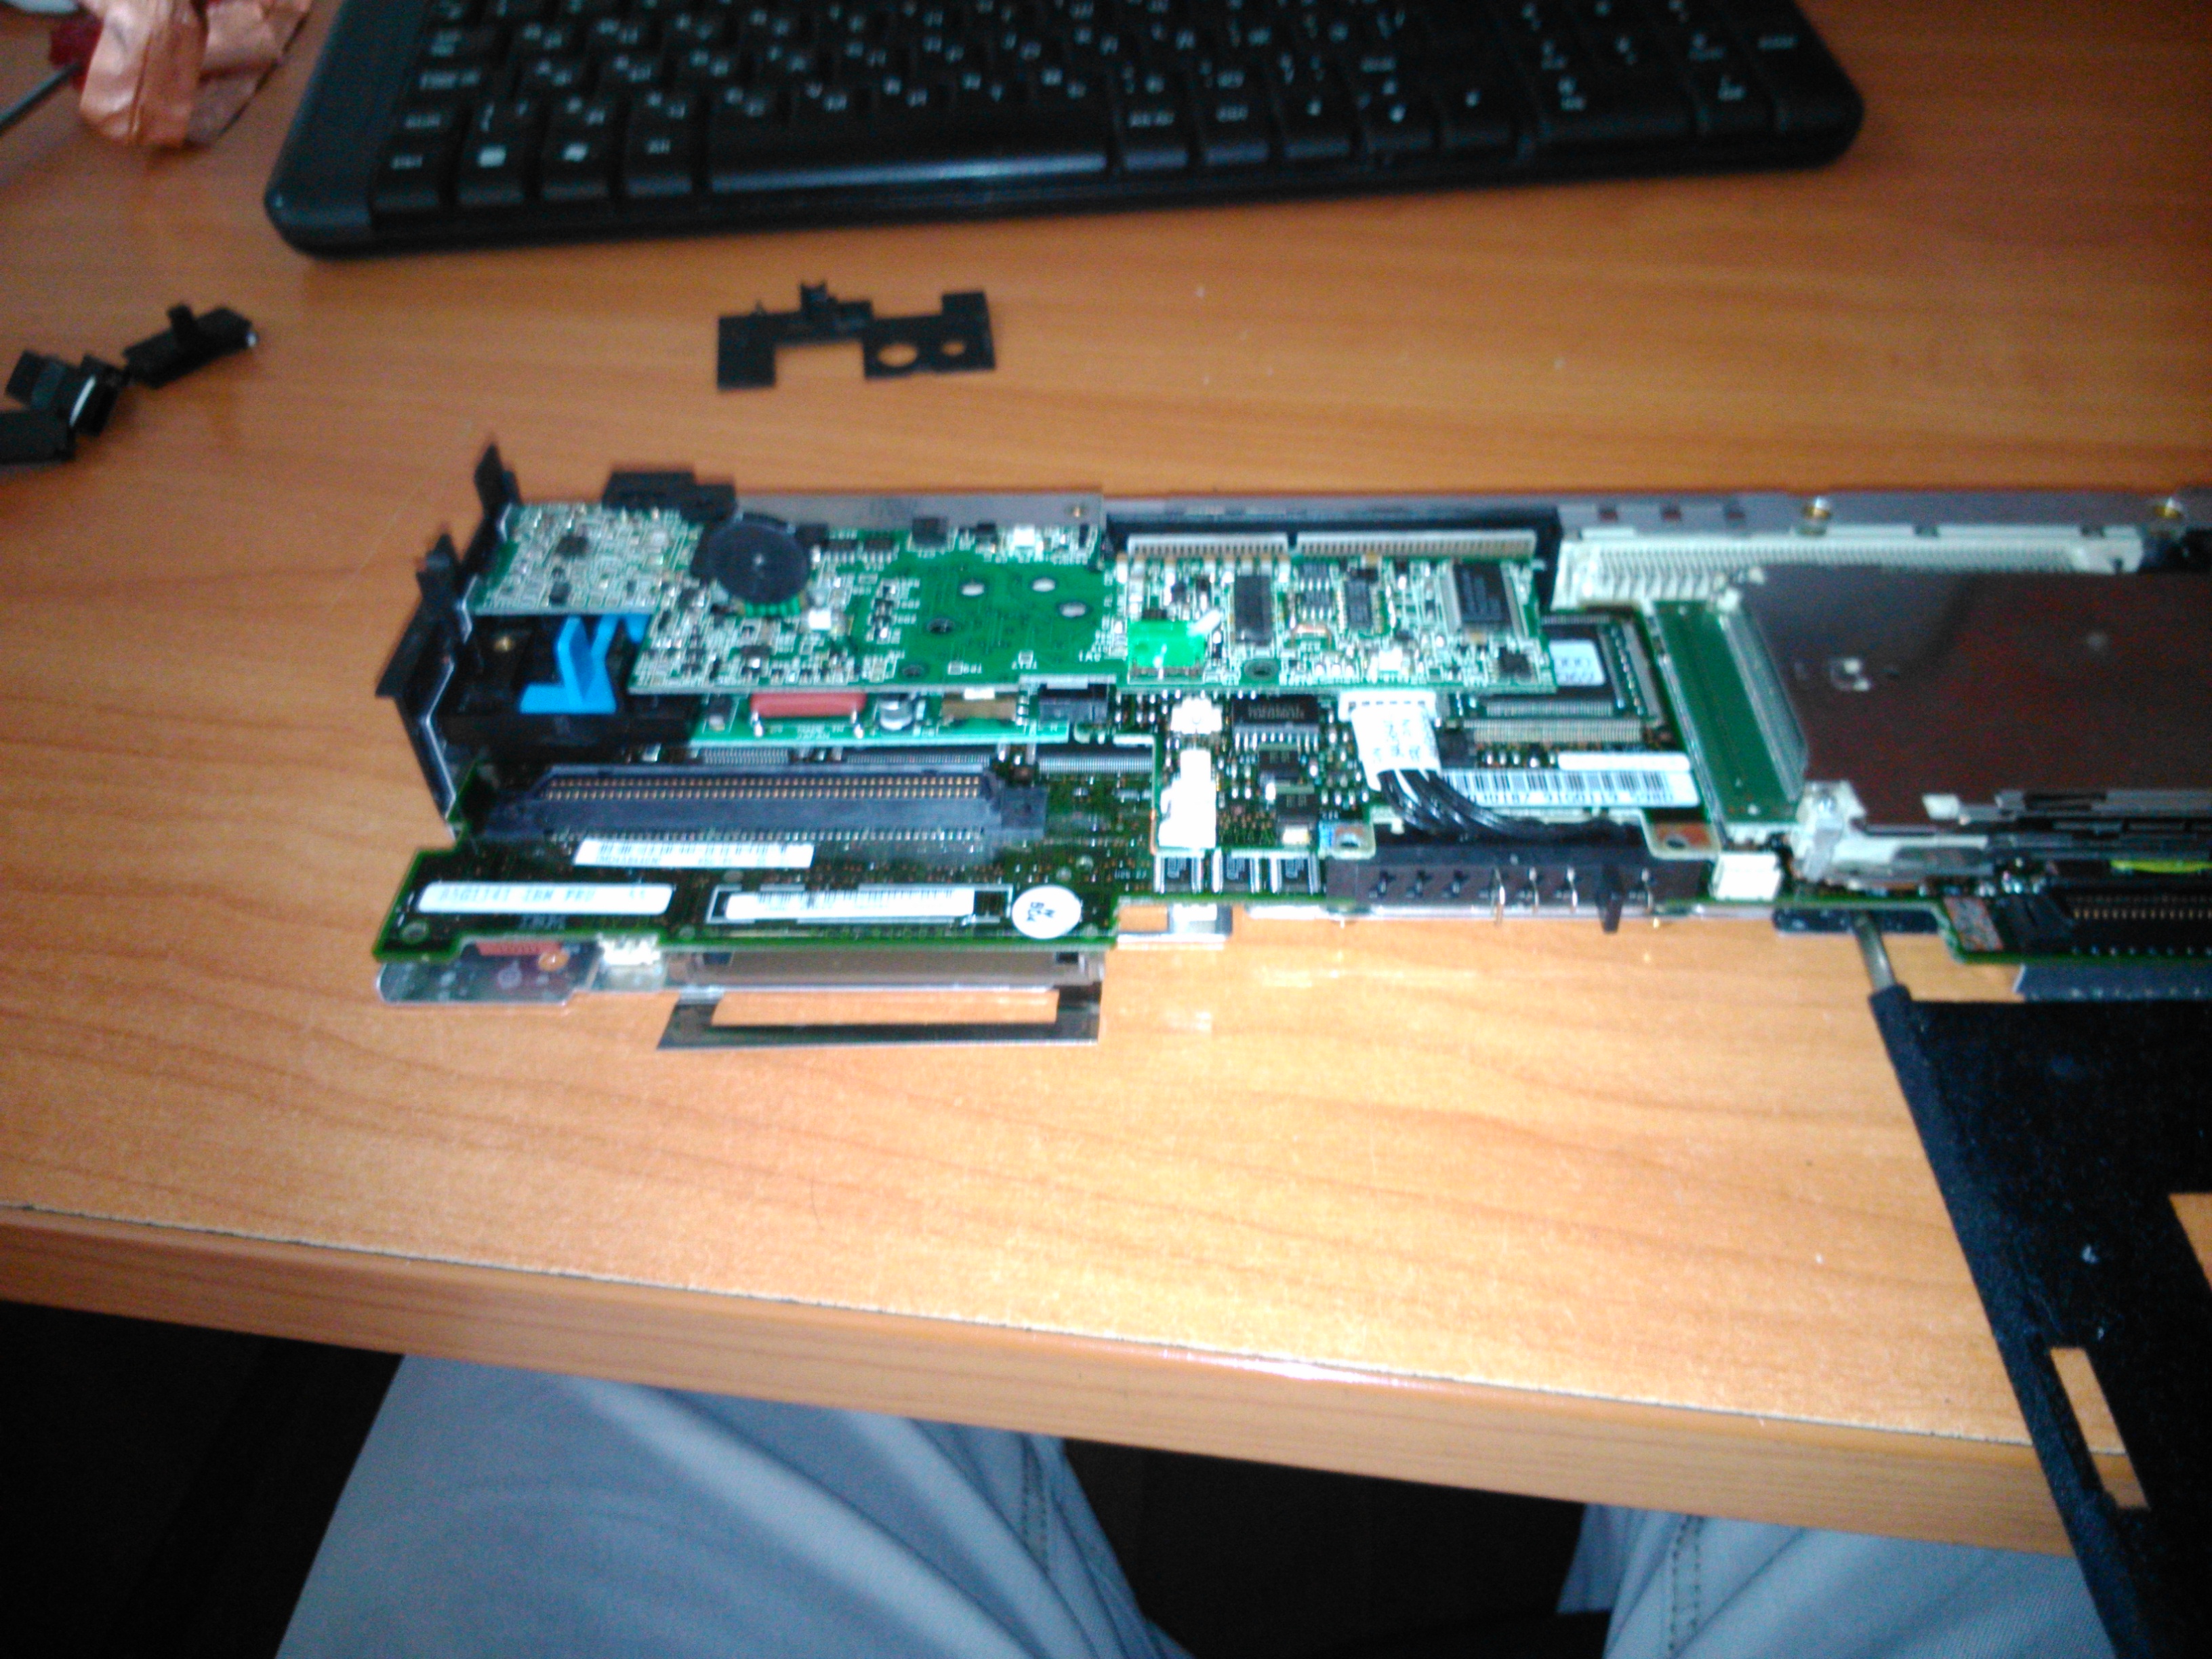
The next board is the VRM module.
The next step was to have a photo with the last of the large boards installed - a video processing board, which also displays LVDS from the video controller, an infrared port and an external drive connector. The Philips 7110 chip and a microcircuit marked with hieroglyphs and number 7320 are installed on the board itself, adjacent to a pair of RAM chips. The first, as I believe, is responsible for the digitization of the analog signal, and the second is the acceleration of video encoding-decoding. Also through this board a signal is supplied to the speakers. But the photo was unsuccessful and I did not have the opportunity to make it again. Therefore, the photo shows an already closed shielded module installed in the case.

The next step is to install the module in the case and connect the front infrared port (for convenience, the ThinkPad has been using two infrared ports for a long time), a memory battery (used to warmly replace batteries in standby mode), and a board with memory slots.
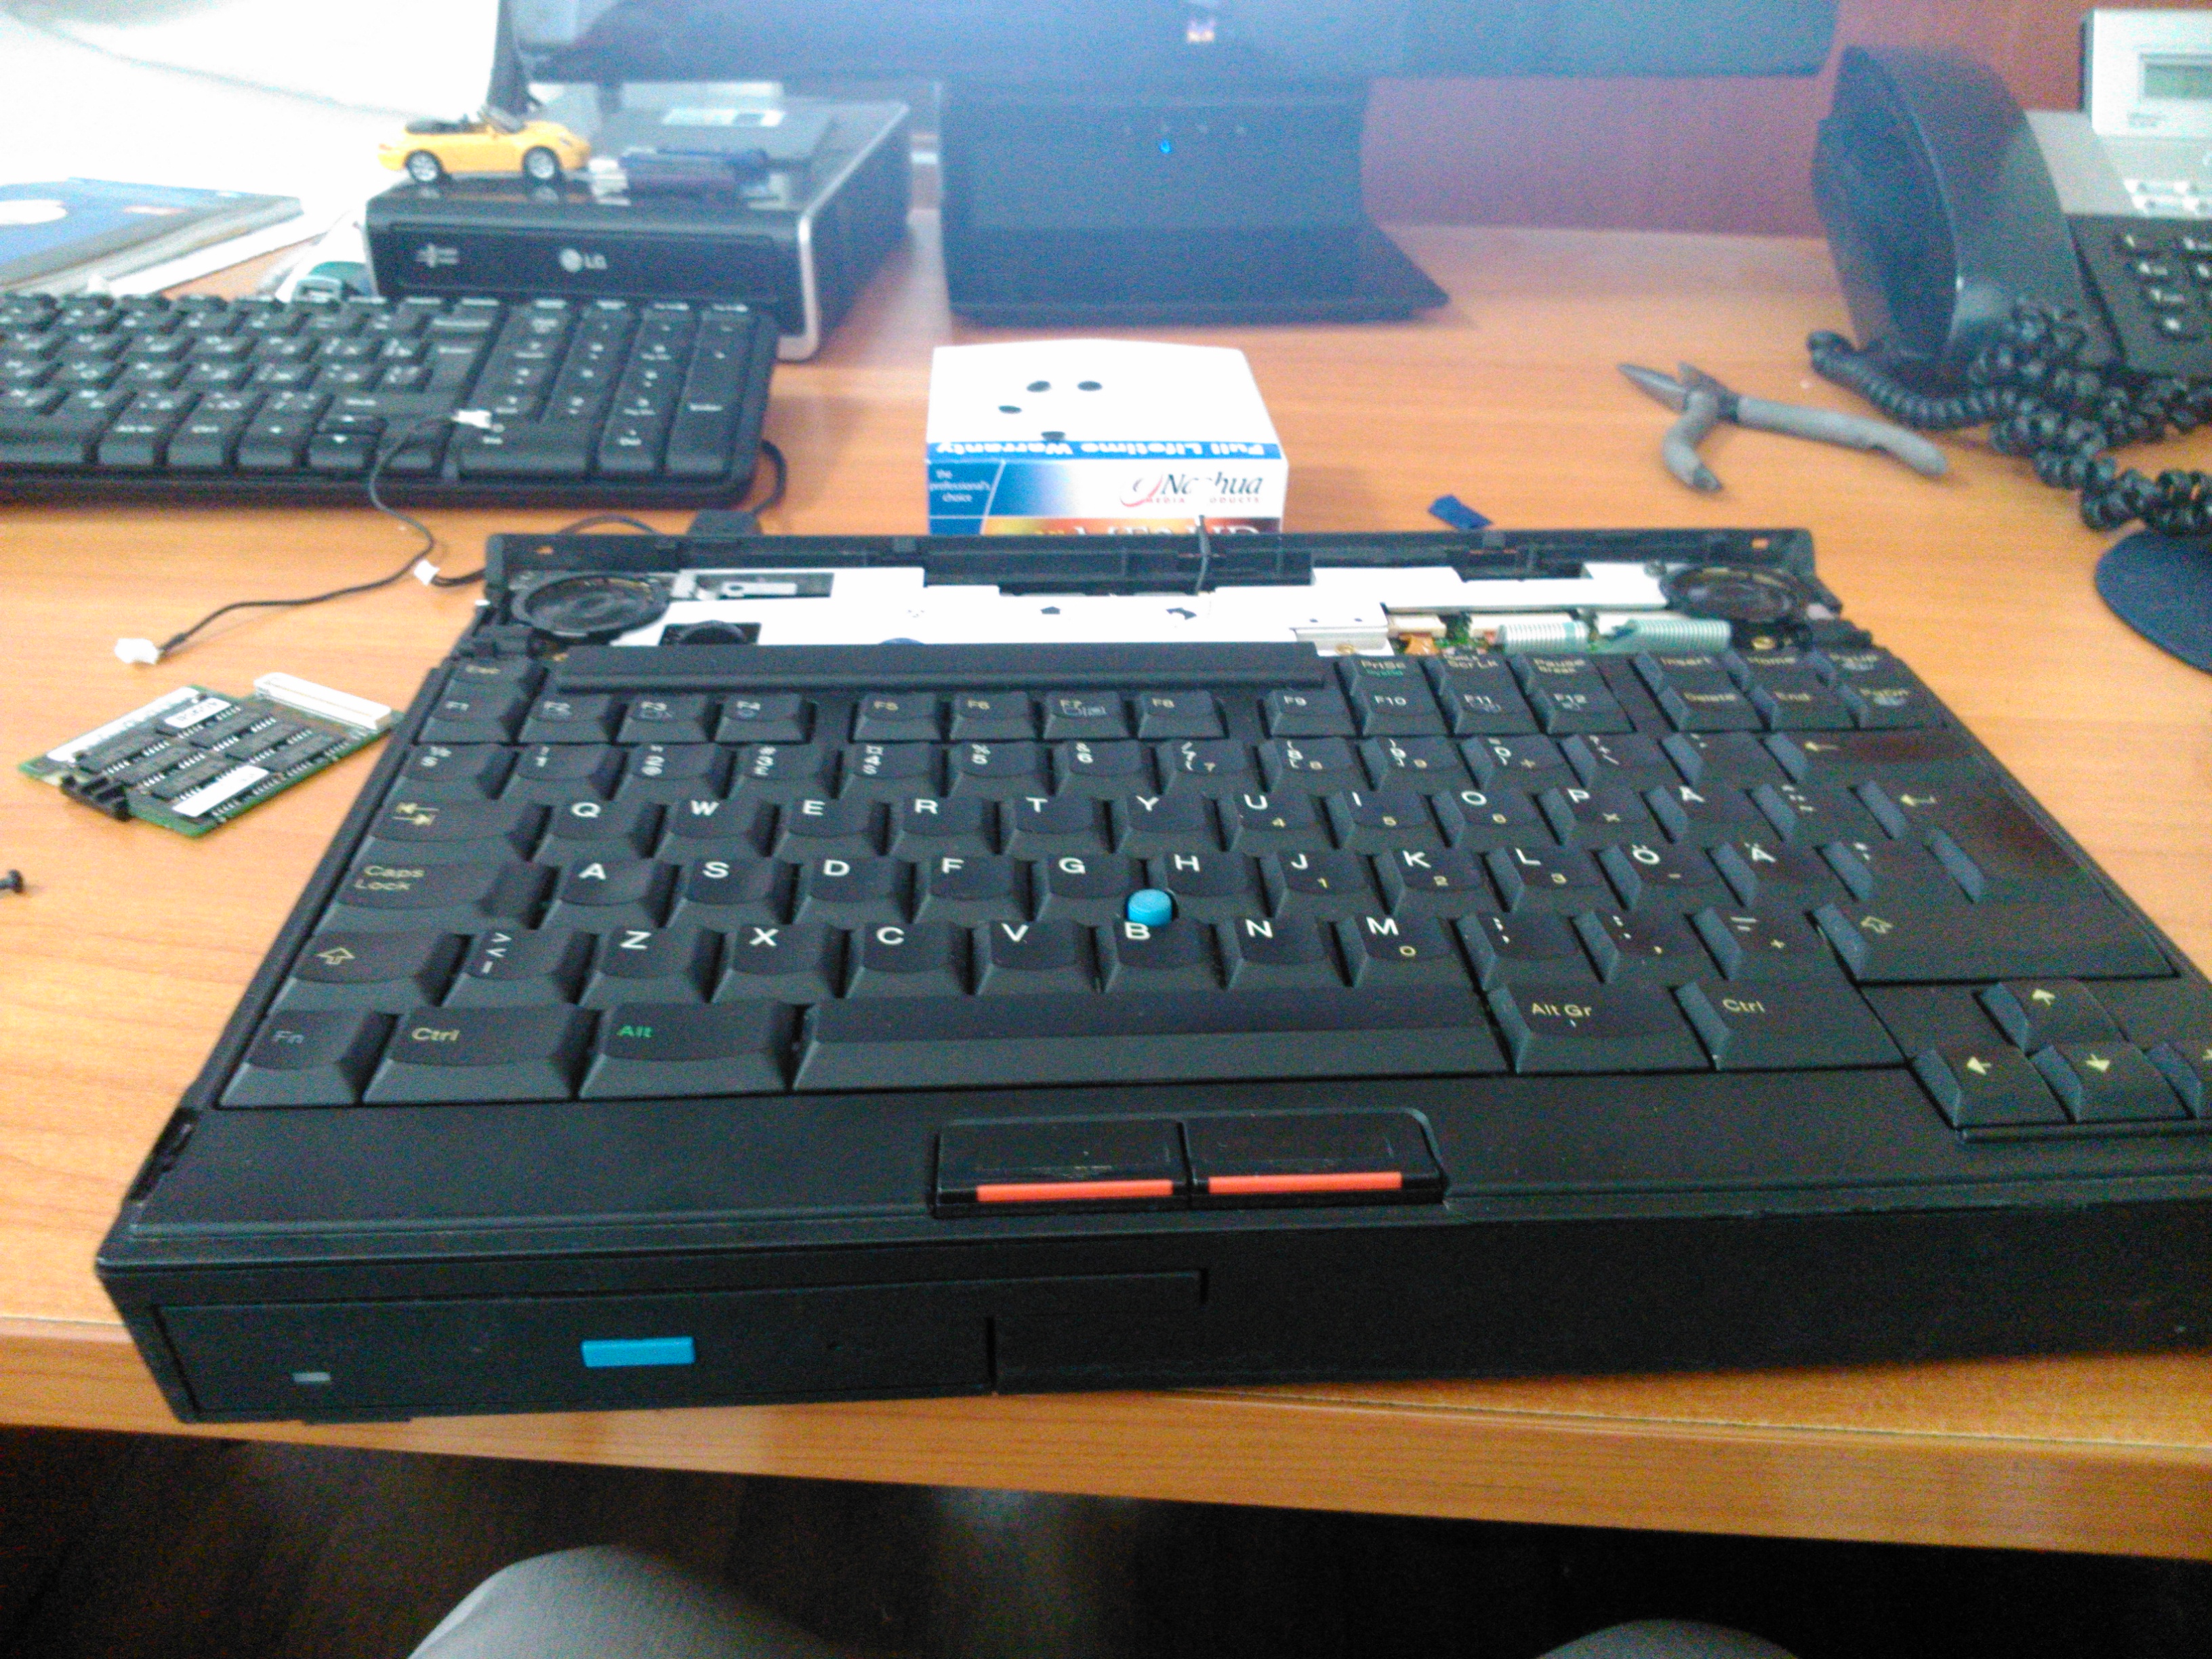
Now - install the keyboard - the bottom half of the laptop is ready.

A little distraction from the bottom - in front of you is a photo of the “filling” of the lid - a matrix, a microphone and a loop. Of the two covers, I assembled one - in one there was a dead cable, the other was heavily worn.
Finally, the finish line - we tighten the 4 screws that secure the hinges of the cover, connect the display cable, the inverter cable and the microphone, put the socket with LED indicators and put on the housing panel. The laptop is ready!


Here is such a handsome man! The laptop is workable, it can be considered that completely. There are only two problems - 8 megabytes less RAM than could be possible and with each shutdown the confusing clock settings - if you connect the CMOS battery, error 201 occurs, memory error - the laptop is surprised that there are not enough 8 megabytes put to it ... why the error does not occur Without a battery, it’s not clear.
I hope the article did not turn out too messy and you will not regret the time spent reading it) I apologize for the quality of the photo - the plans were a little different and I did not take the camera with me.
The following review will be more classic) I will try. Thanks for attention! Stay tuned!
PS Comments are accepted on the topics of the following reviews.
PPS Tradion Link on the exhibit page (so far without a photo).
So, back in 2001. One frosty day, my friend Andrei, whose hobby and job is trading in second-hand iron at Juno (a large multi-assortment market in St. Petersburg), came to visit me and pulled me out of
The first attempt at revitalization was made a couple of months later, when I found out that on this model the memory does not live on the motherboard, but on a small daughter board. A small daughter’s handkerchief located at the very bottom of the sandwich of the boards that make up the laptop. Unfortunately, the laptop did not want to come to life either without this scarf, or with a 4 megabyte motherboard (it was native to 8) from 755Cs. After that there was a move, a large expansion of the collection and much more - it was not up to him.
But, on October 6 this year, a potential donor was discovered on one of the announcement sites, moreover in the best configuration. A few hours later, I already had a laptop. And now, let's digress a bit from this
So, here is the top model of 1994, the IBM ThinkPad 755CD - the first laptop with built-in CD-ROM, and possibly the first laptop with an analog video input and a hardware video encoder board. Inside it has the fastest Intel 486 processor - as much as 100 MHz, 8 megabytes of RAM (looking ahead, I’ll say that our hero will have 16 megabytes), an 810 megabyte hard drive (there were versions with a 540 MB disk). A two-speed CD-ROM can be replaced with a floppod. Serious car.
Outside is a classic black-brick ThinkPad. Then there were no ultrabooks and other thin devices, so 56 mm of thickness was not something beyond. The case is finished with soft-touch coating, the keyboard rises to access the interchangeable components - memory, battery, disk and drive. And now, having got acquainted with the laptop closer, we will climb into its gut!
Why do we do this? We start in the morning of October 7th. I took both laptops to the office, it was convenient there to do a bulkhead. There were no global things planned - just toss the lid with the matrix and the daughter board with the slots for RAM into a new laptop - his lid was badly scratched. And here the difficulties began. After the assembly, the screen went into purple hues (one of the image channels disappeared). It turned out that the connector for connecting the matrix was damaged. It doesn’t matter - we take off the lid, remove the screen (and so, on both machines) and throw the top plate out of the sandwich. It worked! We leave the laptop to work for a couple of hours ...
And then what happens is that because of what today's review from the "review" of the laptop became "notes of the restorer" ... the laptop freezes. After repeated inclusion - sees only 4 megabytes of memory. After removing the bar, no changes occurred - again the trouble with the pre-installed memory ... we disassemble to the bottom. I did not guess to capture this process, despite the fact that I repeated it several times.
Frankly, it was very disappointing. But the desire to revive the laptop was stronger. I tried several combinations of boards, but all to no avail - one is seen at half the volume, the other gives an error when loading the OS. In one of the attempts - I forgot to connect a CMOS battery and a daughter board with memory. In this embodiment, the machine booted without other errors and stably worked for more than an hour. Success.
We disassemble the boards assembled on the knee and begin the assembly process "as it should." That's just the internal structure and the assembly process, and I want to devote the bulk of today's story.
All modern laptops have one main motherboard, and is often limited to it. In some cases, daughterboards are used to place connectors or optional controllers. Sometimes there are on a separate board a video controller is taken out. But earlier, 15-20 years ago it was different: placing everything on one board was difficult, there were a lot of chips, strapping was more difficult. And if you still had to do something functionally rich ... As a result, for most laptops, the filling was located in several layers. This is also done in this device. The boards are located in a separate compartment formed by a metal screen, consisting of two parts - this also achieves the required structural strength - the case itself is made of plastic. The compartment with the boards occupies about a third of the internal volume of the case, the rest is allocated to replaceable components.
Inside the screen is a sandwich of circuit boards. We will consider them in the process of assembling the laptop. Dismantling, although it requires painstaking work, is trivial.
Let's get started. We take the main board in our hands - it has a chipset (Pico Power), a video controller (Western Digital with 1 MB of memory. Not on magnetic plates) and connectors for connecting other components. From the bottom, the ill-fated memory
board is attached to it on the connector ... We insert the board into the lower half of the screen. It is attached to it with two screws, simultaneously fixing the PCMCIA slot block and external port spacer screws. We connect the processor board from below (there is almost nothing there) - it completes the bottom of the screen with a heat sink plate. Also, the processor heat sink is used to preheat the hard drive in the cold winter months.
Now install the communication board. It is soldered to the IBM M-Wave - DSP controller, which is responsible for outputting sound and working with the telephone line. It connects to the cover with a microphone cable and to the video processing board with an audio cable for the speakers.
The next board is the VRM module.
The next step was to have a photo with the last of the large boards installed - a video processing board, which also displays LVDS from the video controller, an infrared port and an external drive connector. The Philips 7110 chip and a microcircuit marked with hieroglyphs and number 7320 are installed on the board itself, adjacent to a pair of RAM chips. The first, as I believe, is responsible for the digitization of the analog signal, and the second is the acceleration of video encoding-decoding. Also through this board a signal is supplied to the speakers. But the photo was unsuccessful and I did not have the opportunity to make it again. Therefore, the photo shows an already closed shielded module installed in the case.
The next step is to install the module in the case and connect the front infrared port (for convenience, the ThinkPad has been using two infrared ports for a long time), a memory battery (used to warmly replace batteries in standby mode), and a board with memory slots.
Now - install the keyboard - the bottom half of the laptop is ready.
A little distraction from the bottom - in front of you is a photo of the “filling” of the lid - a matrix, a microphone and a loop. Of the two covers, I assembled one - in one there was a dead cable, the other was heavily worn.
Finally, the finish line - we tighten the 4 screws that secure the hinges of the cover, connect the display cable, the inverter cable and the microphone, put the socket with LED indicators and put on the housing panel. The laptop is ready!
Here is such a handsome man! The laptop is workable, it can be considered that completely. There are only two problems - 8 megabytes less RAM than could be possible and with each shutdown the confusing clock settings - if you connect the CMOS battery, error 201 occurs, memory error - the laptop is surprised that there are not enough 8 megabytes put to it ... why the error does not occur Without a battery, it’s not clear.
I hope the article did not turn out too messy and you will not regret the time spent reading it) I apologize for the quality of the photo - the plans were a little different and I did not take the camera with me.
The following review will be more classic) I will try. Thanks for attention! Stay tuned!
PS Comments are accepted on the topics of the following reviews.
PPS Tradion Link on the exhibit page (so far without a photo).