Experience in building a copter: WLtoys V949 + MultiWii 2.0
Good afternoon! I want to bring to the attention of the community my small mini-quadrocopter project based on MultiWii 2.0.
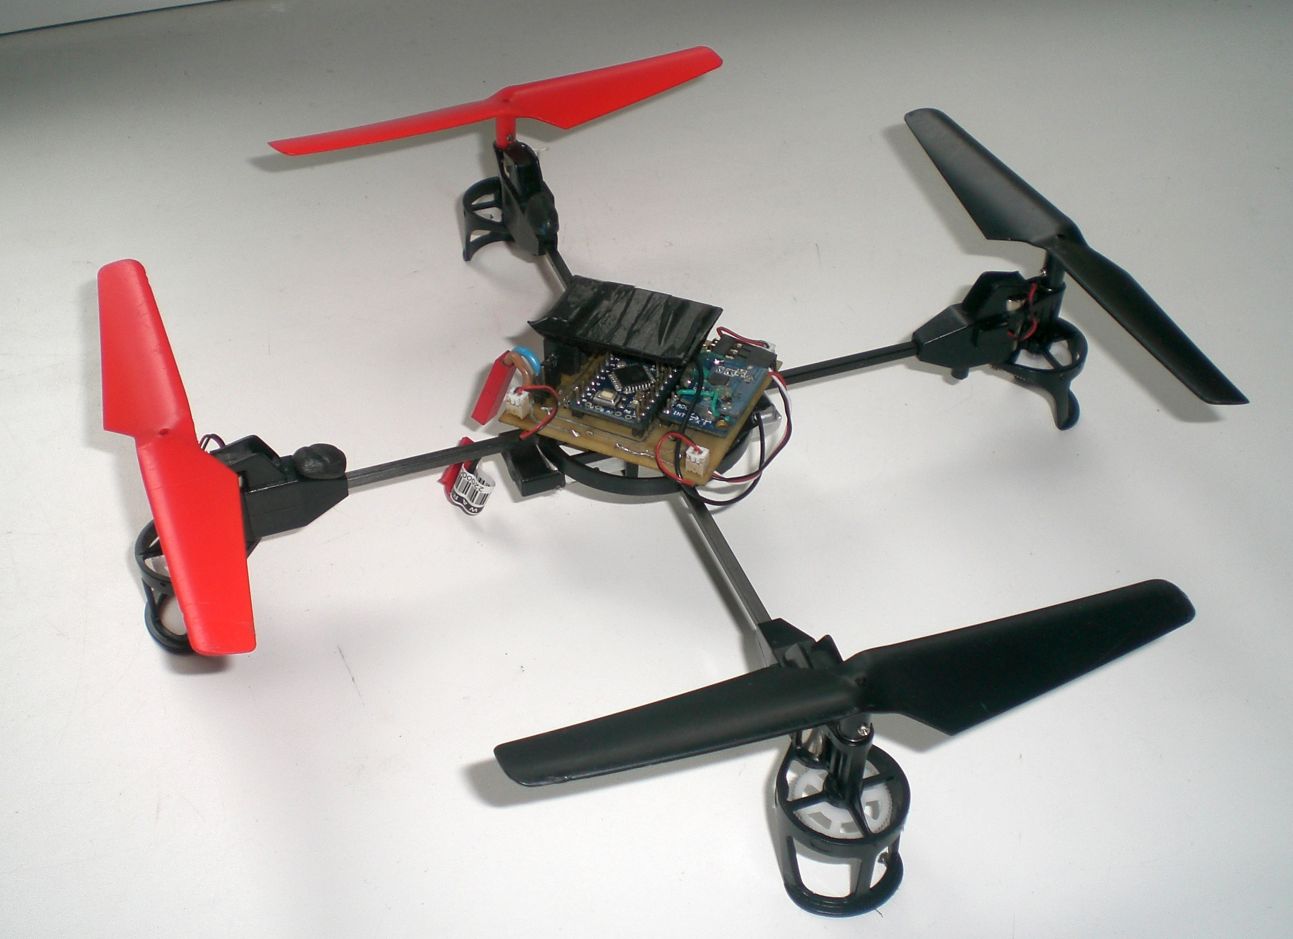
Let's start with the background, otherwise it will be very difficult to understand why the copter turned out exactly the way it is.
In 2011, at the 5th year of university, I wanted to assemble my little just for fun robot, but the wheeled platform somehow did not attract, and it was decided to collect something flying. The easiest option then seemed to me a helicopter. But just to build a flying robot was not interesting, I decided to add it to my diploma project "development of a system for remote control of a moving object."
Helicopter spec-list:
I was (yes, in other matters, and I remain) a novice in the construction of such devices and therefore ran into a number of problems, in particular IMAX B3 turned out to be burned, and I had to solder my memory in emergency mode (about it some other time). As a result, at the time of defense, oddly enough, I managed to assemble my own Rx / Tx system, but the helicopter itself turned into a long-term construction.
The graduation project was presented in the form of a stand:
Here are indicated: current shunt (1), ESC (2), Rx (3), power switch (4), BLDC + tachometer (5), battery (6) and tachometer display (7) . All this stuff was controlled with the help of a nondescript kind of program that I planned to control a helicopter. After a series of experiments with my home-made radio control equipment, I decided to temporarily put it on the shelf and buy specialized for my RC projects.

Some time passed, the defense went off with a bang, everything went according to plan. It’s time to know the honor! The following components were purchased / manufactured:
So, I assembled, tuned, the key to start ... Then everything is like in a fog:
Having analyzed the situation, I found out that the radio equipment is to blame for everything, which, after a couple of minutes after turning on, is very hot and stops working normally.
One year has passed since recent events. I stopped considering myself the most unfortunate “pilot” in the world and bought the missing parts for my helicopter (including the new Turnigy RX7000S receiver). But the helicopters didn't really interest me anymore. At this time, I came across some very interesting material with Hackaday . His eyes lit up, and a new project was born!
Copter spec-list:
* - how the first receiver broke - described earlier, the second broke due to a short circuit (it's to blame), bought 3 more, just in case, total - 5pcs.
** - two modules were ordered in different stores, at different times, about the first read on, the second is still on the way.
The advantages of this configuration, I consider:
As a software platform, I decided to use MultiWii 2.0. Ultimately, the circuit of the device has the following form:

The circuit is implemented in DipTrace 2.7.
In my humble opinion, everything should be understood here. This diagram almost completely copies the original “Connecting Diagrams” from the MultiWii website: www.multiwii.com/connecting-elements .
The board layout may be of interest, here is its 3D model:

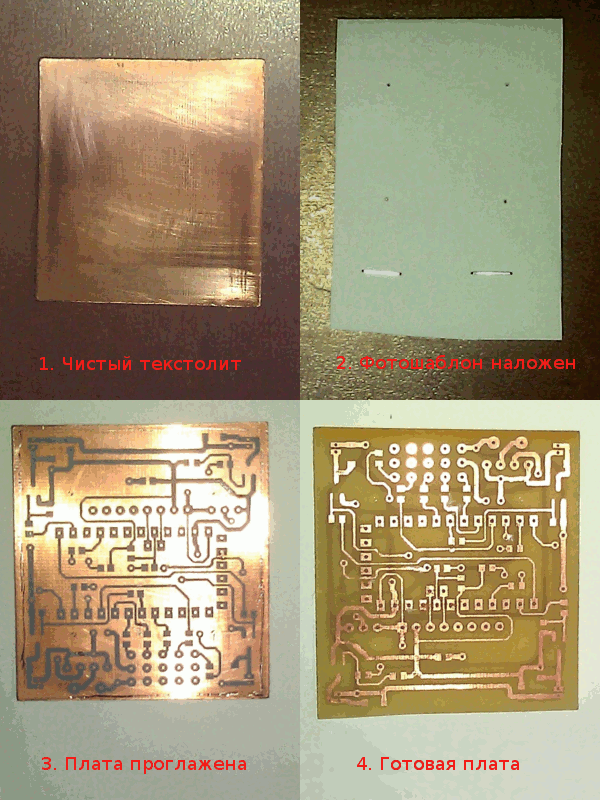
Although the board (and the project as a whole) probably does not represent anything outstanding, I decided to share it with everyone who wants it: github.com/geovas/DCwii . The board is made using LUT technology:
But something bad was supposed to happen, right? One of the elements, namely the GY-521, was already broken after assembly!
And we continue, at the time of the gyroscope breakdown, the device looked like this:
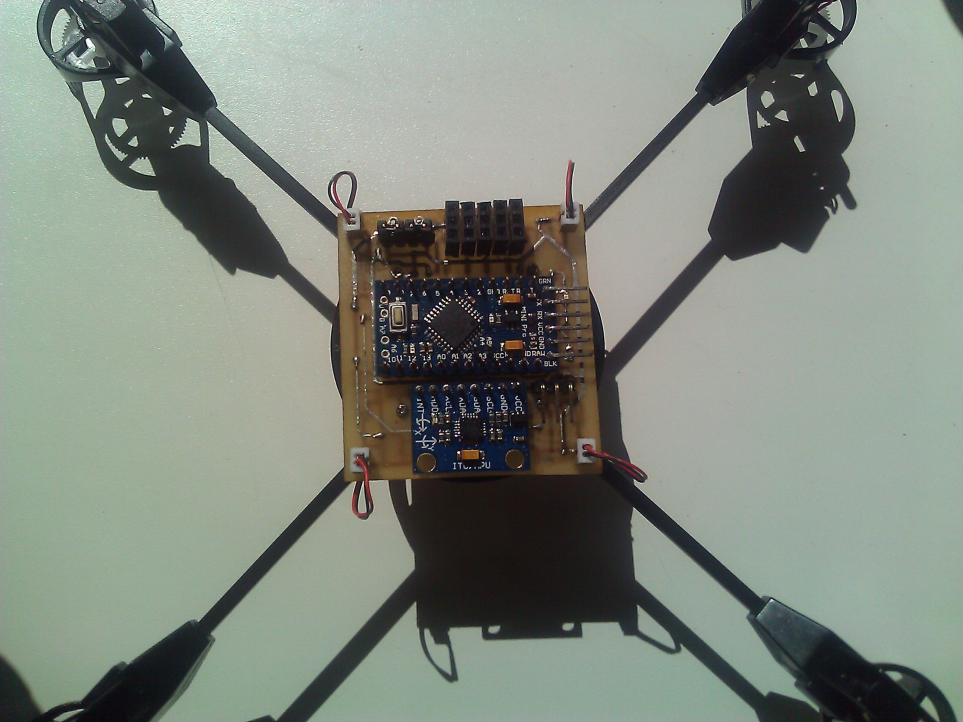
The only idea that visited me at that time was to use the MPU-3050 from the WLtoys V949 control board. No sooner said than done:
It looks disgusting, but it works! In the photo below, the Frankenstein module is highlighted in red:

Today I ordered a new MPU-6050, however, it is still somewhere along the way.
The last bastion of resistance was MultiWii. Of course, I immediately found Fork for the 8MHz version of the Arduino Pro Mini , but I was surprised when I realized that it would not work with my configuration. As a result, I had to tinker. Here is a link to my Fork MultiWii 2.0: github.com/geovas/multiwii-firmware/tree/master .
The main features of my firmware are as follows:
After an uncountable amount of crashes (the small copter turned out to be strong enough), I managed to set up the device. I set up through MultiWii WinGui, which, like MultiWii itself, had to be finished with an 8MHz controller, but this is a completely different story.
I offer a short video of the first flight of the copter, how the good weather will improve (well, or it will snow) I will try to launch it outdoors.
PS
Lyrical digression or project history
Let's start with the background, otherwise it will be very difficult to understand why the copter turned out exactly the way it is.
In 2011, at the 5th year of university, I wanted to assemble my little just for fun robot, but the wheeled platform somehow did not attract, and it was decided to collect something flying. The easiest option then seemed to me a helicopter. But just to build a flying robot was not interesting, I decided to add it to my diploma project "development of a system for remote control of a moving object."
Helicopter spec-list:
| detail | title | link | qty |
|---|---|---|---|
| platform | Fire Fox EP200 | www.hobbyking.com/hobbyking/store/uh_viewItem.asp?idProduct=8938 | 1 |
| motor (BLDC) | V2623-4500kv Heli Brushless Outrunner | N / a | 1 |
| regulator (ESC) | HobbyKing Red Brick 25A ESC | www.hobbyking.com/hobbyking/store/uh_viewItem.asp?idProduct=18003 | 1 |
| servo drive (Servo) | NoName 3.7g | N / a | 4 |
| battery (LiPo, battery) | Rhino 1050mah 2S 7.4V 20C | www.hobbyking.com/hobbyking/store/uh_viewItem.asp?idProduct=7307 | 2 |
| Charger (charger) | IMAX RC B3 | rctimer.com | 1 |
| Transmitter (Tx) & Receiver (Rx) | MSP-EXP430G2 430BOOST-CC110L | www.ti.com/tool/msp-exp430g2 www.ti.com/tool/430boost-cc110l | 1 + 1 |
| Gyro (Gyro) | HobbyKing GA250 AVCS Gyro | www.hobbyking.com/hobbyking/store/uh_viewItem.asp?idProduct=15318 | 1 |
I was (yes, in other matters, and I remain) a novice in the construction of such devices and therefore ran into a number of problems, in particular IMAX B3 turned out to be burned, and I had to solder my memory in emergency mode (about it some other time). As a result, at the time of defense, oddly enough, I managed to assemble my own Rx / Tx system, but the helicopter itself turned into a long-term construction.
The graduation project was presented in the form of a stand:
Here are indicated: current shunt (1), ESC (2), Rx (3), power switch (4), BLDC + tachometer (5), battery (6) and tachometer display (7) . All this stuff was controlled with the help of a nondescript kind of program that I planned to control a helicopter. After a series of experiments with my home-made radio control equipment, I decided to temporarily put it on the shelf and buy specialized for my RC projects.
Hate!
Let's get back to our charger. It went to me for 2 months, and it was too late to contact PayPal. However, out of children's naivety, I wrote to RCtimer a request to return the money to me. They solved this problem radically by removing IMAX B3 from their range, and with it, obviously, my comments.
Some time passed, the defense went off with a bang, everything went according to plan. It’s time to know the honor! The following components were purchased / manufactured:
| detail | title | link | qty |
|---|---|---|---|
| Rx / tx | Turnigy 6XS FHSS | www.hobbyking.com/hobbyking/store/uh_viewItem.asp?idProduct=24903 | 1 |
| gear (pinion) | Custom | manufactured at the factory | 1 |
So, I assembled, tuned, the key to start ... Then everything is like in a fog:
- broken tail rotor mechanics;
- broken landing brackets (landing gear brace);
- the engine no longer starts;
- pride is hurt.
Having analyzed the situation, I found out that the radio equipment is to blame for everything, which, after a couple of minutes after turning on, is very hot and stops working normally.
Hate!
I swore with HobbyKing about 2 months, I contacted PayPal who replied that the seller will return the money to me as soon as I send them the parcel back. I sent the parcel, another month passed, I received an answer from PayPal that they said the parcel was gone and no one will return anything to me. Another 3 months pass, the parcel is returned to me (in the end I paid 750 rubles for everything), to my reasonable question “what’s the best thing?” A lady from my beloved Russian Post replied that “the recipient refused to pick up the parcel”. God decided to judge them, and stomped away ...
Building a copter
One year has passed since recent events. I stopped considering myself the most unfortunate “pilot” in the world and bought the missing parts for my helicopter (including the new Turnigy RX7000S receiver). But the helicopters didn't really interest me anymore. At this time, I came across some very interesting material with Hackaday . His eyes lit up, and a new project was born!
Copter spec-list:
| detail | title | link | qty |
|---|---|---|---|
| platform | WLtoys V949 BNF | www.banggood.com/Wholesale-WLtoys-V949-Beetle-RC-Quadcopter-Mini-UFO-BNF-p-57271.html | 1 |
| Microcontroller (MCU) | Arduino Pro Mini 8MHz 3.3v | www.ebay.com/itm/Redesign-Pro-Mini-atmega328-3-3V-8M-Replace-ATmega128-Arduino-Compatible-Nano-/200914924969?pt=LH_DefaultDomain_0&hash=item2ec77675a9 | 1 |
| Transmitter (Tx) | Turnigy 6XS | www.hobbyking.com/hobbyking/store/uh_viewItem.asp?idProduct=24903 | 1 |
| Receiver (Rx) | Turnigy RX7000S | www.hobbyking.com/hobbyking/store/uh_viewItem.asp?idProduct=28472 | 5* |
| battery (LiPo, battery) | Turnigy Nano-Tech 600mAh 1S | www.hobbyking.com/hobbyking/store/uh_viewItem.asp?idProduct=20385 | 3 |
| Avionics (Gyro, Acc) | MPU-3050 MPU-6050 | Brutally torn from WLtoys V949 cm. Hate! - spoiler below | 1 2 ** |
| Charger (charger) | Custom | Homemade (two varieties) | 2 |
| Additionally | Turnigy Voltage Booster for Servo | www.hobbyking.com/hobbyking/store/uh_viewItem.asp?idProduct=11784 | 1 |
** - two modules were ordered in different stores, at different times, about the first read on, the second is still on the way.
The advantages of this configuration, I consider:
- the ability to use a gyroscope from WLtoys V949;
- the ability to use LEDs, capacitors, various connectors, MOSFETs and Schottky diodes from WLtoys V949;
- the presence of a battery (and even a charger) in the kit WLtoys V949;
- the ability to power the gyroscope directly from Arduino (Arduino at 3.3v was not chosen by chance).
As a software platform, I decided to use MultiWii 2.0. Ultimately, the circuit of the device has the following form:
The circuit is implemented in DipTrace 2.7.
In my humble opinion, everything should be understood here. This diagram almost completely copies the original “Connecting Diagrams” from the MultiWii website: www.multiwii.com/connecting-elements .
The board layout may be of interest, here is its 3D model:
Although the board (and the project as a whole) probably does not represent anything outstanding, I decided to share it with everyone who wants it: github.com/geovas/DCwii . The board is made using LUT technology:
But something bad was supposed to happen, right? One of the elements, namely the GY-521, was already broken after assembly!
Hate!
I asked the seller to send me a new scarf instead of the defective one (after leaving him bad feedback). We agreed that I will correct feedback, and at the same time I will order something else from him, while he will send me a new GY-521 in the package. The package arrived, but what was my surprise when I did not find the cherished detail in it! Well, one more bad feedback (this time really angry). He offered to return the money and was “surprised” that I never received the item. I agreed, but he demanded that I first change my review. Of course, I did not agree. Surprisingly, this Chinese citizen quickly disappeared from my horizon and did not write to me anymore. Well, and the Lord is his judge!
And we continue, at the time of the gyroscope breakdown, the device looked like this:
The only idea that visited me at that time was to use the MPU-3050 from the WLtoys V949 control board. No sooner said than done:
- Part of the board with a gyroscope was cut with metal scissors.
- The old MPU-6050 has been disabled.
- The new “module” was glued over the old one and soldered.
It looks disgusting, but it works! In the photo below, the Frankenstein module is highlighted in red:
Today I ordered a new MPU-6050, however, it is still somewhere along the way.
Copter firmware
The last bastion of resistance was MultiWii. Of course, I immediately found Fork for the 8MHz version of the Arduino Pro Mini , but I was surprised when I realized that it would not work with my configuration. As a result, I had to tinker. Here is a link to my Fork MultiWii 2.0: github.com/geovas/multiwii-firmware/tree/master .
The main features of my firmware are as follows:
- work with Arduino Pro Mini 8MHz 3.3v;
- support for working with DC motors (DCT);
- DPT can be completely stopped;
- the ability to work with the MPU-3050 gyroscope.
After an uncountable amount of crashes (the small copter turned out to be strong enough), I managed to set up the device. I set up through MultiWii WinGui, which, like MultiWii itself, had to be finished with an 8MHz controller, but this is a completely different story.
I offer a short video of the first flight of the copter, how the good weather will improve (well, or it will snow) I will try to launch it outdoors.
PS
- Projects on GitHub will gradually develop, if you also build a copter based on the WLtoys V949 or a similar device, I will be glad to hear your suggestions and comments, as well as share my experience!
- Friends! If you find any errors or inaccuracies in my article, immediately let me know.
- If you didn’t like the “evil bets”, feel free to speak. Their goal is to show the “honest process of building the apparatus” with all the difficulties that I had to face and the important commandment of such projects is humility, because without it there would be no article. If such inserts do not have a place on the hub, then so be it! Thank you for understanding.