A pseudoscope, or what if you change your eyes
If you, having seen this picture, understood that your life will never be the same again, then you understand me. Quite a long time ago, more than two and a half years ago, quite by accident I saw this picture on the Internet (it seems, on ffffound ), and a toggle switch clicked in my head. An irreversible process has been started.
The usual course of everyday events has ceased to reassure its completeness. Everything that once filled my life with meaning became only a pale background for swollen thoughts that permanently took away the resources of my brain; secondary garbage in front of the question, which at that time became the center of my existence - “How? What is it like to look into such a design? What will a person see? ”(I hope no one has noticed that there are three questions here). I definitely wanted to assemble this design and find out the answer to the question.
Years passed, I got the second diploma and graduated from university. The severe matan, Lobachevsky’s geometry and other abstruse things made me less susceptible to such images, my psyche stabilized (I hope). I got acquainted with the books of Oliver Sachs, which told amazing stories, including the perception and interpretation of visual information by the brain (say, the story of a guy who was blind from birth, who gained his eyesight due to surgery).
In addition, I learned that, of course, long before me, smart people thought of building such structures, using them to study the reaction of the brain to optical illusions, and even give a clever scientific name - a pseudoscope (and also an invertoscope and my next dream - a stereo tube ).

All sorts of communities were found, articles with mathematical calculations , notes with impressions of use , online stores , circles of interest and parties of varying degrees of dart , videos without SMS and registration , rubble fittings cheap Moscow pickup ... sorry, I felt like a labor-trainer.
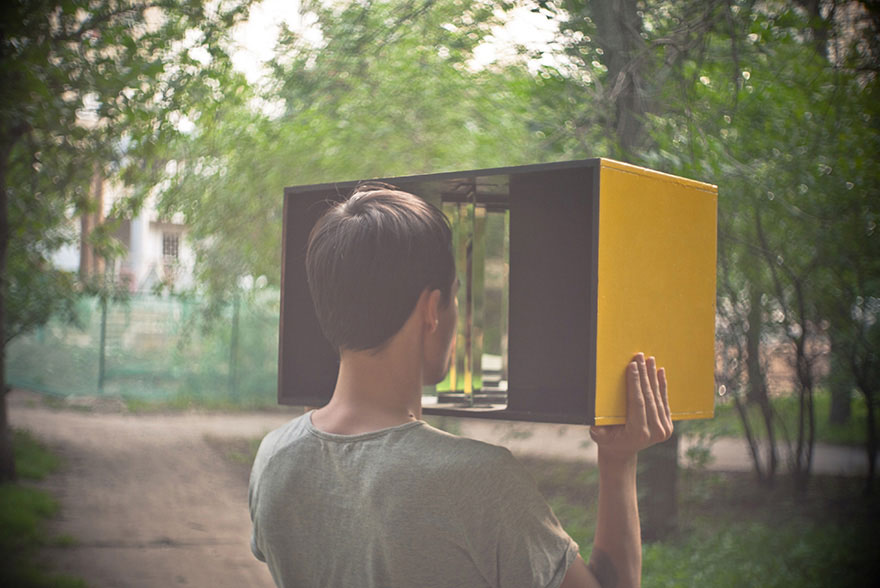
Finally, the magic of mystery and obscurity by the bulldozer was demolished by the discovery of such a resource as tiniay and the feature of searching images on Google images . Using these services, I found out the source of that primary image. As it turned out, long before me I trod a pathAnatoly Zenkov , a cool designer, as you can judge from his vimeo channel. We found video testing and a flickr gallery with the process of creating a pseudoscope.

The end of the story?
It would seem that this is the end of the story, the universe taught me a lesson: “The pioneer laurels are busy, everything has already been invented before you, the inspiration that seems great to you is just a moment of useless bicycle invention, this world is harsh and uncompromising, and there is no place for your rotten ideas " .But for some reason the hunt did not repel. Desire did not die, it still glowed, although it diminished. The catalyst during the incubation period was the year spent in prisons under the name of the Armed Forces of the Russian Federation, where you do what they tell you from what you find yourself. Screwdriver? Hacksaw for metal? Ha! It took a week to ask the officers to take them to the store to buy a bolt for their money; and if self-tapping screws were needed, they were twisted out in other places, with the hope that nothing would collapse. So the recent acquisition of freedom has certainly contributed to the transition from idea to action.
Another motive that started the creation process is the desire to get rid of the idea so that it finds a way out, does not pursue and does not strangle me, does not capture me , as I wroteabout this Oleg Pashchenko (illustration below him).

Be that as it may, I found free time, and I decided to build my own mirror pseudoscope.
Paper and virtual stage
It all started with calculations on a piece of paper. Not tensor calculus, of course, but also had to suffer with trigonometry.
The overall scale of disasters can be estimated from the photograph:

After this tedious stage, a desire arose to automate the calculation of the coordinates of the mirrors. Firstly, there are quite a lot of variable input parameters (the angle of the mirrors, the distance between the eyes, their viewing angle, etc.). Secondly, even then I planned to show my brainchild to the world and decided to make it easier for those interested to create the structure.
As a result, he quickly blinded on a flash (sorry) a program in which everyone can calculate all the sizes for themselves. The configuration option that I built on was set in the program by default.

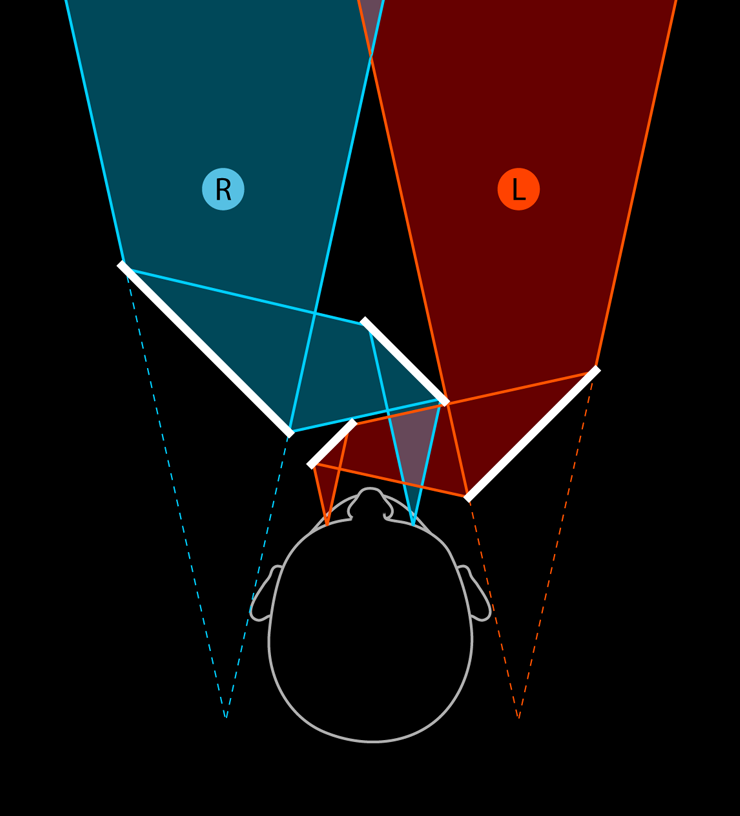
I think there is no need to explain each slider. Just mention about the gaps. All calculations were carried out taking into account the “sterile” configuration, i.e. mirrors with zero thickness, everything falls millimeter to millimeter. In life, things do not go so smoothly - there is a gap, there is inconsistency, the curvature of the hands exceeds permissible norms, etc. Mirrors, on the other hand, have a nonzero thickness, which imposes an error: when a ray falls on a reflecting surface at an angle different from a straight line, the effective surface of the mirror is less than real, because from the end of the mirror the beam will not pass normally. On the diagram, this can be considered (the fact of the refraction of a ray of light at the boundary is not yet displayed):

So I left the centimeter of the gap. If anyone is interested in digging, here are the source. It is written in AS3, but without classes (once again, I'm sorry) and all this OOP party, dumb and ingenuous code.
Well, the sizes are received, it is possible to start a large construction site. Finally, I run the dimensions through cinema4d, just to calm down.

Physical stage
Now from the paper-virtual world we return to the real world.We think over the physical implementation of the drawings - materials, fixtures, color. After this, a raid on the shops - first OBI, then Leroy Merlin.
That as a result of glamorous shopping (I very organically wandered around shopping centers with building materials, looking into fashion shops) we have:

- 4 mirrors 300 mm high and 65, 130, 200 and 265 mm wide, respectively. If you are afraid of awakening the mighty power of hand-made mirror cutting in yourself, everything will be cut in Leroy Merlin, although for good money - 90 rubles. in one cut. As a result, cutting cost more than the mirrors themselves.
- 4 pieces of plywood, 7-ply, 1 cm thick (I couldn’t find any thinner):
300 × 300mm - 2 pcs. (sides),
550 × 300mm - 2 pcs. (up and down).
Similarly, in order not to turn the apartment into a sawmill, then finding sawdust in the most unexpected places for a couple of years, you can use the free plywood cutting service in OBI. - Corners are metal. I planned plastic ones, but there weren’t any in OBI. Two formats: wide (three meter), for fastening the frame of the box and attaching the back of the mirrors to the frame; and narrow (two meter), for mounting the reflecting side of the mirrors to the frame.
- Hacksaw for metal and miter box for drank corners.
- Glue in plentiful amounts for corners. I scored everything - a normal moment, a super moment (in the end I just used it), an epoxy moment. The box itself could, of course, be elegantly put on self-tapping screws, but I really wanted to smell more glue. Damn, did I say that out loud?
- I decided to choose the color scheme as for the Zenkov version. For this enamel was bought black (for viscera) and yellow (for exterior decoration) with rollers and brushes. Plus, yellow paint in the spray can (not needed) and a black marker for painting narrow corners, which were only white in the store.
After purchasing the materials, I calculated everything in more detail in a vector editor, taking into account the dimensions of the corners, the thickness of plywood and mirrors, so that nothing would overlap. Based on these data, I’ll clarify the coordinates.

We start with the layout of the drawings on the upper and lower panels. Here you need to be precise, especially when it comes to matching the upper and lower panels - any mismatch will lead to tilt of the mirror. At the same time, we color black the back sides of the mirrors.

On the basis of the updated drawings, we cut the corners - for connecting mirrors with panels and panels with each other.

Before gluing, I paint over the white corners with a black marker. We do not fix corners with glue to the mirrors, to the panels.

Then we glue everything to the bottom panel according to the markings on it.

We paint all the insides black (after complete assembly of the structure, climbing with a brush / roller between the mirrors will be inconvenient). At this moment, I decided to abandon the lining of the upper panel, relying on the perpendicularity of the corners of the mirror (as it turned out later, in vain).

Install the top cover.

A jamb is immediately detected due to the incorrect order of gluing the corners (more on this at the end) - the upper corner does not fit snugly on the frame. We'll have to pick a corner and stick it separately.


Hello. It
remains to paint the outside. We seal the cavity with paper.

We cover with a black base.

Then in two layers of yellow paint. Done!

Total
Maybe the first pancake didn’t come out lumpy, but the implementation is far from ideal (I will describe errors and possible improvements below).
As for the answer to that very question - What is it?
I will quote Zenkov:
“As it turned out, for me this device doesn’t work. Due to poor vision, I had the feeling that I was just looking with one eye. However, having tested the device with other people, a lot of interesting things turned out. For example, that it is almost impossible to focus on near objects. Distant objects lose volume and become flat. In addition, the understanding of the distance to objects is lost, up to the point that some distant objects are literally visible in front of neighbors. Many people compared the effect with 2D games, where, due to the difference in the displacement of the layers, the depth of the scene is simulated, but noted that it looks like an unfinished game. "

Mistakes and Tips
In the course of work, I made mistakes, mainly due to a lack of patience and engineering experience (* pathosmodon * well, more precisely, the experience of implementing my engineering developments, and so I made a model of gamma radiation detector on GEANT4 * pathosmodoff *), and also because of laziness. I didn’t want to think anymore, I wanted to do-do-do to the bitter end, not including the brain. Therefore, something I did not plan correctly, somewhere I mowed during the implementation, changed my mind in the middle of the process, etc.In general, looking back what I would do differently:
- The size. I would still do less. I don’t have an art workshop in the attic of an old brick house in the center of Moscow, and I don’t have a place for such a thing. On the cabinet only if thrown.
- The material of the panels. I chose plywood simply by the principle of least resistance (it was in OBI, and it was too lazy to make extra trips to the shops). Cons - heaviness, knots, texture (painting is difficult, but the dust collects especially well, visually and to the touch I would like something smooth). The strength of 7-ply plywood is not needed here - in fact, it is only necessary that the structure does not bend under its own weight. If you persist and want to go shopping, I’m sure you could find suitable thin, light and durable material from some polycarbonate or some who would like to.
- Still, I would find black narrow corners. Of course, I repainted my whites in black with a marker, but it won’t work on the side of the mirror (the glue dissolves the paint and refuses to sit on the painted side). As already seen in the diagram above, the reflecting surface of the mirror is protected by a layer of glass, because of this, white stripes from the corners are visible in the reflection. Strongly spoils the look.
- Another gluing sequence. I would probably first glued the corners to the frame above and below according to the drawings, and then I would have glued the mirrors to them. Accuracy would be improved. And then the slightest miscalculation, the tilt of the mirror - and the effect of the pseudoscope is lost.
- I would read on the Internet about the basics of painting, so as not to learn everything, so to speak, live. Outside the brackets of the story, I left many of my fakaps in this area, which I am even ashamed to recall.
- Cracks. Several holes in the construction have no functional use. You can either initially lengthen the mirrors to close them, or, if after assembly, they can be closed with some sheet of black plastic. And visually it will become better, and the effect of the pseudoscope is stronger, because the eye will not be distracted by extraneous images

Well, a couple of tips:
- It would be nice to first make sure that this works for you. From the Zenkov quote above, it is clear that not everyone is able to evaluate the effect of a pseudoscope. If you have vision problems, think about whether you’ll fly over in the end.
- Take care of mirrors. They must be perfectly clean. Any scratch, stain or even a speck of dust breaks the whole effect - the brain realizes that they are trying to fool it.
And finally, I apologize for graphomania, the general atmosphere of posturing and the outpouring of biography facts unnecessary to the reader. He barely stopped himself when he was about to introduce you to his family.