July 13, 2013 at 21:11
Protection against listening to SIP using - TLS + SRTP + encrypted tunnel and Yealink T26p phone
- Tutorial

Do you have paranoia? It seems to you that they constantly want to eavesdrop on you? Do you have important negotiations? Then to you here!
In this article, I will talk about the main difficulties when setting up your Yealink T26p phone.
To get started, we will make the phone raise the encrypted tunnel with certificates to the OpenVPN server, and then let the SIP tunnel inside the SIP tunnel with signaling encrypted through the certificates and voice! (TLS + SRTP).
To whom it is interesting I ask under kat.
To begin with, I propose to get acquainted with the scheme of work.
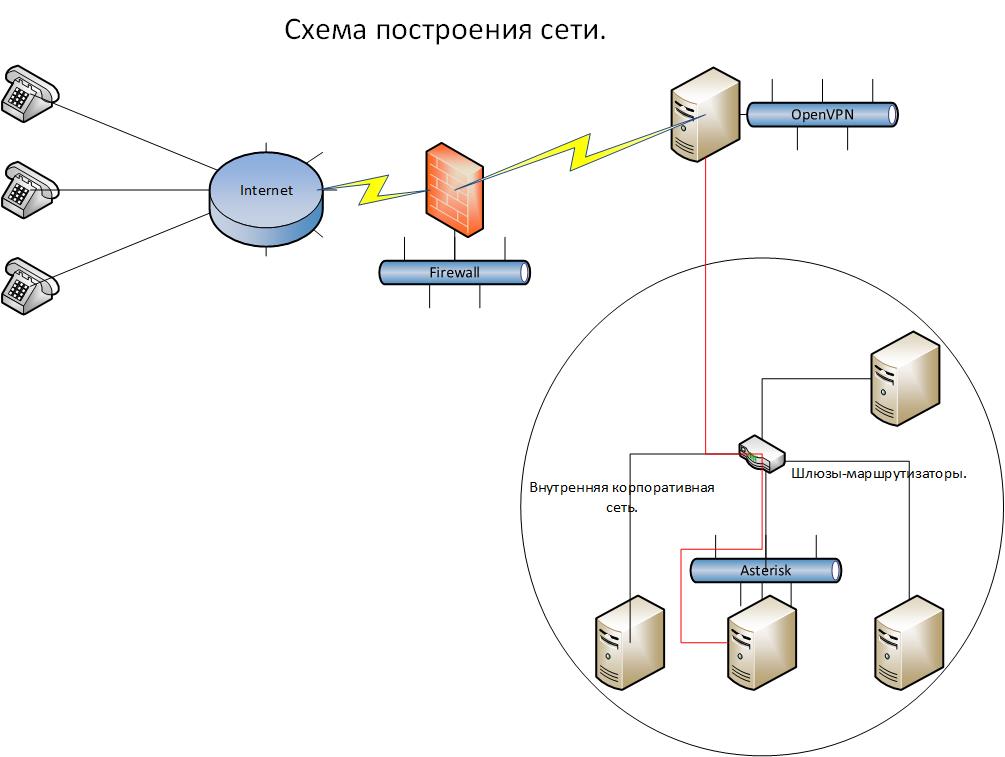
The meaning of the work is as follows - phones are connected from anywhere through the Internet. They raise the encrypted channel to the only OpenVPN server port sticking into the world. And then from this server telephony goes into the bowels of the corporate network, to the Asterisk server hidden there. But as you can see, the channel to the OpenVPN server is encrypted, but inside the corporate network where there are a lot of service personnel, you can intercept SIP traffic on any of the gateways and subsequently decrypt it and find out what the conversation was about! This piece of the network is specially marked with a red line. Therefore, we will configure SRTP + TLS on the asterisk and will also encrypt traffic within the network so that it is protected from unscrupulous employees of the company. Thus, the circle of people with access to conversations is very narrowing.
To install the OpenVPN server, I used the Centos 6.4 dvd image. I will not stop at the installation, everything is standard.
We fix the locale glitch right away.
export LC_CTYPE=en_US.UTF-8
We enable forwarding on network interfaces.
nano /etc/sysctl.conf
#Найти и заменить
net.ipv4.ip_forward = 1
We turn on the loading of the network interface at startup.
nano /etc/sysconfig/network-scripts/ifcfg-eth0
#Найти и заменить.
ONBOOT=yes
Update CentOS.
cd /usr/src/
yum update -y
Add the desired repository.
wget http://fedora.ip-connect.vn.ua/fedora-epel/6/i386/epel-release-6-8.noarch.rpm
rpm -Uvh epel-release-6-8.noarch.rpm
We put the required packages.
yum install openvpn git bridge-utils -y
EasyRSA is now separate and on the github - therefore:
git clone https://github.com/OpenVPN/easy-rsa.git
cp -r /usr/src/easy-rsa/easy-rsa /etc/openvpn/
I advise you to copy the original VPN config and comment out all the lines for subsequent additions and changes, then it will be convenient to search for the necessary commands for adding and their syntax.
cp /usr/share/doc/openvpn-2.3.1/sample/sample-config-files/server.conf /etc/openvpn/
nano /etc/openvpn/server.conf
#Закоментировать все в конфиге и оставить для наглядности, потом вставляем :
port 1194
proto udp
dev tun0
ca /etc/openvpn/easy-rsa/2.0/keys/ca.crt
cert /etc/openvpn/easy-rsa/2.0/keys/server.crt
key /etc/openvpn/easy-rsa/2.0/keys/server.key
dh /etc/openvpn/easy-rsa/2.0/keys/dh1024.pem
server 172.19.7.0 255.255.255.0
ifconfig-pool-persist ipp.txt
push "route 172.19.7.0 255.255.255.0"
keepalive 10 120
user root
group root
persist-key
persist-tun
status openvpn-status.log
log /var/log/openvpn.log
verb 3
mute 20
comp-lzo no
We change the encryption method from sha256 to MD5 since The phone does not understand the first method. There are 3 options for the openssl file in the easy-rsa assembly, we will change all at once so as not to find out which system the system will use when generating keys and certificates.
cp /etc/openvpn/easy-rsa/2.0/openssl-0.9.6.cnf /etc/openvpn/easy-rsa/2.0/openssl-0.9.6.cnf.orig && sed -e 's/default_md.*=.*sha256/default_md = md5 /g' /etc/openvpn/easy-rsa/2.0/openssl-0.9.6.cnf.orig > /etc/openvpn/easy-rsa/2.0/openssl-0.9.6.cnf
cp /etc/openvpn/easy-rsa/2.0/openssl-0.9.8.cnf /etc/openvpn/easy-rsa/2.0/openssl-0.9.8.cnf.orig && sed -e 's/default_md.*=.*sha256/default_md = md5 /g' /etc/openvpn/easy-rsa/2.0/openssl-0.9.8.cnf.orig > /etc/openvpn/easy-rsa/2.0/openssl-0.9.8.cnf
cp /etc/openvpn/easy-rsa/2.0/openssl-1.0.0.cnf /etc/openvpn/easy-rsa/2.0/openssl-1.0.0.cnf.orig && sed -e 's/default_md.*=.*sha256/default_md = md5 /g' /etc/openvpn/easy-rsa/2.0/openssl-1.0.0.cnf.orig > /etc/openvpn/easy-rsa/2.0/openssl-1.0.0.cnf
Next, change the default values
nano /etc/openvpn/easy-rsa/2.0/vars
export KEY_SIZE=1024
export KEY_COUNTRY="RU"
export KEY_PROVINCE="CA"
export KEY_CITY="Moscow"
export KEY_ORG="YOURCOMPANY"
export KEY_EMAIL="[email protected]"
export KEY_OU="MY"
You can start generating certificates:
Let's move to the desired directory where we will generate keys and certificates
cd  /etc/openvpn/easy-rsa/2.0
[root@test 2.0]# source ./vars
NOTE: If you run ./clean-all, I will be doing a rm -rf on /etc/openvpn/easy-rsa/2.0/keys
[root@test 2.0]# ./clean-all
#Создаем самоподписной корневой сертификат и ключ, все ответы можно оставить по умолчанию, кроме Common Name
[root@test 2.0]# ./build-ca
Generating a 1024 bit RSA private key
.........++++++
.......................++++++
writing new private key to 'ca.key'
-----
You are about to be asked to enter information that will be incorporated
into your certificate request.
What you are about to enter is what is called a Distinguished Name or a DN.
There are quite a few fields but you can leave some blank
For some fields there will be a default value,
If you enter '.', the field will be left blank.
-----
Country Name (2 letter code) [RU]:
State or Province Name (full name) [CA]:
Locality Name (eg, city) [Moscow]:
Organization Name (eg, company) [YOURCOMPANY]:
Organizational Unit Name (eg, section) [changeme]:
Common Name (eg, your name or your server's hostname) [changeme]:test
Name [changeme]:
Email Address [[email protected]]:
We create a certificate and a key for the server.
All answers can be left by default.
[root@test 2.0]# ./build-key-server server
Generating a 1024 bit RSA private key
.........................++++++
.............................++++++
writing new private key to 'server.key'
-----
You are about to be asked to enter information that will be incorporated
into your certificate request.
What you are about to enter is what is called a Distinguished Name or a DN.
There are quite a few fields but you can leave some blank
For some fields there will be a default value,
If you enter '.', the field will be left blank.
-----
Country Name (2 letter code) [RU]:
State or Province Name (full name) [MOSCOW]:
Locality Name (eg, city) [MOSCOW]:
Organization Name (eg, company) [YOURCOMPANY]:
Organizational Unit Name (eg, section) [changeme]:
Common Name (eg, your name or your server's hostname) [server]:
Name [changeme]:
Email Address [[email protected]]:
Please enter the following 'extra' attributes
to be sent with your certificate request
A challenge password []:
An optional company name []:
Using configuration from /etc/openvpn/easy-rsa/2.0/openssl-0.9.8.cnf
Check that the request matches the signature
Signature ok
The Subject's Distinguished Name is as follows
countryName           :PRINTABLE:'RU'
stateOrProvinceName   :PRINTABLE:'MOSCOW'
localityName          :PRINTABLE:'MOSCOW'
organizationName      :PRINTABLE:'YOURCOMPANY'
organizationalUnitName:PRINTABLE:'changeme'
commonName            :PRINTABLE:'server'
name                  :PRINTABLE:'changeme'
emailAddress          :IA5STRING:'[email protected]'
Certificate is to be certified until Mar 20 06:56:48 2023 GMT (3650 days)
Sign the certificate? [y/n]:y
1 out of 1 certificate requests certified, commit? [y/n]y
Write out database with 1 new entries
Data Base Updated
Generating a Diffie-Hellman key
[root@test 2.0]# ./build-dh
Generating DH parameters, 1024 bit long safe prime, generator 2
This is going to take a long time
...................................................+.................................................................+...................+..+.........................................................................................................................................+...........+.......................................................+....+..................................................................................................+......................................................................+.................................................................................................+............................+.....................................................................+.............++*++*++*
Generate a client key (for each machine or phone it has to be your own)
All answers leave the default
[root@test 2.0]# ./build-key client1
Generating a 1024 bit RSA private key
.++++++
......++++++
writing new private key to 'client1.key'
-----
You are about to be asked to enter information that will be incorporated
into your certificate request.
What you are about to enter is what is called a Distinguished Name or a DN.
There are quite a few fields but you can leave some blank
For some fields there will be a default value,
If you enter '.', the field will be left blank.
-----
Country Name (2 letter code) [RU]:
State or Province Name (full name) [CA]:
Locality Name (eg, city) [Moscow]:
Organization Name (eg, company) [YOURCOMPANY]:
Organizational Unit Name (eg, section) [changeme]:
Common Name (eg, your name or your server's hostname) [client1]:
Name [changeme]:
Email Address [[email protected]]:
Please enter the following 'extra' attributes
to be sent with your certificate request
A challenge password []:
An optional company name []:
Using configuration from /etc/openvpn/easy-rsa/2.0/openssl-0.9.8.cnf
Check that the request matches the signature
Signature ok
The Subject's Distinguished Name is as follows
countryName           :PRINTABLE:'RU'
stateOrProvinceName   :PRINTABLE:'CA'
localityName          :PRINTABLE:'Moscow'
organizationName      :PRINTABLE:'YOURCOMPANY'
organizationalUnitName:PRINTABLE:'changeme'
commonName            :PRINTABLE:'client1'
name                  :PRINTABLE:'changeme'
emailAddress          :IA5STRING:'[email protected]'
Certificate is to be certified until Mar 20 07:01:46 2023 GMT (3650 days)
Sign the certificate? [y/n]:y
1 out of 1 certificate requests certified, commit? [y/n]y
Write out database with 1 new entries
Data Base Updated
Preparing the file to connect the phone:
Create a folder - inside should be the keys folder and the vpn.cnf file.
Example vpn.cnf - instead of XXX, naturally your server address is:
client
dev tun
proto udp
remote XXX.XXX.XXX.XXX 1194
resolv-retry infinite
nobind
ca /yealink/config/openvpn/keys/ca.crt
cert /yealink/config/openvpn/keys/client1.crt
key /yealink/config/openvpn/keys/client1.key
verb 3
mute 20
comp-lzo no
Inside the keys folder should be respectively three files - ca.crt, client1.crt, client1.key. The file names in the config and in the folder must match. Pull files from the server after generation in any convenient way.
After that, put 7zip and archive the vpn.cnf file and the keys folder in the tar archive without compression. Or you can run it on Linux from the folder with the vpn.cnf file and the keys folder:
tar cvf connect.tar ./vpn.cnf ./keys
We go into the web interface of the phone. Go to the tab Network> Advanced> Vpn. We set active = enabled, import the file and click submit below.
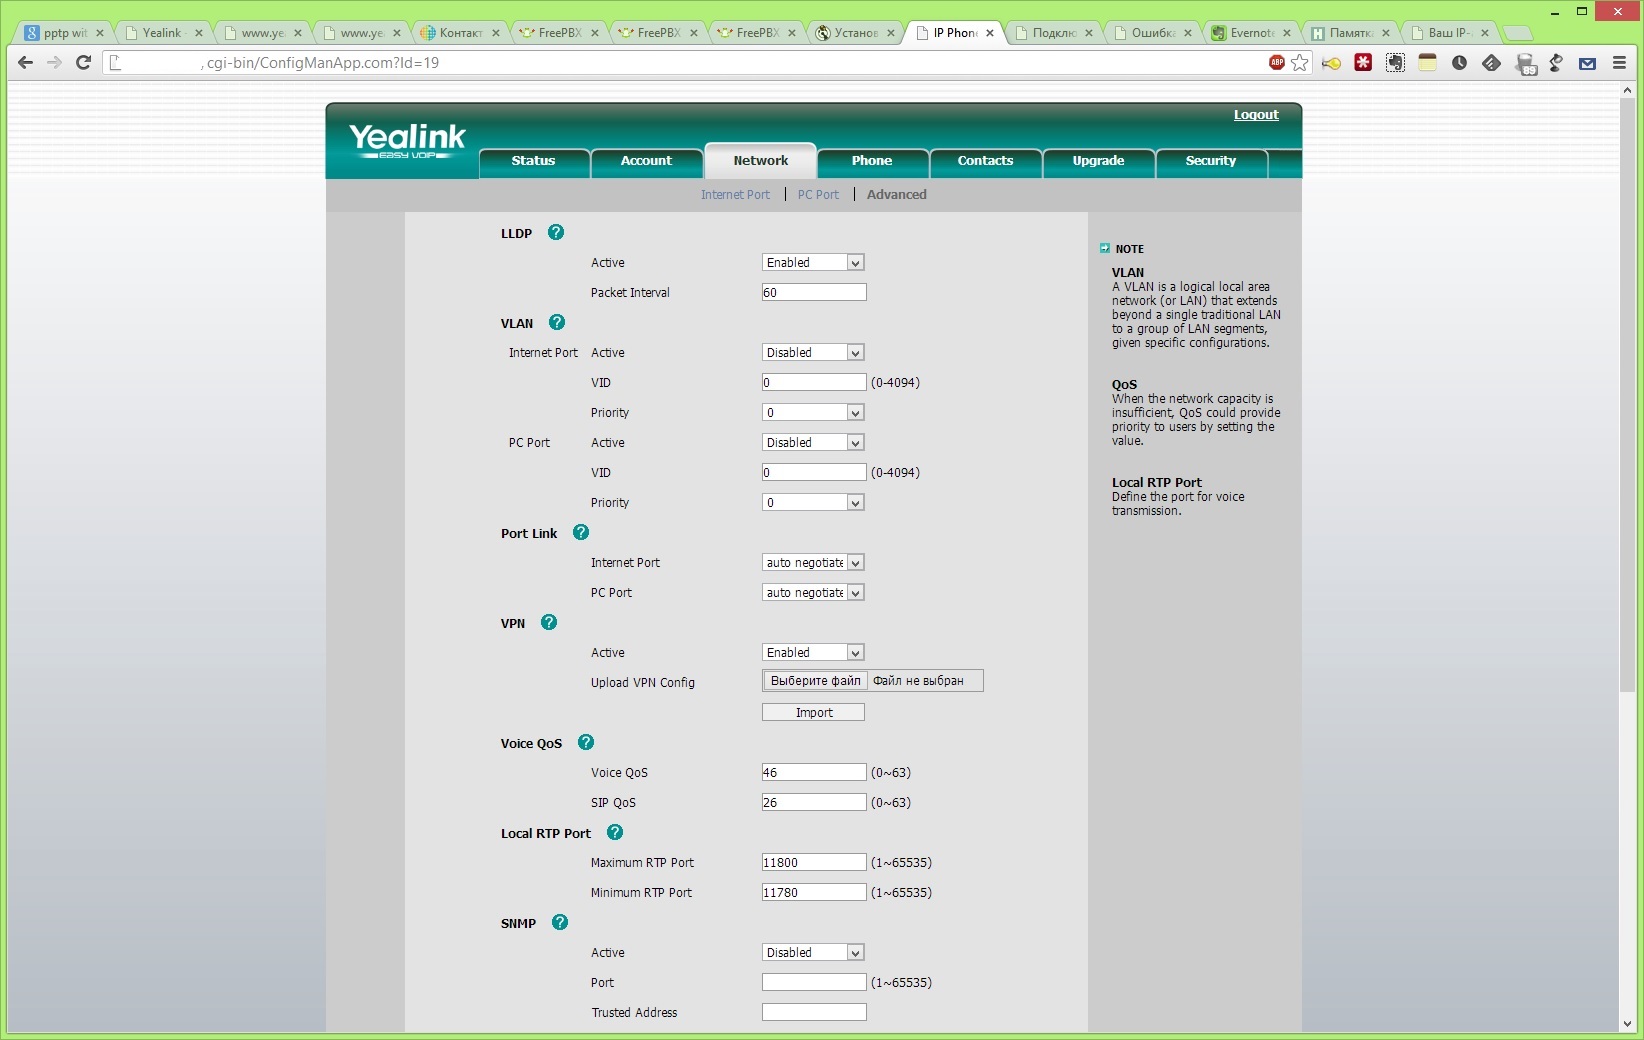
If the phone did not download the file, you can restart it. To see that he connected to our server - by looking at the logs:
tail -n100 -f /var/log/openvpn.log
Configure TLS + SRTP on Asterisk.
I won’t write a setting from scratch because there are lots of articles, and mine are there too. I’ll tell you how to make certificates, enable encryption and shove it all into the phone.
So on an aster it is necessary to make Certificate Authority.
mkdir /etc/cert
cd /etc/cert/
root@server-sip1:/etc/cert# openssl genrsa -des3 -out ca.key 4096
Generating RSA private key, 4096 bit long modulus
.......................++
...............................++
e is 65537 (0x10001)
Enter pass phrase for ca.key:
Verifying - Enter pass phrase for ca.key:
root@server-sip1:/etc/cert#
root@server-sip1:/etc/cert#
root@server-sip1:/etc/cert# openssl req -new -x509 -days 365 -key ca.key -out ca.crt
Enter pass phrase for ca.key:
You are about to be asked to enter information that will be incorporated
into your certificate request.
What you are about to enter is what is called a Distinguished Name or a DN.
There are quite a few fields but you can leave some blank
For some fields there will be a default value,
If you enter '.', the field will be left blank.
-----
Country Name (2 letter code) [AU]:RU
State or Province Name (full name) [Some-State]:MOSCOW
Locality Name (eg, city) []:MOSCOW
Organization Name (eg, company) [Internet Widgits Pty Ltd]:YOURCOMPANY
Organizational Unit Name (eg, section) []:VoIP
Common Name (eg, YOUR name) []:YUORCOMPANY CA
Email Address []:[email protected]
root@server-sip1:/etc/cert#
root@server-sip1:/etc/cert#
root@server-sip1:/etc/cert# ls
ca.crt  ca.key
root@server-sip1:/etc/cert#
CA created - then you need to download the file ca.crt to your phone so that it knows that this CA can be trusted - Security> Trusted Certificates tab.

Creating and signing a server certificate for phones - I describe for the server, and repeat the procedure for the phone.
root@server-sip1:/etc/cert# openssl genrsa -out key-server.pem 1024
Generating RSA private key, 1024 bit long modulus
.....++++++
...++++++
e is 65537 (0x10001)
root@server-sip1:/etc/cert# openssl req -new -key key-server.pem -out req-server.csr
You are about to be asked to enter information that will be incorporated
into your certificate request.
What you are about to enter is what is called a Distinguished Name or a DN.
There are quite a few fields but you can leave some blank
For some fields there will be a default value,
If you enter '.', the field will be left blank.
-----
Country Name (2 letter code) [AU]:RU
State or Province Name (full name) [Some-State]:MOSCOW
Locality Name (eg, city) []:MOSCOW
Organization Name (eg, company) [Internet Widgits Pty Ltd]:YOURCOMPANY
Organizational Unit Name (eg, section) []:VoIP
Common Name (eg, YOUR name) []:server
Email Address []:[email protected]
Please enter the following 'extra' attributes
to be sent with your certificate request
A challenge password []:
An optional company name []:
root@server-sip1:/etc/cert#
root@server-sip1:/etc/cert#
root@server-sip1:/etc/cert#
root@server-sip1:/etc/cert# openssl x509 -req -days 365 -in req-server.csr -CA ca.crt -CAkey ca.key -set_serial 01 -out cert-server.crt
Signature ok
subject=/C=RU/ST=MOSCOW/L=MOSCOW/O=Yourcompany/OU=VoIP/CN=server/[email protected]
Getting CA Private Key
Enter pass phrase for ca.key:
root@server-sip1:/etc/cert#
Preparation of certificate for Asterisk.
The file structure for an aster should look like this - first a certificate file of the following form:
-----BEGIN CERTIFICATE-----
MIIDvDCCAyWgAwIBAgIJAPMabsMiJJQPMA0GCSqGSIb3DQEBBQUAMIGbMQswCQYD
[...]
CfITDxcJBZfeXIPZP52+8FSMlm5985uMvao+emlIUGk11rY61Amxr387grDvgOaI
-----END CERTIFICATE-----
Then immediately the key file:
-----BEGIN RSA PRIVATE KEY-----
MIICXQIBAAKBgQCqRw0jpQFn+f+lnDZiZzCRca9ojgu2brO+Q56jnqorvCIlYFC0
[...]
FT65O46u6Vmp1gPbNklOEg7TtZUtfacPY2PyeP4KoHaG
-----END RSA PRIVATE KEY-----
You can build it through cat:
root@server-sip1:/etc/asterisk/cert# cat /etc/cert/key.pem > /etc/asterisk/cert/asterisk.pem
root@server-sip1:/etc/asterisk/cert# cat /etc/cert/cert-server.crt >> /etc/asterisk/cert/asterisk.pem
Now we write in the sip.conf file (or sip_general_custom.conf if it is Elastix or FreePBX)
tcpenable=yes
tcpbindaddr=0.0.0.0
tlsenable=yes
tlsbindaddr=0.0.0.0
tlscertfile=/etc/asterisk/cert/asterisk.pem
tlscafile=/etc/cert/ca.crt
When everything is ready, you need to enable TLS and SRTP on a specific extension.
In the same way, we prepare the file for the phone and load it in the Security> Server Certificates menu. In

this article I do not want to claim to be complete. But I really wanted to convey these important nuances of the settings for a person who may encounter this later. It took me a week to find out all the nuances of extracting and preparing certificates for the phone and the asterisk. If you have any suggestions on how to do it - it’s better \ faster \ more correctly, then I’ll read it in the comments with pleasure!
Update When setting up the Business HD IP DECT Phone W52P, it became clear that the configs were uploaded to it. It is necessary to register in the paths without "/ yealink":
ca /config/openvpn/keys/ca.crt
cert /config/openvpn/keys/client1.crt
key /config/openvpn/keys/client1.key
In addition, I would like to say that the Business HD IP DECT Phone W52P phone in the Asterisk password on extension understands the "&" character, and the Yealink T26p phone does not understand.
For better stability in the phone, on the Accounts tab, we changed Login expire to 600 and Subscribe period 300.