Cambot - Robot Photographer on the Raspberry Pi
Last year, the Raspberry Pi minicomputer fell into my hands. Because I never encountered Linux, it lay for a long time without movement in a drawer of the table, but, in the end, it lied ... One of the last experiments that I performed with its help was the manufacture of a photographer’s robot - a web-based interface of a self-propelled platform with the ability to video and photography.
Tasks for the robot:

Of course, the robot is taken simply as an example of the operation of the web interface. You can control much less exotic devices - curtains, lights, heaters ... I.e. from Raspberry Pi, for example, you can build a smart home controller with a web interface.
To build the interface, I used webiopi , because it allows you to start a project very quickly with zero knowledge of php, apache, etc. programs.
What you need to know to repeat the project:
Now let's continue. First, a few words about webiopi:
WebIOPi allows you to monitor the status and manage all GPIO ports locally or remotely, from a browser or any application.
Features:
• REST API via HTTP and CoAP with multicast support
• Server written in Python
• Work with GPIO, Serial, I2C, SPI, 1-Wire
• Built-in support for more than 30 devices, including DAC, ADC, sensors ...
• Python compatibility 2 and 3
• Excellent customization options for users ’needs
• Username password protection
• Many examples
Installation requires Python, 2.7, or 3.2 to be installed on the Raspberry Pi. Installation is performed by four commands from the terminal, locally or remotely:
Now you can run webiopi at the command prompt:
True, the webiopi server and the state of the GPIO ports will be lost as soon as you complete the script with the Ctrl-C command or close the terminal window. Therefore, it is worth running webiopi as a service:
If you want webiopi to start automatically when you load the RPI, you can use the following command:
Now on the local network, you can type http: // [IP]: 8000 on any computer and access the web interface to the RPI. [IP] must be replaced with IP Raspberry Pi. The default login is “webiopi” and the password is “raspberry”. True, the author of the program says that the code does not work in all browsers. I recommend using Chrome.
Here, for example, looks like an interface for all I / O ports:
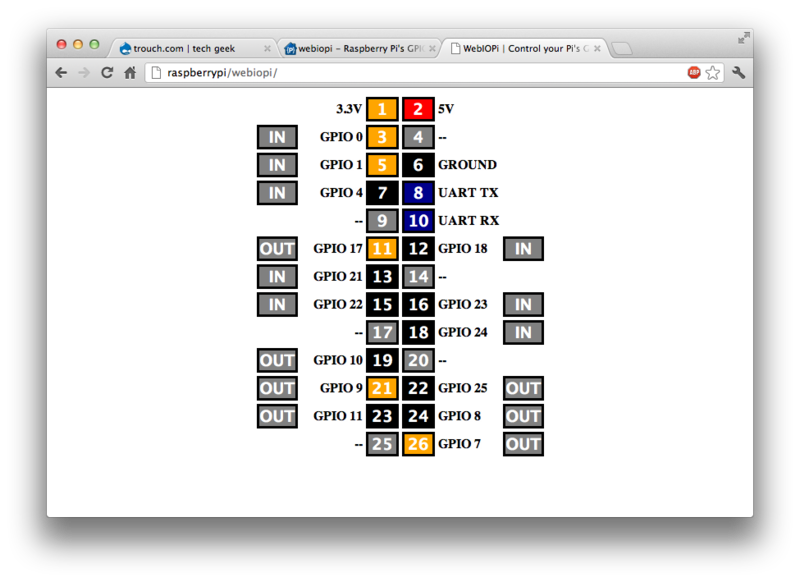
You can set the operation mode of any leg, and set the value at the output.
The project is based on the Cambot project with some improvements. The motor driver was not assembled on the breadboard, but on the Raspirobot board, the software was adapted for this board, and web-buttons for controlling the web-camera were added. On the Raspirobot board, the linear regulator is replaced by a pulse regulator.
To control the electric motors connected to the Raspirobot board, four RPI outputs are used. Their purpose is as follows:
The webcam operates in two modes - streaming video with a minimum resolution using the mjpg-streamer program and taking photos with a maximum resolution. The mode is selected by running one of the scripts: stream.sh, stream_stop.sh, photo.sh.
You probably know how to control a web-camera using the mjpg-streamer and fswebcam programs, therefore I will not comment on the contents of the script.
Photographing script:
Webcam enable script:
Camera shutdown script:
Writing a web interface for WebIOPi is as simple as possible. Essentially, after loading the page by calling functions from javascript webiopi, you need to create controls that invoke macros written in Python and stored in RPI. Then the controls need to be added to the HTML code of the page using jQuery. This is done as follows:
The go_forward function is as follows:
those. it just calls the go_forward macro.
Since it is not always convenient to press the buttons on the interface with a mouse, you can duplicate the control from the keyboard:
Video and photos in the interface are loaded into the corresponding div after the macro is executed:
The configuration file is located in the / etc / webiopi / folder.
It consists of several blocks like ini windows files, the block describing macros is of interest first of all:
In this block, add a line in the format name = sourcefile with a python script containing macros.
And the second block of interest is the server configuration. In it, you can set the port number on which the server will work, the path to the password file and the root directory for the server.
For WebIOPi, the script must contain the setup and destroy functions that will be called when the server starts and shuts it down. Typically, these functions determine the operating mode and status of the I / O ports.
Functions that should be available in the web interface should be preceded by the identifier @ webiopi.macro. For example, this is the description of the go_forward function that causes the robot to move forward:
To control the webcam, use the call command, which calls the corresponding script:
As a result, I got the following interface:
If the page on the server with your application does not open, most likely there is an error in the script code. To localize it, you need to run the written script (in my case, for example, with the sudo python ./cambot.py command and look at the errors and warnings that have been received. It is also worth looking at the errors in the webiopi log file located in the / var / folder log / webiopi
If the page loads, but there is no reaction to clicking on the interface elements, it is worth looking at errors in javascript.
Entire source codes can be downloaded here.
Tasks for the robot:
- WiFi control
- Movement back and forth, turns left and right
- Shooting video during movement and transferring it to the control computer
- Taking high-resolution photos on command from the control computer and transferring this image to the web-based interface.
Of course, the robot is taken simply as an example of the operation of the web interface. You can control much less exotic devices - curtains, lights, heaters ... I.e. from Raspberry Pi, for example, you can build a smart home controller with a web interface.
To build the interface, I used webiopi , because it allows you to start a project very quickly with zero knowledge of php, apache, etc. programs.
What you need to know to repeat the project:
- python (Knowledge level depends on the complexity of the planned algorithm)
- HTML
- javascript, jquery
- Well, you need to be able to solder to assemble the Raspirobot board.
Now let's continue. First, a few words about webiopi:
WebIOPi is a complete Raspberry Pi I / O framework
WebIOPi allows you to monitor the status and manage all GPIO ports locally or remotely, from a browser or any application.
Features:
• REST API via HTTP and CoAP with multicast support
• Server written in Python
• Work with GPIO, Serial, I2C, SPI, 1-Wire
• Built-in support for more than 30 devices, including DAC, ADC, sensors ...
• Python compatibility 2 and 3
• Excellent customization options for users ’needs
• Username password protection
• Many examples
Install WebIOPi
Installation requires Python, 2.7, or 3.2 to be installed on the Raspberry Pi. Installation is performed by four commands from the terminal, locally or remotely:
$ wget http://webiopi.googlecode.com/files/WebIOPi-0.6.0.tar.gz
$ tar xvzf WebIOPi-0.6.0.tar.gz
$ cd WebIOPi-0.6.0
$ sudo ./setup.sh
Now you can run webiopi at the command prompt:
$ sudo webiopi [-h] [-c config] [-l log] [-s script] [-d] [port]
    Options:
      -h, --help           Display this help
      -c, --config  file   Load config from file
      -l, --log     file   Log to file
      -s, --script  file   Load script from file
      -d, --debug          Enable DEBUG
    Arguments:
      port                 Port to bind the HTTP Server
True, the webiopi server and the state of the GPIO ports will be lost as soon as you complete the script with the Ctrl-C command or close the terminal window. Therefore, it is worth running webiopi as a service:
$ sudo /etc/init.d/webiopi start
 и
$ sudo /etc/init.d/webiopi stop
If you want webiopi to start automatically when you load the RPI, you can use the following command:
$ sudo update-rc.d webiopi defaults
Try
Now on the local network, you can type http: // [IP]: 8000 on any computer and access the web interface to the RPI. [IP] must be replaced with IP Raspberry Pi. The default login is “webiopi” and the password is “raspberry”. True, the author of the program says that the code does not work in all browsers. I recommend using Chrome.
Here, for example, looks like an interface for all I / O ports:
You can set the operation mode of any leg, and set the value at the output.
WebCamBot - Robot Photographer
The project is based on the Cambot project with some improvements. The motor driver was not assembled on the breadboard, but on the Raspirobot board, the software was adapted for this board, and web-buttons for controlling the web-camera were added. On the Raspirobot board, the linear regulator is replaced by a pulse regulator.
To control the electric motors connected to the Raspirobot board, four RPI outputs are used. Their purpose is as follows:
# Left motor GPIOs
LEFT_GO_PIN = 17 #PWM сигнал скорости
LEFT_DIR_PIN = 4 #направление движения
# Right motor GPIOs
RIGHT_GO_PIN = 10  #PWM
RIGHT_DIR_PIN = 25 #направление движения
The webcam operates in two modes - streaming video with a minimum resolution using the mjpg-streamer program and taking photos with a maximum resolution. The mode is selected by running one of the scripts: stream.sh, stream_stop.sh, photo.sh.
You probably know how to control a web-camera using the mjpg-streamer and fswebcam programs, therefore I will not comment on the contents of the script.
Photographing script:
#!/bin/sh
fswebcam -d /dev/video0 -p MJPEG -r 640x480  --jpeg 95 --shadow --title "cambot" --subtitle "Front camera" --info "" --save /usr/share/webiopi/htdocs/app/Raspirobot/ph.jpg -q
Webcam enable script:
#!/bin/sh
STREAMER=mjpg_streamer
DEVICE=/dev/video0
RESOLUTION=160x120        #320x240
FRAMERATE=25
HTTP_PORT=8001
# check for existing webcam device
if [ ! -e "/dev/video0" ]; then
  echo "stream.sh: Error - NO /dev/video0 device" 2>&1 | logger
  exit 2
fi
PLUGINPATH=/home/pi/mjpg-streamer-r63
"$PLUGINPATH/$STREAMER" -i  "$PLUGINPATH/input_uvc.so -n -d $DEVICE -r $RESOLUTION -f $FRAMERATE" -o "$PLUGINPATH/output_http.so -n  -p $HTTP_PORT" -b
Camera shutdown script:
#!/bin/sh
kill -9 `pidof mjpg_streamer`
Web interface
Writing a web interface for WebIOPi is as simple as possible. Essentially, after loading the page by calling functions from javascript webiopi, you need to create controls that invoke macros written in Python and stored in RPI. Then the controls need to be added to the HTML code of the page using jQuery. This is done as follows:
button = webiopi().createButton("bt_up", "/\\", go_forward, stop); // создание кнопки с id bt_up, текстом /\, вызывающей функцию go_forward
$("#up").append(button); // добавление кнопки в div с id=up
The go_forward function is as follows:
function go_forward() {
	webiopi().callMacro("go_forward");
}
those. it just calls the go_forward macro.
Since it is not always convenient to press the buttons on the interface with a mouse, you can duplicate the control from the keyboard:
$(document).keydown(function(e)
{
	switch(e.which)
	 {
		case 37:turn_left(); break;  //key Arroy left
		case 38:go_forward(); break;  // key Arroy up
		case 39:turn_right(); break;  //key Arroy right
		case 40:go_backward(); break;  //key Arroy down
		case 32:stop(); break;  //key Space
		case 75:camera(); break; ..//key K
		case 80:photo(); break;  // key P
	}
});
Video and photos in the interface are loaded into the corresponding div after the macro is executed:
function camera() {
$("#vid").html('');
webiopi().callMacro("camera");
$("#vid").html(' ');
}
function photo() {
$("#ph").html('');
webiopi().callMacro("photo");
$("#ph").html('
');
}
function photo() {
$("#ph").html('');
webiopi().callMacro("photo");
$("#ph").html(' ');
}
');
}
Configuring WebIOPi
The configuration file is located in the / etc / webiopi / folder.
It consists of several blocks like ini windows files, the block describing macros is of interest first of all:
[SCRIPTS]
# Load custom scripts syntax :
# name = sourcefile
#   each sourcefile may have setup, loop and destroy functions and macros
cambot =/usr/share/webiopi/htdocs/app/Raspirobot/cambot.py
In this block, add a line in the format name = sourcefile with a python script containing macros.
And the second block of interest is the server configuration. In it, you can set the port number on which the server will work, the path to the password file and the root directory for the server.
[HTTP]
# HTTP Server configuration
enabled = true
port = 8000
# File containing sha256(base64("user:password"))
# Use webiopi-passwd command to generate it
passwd-file = /etc/webiopi/passwd
# Use doc-root to change default HTML and resource files location
#doc-root = /home/pi/webiopi/examples/scripts/macros
# Use welcome-file to change the default "Welcome" file
#welcome-file = index.html
Python scripting
For WebIOPi, the script must contain the setup and destroy functions that will be called when the server starts and shuts it down. Typically, these functions determine the operating mode and status of the I / O ports.
Functions that should be available in the web interface should be preceded by the identifier @ webiopi.macro. For example, this is the description of the go_forward function that causes the robot to move forward:
@webiopi.macro
def go_forward():
    left_forward()
    right_forward()
To control the webcam, use the call command, which calls the corresponding script:
def camera_start():
    return_code = call("/usr/share/webiopi/htdocs/app/Raspirobot/stream.sh", shell=True)
As a result, I got the following interface:
Application debugging
If the page on the server with your application does not open, most likely there is an error in the script code. To localize it, you need to run the written script (in my case, for example, with the sudo python ./cambot.py command and look at the errors and warnings that have been received. It is also worth looking at the errors in the webiopi log file located in the / var / folder log / webiopi
If the page loads, but there is no reaction to clicking on the interface elements, it is worth looking at errors in javascript.
Video - the work of the robot
Entire source codes can be downloaded here.









