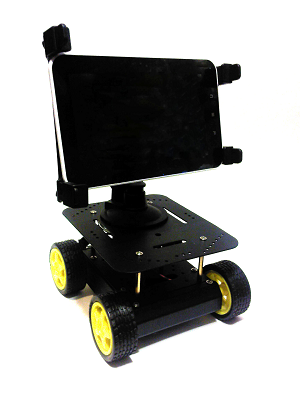
Creating a Telepresence Robot

After reading several articles about the Arduino platform and having played enough with the flashing LEDs, I decided to try my hand at robotics. The project does not claim to be unique, Hinduism goes wild in bydcode, however, if it doesn’t scare you ...
The essence of the project is simple: I am sitting at a computer, controlling a robot “in the first person”, at the same time, people who see the robot see the same way me on the screen of a robot tablet. Perhaps the diagram below will help to understand what is happening:

Commands are sent to the robot via the COM port via Bluetooth in the form of a string of characters, Skype is responsible for real-time video communication.
Hardware
For the basis of the robot, I took a four-wheeled platform with conveniently located holes for mounting boards and enough space to accommodate the battery.
Platform dimensions: 200mm x 170mm x 105mm, weight: 660g.

A capacious battery is the key to a long trip without recharging. I used a 12-volt battery with a capacity of 6700 mAh.

As you can see from the photo, the battery landing was an interference fit, so I had to modify the
An Arduino microcontroller with an expansion board for Motor Shield DC motors was chosen as the “spinal cord”.

At the bottom of the “sandwich” is a microcontroller, on top is a shield for controlling engines. USB and power connectors are looking at us directly.
Software
The software consists of two parts:
1. A program on a Windows PC that is responsible for the user interface and for transmitting commands via the COM port to the microcontroller.
2. A sketch on a microcontroller that receives commands from a PC and sets engine modes in accordance with them.
As the environment for developing the interface, I chose the Delphi 7 environment, since with it you can make a form with buttons for control without much effort. Also, the syntax of the language seemed quite simple and understandable to me, and writing the application did not cause me any difficulties.

Before describing the program, I would like to focus on the commands transmitted by this application. Each command is a string with a length of 6 characters. The first three characters indicate the Id of the command, the remaining three - the transmitted parameter value.
List of Id Commands:
- 001 - Left engine forward
- 002 - Left engine back
- 003 - Right engine forward
- 004 - Right engine back
- 005 - Both engines forward
- 006 - Both engines back
- 255 - Launching a robot test program
The transmitted parameter value must lie in the range from 000 to 255, and ultimately it affects the engine speed. If you pass the value 000, then the engines will stop. After starting the program, you must open the COM port for data transfer. The default is to open COM10. If the port is busy, a warning message will be displayed.
Commands can be transmitted either using buttons located on the form or using a combination of numbers. For example, the command “005200” means that the robot will go forward with a conditional “speed” of 200. When you press the Up button, the line “005200” is transmitted through the COM port, and when you release the button, “000000”.
The main task of the sketch in my project is to split the incoming character stream from the COM port into groups of 6 digits, analyze and execute the corresponding commands.
Conclusion
At the end of my work, I got a robot with a battery life of about two hours. The full charge time of the battery is 10-15 hours. Possible applications of the robot are security systems, monitoring processes in conditions that are not suitable for people to work, also in production, as a controlling mechanism.

This device is not the final implementation of my idea. Subsequently, I plan to abandon the USB cable in favor of a bundle of Wi-Fi - Tablet PC - Bluetooth - microcontroller. To do this, you will have to write an application for Android and use the Bluetooth module on the controller. Also, for convenience and cross-platform support, I plan to switch from a Delphi application to a Web interface with a server for storing, processing and transmitting commands to an Android device.

Well, for a sweet video:
