Overview of IPSec in Mikrotik
IPSec (IP Security) is a set of protocols and algorithms for encrypting data in IPv4 and IPv6 networks. It doesn't sound complicated, but IPSec does not set clear rules for encrypting traffic; instead, developers implement a set of tools (protocols and algorithms) that the administrator uses to create a secure channel for data.
I want to talk about the topic of IPSec in RouterOS a little deeper than a simple HOWTO, with minimal immersion in theory and examples of how to configure and debug IPSec. This is not a guide and without practice on a test bench it is not recommended to start setting up real tunnels and VPN servers.
Advantages and disadvantages of IPSec
Strengths:
- Works on the network layer of the OSI model
- It can encrypt the source packet entirely from the transport layer and above.
- There is a mechanism to overcome NAT
- A large set of encryption and hashing algorithms to choose from
- IPSec - a set of open, extensible standards
- In the case of Mikrotik, does not require the purchase of additional fees or licenses
Weak sides:
- Complexity
- Different terminology and configuration tools from different vendors.
- Using strong encryption algorithms requires good computing power.
- Easy to detect DPI
Protocols included with IPSec
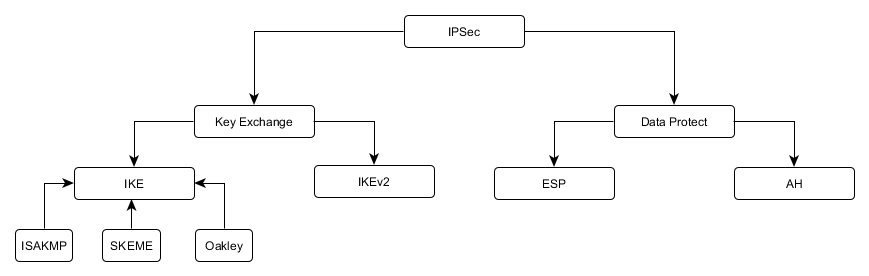
Globally, all the protocols you will deal with during configuration can be divided into two groups: key exchange protocols and data protection protocols.
Key Exchange Protocols (IKE)
The main task is to authenticate the participants of the connection and agree on the parameters and encryption keys to protect the transmitted information.
- IKE (Internet Key Exchange) - defined in 1998. Many features (for example, overcoming NAT) were added later as add-ons and may not be implemented by various vendors. The basis for key negotiation is the ISAKMP protocol.
- IKEv2 (Internet Key Exchange version 2) is the latest edition from 2014. Is the development of the IKE protocol, in which some problems were solved, the key agreement mechanism was simplified, extensions (NAT-T, Keepalives, Mode Config) became part of the protocol.
In practice, most IPSec connections are implemented using IKE, due to outdated equipment, or the reluctance to change something with administrators.
Data Security Protocols (ESP, AH)
The main task is to protect user data.
- ESP (Encapsulating Security Payload) - encrypts and partially authenticates transmitted data
- AH (Authentication Header) - authenticates the entire packet (with the exception of changeable fields), does not encrypt data, but allows you to make sure that the packet was not changed during transmission over the network
IPSec connection setup procedure

The participants of an IPSec connection are called peers (peers), which indicates their equivalence in the established connection. A configuration close to the client-server is possible, but when building persistent IPSec tunnels, any of the peers can be an initializer.
- One of the peers initializes the IPSec connection
- Key information is exchanged, peer authentication, connection parameters negotiation
- Based on the received key information, an auxiliary encrypted tunnel is formed.
- Using an encrypted tunnel, peers determine data encryption parameters and exchange information to generate keys.
- The result of the previous phase is a set of rules and keys for data protection (SA).
- Periodically peers update encryption keys
One of the key concepts in IPSec is the SA (Security Association) - it is a peer-coordinated set of information encryption and hashing algorithms, as well as encryption keys.
Sometimes you can find a division on:
- ISAKMP SA - parameters and keys related to the auxiliary tunnel
- Data SA (or just SA) - parameters and keys related to traffic encryption
The operation of the key agreement protocols
IKE protocol can work in two modes: mainly (main) and aggressive (aggressive), IKEv2 protocol contains one mode.
Ike main
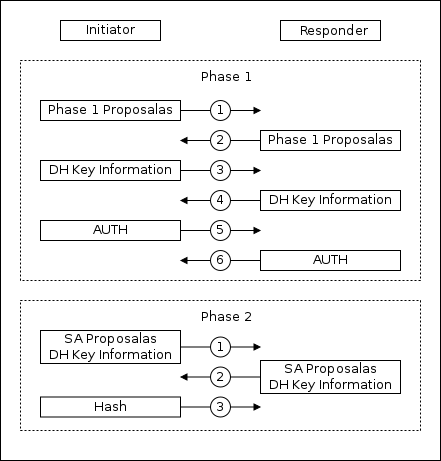
The first phase consists of six packets:
1-2: Coordination of encryption parameters of the auxiliary tunnel and various IPSec
3-4 options : Information exchange for generating the secret key
5-6: Authentication of peers using an auxiliary encrypted channel
The second phase consists of three packets:
1-3: Using an encrypted auxiliary channel. Coordination of traffic protection parameters, information exchange for generating a secret key
IKE Aggressive
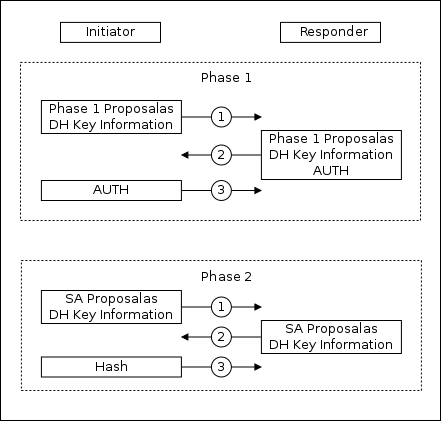
The first phase consists of three packets:
1: Sending a proposal to install an auxiliary encrypted channel and information for generating a secret key
2: Response to the offer, information for generating a secret key, data for authentication
3: Data for authentication
The second phase consists of three packets:
1-3: Using an encrypted auxiliary channel. Coordination of traffic protection parameters, information exchange for generating a secret key
In aggressive mode, the initiator sends only one set of parameters in the offer. Peer authentication information is exchanged prior to the installation of a secure auxiliary tunnel. Aggressive mode is consistent faster, but less secure.
IKEv2
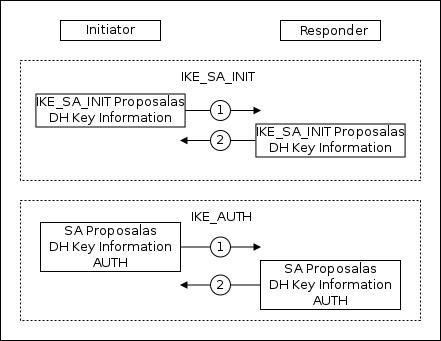
In IKEv2, the phases are named: IKE_SA_INIT and IKE_AUTH. But if in the text below I’m talking about Phase1 and Phase2, then this also applies to IKEv2 phases.
Each IKEv2 phase consists of two packets:
IKE_SA_INIT: Coordinating the encryption parameters of the secondary tunnel, exchanging information to generate the secret key
IKE_AUTH: using an encrypted auxiliary channel. Authenticating peers, negotiating traffic protection parameters, exchanging information for generating a secret key
Security Assotiations Database (SAD)
The result of the work of IKE (and IKEv2) are Security Assotiations (SA), which determine the parameters of traffic protection and encryption keys. Each SA is unidirectional and the IPSec connection contains a pair of SA. All SAs are stored in the SAD database and are available to the administrator for viewing and resetting.
Data encapsulation
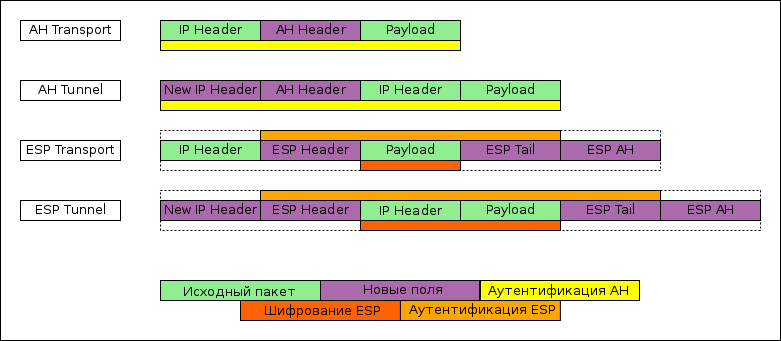
IPSec provides two options for encapsulating data:
- Transport mode - only the payload of the packet is protected, leaving the original header. To build tunnels, the transport mode is usually used in conjunction with ipip or gre, the payload of which already contains the entire source packet.
- Tunnel mode - fully encapsulates the original packet into a new one (by analogy with gre or ipip). But for tunnel ipsec, no explicit interface is created in the system; this can be a problem if dynamic or complex static routing is used.
Security Policy Database (SPD)
The base of rules determining which traffic should be encrypted, data protection protocol, encapsulation type and a number of other parameters.
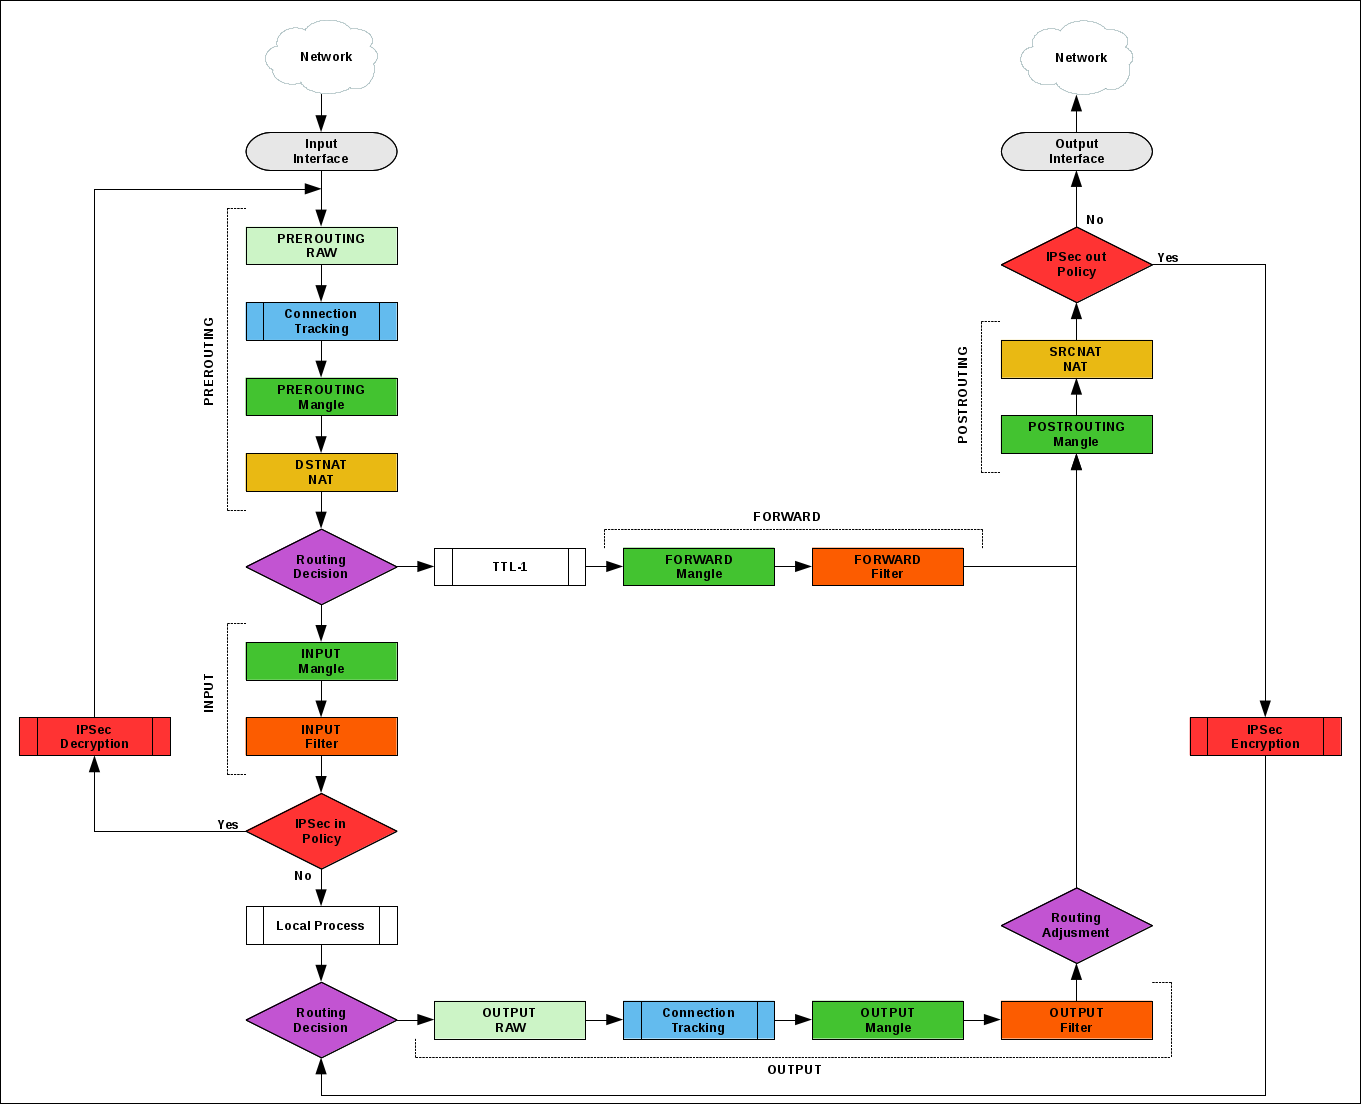
The SPD check position can be displayed on the Packet Flow schematic.
Overcoming NAT
IPSec uses network layer protocols to transfer data that NAT cannot handle. To solve the problem, the NAT-T protocol is used (extension in IKE and part of IKEv2). The essence of NAT-T is the additional encapsulation of IPSec packets into UDP packets that NAT processes.
IPSec in Mikrotik
IPSec is available for free on any device running RouterOS with the Security package installed.
Hardware encryption
For offloading the CPU, hardware acceleration of encryption is added to some models of MikroTik routers, a full list can be found on the wiki .
The most budget options: RB750Gr3 , RB3011 , HAP AC ^ 2 .
On my own, I checked the IPSec speed between two RB1100AHx2 and between two RB750Gr3.
To achieve maximum results on RB1100AHx2, you need:
- Use port 11 directly connected to the CPU and configure one CPU core to handle traffic on port 11
- Use only-hardware-queues on interfaces, disable RPS
- Enable Layer3 FastPath (about 800mb / sec), or exclude IPSec traffic from conntrack (about 700mb / sec)
Without the described manipulations on the slowest port (ether13) it is possible to get ~ 170Mb / sec, on the usual ~ 400Mb / sec.
On RB750Gr3 without optimizations around 200Mb / sec.
Routers on single-core Qualcomm show a result of 10-40mb / sec, depending on the model, optimizations and congestion with other processes.
I recommend to get acquainted with the presentation from the employee mikrotik, there are topics on how to optimize settings to reduce the load on the CPU and increase the speed, which I did not add to the text.
Differences 6.42.X and 6.43.X
Depending on the version of RouterOS used, the IPSec configuration menu will vary.
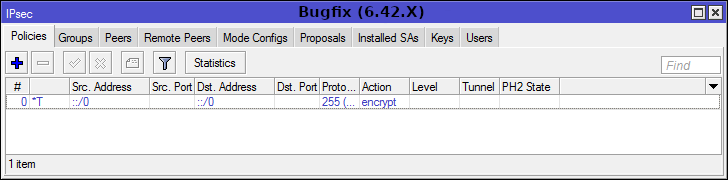
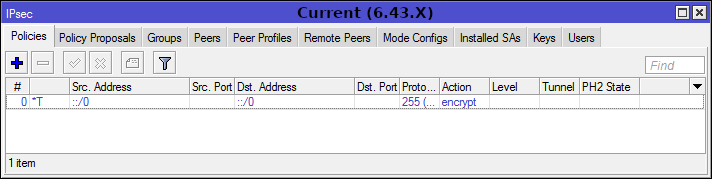

There are already new changes in the testing version, so read the Release Notes before updating.

IPSec configuration
Menu [IP] -> [IPSec] is not as scary as it seems at first glance. The diagram shows that the main configuration items are: Peers and Profiles.
The Remote Peers and Installed SAs tabs are informational.
Peers and Peers Profiles
IPSec peers configuration to establish an IKE connection and create an auxiliary secure tunnel.
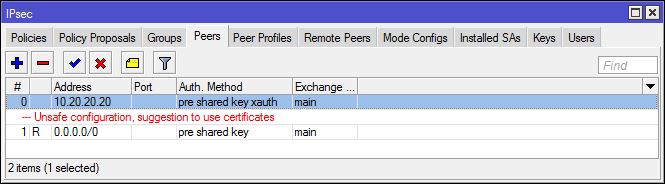
Setting up IPSec remote peers

- Starting at 6.43, RouterOS swears when using PSK without additional authentication. If you do not want to further configure the keys, certificates, or xAuth, you can switch to IKEv2 or ignore the warning.
- As peers, you can specify specific IP or subnet (relevant for Client-Server VPN)
- If there are conflicting rules, a rule with a more accurate subnet will be used to connect to the peer (by analogy with routes)
- Аутентификация xAuth и rsa key не работает в IKEv2
- Для IKEv2 Mikrotik сделали свою реализацию xAuth не совместимую с другими платформами
- Passive режим обычно используется для создания Client-Server VPN (L2TP/IPsec или IKEv2 mode config), но может быть полезен при подключении большого числа Site-to-Site туннелей к одной точке, для снижения паразитного трафика.
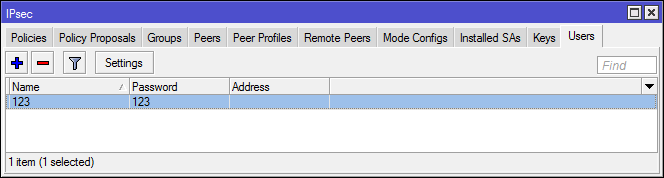
- Если планируете использовать xAuth, то "сервер" должен быть passive. Пользователи для сервера создаются в [IPSec]->[Users]
- При использовании Generate policy выбирайте режим port-strict
Setting Profiles (Proposals) for Phase 1 Matching
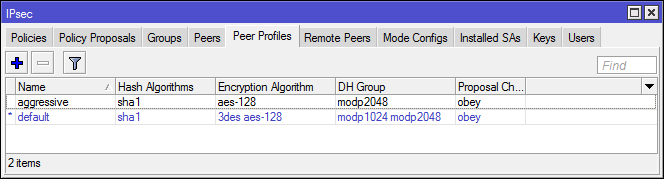
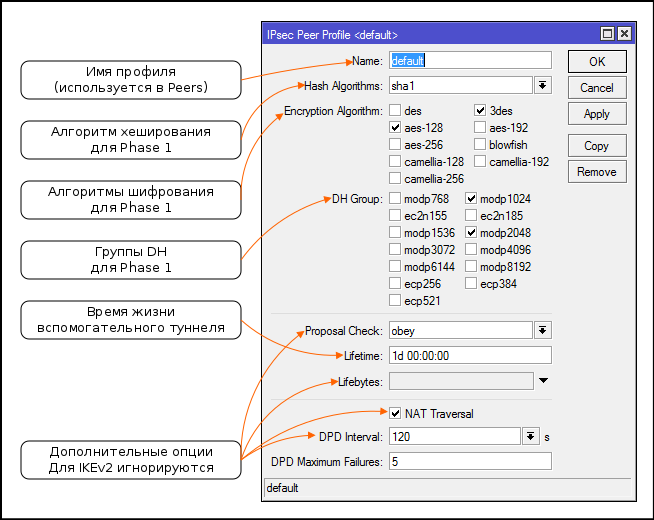
- Дополнительные опции для IKE стали частью IKEv2, настройки игнорируются
- Соотношение групп DH с их номерами (номера групп используются у других вендеров)
- При отправке предложений (Proposals) система сортирует пары алгоритм+группа dh от более стойких к менее стойким

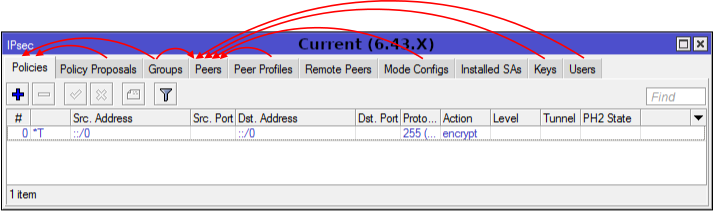
Policies and Policy Proposals
Policies check passing packages for compliance with the conditions and apply the specified actions. If you return to Packet flow, then blocks with IPSec Policy are reconciliation with policies. The actions specify: IPSec security protocol (ESP or AH), suggestions for SA negotiation, encapsulation mode.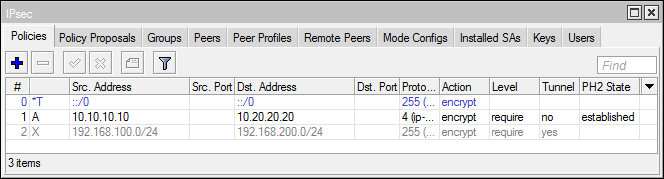
The package passes the policy one by one until it matches the terms of one of them.
Policy setting
- Обычно не требуется указывать конкретный Src. и Dst. Port, но в целом возможность шифровать трафик отдельного приложения интересна
- В списке Protocols представлены не все протоколы ip (например нет gre), можно указать номер нужного протокола вручную.
- Шаблоны не являются политиками! Они используются, если в конфигурации пира установлено generate-policy
- Что делать, если определенные SA для политики не были найдены. Раньше с L2TP/IPSec была проблема, когда несколько клиентов из-за одного NAT не могли подключиться (при использовании IKE), данный баг решается (при условии, что эти клиенты не windows) если установить level=unique. Иначе переходите на IKEv2
- При настройке политик используйте [Safe mode], одно неловкое движение и вы рискуете потерять доступ к роутеру по Level3
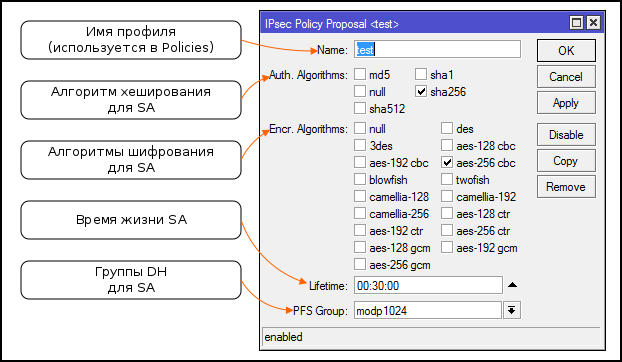
Setting up offers (Proposals) to negotiate SA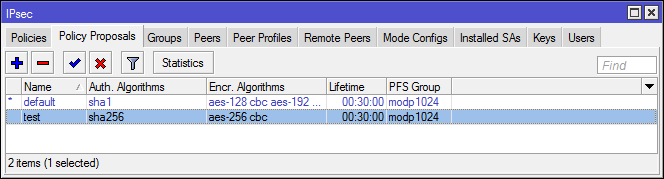
Groups
Used to associate policy templates and peers.

In one of the old versions of RouterOS, there was a bug with the default non-working group.
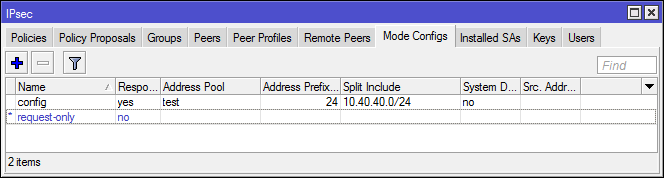
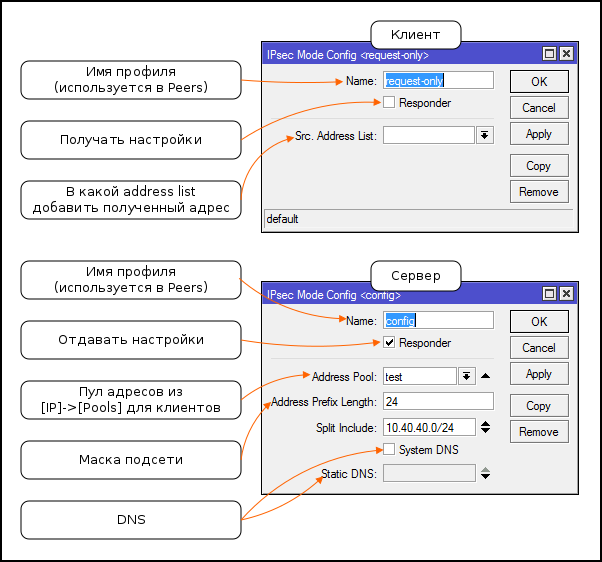
Mode Config
Sending and receiving IP parameters without using additional protocols. Allows you to create a self-contained Client-to-Server VPN only IPSec.
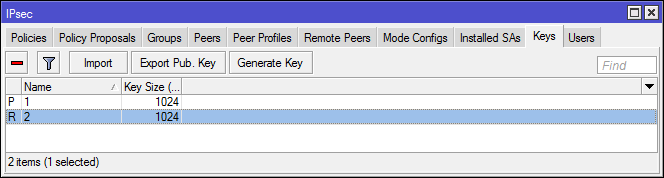
Keys and Users
Used for advanced peer authentication.
Keys
RSA Keys: generation, import, export. Not supported in IKEv2.
Users
xAuth user database for "server". The client specifies the xAuth settings in the peer configuration. It is possible to forward xAuth authentication to a RADIUS server.
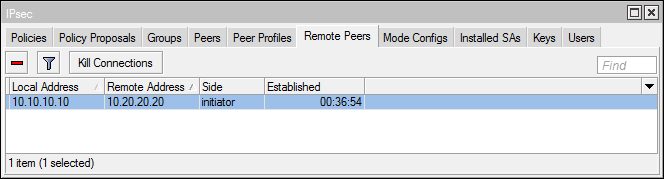
Remote peers
A list of all peers installing and installing an auxiliary tunnel (Phase 1). You can delete peers to update secondary tunnel keys.

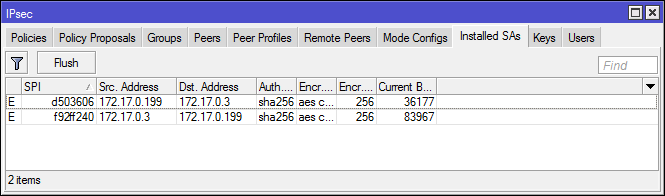
Installed SAs
SAD database or list of all agreed SAs. You can see the data protection algorithms and keys used.

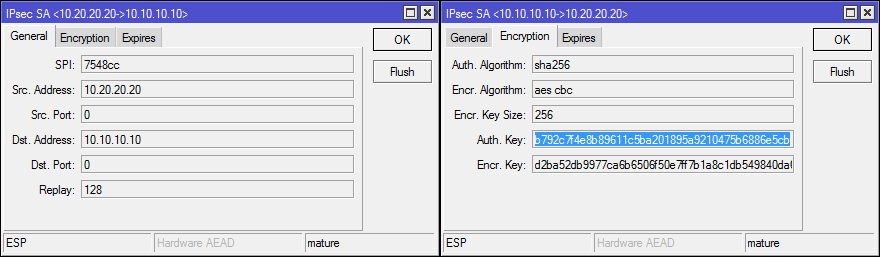
The Hardware AEAD flag indicates the use of hardware encryption.
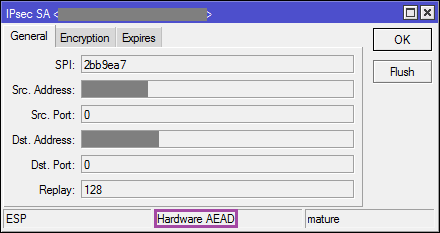
The administrator can reset the SA, but only simultaneously all of the same type (esp or ah).
IPSec and Firewall
In the Firewall, you can check whether the traffic is inbound or outbound IPSec policy or not. The obvious use is L2TP / IPSec, you can prevent the installation of L2TP connections if the traffic was not previously encrypted.

Protocols and ports used in IPSec
- IKE-UDP: 500
- IKEv2 - UDP: 4500
- NAT-T - UDP: 4500
- ESP - ipsec-esp (50)
- AH - ipsec-ah (51)
IPSec and Endpoinds
And now about the sore ...
On the wiki mikrotik there are tables with hashing and encryption algorithms for: Windows , iOS , OS-X .
I did not find any information about the client built into the android vpn, but in general it works with the proposals from windows. IKEv2 does not support Android, you must use StrongSwan .
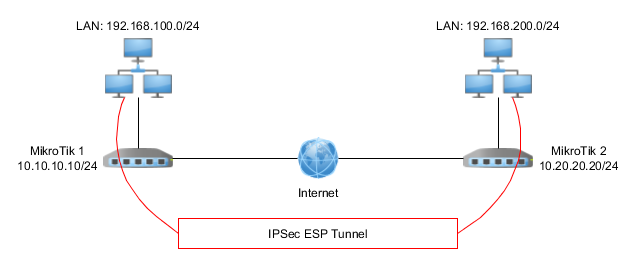
Configuration examples
Scheme and basic configuration for examples with Site-to-Site tunnels:

#Mikrotik1
/ip address
add address=10.10.10.10/24 interface=ether1 network=10.10.10.0
add address=192.168.100.1/24 interface=ether2 network=192.168.100.0
/ip firewall nat
add action=masquerade chain=srcnat out-interface=ether1
/ip route
add distance=1 gateway=10.10.10.1 dst-address=0.0.0.0/0
#Mikrotik2
/ip address
add address=10.20.20.20/24 interface=ether1 network=10.20.20.0
add address=192.168.200.1/24 interface=ether2 network=192.168.200.0
/ip firewall nat
add action=masquerade chain=srcnat out-interface=ether1
/ip route
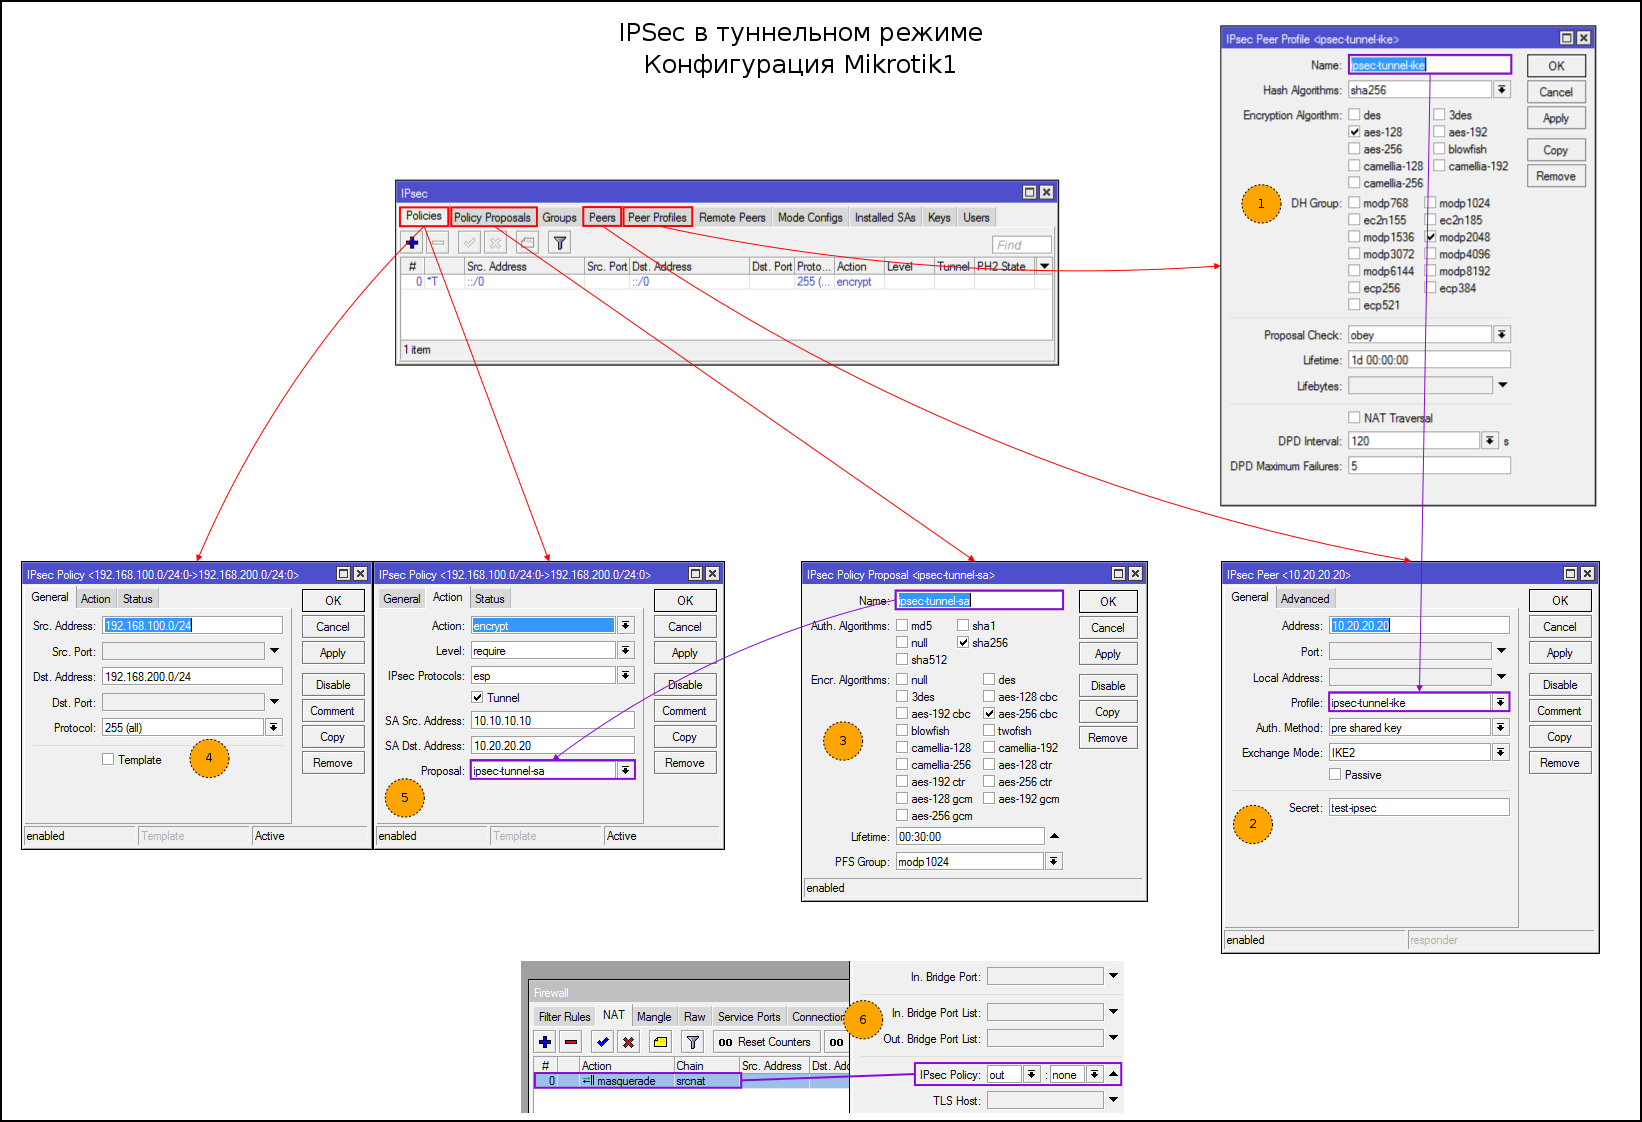
add distance=1 gateway=10.20.20.1 dst-address=0.0.0.0/0IPSec in tunnel mode
Step configuration:
- Create Proposals for IKE Phase1
- Create a feast. Specify the address, proposals, exchange mode, key PSK. I chose IKEv2, you can use main / agressive as desired
- Create Proposals for SA
- Specify the subnets between which we create the tunnel
- Specify the SA addresses, tunnel mode and proposals to encrypt traffic
- Editing the NAT rule
Консольный вариант:
#1
/ip ipsec peer profile
add dh-group=modp2048 enc-algorithm=aes-128 hash-algorithm=sha256 name=ipsec-tunnel-ike nat-traversal=no
#2
/ip ipsec peer
add address=10.20.20.20/32 exchange-mode=ike2 profile=ipsec-tunnel-ike secret=test-ipsec
#3
/ip ipsec proposal
add auth-algorithms=sha256 enc-algorithms=aes-256-cbc name=ipsec-tunnel-sa
#4-5
/ip ipsec policy
add dst-address=192.168.200.0/24 proposal=ipsec-tunnel-sa sa-dst-address=10.20.20.20 sa-src-address=10.10.10.10 src-address=192.168.100.0/24 tunnel=yes
#6
/ip firewall nat
set 0 ipsec-policy=out,none
Консольный вариант:
#1
/ip ipsec peer profile
add dh-group=modp2048 enc-algorithm=aes-128 hash-algorithm=sha256 name=ipsec-tunnel-ike nat-traversal=no
#2
/ip ipsec peer
add address=10.10.10.10/32 exchange-mode=ike2 profile=ipsec-tunnel-ike secret=test-ipsec
#3
/ip ipsec proposal
add auth-algorithms=sha256 enc-algorithms=aes-256-cbc name=tets-ipsec-sa
#4-5
/ip ipsec policy
add dst-address=192.168.100.0/24 proposal=tets-ipsec-sa sa-dst-address=10.10.10.10 sa-src-address=10.20.20.20 src-address=192.168.200.0/24 tunnel=yes
#6
/ip firewall nat
set 0 ipsec-policy=out,noneДля работы в туннельном режиме необходим фейковый маршрут до удаленной подсети, либо маршрут по умолчанию, иначе пакеты не пройдут дальше Routing decision. С первым вариантом проблем обычно нет, а вот с дефолтным маршрутом и Source NAT (первое и второе присутствует на подавляющем большинстве домашних и офисных маршрутизаторов) будут проблемы.
Вспоминаем Packet Flow. Пакеты проходят Source NAT раньше чем политики IPSec, правило с masquerade ничего не знает о том что трафик предназначен для отправки в "эфимерный" туннель и будет транслировать заголовки пакетов подлежащих отправки в IPSec, когда пакет с измененным заголовком попадет на проверку в Policies адрес источкина в заголовке не будет подходить под правило и пакет улетит на default route, который увидев адрес назначения из приватной сети вероятнее всего его отбросит.
Есть несколько решений проблемы:
- Использование фейкового маршрута
- Использование дополнительного accept правила перед SourceNAT
- Подвергать src-nat только те пакеты, для которых нет политик IPSec (в примере)
- Исключать трафик из connection tracking средствами RAW
Check connection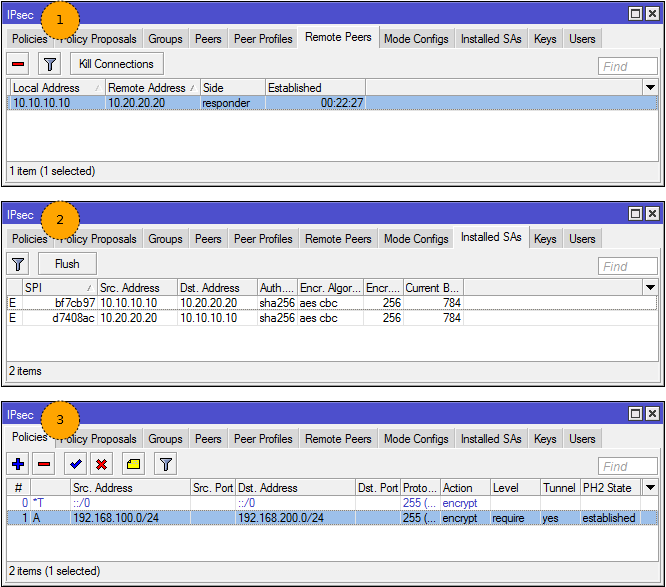
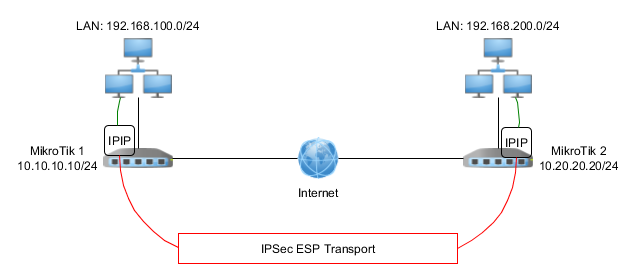
- We see a neighbor in the Remote Peers
- We see installed SA (traffic counters will not change until you let it go)
- Established status and flag (A) ctive in politics
IPIP / IPSec
Pre-configuration of IPIP tunnel:
#Mikrotik1
#Настройка интерфейса ipip
/interface ipip
add allow-fast-path=no clamp-tcp-mss=no name=ipip-vpn remote-address=10.20.20.20
#Установка ip адреса на ipip интерфейс
/ip address
add address=10.30.30.1/30 interface=ipip-vpn
#Статический маршрут до удаленной подсети
/ip route
add distance=1 dst-address=192.168.200.0/24 gateway=10.30.30.2
#Mikrotik2
#Все аналогично, меняются только адреса и подсети
/interface ipip
add allow-fast-path=no clamp-tcp-mss=no name=ipip-vpn remote-address=10.10.10.10
/ip address
add address=10.30.30.2/30 interface=ipip-vpn
/ip route
add distance=1 dst-address=192.168.100.0/24 gateway=10.30.30.1
Step by Step IPSec Configuration:
- Create Proposals for IKE Phase1
- Create a feast. Specify the address, proposals, exchange mode, PSK key
- Create Proposals for SA
- Specify the subnets between which we create the tunnel
- Specify the addresses of SA, the type of traffic that we will encrypt and proposals

Консольный вариант:
#1
/ip ipsec peer profile
add dh-group=modp2048 enc-algorithm=aes-128 hash-algorithm=sha256 name=ipsec-tunnel-ike nat-traversal=no
#2
/ip ipsec peer
add address=10.20.20.20/32 exchange-mode=ike2 profile=ipsec-tunnel-ike secret=test-ipsec
#3
/ip ipsec proposal
add auth-algorithms=sha256 enc-algorithms=aes-256-cbc name=ipsec-tunnel-sa
#4-5
/ip ipsec policy
add dst-address=10.20.20.20/32 proposal=ipsec-tunnel-sa protocol=ipencap src-address=10.10.10.10/32 sa-dst-address=10.20.20.20 sa-src-address=10.10.10.10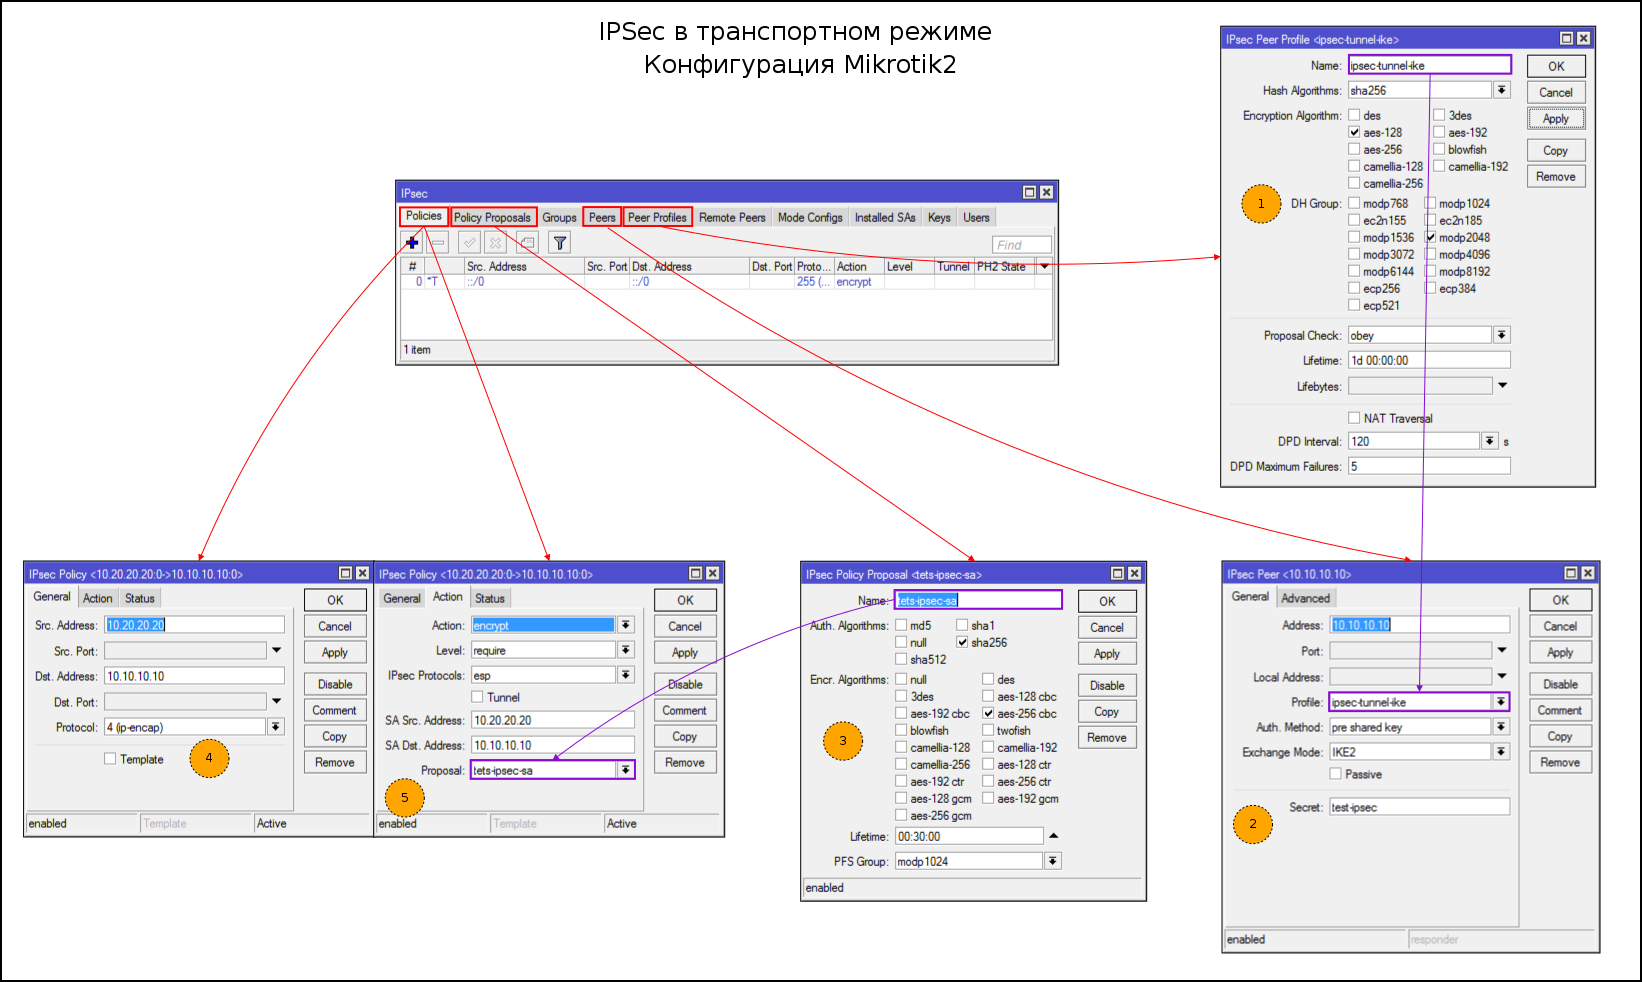
#1
/ip ipsec peer profile
add dh-group=modp2048 enc-algorithm=aes-128 hash-algorithm=sha256 name=ipsec-tunnel-ike nat-traversal=no
#2
/ip ipsec peer
add address=10.10.10.10/32 exchange-mode=ike2 profile=ipsec-tunnel-ike secret=test-ipsec
#3
/ip ipsec proposal
add auth-algorithms=sha256 enc-algorithms=aes-256-cbc name=tets-ipsec-sa
#4-5
/ip ipsec policy
add dst-address=10.10.10.10/32 proposal=tets-ipsec-sa protocol=ipencap src-address=10.20.20.20/32 sa-dst-address=10.10.10.10 sa-src-address=10.20.20.20
For the inattentive, the real difference is the configuration of the tunnel and transport mode in IPSec Policies: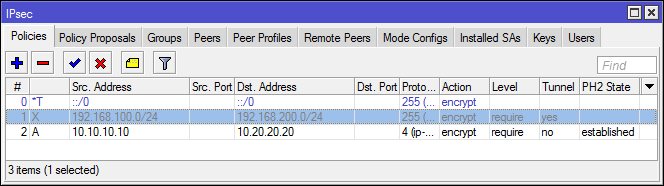
Connection test is similar to tunnel mode.
L2TP / IPSec
The previous examples are well suited for creating persistent VPNs between two peers, with static external IP addresses.
If the address of one of the peers is dynamic (and is usually located behind a NAT), you must use another Client-to-Server VPN.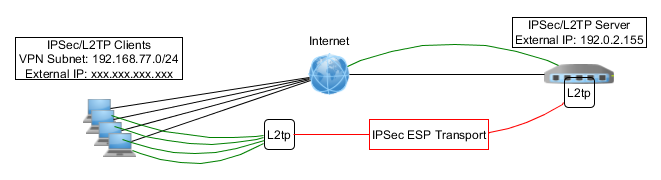
Preliminary L2TP configuration:
#Создание пула адресов для клиентов
/ip pool
add name=pool-l2tp ranges=192.168.77.10-192.168.77.20
#Создание профиля для клиентов
/ppp profile
add change-tcp-mss=yes local-address=192.168.77.1 name=l2tp-ipsec only-one=yes remote-address=pool-l2tp use-compression=no use-encryption=no use-mpls=no use-upnp=no
#Создание учетных записей
/ppp secret
add name=user1 password=test1 profile=l2tp-ipsec service=l2tp
add name=user2 password=test2 profile=l2tp-ipsec service=l2tp
add name=user3 password=test3 profile=l2tp-ipsec service=l2tp
#Включение сервера L2TP (без автонастройки ipsec)
/interface l2tp-server server
set authentication=chap,mschap2 default-profile=l2tp-ipsec enabled=yesВ конфигурации ipip,gre,eoip,l2tp присутствует автонастройка ipsec соединения, по сути система создает динамические правила для Peers и Policies за вас, но во-первых — мы не ищем легких путей, во-вторых при обновлении с 6.42 на 6.43 автоматически созданные туннели ломались и не факт, что этого не повторится.
Step by Step IPSec Configuration:
- Create a new group (you can use default)
- Create Proposals for IKE Phase1
- Create a feast, or rather a subnet. Swears on the PSK key, but if we are dealing with windows as a client, then we have a choice: Certificates or PSK.
- Set passive = yes and send-init-contact = no, generate-policy = port-strict (accept port from client)
- Create Proposals for SA
- Create a template for generating policies
- Specify proposal for SA
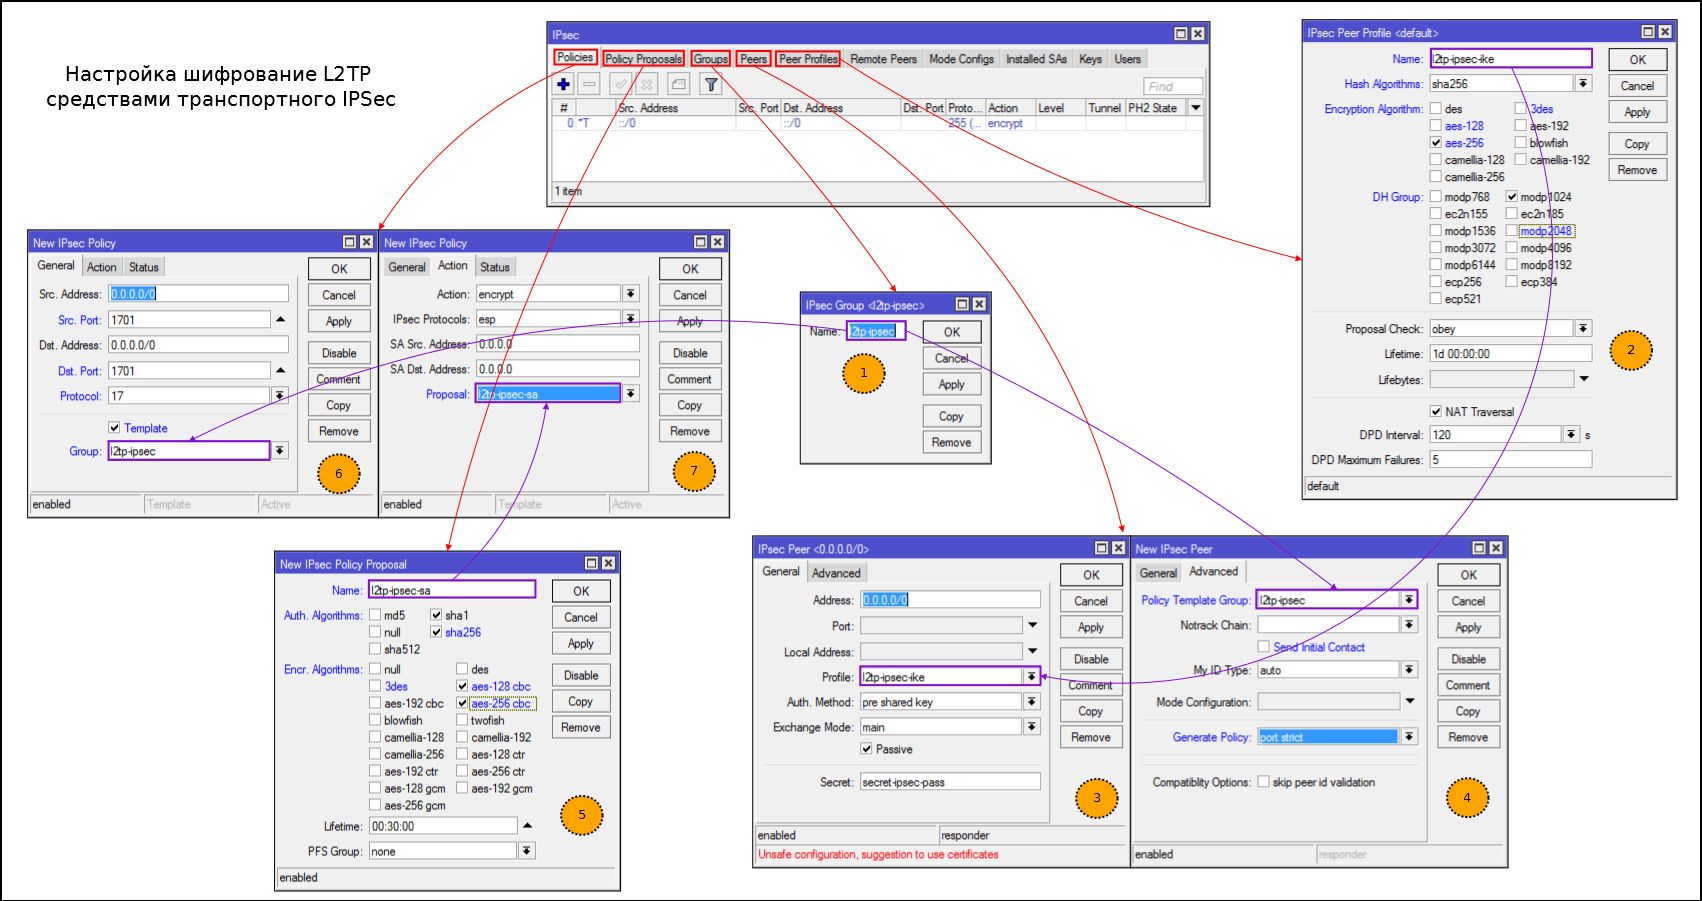
На скриншоте ошибка — указывать dst. port и src. port не нужно
Консольный вариант:
#1
/ip ipsec policy group
add name=l2tp-ipsec
#2
/ip ipsec peer profile
add dh-group=modp1024 enc-algorithm=aes-256 hash-algorithm=sha256 name=l2tp-ipsec-ike
#3-4
/ip ipsec peer
add address=0.0.0.0/0 generate-policy=port-strict passive=yes policy-template-group=l2tp-ipsec profile=l2tp-ipsec-ike secret=secret-ipsec-pass send-initial-contact=no
#5
/ip ipsec proposal
add auth-algorithms=sha256,sha1 enc-algorithms=aes-256-cbc,aes-128-cbc name=l2tp-ipsec-sa pfs-group=none
#6-7
/ip ipsec policy
add dst-address=0.0.0.0/0 group=l2tp-ipsec proposal=l2tp-ipsec-sa protocol=udp src-address=0.0.0.0/0 template=yes
Configuring a firewall to create L2TP connections only after IPSec
/ip firewall filter
#Разрешаем IKE, NAT-T и ipsec-esp
add chain=input protocol=17 dst-port=500,4500 action=accept
add chain=input protocol=50 action=accept
#Разрешаем L2TP, только если есть политика ipsec для данного трафика
add chain=input protocol=17 dst-port=1701 ipsec-policy=in,ipsec action=accept
add chain=input protocol=17 dst-port=1701 action-drop
IKEv2 VPN
The variant with L2TP is popular, but thanks to the mode config you can configure the VPN server using only IPSec. This is a promising type of VPN, but rarely used so far, so besides the configuration of the server part, I will give an example of setting up a strongSwan client on android.

Of course, not everything is so rosy. Most of the "user" OS (in particular, Windows and Android) agree to work with such a VPN only if they are authenticated by certificates or EAP.
Certificates are my weak point, if someone knows how to correctly generate a self-signed certificate that windows imports and will use in a connection - write in the comment.
Pre-generation certificates:
#Root CA и сапомодпись
/certificate add name=ca common-name="IKEv2 CA" days-valid=6928
/certificate sign ca ca-crl-host=<IP роутера>
#Сертификат для сервера vpn
/certificate add common-name=<IP роутера> subject-alt-name=IP:<IP роутера> key-usage=tls-server name=vpn days-valid=6928
#Подпись серверного сертификата
/certificate sign vpn ca=ca
#Сертификат для клиента
#Клиенты с одним сертификатам не смогут работать одновременно, поэтому генерируйте по одному для каждого
#Для отмены доступа необходимо сделать Revoke клиентского сертификата
/certificate add common-name=client key-usage=tls-client name=client days-valid=6928
#Подпись клиентского сертификата
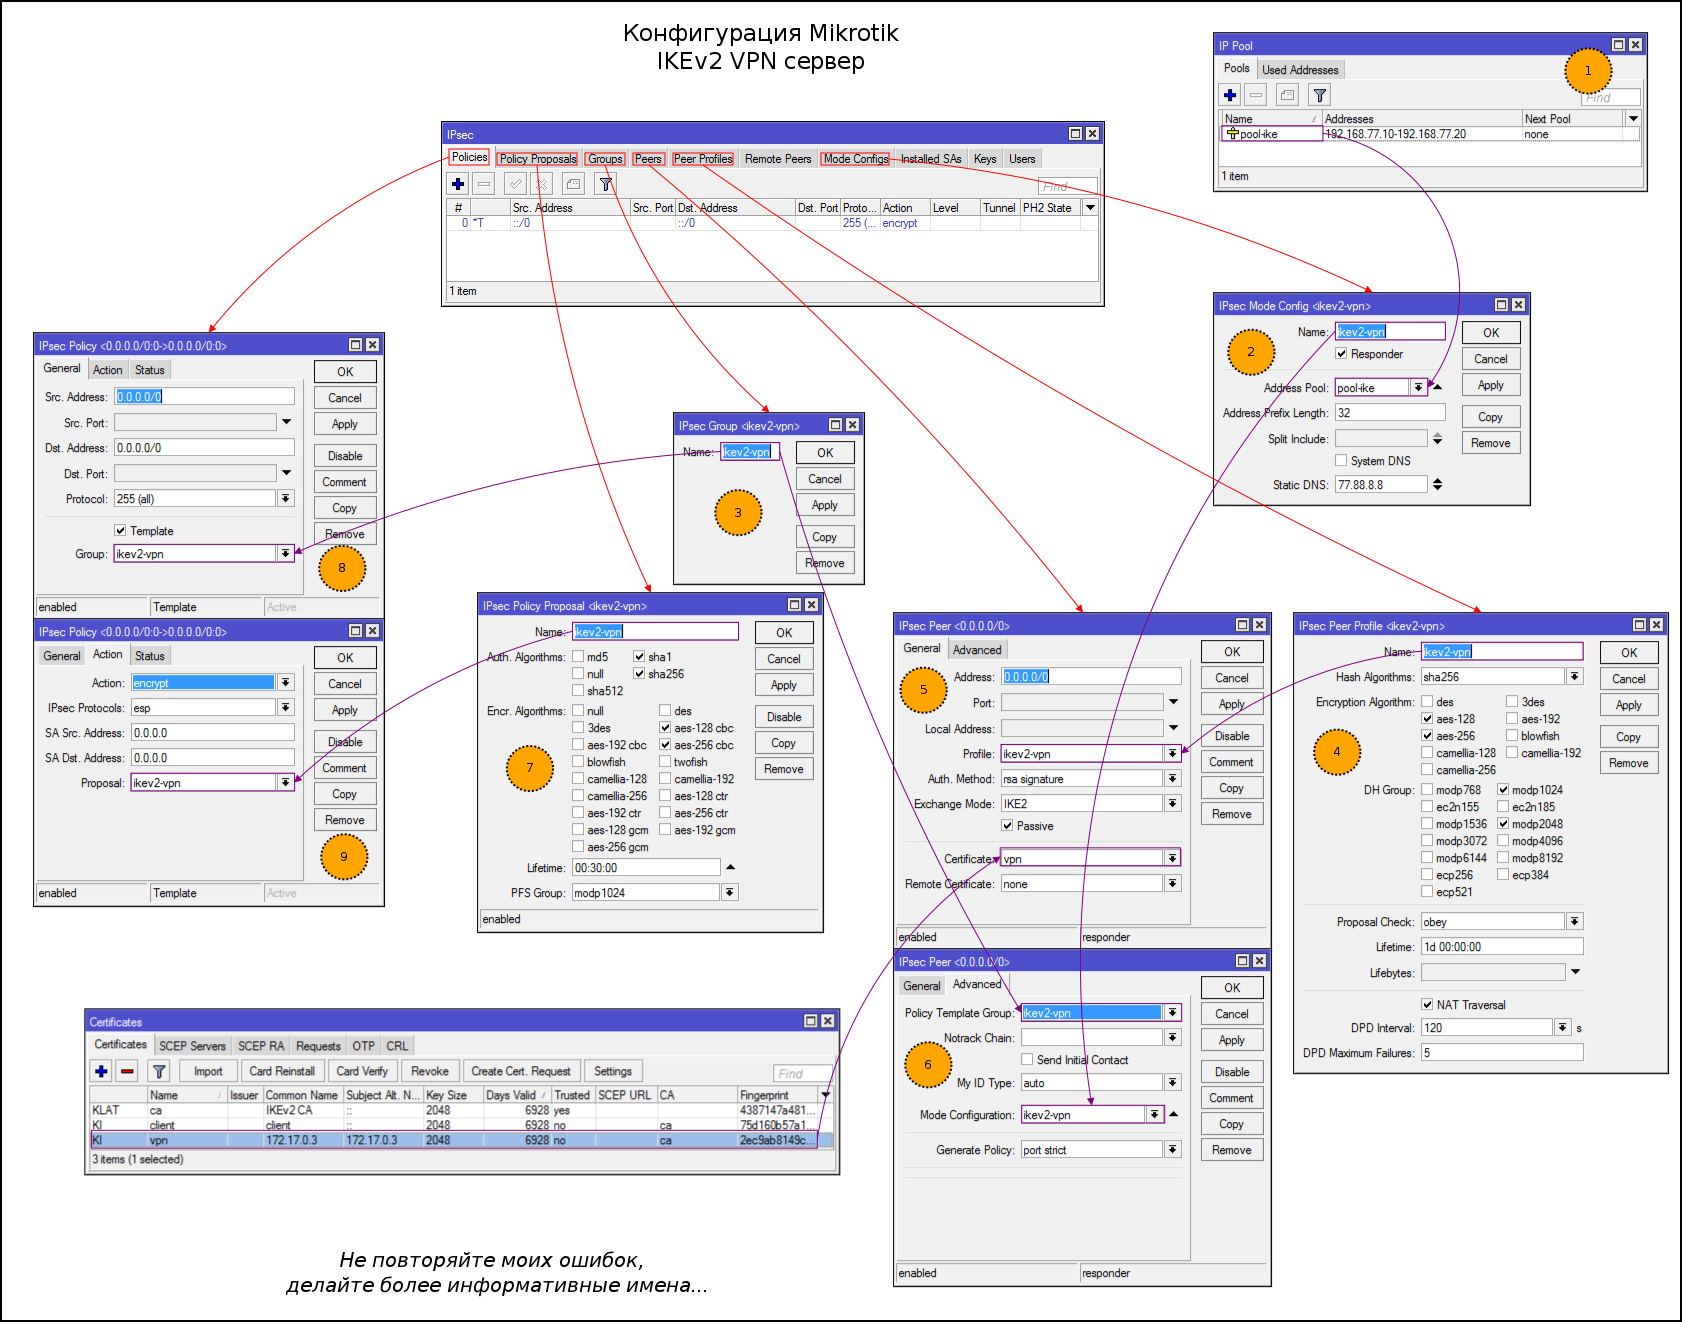
/certificate sign client ca=caStep-by-step configuration of IKEv2 VPN:
- We create a pool of addresses for distribution to clients
- Create a mode config profile for distributing IP settings to clients
- Create groups to link Peers and templates policies
- Create Proposals for IKE Phase1
- Create a profile to connect peers. Authentication via certificates, IKEv2 protocol, passive mode
- Specify the profile mode config profile, a group of 3 steps and enable policy generation
- Create Proposals for SA
- Create a template for generating policies
- Specifying Proposals for SA
#1
/ip pool
add name=pool-ike ranges=192.168.77.10-192.168.77.20
#2
/ip ipsec mode-config
add address-pool=pool-ike address-prefix-length=32 name=ikev2-vpn static-dns=77.88.8.8 system-dns=no
#3
/ip ipsec policy group
add name=ikev2-vpn
#4
/ip ipsec peer profile
add enc-algorithm=aes-256,aes-128 hash-algorithm=sha256 name=ikev2-vpn
#5-6
/ip ipsec peer
add address=0.0.0.0/0 auth-method=rsa-signature certificate=vpn exchange-mode=ike2 generate-policy=port-strict mode-config=ikev2-vpn passive=yes policy-template-group=ikev2-vpn profile=ikev2-vpn send-initial-contact=no
#7
/ip ipsec proposal
add auth-algorithms=sha256,sha1 enc-algorithms=aes-256-cbc,aes-128-cbc name=ikev2-vpn
#8-9
/ip ipsec policy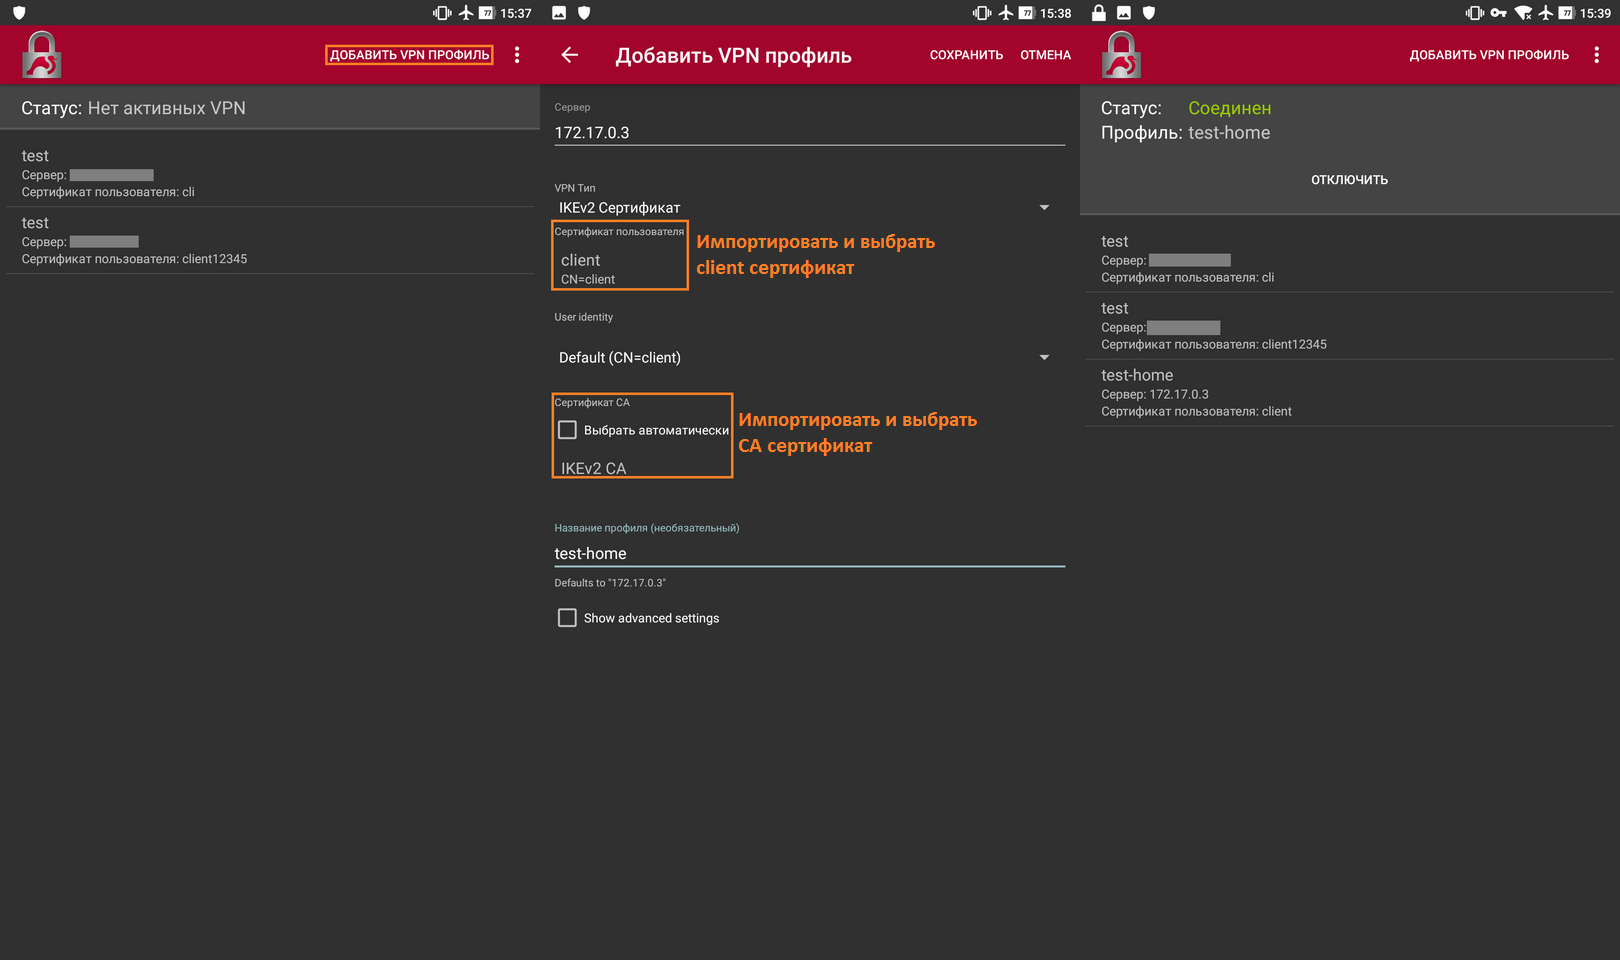
add dst-address=0.0.0.0/0 group=ikev2-vpn proposal=ikev2-vpn src-address= 0.0.0.0/0 template=yesПредварительно необходимо перенести client и ca сертификаты на телефон.
https://habrastorage.org/webt/tp/pk/ad/tppkadaifd1k7xi6hf3jxgg7vcs.png
Для глазастых: Крестик около wi-fi стоит т.к. большая часть системных приложений заблокирована средствами AFWall+.
If the connection is successful, there will be: a dynamic policy, an entry in remote Peers and a pair of SA.


The RouterOS x86 demo license has no restrictions on the number of IPSec tunnels, including IKEv2 VPN. You can deploy the RouterOS x86 demo (do not confuse with RouterOS CHR free, everything is sad there) on the VPS and get a personal VPN server with minimal administrative pressure, without buying a license for RouterOS or RouterOS CHR.
A couple of words about the analysis of IPSec logs
The logs in Mikrotik are a separate story, and sometimes they are detailed enough to analyze the problem, but the lack of commonplace features: clear, copy, find, forces you to install a separate syslog server.
As for IPSec, here’s a quick log analysis option (leaving only the one you need on a separate tab):
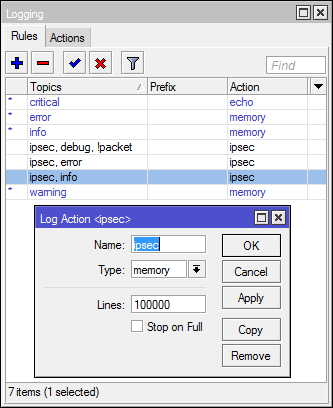
/system logging action
add memory-lines=100000 name=ipsec target=memory
/system logging
add action=ipsec topics=ipsec,error
add action=ipsec topics=ipsec,debug,!packet
add action=ipsec topics=ipsec,info
And a couple of examples of typical IPSec configuration problems:
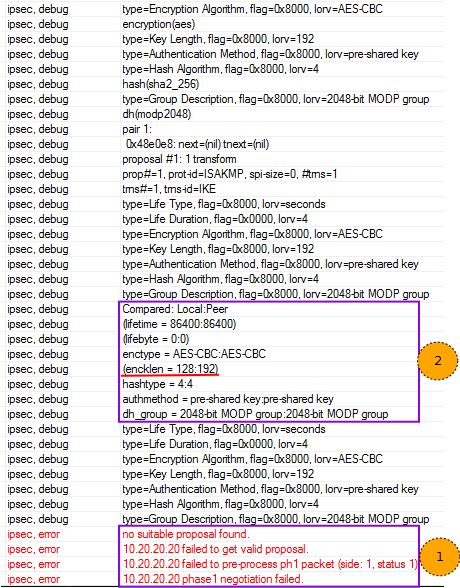
- Читаем сообщение об ошибке. Проблема при согласовании Proposals на первой фазе.
- Смотрим выше, роутер сам подсказывает что прислал пир, а что настроено локально
В логах вы увидите примерно следующее:
Анализируем трафик
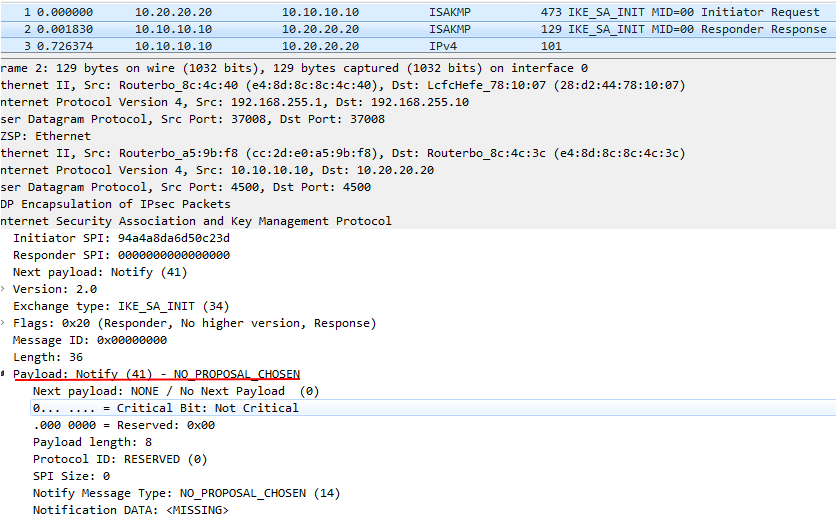
В запросе можно посмотреть proposals от пира:

В ответе видим, что не найдено подходящих proposals:
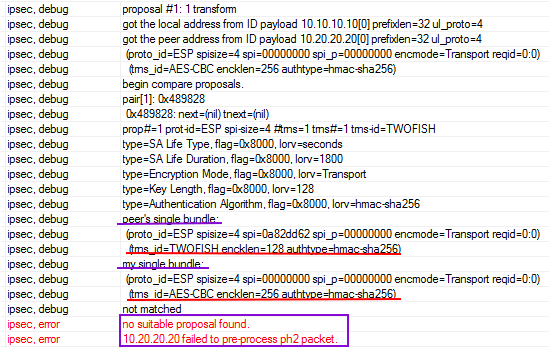
Роутер подсказывает о ошибке proposals на phase2 и показывает что настроено локально, а что удаленно.

Видим, что произошло соединение и аутентификация пиров, но дальше ошибка proposals. В debug подробностей не увидите, в wireshark тоже (трафик IKE_AUTH зашифрован).
Для IKE:

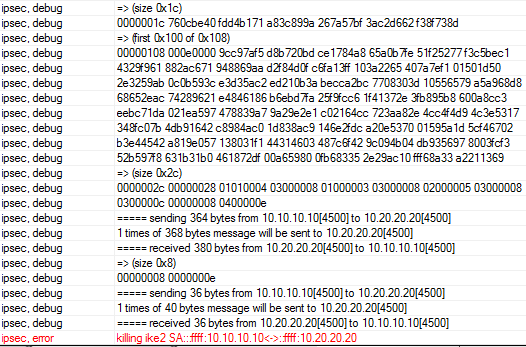
Для IKEv2:
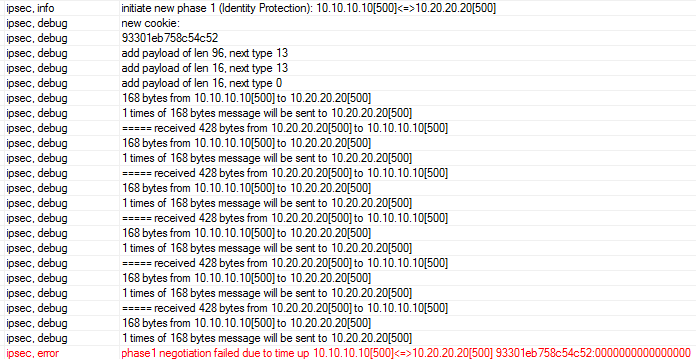
Видим, что Phase1 рвется по таймауту, хотя пакеты между пирами ходят. Но размер входящего пакета значительно больше, если проанализировать через wireshark, то увидим, что удаленный пир использует aggressive mode.

Видим, что от нас пакеты отправляются на UDP:500, а приходят на UDP:4500 причем довольно крупные. Тут у удаленного пира стоит режим IKEv2.
And finally, read the troubleshooting section of the wiki . And all the material about IPSec is desirable for review, I described only the basic set of tools and settings.