Organization of Internet broadcasting of events by budget funds
Introductory
The article is intended for event organizers, trainers, teachers who wish to organize an online broadcast of events with minimal costs for the purchase of equipment and software.
In this article, we will describe in detail the steps that you need to take to organize a free online broadcast. We give a list of the necessary equipment and give instructions on how to install it. We describe the main problems that organizers may encounter when organizing online broadcasts, and possible solutions.
Use cases
Online broadcasts can be conditionally divided into two categories:
- Video broadcasting of offline events on the Internet: conferences, seminars, round tables;
- Web conferencing: simultaneous video chat of many participants among themselves.
In the first case, the organizer, as a rule, rents a room in which participants gather and simultaneously organizes an online broadcast of this event. In this case, it is necessary to transmit high-quality sound and video stream, and use video and audio equipment.
In the second case, participants organize a web conference at home using their home computers or laptops with built-in web or USB cameras.
Equipment
According to the list of equipment for video broadcasting offline events on the Internet, you need to use:
- digital camcorder
- radio microphone system
- audimixer
- video capture card
- desktop computer
- wired Internet,
- sound speakers, if you need to output sound to a room or audience;
- Cables: audio cable, HDMI cable, balanced cables.
Digital camcorders can be used both professional and home. We recommend that novice organizers use home camcorders first.
A radio microphone system is used to transmit high-quality sound.
The audio mixer is used to amplify and control the sound volume (more details here.wikipedia.org/wiki/%D0%90%D1%83%D0%B4%D0%B8%D0%BE_%D0%BC%D0%B8%D0% BA% D1% 88% D0% B5% D1% 80 .
video capture Card - an electronic device (usually a PCI or PCI-E, rarely are USB-compatible motherboard) to convert analog video to digital video stream (details here (http: // ru. wikipedia.org/wiki/%D0%9F%D0%BB%D0%B0%D1%82%D0%B0_%D0%B2%D0%B8%D0%B4%D0%B5%D0%BE%D0%B7 % D0% B0% D1% 85% D0% B2% D0% B0% D1% 82% D0% B0) The
computer requires a desktop or laptop.
Speakers with speakers (possibly with amplifiers, if you need to broadcast in large audiences) (with jack or balance input)
We conditionally grouped all the equipment into three lists, depending on the quality of the video broadcast: broadcast is of good quality (let's call it HD quality) and more low quality (conditionally SD quality or Lite version) and equipment for webcasting at home.
Equipment for HD video broadcast quality
For HD broadcast quality you will need to install the following equipment:
- home digital video camera (with HDMI output), with support for Full HD;
- a desktop computer, preferably with a processor no lower than Intel Core i3 (with a monitor) with a PCI-Express slot;
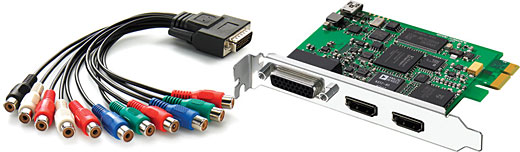
- built-in video capture card Blackmagic Intensity Pro (with HDMI input);
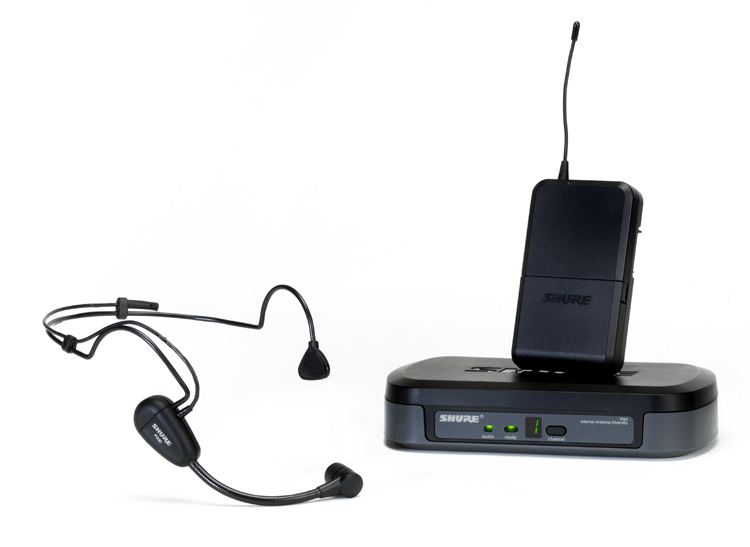
- radio microphone system. We recommend Shure brand radio microphones;
- audio mixer. We recommend Behringer brand audio mixers (http://mmag.ru/behringer-xenyx-1002fx.html or a little more professional mmag.ru/behringer-xenyx-qx1202usb.html );
- tripod for a video camera (must match the brand of your video camera);
- Cables: Mini HDMI - HDMI cameras for connecting the camcorder to the video capture card, an audio cable for connecting the audio mixer to the computer, 2 Jack-Jack cables or balance cables for connecting the radio microphone system to the audio mixer.
Features of equipment for HD video broadcast quality
The Blackmagic Intensity Pro video capture card only works with camcorders that have been released the last two years and which support Full HD. In general, you should check to see if your camcorder supports this video capture card. The advantage of this board is that it can be used to transmit sound from a video camera. At a price this fee is in the range of 8-9 thousand rubles.
A low-cost alternative to this board is the TV Tuner - a built-in AVerMedia AVer3D CaptureHD video capture card with HDMI input. The disadvantage of this board is that it does not allow you to transmit sound directly to the camcorder (therefore, an external radio microphone system and audio mixer are required). Also, to capture the image, you need to run the software that comes with this board every time.
Video Capture Card AVerMedia AVer3D CaptureHD:

Links to Video Capture Cards :
- built-in video capture card AVerMedia AVer3D CaptureHD with HDMI input (http://www.ulmart.ru/goods/216874/?head=1)
- Blackmagic Intensity Pro Video Capture Card
camcorder.ru/blackmagic_intensity-pro.html
forsite-company.spb.ru/professionalnie-plati-videozaxvata-blackmagic/professionalnaya-plata-videozaxvata-blackmagic-decklink-intensity-pro/flypage_new.tpl.html
wireless microphone system, we recommend the brand Shure . The following models can be used:
- Shure PG288 PG58 mmag.ru/shure-pg288-pg58.html
- Shure PG14 PG30: mmag.ru/shure-pg14-pg30.html
We recommend Behringer brand audio mixers:
- for the entry-level Behringer XENYX 1002FX (http://mmag.ru/behringer-xenyx-1002fx.html_
- or a little more professional Behringer XENYX QX1202USB (http://mmag.ru/behringer-xenyx-qx1202usb.html)

Equipment for SD quality (lite version) video broadcast
For broadcasts of the worst quality (SD quality, Lite version) the following equipment is required:
- a laptop;
- digital video camera;
- Video capture card via USB. We recommend using the brand Pinnacle Systems Dazzle;
- radio microphone system. We recommend Shure brand radio microphones
- audio mixer. we recommend Behringer brand audio mixers (http://mmag.ru/behringer-xenyx-1002fx.html or a bit more professional mmag.ru/behringer-xenyx-qx1202usb.html )
- tripod for a video camera (must match the make of your video camera)
- Cables: an audio cable for connecting an audio mixer to a computer, 2 Jack-Jack cables or balance cables for connecting a radio microphone system to an audio mixer.
Hardware Features
The laptop can be used by anyone. Preferably with a processor no lower than Intel Core i3.
A digital video camera must be used with AV / S-Video outputs.
Video capture card via USB. We recommend using the Pinnacle Systems Dazzle DVD Recorder (http://www.pinnaclesys.ru/catalog/video_capture_transfer/32602/) or the Pinnacle Systems Dazzle Video Creator (http://www.pinnaclesys.ru/catalog/video_capture_transfer/32603/)

The disadvantage of using a capture card is that when using Pinnacle Systems Dazzle, you can only transfer video stream to video cameras, and you won’t be able to transmit sound from the video camera. For this reason, you will have to use a separate radio microphone system and audio mixer.
Webcasting Equipment
For home broadcasting you will need:
- A laptop
- Webcam
Hardware Features
The laptop can be used by anyone. Preferably with a processor no lower than Intel Core i3. The laptop must have a built-in webcam and microphone.
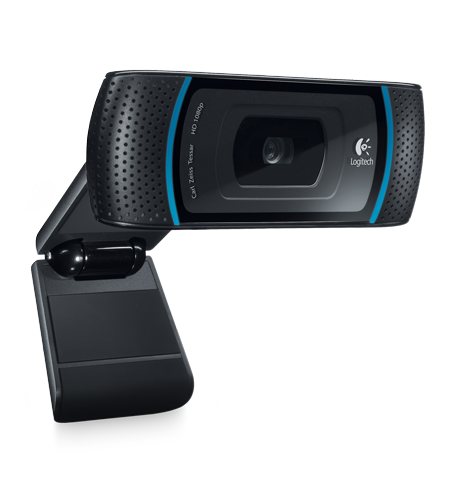
However, we additionally recommend purchasing a webcam that connects to the laptop via USB, and which supports HD quality and has a built-in microphone.
Of the most recommended webcams, we recommend Logitech high definition (located here www.logitech.com/en-us/support/webcams )
the Internet
Internet We recommend using wired internet: 5-10 megabits per second broadband Internet connection.
We do not recommend using Wifi when organizing an online broadcast of offline events, as the signal will be rather unstable and the connection will be disconnected regularly, which will lead to discontent of listeners.
Software prerequisite
From the software you will need:
- Flash Media Live Encoder 3.2. You can download it for free from here www.adobe.com/products/flash-media-encoder.html (you must register)
- Free service for hosting webcasts seemedia.ru (you must register)
- If you need to record a desktop, we recommend using Camtasia Studio 7 (http://www.techsmith.com/camtasia.html) (the first thirty days of free use)
Procedure for setting up and connecting
To organize an online broadcast of an offline event.
Steps for the initial installation of equipment for organizing an online broadcast of an offline event:
1. Connect a video capture card and install the necessary drivers (as a rule, the necessary software is included). You may need to restart your computer after installing the drivers.
2. Connect the camcorder to the computer via a video capture card (via HDMI for HD broadcasting and a video capture card through USD for SD broadcasting).
3. Register on the website www.adobe.com and install Adobe Flash Media Live Encoder 3.2 on the computer. (http://www.adobe.com/products/flash-media-encoder.html)
4. Check if the video capture card sees video from the camera.
To do this, run the program Adobe Flash Media Live Encoder 3.2. and in the “Device” field, select the installed software corresponding to the video capture card.

If the software was installed correctly and the image from the camcorder is captured, then in Adobe Flash Media Live Encoder you will see the image from the camcorder.

Sometimes, even with the correct installation of the video capture card drivers, the image in Adobe Flash Media Live Encoder is not displayed until you select the right parameters:
- Format: should be H.264;
- Frame rate. The Blackmagic Intensity Pro video capture card should be set to 25.00;
- Input size (set the maximum possible).

5. Connect the sound. To do this, connect the radio microphone system to the audio mixer in series (via Jack cables or balance cameras).

Then connect the audio mixer to your computer through the audio cable (on one side of which there are two red and white bells that connect to the mixer, and on the other side there is a mini-jack input that connects to the microphone or line-in on your computer). The figure shows the inputs for connecting an audio cable to an audio mixer.

6. In Adobe Flash Media Live Encoder, select a sound source.

Check if there is sound when you speak into the microphone. When the sound is captured, you will see a color indication:

7. Register and create an event on the SeeMedia.ru Internet service
8. Go to the seminar calendar on the SeeMedia service by going to the created event and click the Adobe Media Live Encoder icon.

Two FMS URL and Stream links will appear on the screen:

Paste these two links into Adobe Media Live Encoder:

9. Set the “Bit Rate” streams as shown in the picture and uncheck the “Save to file” checkbox. Then press the “Start” button. A

different level of Bit Rate will allow you to create several broadcast channels with different video quality for listeners with different bandwidth of the Internet channel.
We’ll download the first level of Bit Rate at 300 Kilobits / sec and allow those users who do not have Internet connection, say 400 Kilobits / sec (via 3G modems, from distant regions of the country) to connect. And the second Bit Rate of 800 Kbps will allow you to watch broadcasts of better quality for those users who have an Internet channel of more than 900 Kbps (80-100 Kbps will be used to transmit sound).
It is always worthwhile to set the first (top) Bit Rate lower than the second, so that all users connect to this first lower Bit Rate and then, if they wish, can choose a higher level of Bit Rate. If the first level of Bit Rate is set more than the second, then all users will connect to high quality, and for those who have poor Internet, the picture may not be shown at all, which will cause dissatisfaction.
After clicking the Start button in Adobe Media Live Encoder, you will see the following window, do not close it.

10. Go to the webinar in SeeMedia by clicking on the “Enter webinar” button.

After that, you will go directly to the Internet broadcast window in SeeMedia

11. Send the broadcast link to your friends and potential listeners.
In the calendar of seminars for seminars in SeeMedia, click the “Codes” icon

. In the window that opens, copy the link:

12. Choose a convenient option for viewing and arranging windows in the webcast.
Press the "Workspace" button and select the viewing option convenient for you:


Home Streaming Activities
Steps for the initial installation of equipment and software for organizing webcasting at home:
Step 1. Connect the webcam and install the necessary drivers for the webcam to work properly.
Step 2. Register and create an event in the SeeMedia.ru service.
Step 3. Enter the created webinar.

Step 4. Select the correct webcam and sound settings.
To do this, click the “Broadcast Settings” icon:

in the menu that appears, select: broadcast quality, video source (if you have several webcams or have a built-in camera, select a gentle webcam), sound source (by default, the microphone built into your computer will be used), echo cancellation mode.

Step 5. Press the “Video Conference” or “Audio Conference” button.


In the "Adobe Flash Player Settings" window that appears, click the "Allow" button.

Step 6. Choose a convenient option for viewing and arranging windows in the webcast.
Press the "Workspace" button and select the viewing option convenient for you:

Equipment Prices
Cost of equipment for HD video broadcast quality:
- home digital video camera (with HDMI output), with support for Full HD: 8000 - 17 000 rubles.
- HDMI cord (HDMI-Mini HDMI): 750 rub.
- A desktop computer, preferably with a processor no lower than Intel Core i3 (with a monitor): 12000-16000 rub.
- Computer monitor: 4000-6000 rub.
- built-in video capture card AVerMedia AVer3D CaptureHD or Blackmagic Intensity Pro (with HDMI input): 3200 - 8800 rub.
- radio microphone system. We recommend Shure brand radio microphones: 13000-25 000 rub.
- audio mixer. We recommend Behringer brand audio mixers (http://mmag.ru/behringer-xenyx-1002fx.html or a little more professional mmag.ru/behringer-xenyx-qx1202usb.html ): 4500 - 8500 rub.
- a tripod for a video camera (must match the brand of your video camera): 750 - 1500 rubles.
- Two cables for signal transmission from the radio microphone system to the audio mixer: 1000 rubles.
- Audio cable: for transmitting a signal from an audio mixer to a computer: 1000 rub.
Total:
- The cheapest option is 48,200 rubles.
- More expensive 85 500 rubles.
For broadcasts of the worst quality (SD quality, Lite version) the following equipment is required:
- Notebook: 15 000 - 25 000 rub.
- digital video camera: 8000 - 17000 rub.
- Video capture card via USB. We recommend using the brand Pinnacle Systems Dazzle: 2000-3000 rub.
- radio microphone system. We recommend Shure brand radio microphones: 13000-25 000 rub.
- audio mixer. We recommend Behringer brand audio mixers (http://mmag.ru/behringer-xenyx-1002fx.html or a little more professional mmag.ru/behringer-xenyx-qx1202usb.html ): 4500 - 8500 rub.
- a tripod for a video camera (must match the brand of your video camera): 750 - 1500 rubles.
- Two cables for transmitting a signal from a radio microphone system to an audio mixer: 1000 rubles.
- Audio cable: to transmit a signal from an audio mixer to a computer: 1000 rubles.
Total:
- The cheapest option is 45,250 rubles.
- More expensive 82 000 rubles.
For webcasting at home, purchase:
• Laptop: 15,000 - 25,000 rubles.
• Logitech webcam: 1,000 - 5,000 rubles.
Total:
• Cheap option 16 000 rubles.
• More expensive 30,000 rubles.
Key issues or frequently asked questions
There is a lot of sound noise in the webcast.
Perhaps you have a poorly connected electrical outlet, in which the ends of the electrical cable or the contacts that spark are poorly connected. Plug all equipment into a different electrical outlet.
After configuring the drivers for the audio capture board, the operating system writes a message that the drivers are not connected correctly and may not work.
Remove all the drivers of all webcams that were on your computer and repeat the installation. We noticed that sometimes there is a conflict between webcam drivers and video capture cards.
Video capture card drivers installed correctly, but Adobe Flash Media Live Encoder does not see them
In this case, you may need to first run the software that came with the video capture card, display the video in the software, and then launch Adobe Flash Media Live Encoder. So, at least, AVerMedia AVer3D CaptureHD can work.
When the audio mixer is connected, the correct low and high frequencies are transmitted
. Reduce the low frequencies (bass) to a minimum. Make the mids a little less than the balance; the highs a little more than the balance.
Users complain that they can’t connect to the Internet broadcast
. Users must have port 1935 open.
Users complain that their video image slows down and the sound is interrupted
Encourage users to connect to a wider Internet channel. Set two different Bit Rate in Adobe Flash Media Live Encoder.