Using the Fish eye camera on the Raspberry Pi 3 with ROS - part 1
Good afternoon, dear readers of Habr. A few years ago I wrote about using the Raspberry Pi Camera Board camera on the Raspberry Pi in conjunction with ROS. In this and the next article, I would like to talk about using a wide-angle fish eye camera on the Raspberry Pi 3 with Ubuntu 16.04 installed. Who cares please under the cat.
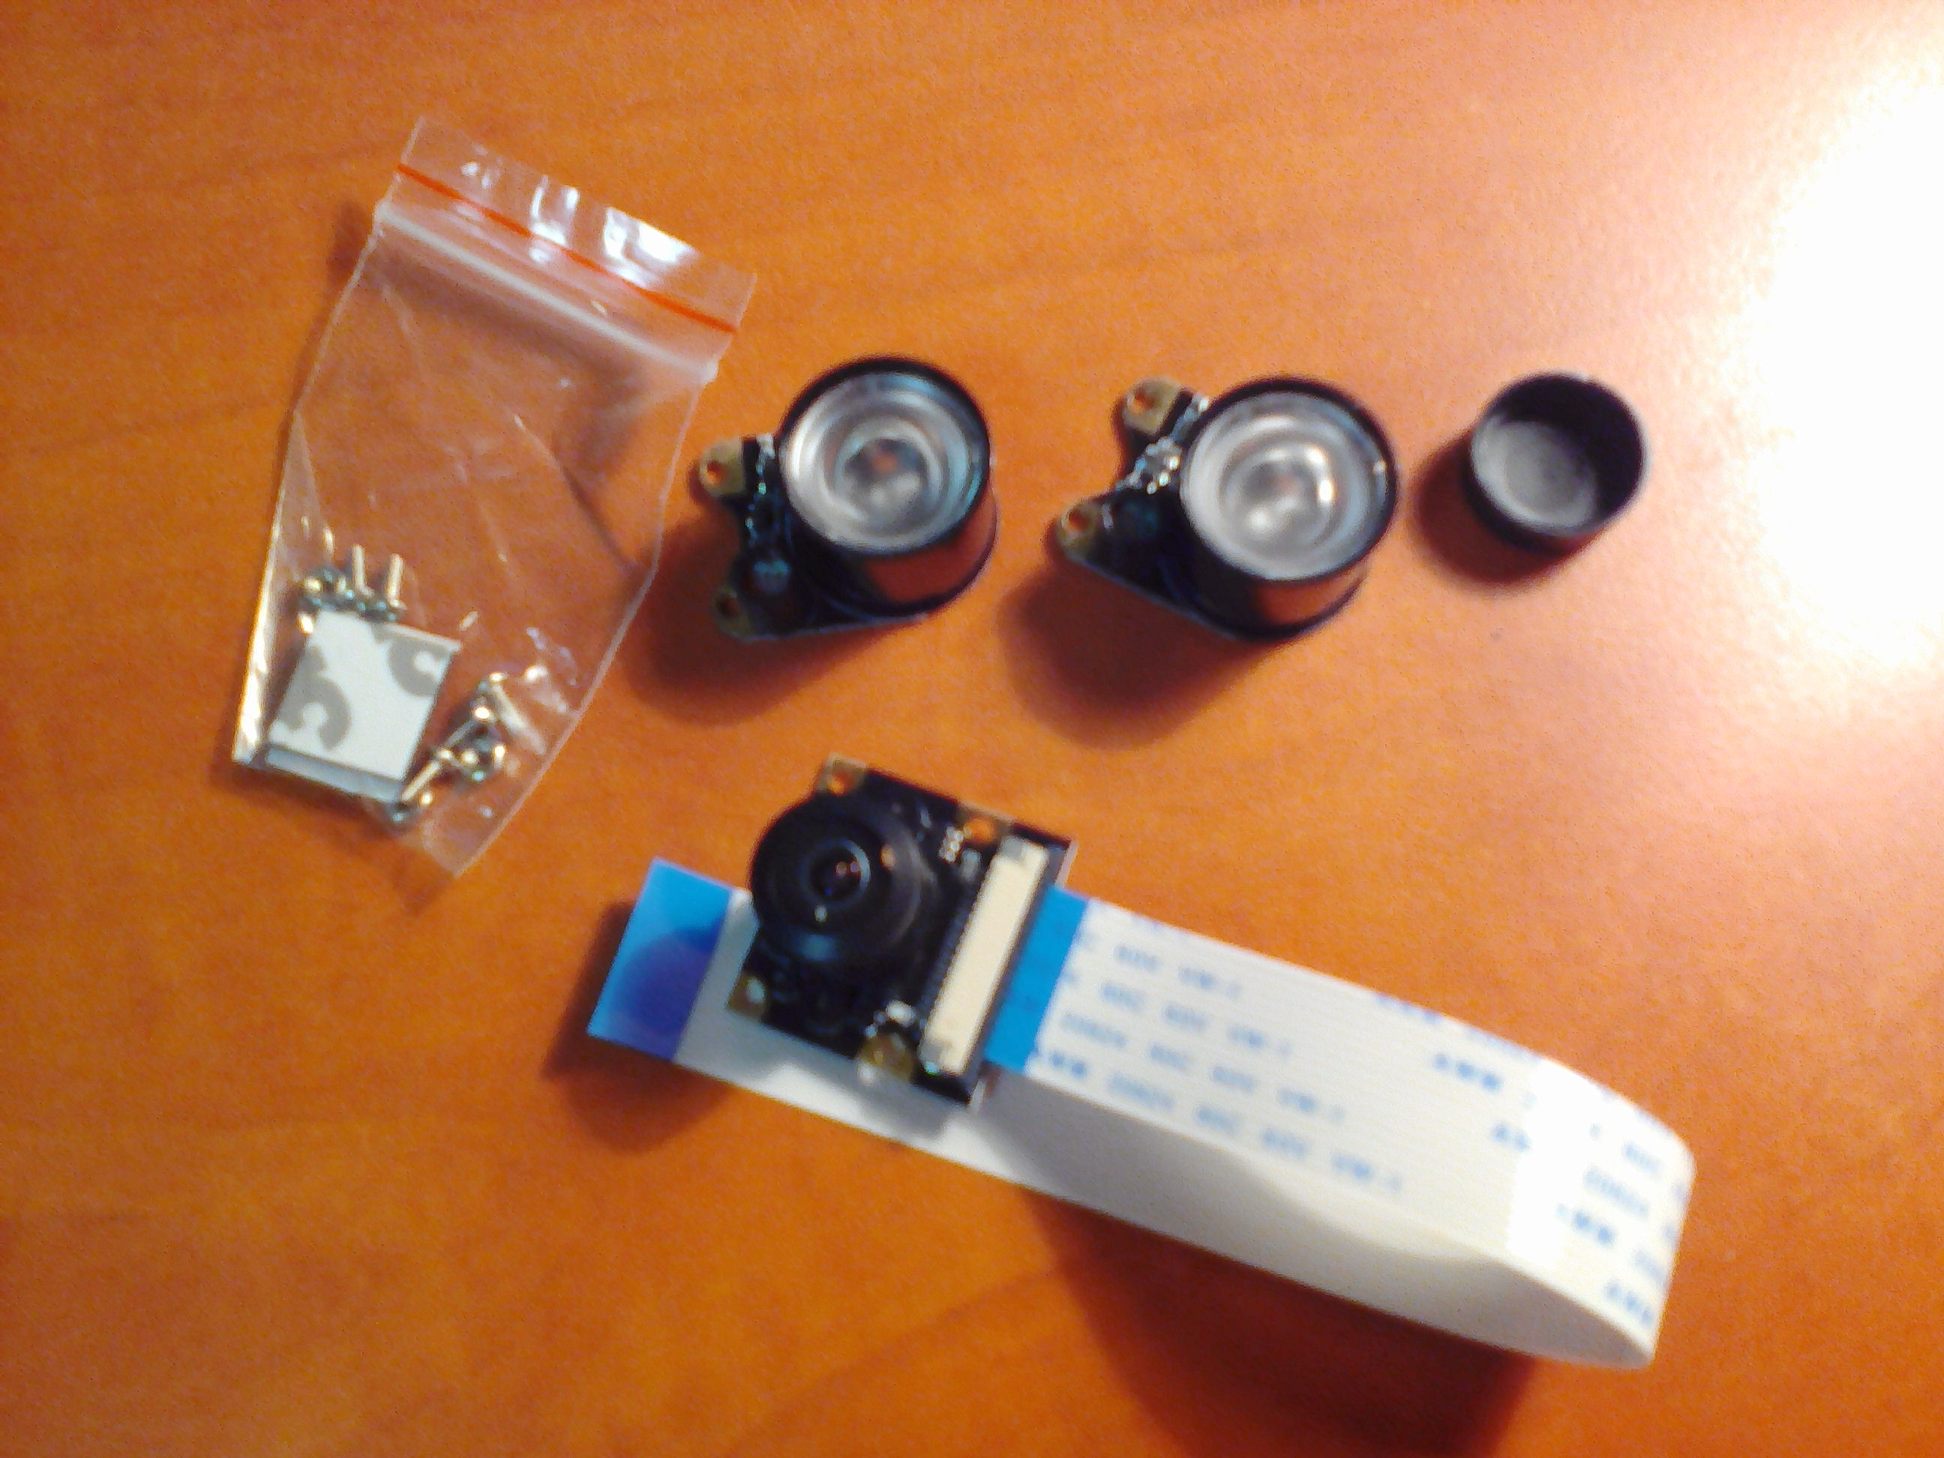
First, why fish eye camera? I have seen many articles on the use of wide-angle cameras for visual odometry and SLAM. Due to the greater viewing angle fish eye camera improves the accuracy of visual odometry. So I wanted to try one such camera with Raspberry Pi with ROS support. I bought a camera with a 160 degree angle on dx.com for $ 28. Two IR lamps for night vision are also included with the camera:
In the first article I will talk about installing the necessary drivers, OpenCV 3 and packages to support the Raspberry Pi Camera Board camera in ROS.
So, let's begin. Connect to RPi 3 via SSH:
The -Y parameter allows you to solve the problem of getting the error “Could not connect to display” when running some GUI applications (Qt, window with an image from the OpenCV program). More details can be found here .
First we need to enable the camera driver support in the Raspberry Pi raspi-config settings. This service is already included in Raspbian, it must be installed in Ubuntu:
Run the raspi-config:
Select the Interfacing option, then Pi Camera and click Yes. And finally Finish.
Verify that camera support is enabled using the raspistill utility:
If you get the error “Camera is not detected. Please check carefully the camera module is installed “correctly” and check if you have correctly connected the camera to the Raspberry Pi. You can also perform a system reboot (this helped me).
Let's try to record a video:
I got an image on a monitor connected to a Raspberry Pi. I was unable to get a pop-up window on my computer when connected via ssh.
Install the picamera [array] library:
Install the necessary dependencies for OpenCV. To begin, update the apt package manager and upgrade the pre-installed packages:
Install some libraries:
We will install OpenCV 3 from source.
We also need to load the opencv_contrib repository:
The fact is that in OpenCV 3, packages with feature descriptors (such as SIFT and SURF) were transferred to a separate contrib repository. Now, to use the tag descriptors, we need to separately download the contrib repository.
Now we are finally ready to install OpenCV. We can perform cmake to compile OpenCV with the necessary parameters:
If cmake runs without errors, run make:
When compiling, I received an “Segmentation fault” error. If you get the same error, run make clean to remove the compilation results and run make with one kernel:
My compilation procedure took 3 hours. Finally, install OpenCV 3:
There is an interesting nuance associated with ROS Kinetic. If you install Kinetic ROS, then ROS adds the path to the Python libraries (/opt/ros/kinetic/lib/python2.7/dist-packages) to the system path when executing the source /opt/ros/kinetic/setup.bash command. This leads to some problems with the subsequent installation of OpenCV from source (more on this written here ). To solve the problem, you need to remove the line 'source /opt/ros/kinetic/setup.bash' from the file .bashrc. Do not forget to run:
Let's check that OpenCV is now correctly linked from Python.
Create a folder for the project and a simple test script:
Add the following code to the file:
Run the script:
If successful, we will get something like this:
Let's now try to record video from the camera.
Add the following code to the file:
Let's try something more interesting, for example, add edge detection. I am using Kenny's detector here (the code is taken from here ):
Here is the result of running the program:
Now let's add the ability to work with a fish eye camera for the Raspberry Pi from ROS. First, install the necessary V4L2 driver for the Raspberry Pi camera (you can read more here ). Run the command:
and reboot the system. Now add the driver:
Check that the device / dev / video0 is available:
The output will be:
Download the usb_cam package:
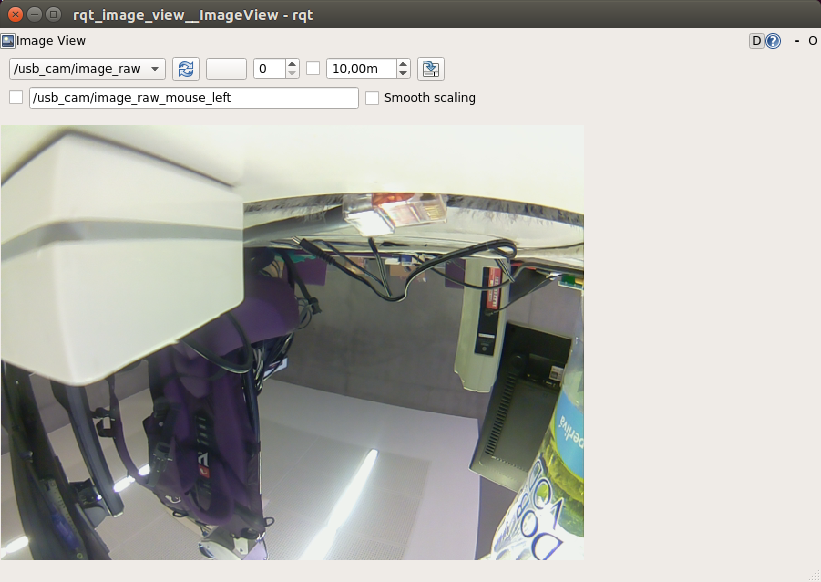
Run the ROS master and rqt_image_view:
Select the topic / usb_cam / image_raw. We will get this picture:
Now the fish eye camera can be used with any packages of computer vision in ROS. Next time we will try object detection. Good luck in your experiments and see you soon!
First, why fish eye camera? I have seen many articles on the use of wide-angle cameras for visual odometry and SLAM. Due to the greater viewing angle fish eye camera improves the accuracy of visual odometry. So I wanted to try one such camera with Raspberry Pi with ROS support. I bought a camera with a 160 degree angle on dx.com for $ 28. Two IR lamps for night vision are also included with the camera:
In the first article I will talk about installing the necessary drivers, OpenCV 3 and packages to support the Raspberry Pi Camera Board camera in ROS.
Installing the fish eye camera driver on the Raspberry Pi 3
So, let's begin. Connect to RPi 3 via SSH:
ssh -Y <user>@<ip>
The -Y parameter allows you to solve the problem of getting the error “Could not connect to display” when running some GUI applications (Qt, window with an image from the OpenCV program). More details can be found here .
First we need to enable the camera driver support in the Raspberry Pi raspi-config settings. This service is already included in Raspbian, it must be installed in Ubuntu:
sudo apt-get install raspi-config
Run the raspi-config:
sudo raspi-config
Select the Interfacing option, then Pi Camera and click Yes. And finally Finish.
Verify that camera support is enabled using the raspistill utility:
raspistill -o mypicture.jpg
If you get the error “Camera is not detected. Please check carefully the camera module is installed “correctly” and check if you have correctly connected the camera to the Raspberry Pi. You can also perform a system reboot (this helped me).
Let's try to record a video:
raspivid -o myvideo.h264
I got an image on a monitor connected to a Raspberry Pi. I was unable to get a pop-up window on my computer when connected via ssh.
Using OpenCV 3 with a fish eye camera on the Raspberry Pi
Install the picamera [array] library:
pip install "picamera[array]"Install the necessary dependencies for OpenCV. To begin, update the apt package manager and upgrade the pre-installed packages:
sudo apt-get update
sudo apt-get upgrade
Install some libraries:
sudo apt-get install build-essential cmake pkg-config
sudo apt-get install libjpeg8-dev libtiff5-dev libjasper-dev libpng12-dev
sudo apt-get install libavcodec-dev libavformat-dev libswscale-dev libv4l-dev
sudo apt-get install libxvidcore-dev libx264-dev
sudo apt-get install libgtk-3-dev
sudo apt-get install libatlas-base-dev gfortran
sudo apt-get install python2.7-dev python3.5-dev
We will install OpenCV 3 from source.
cd ~
wget -O opencv.zip https://github.com/Itseez/opencv/archive/3.1.0.zip
unzip opencv.zip
We also need to load the opencv_contrib repository:
wget -O opencv_contrib.zip https://github.com/Itseez/opencv_contrib/archive/3.1.0.zip
unzip opencv_contrib.zip
The fact is that in OpenCV 3, packages with feature descriptors (such as SIFT and SURF) were transferred to a separate contrib repository. Now, to use the tag descriptors, we need to separately download the contrib repository.
Now we are finally ready to install OpenCV. We can perform cmake to compile OpenCV with the necessary parameters:
cd ~/opencv-3.1.0/
mkdir build
cd build
cmake -D CMAKE_BUILD_TYPE=RELEASE \
    -D CMAKE_INSTALL_PREFIX=/usr/local \
    -D INSTALL_PYTHON_EXAMPLES=ON \
    -D INSTALL_C_EXAMPLES=OFF \
    -D OPENCV_EXTRA_MODULES_PATH=~/opencv_contrib-3.1.0/modules \
    -D PYTHON_EXECUTABLE=~/.virtualenvs/cv/bin/python \
    -D BUILD_EXAMPLES=ON ..
If cmake runs without errors, run make:
make -j4
When compiling, I received an “Segmentation fault” error. If you get the same error, run make clean to remove the compilation results and run make with one kernel:
make clean
make
My compilation procedure took 3 hours. Finally, install OpenCV 3:
sudo make install
sudo ldconfig
There is an interesting nuance associated with ROS Kinetic. If you install Kinetic ROS, then ROS adds the path to the Python libraries (/opt/ros/kinetic/lib/python2.7/dist-packages) to the system path when executing the source /opt/ros/kinetic/setup.bash command. This leads to some problems with the subsequent installation of OpenCV from source (more on this written here ). To solve the problem, you need to remove the line 'source /opt/ros/kinetic/setup.bash' from the file .bashrc. Do not forget to run:
source ~/.bashrc
Let's check that OpenCV is now correctly linked from Python.
Create a folder for the project and a simple test script:
mkdir PiCamera && cd PiCamera
vim test_cam.py
Add the following code to the file:
from picamera.array import PiRGBArray
from picamera import PiCamera
import time
import cv2
# initialize the camera and reference the raw camera capture
camera = PiCamera()
rawCapture = PiRGBArray(camera)
# allow camera to warmup
time.sleep(0.1)
# grab an image
camera.capture(rawCapture, format="bgr")
image = rawCapture.array
cv2.imshow("Capture", image)
cv2.waitKey(0)
Run the script:
python test_cam.py
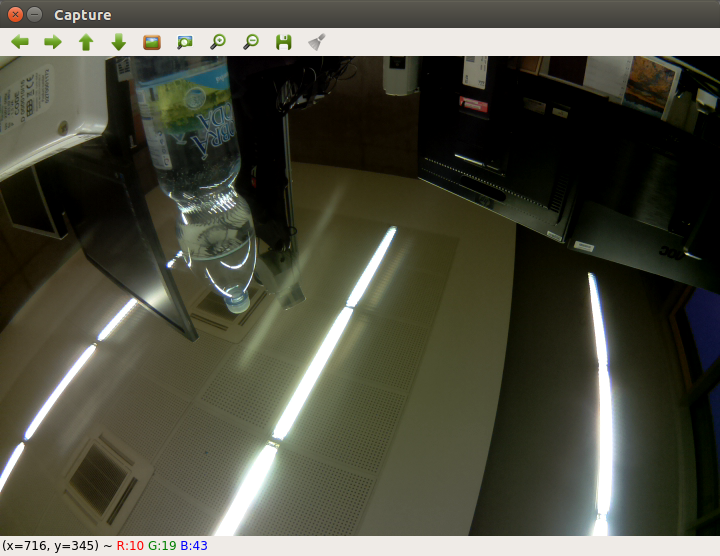
If successful, we will get something like this:
Let's now try to record video from the camera.
vim test_videom.py
Add the following code to the file:
# import the necessary packages                                                                               from picamera.array import PiRGBArray
from picamera import PiCamera
import time
import cv2
# initialize the camera and grab a reference to the raw camera capture
camera = PiCamera()
camera.resolution = (640, 480)
camera.framerate = 32
rawCapture = PiRGBArray(camera, size=(640, 480))
# allow the camera to warmup
time.sleep(0.1)
# capture frames from the camera                                                                              for frame in camera.capture_continuous(rawCapture, format="bgr", use_video_port=True):
    # grab the raw NumPy array representing the image, then initialize the timestamp                          # and occupied/unoccupied text
    image = frame.array
    # show the frame
    cv2.imshow("Frame", image)
    key = cv2.waitKey(1) & 0xFF# clear the stream in preparation for the next frame
    rawCapture.truncate(0)
    # if the `q` key was pressed, break from the loop                                                         if key == ord("q"):
        break
Let's try something more interesting, for example, add edge detection. I am using Kenny's detector here (the code is taken from here ):
from picamera.array import PiRGBArray
from picamera import PiCamera
import time
import cv2
import numpy as np
# initialize the camera and grab a reference to the raw camera capture
camera = PiCamera()
camera.resolution = (640, 480)
camera.framerate = 32
rawCapture = PiRGBArray(camera, size=(640, 480))
# allow the camera to warmup
time.sleep(0.1)
# capture frames from the camera for frame in camera.capture_continuous(rawCapture, format="bgr", use_video_port=True):
# grab the raw NumPy array representing the image, then initialize the timestamp # and occupied/unoccupied text
image = frame.array
hsv = cv2.cvtColor(image, cv2.COLOR_BGR2HSV)
lower_red = np.array([30,150,50])
upper_red = np.array([255,255,180])
mask = cv2.inRange(hsv, lower_red, upper_red)
res = cv2.bitwise_and(image,image, mask= mask)
edges = cv2.Canny(res,100,200)
# show the frame
cv2.imshow("Frame", image)
cv2.imshow("Edges", edges)
key = cv2.waitKey(1) & 0xFF# clear the stream in preparation for the next frame
rawCapture.truncate(0)
# if the `q` key was pressed, break from the loop if key == ord("q"):
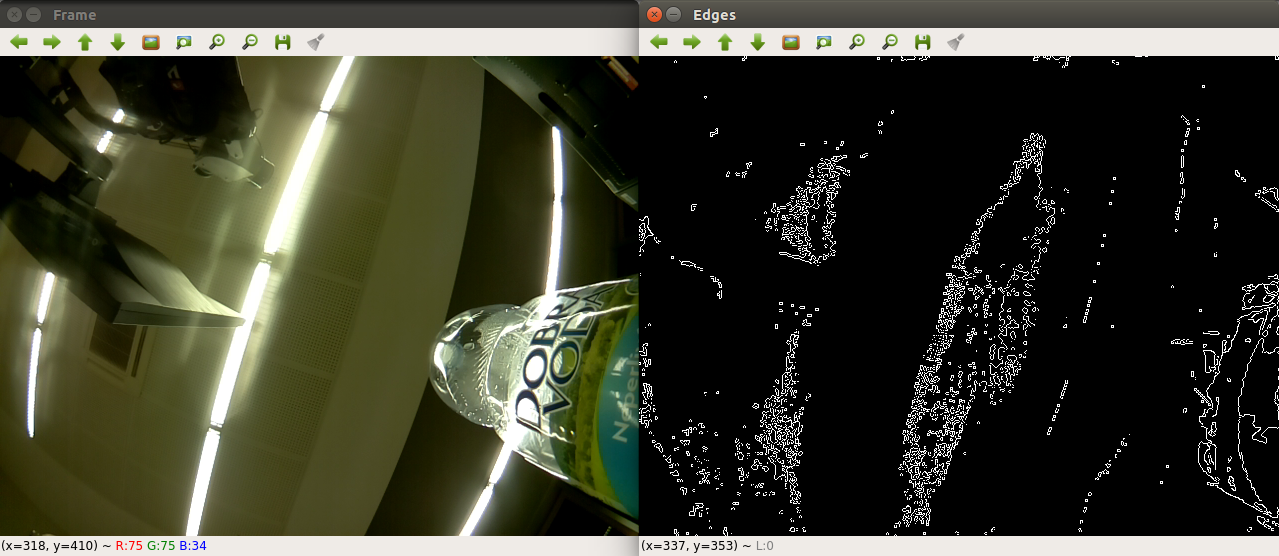
breakHere is the result of running the program:
Adding Raspberry Pi Camera Camera Support to ROS
Now let's add the ability to work with a fish eye camera for the Raspberry Pi from ROS. First, install the necessary V4L2 driver for the Raspberry Pi camera (you can read more here ). Run the command:
sudo rpi-update
and reboot the system. Now add the driver:
sudo modprobe bcm2835-v4l2
Check that the device / dev / video0 is available:
ll /dev/video0
The output will be:
crw-rw----+ 1 root video 81, 0 Mar 17 15:47 /dev/video0
Download the usb_cam package:
sudo apt-get install ros-kinetic-usb-cam
source /opt/ros/kinetic/setup.bash
Run the ROS master and rqt_image_view:
roscore
roslaunch usb_cam usb_cam-test.launch
rosrun rqt_image_view rqt_image_view
Select the topic / usb_cam / image_raw. We will get this picture:
Now the fish eye camera can be used with any packages of computer vision in ROS. Next time we will try object detection. Good luck in your experiments and see you soon!