Reverse engineering NES emulator in GameCube game
- Transfer
In the process of finding ways to activate the developer menu left in Animal Crossing, including the game selection menu for the NES emulator, I discovered an interesting function that exists in the original game and was constantly active, but never used by Nintendo.
In addition to the NES / Famicom games that can be obtained inside the game, you can download new NES games from a memory card.
I also managed to find a way to use this ROM loader to patch my code and data into the game, which allows you to run the code through a memory card.
Introduction - NES Console Objects
Conventional NES games that can be obtained at Animal Crossing are individual pieces of furniture in the form of an NES console with a cartridge on it.
By placing this object in your home and interacting with it, you can run this single game. The picture below shows Excitebike and Golf.

There is also a common “NES Console” object in which there are no embedded games. You can buy it from Redd, and sometimes get through random events, for example, by reading on the city bulletin board that the console is buried at a random point in the city.

This object looks like a NES console with no cartridges on it.
The problem with this object is that it was conceived as unplayable. Every time you interact with it, you simply see a message stating that you do not have gaming software.
It turned out that this object is actually trying to scan the memory card for the presence of specially designed files containing ROM images for NES! The NES emulator used to run embedded games seems to be the full standard NES emulator for the GameCube, and is able to run most games.
Before demonstrating these functions, I will explain the process of their reverse development.
Search ROM loader on a memory card
Looking for developer menu
Initially, I wanted to find a code that activates various developer menus, such as the map selection menu or the game selection menu for the NES emulator. The Forest Map Select menu , which makes it easy to instantly download different locations of the game, was quite easy to find - I just searched for the FOREST MAP SELECT line that appears at the top of the screen (you can see it in various videos and on screenshots on the Internet ).
In FOREST MAP SELECT, there are cross-references of data to a function
select_print_wait, which leads to a bunch of other functions that also have a prefix select_*, including the function select_init. These turned out to be functions that control the card selection menu. The function
select_initleads to another interesting function calledgame_get_next_game_dlftbl. This function links together all the other menus and “scenes” that can be launched: a screen with the Nintendo logo, the main screen, the map selection menu, the NES (Famicom) emulator menu, and so on. It starts at the beginning of the main game procedure, finds which scene initialization function it should start, and finds its entry in the table data structure called game_dlftbls. This table contains links to various scene processing functions, as well as some other data.
A careful study of the first block of the function showed that it loads the “next game init” function, and then begins to compare it with a series of known init functions:
first_game_initselect_initplay_initsecond_game_inittrademark_initplayer_select_initsave_menu_initfamicom_emu_initprenmi_init
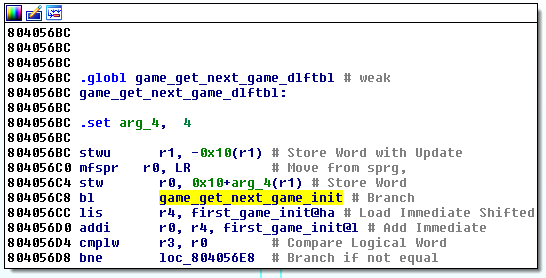
One of the pointers to the functions that it is looking for is that
famicom_emu_initwhich is responsible for running the NES / Famicom emulator. Forcing the game_get_next_game_initvalue in the Dolphin debugger to the result famicom_emu_initor select_init, I was able to display special menus. The next step is to determine how these pointers are set in the normal way during program execution. The only thing that the function does game_get_next_game_initis load the value by the offset of the 0xCfirst argument in game_get_next_game_dlftbl. Keeping track of these values in various data structures was a bit boring, so I’ll go straight to the main one. Most importantly, I found:
- When a game is launched in the usual way, it performs the following sequence of actions:
first_game_initsecond_game_inittrademark_initplay_init
player_select_initsets the next init valueselect_init. This screen should let you choose a player immediately after choosing a card, but it looks like it is not working properly.
I also found one nameless function defining the init function of the emulator, but I didn’t find anything assigning the init functions the init values of the player or card selection.
At that point, I realized that I had another stupid problem with how I loaded the function names in IDA: because of the regular expression used to cut lines in the debug symbol file, I missed all the function names starting with a capital letter . The function that asked
famicom_emu_initlooked similar to transitions between scenes, and, of course, was called Game_play_fbdemo_wipe_proc. Game_play_fbdemo_wipe_prochandles scene transitions, such as clearing the screen and dimming. Under certain conditions, the screen transition was performed from the usual gameplay to the emulator display. It was he who set the em function init.
Processing console objects
In fact, switching to the screen transition handler emulator is forced by the function-handlers of furniture objects for NES consoles. When a player interacts with one of the consoles, it is called
aMR_FamicomEmuCommonMove. When the function
r6is called, it contains the index value corresponding to the numbers in the NES game file names in famicom.arc:01_nes_cluclu3.bin.szs02_usa_balloon.nes.szs03_nes_donkey1_3.bin.szs04_usa_jr_math.nes.szs05_pinball_1.nes.szs06_nes_tennis3.bin.szs07_usa_golf.nes.szs08_punch_wh.nes.szs09_usa_baseball_1.nes.szs10_cluclu_1.qd.szs11_usa_donkey3.nes.szs12_donkeyjr_1.nes.szs13_soccer.nes.szs14_exbike.nes.szs15_usa_wario.nes.szs16_usa_icecl.nes.szs17_nes_mario1_2.bin.szs18_smario_0.nes.szs19_usa_zelda1_1.nes.szs
(
.arc- This is the proprietary format of file archives.) When
r6non-zero, it is transmitted in the call aMR_RequestStartEmu. This triggers the transition to the emulator.
However, if it
r6is zero, the function is called instead aMR_RequestStartEmu_MemoryC. Having assigned the value 0 in the debugger, I received the message "I don't have any software". I didn’t immediately remember that I had to check the NES Console object to make sure that it clears the value r6, but it turned out that the zero index is used for the console object without a cartridge. Although it
aMR_RequestStartEmusimply saves the value of the index in some kind of data structure, it aMR_RequestStartEmu_MemoryCperforms much more complex operations ...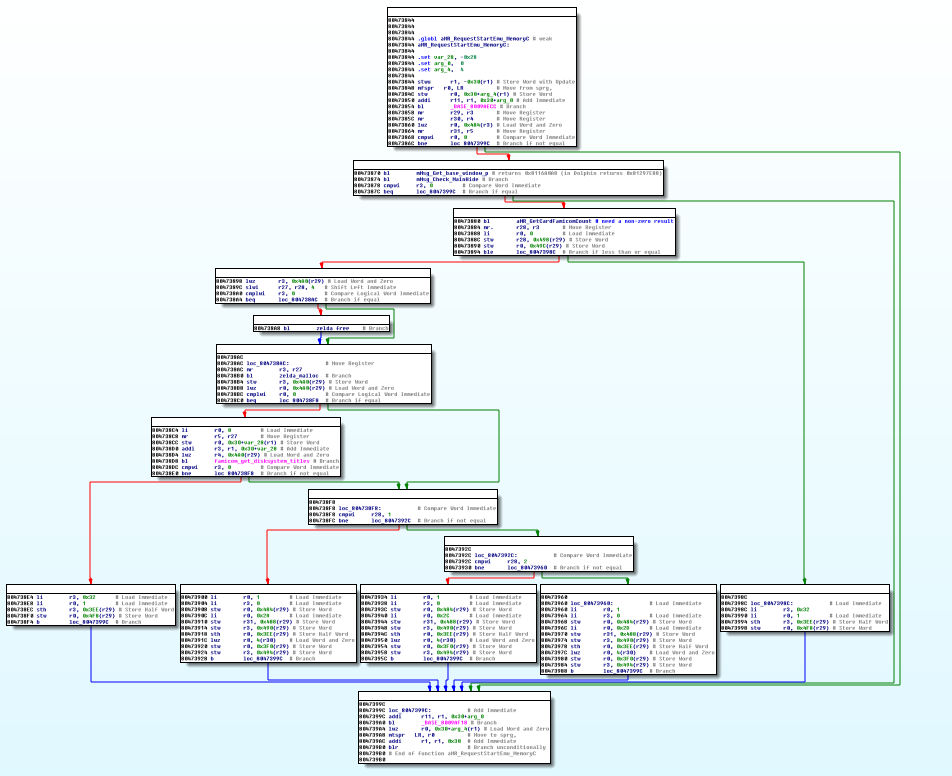
This third block of code calls
aMR_GetCardFamicomCountand checks for the presence of a non-zero result, and otherwise it misses most of the interesting things on the left side of the function graph. aMR_GetCardFamicomCountcauses famicom_get_disksystem_titles, which then causes memcard_game_list, and then everything becomes very interesting. memcard_game_listMounts a memory card and begins to bypass in the file writing cycle, checking in each some values. Having traced the function in the debugger, I was able to understand that it compared the values with each of my files on the memory card.
The function decides whether or not to load the file, depending on the results of checking several lines. First, it checks for the presence of the “GAFE” and “01” strings, which are game and company identifiers. 01 stands for Nintendo, “GAFE” is Animal Crossing. I think it stands for "GameCube Animal Forest English".
She then checks the strings “DobutsunomoriP_F_” and “SAVE”. In this case, the first line should match, but not the second. It turned out that “DobutsunomoriP_F_SAVE” is the name of the file in which the data of the embedded NES games are stored. Therefore, all files will be loaded, except for this, with the prefix "DobutsunomoriP_F_".
Using the Dolphin debugger to skip the string comparison with “SAVE” and forcing the game to assume that my SAVE file can be safely downloaded, I received this menu after using the NES console:

I answered “Yes” and tried to load the save file as a game, after which I first saw the built-in game crash screen:

Fine! Now I know that she is actually trying to load games from a memory card, and I can start analyzing the format for save files to see if you can load a real ROM.
The first thing I tried to do was try to find where the name of the game is read from the memory card file. Searching string «FEFSC», which was present in the message «? Would you like to play < name>», I found a bias in which she read from the file:
0x642. I copied the save file, changed the file name to “DobutsunomoriP_F_TEST”, changed the bytes by offset 0x642to “TESTING” and imported the changed save, after which the name I needed was displayed in the menu. After adding a few more files in this format, several more choices appeared in the menu:

ROM download
If it
aMR_GetCardFamicomCountreturns non-zero, then memory is allocated in the heap, it is directly called again famicom_get_disksystem_titles, after which a heap of random offsets is specified in the data structure. Instead of deciphering where these values will be read, I began to study the list of functions famicom. It turned out that I needed
famicom_rom_load. It manages the loading of a ROM, or from a memory card, or from the game’s internal resources.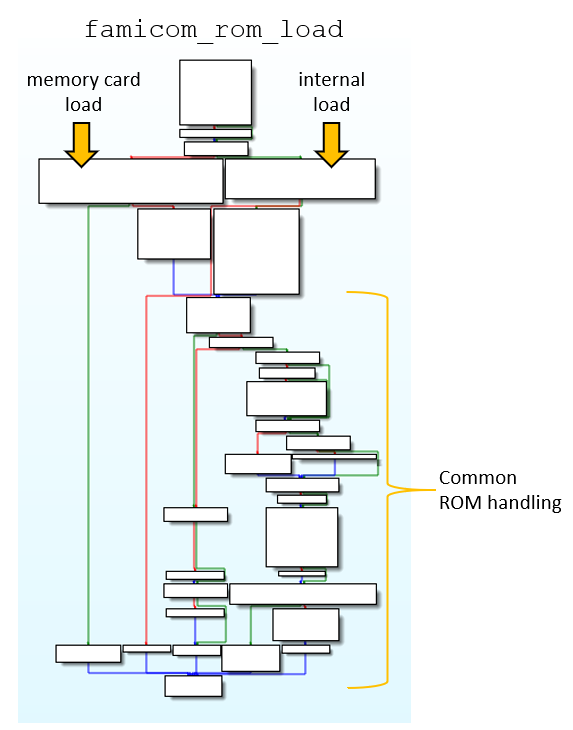
The most important thing in this “boot from memory card” block is what it calls
memcard_game_load. She again mounts the file on the memory card, reads it and parsit. This is where the most important file format options become apparent.Checksum value
The first thing that happens after downloading a file is the calculation of the checksum. A function is called
calcSum, which is a very simple algorithm that summarizes the values of all bytes in the data from a memory card. The bottom eight bits of the result must be zero. That is, in order to pass this check, you need to sum up the values of all bytes in the source file, calculate the value that needs to be added so that the bottom eight bits become zero, and then assign a value to the checksum byte in the file. If the check fails, then you get a message that the memory card cannot be correctly read, and nothing happens. During debugging, I just have to skip this check.
Copy ROM
Toward the end
memcard_game_load, another interesting thing happens. Between it and the checksum there are a few more interesting blocks of code, but none of them leads to branching that skips the execution of this behavior.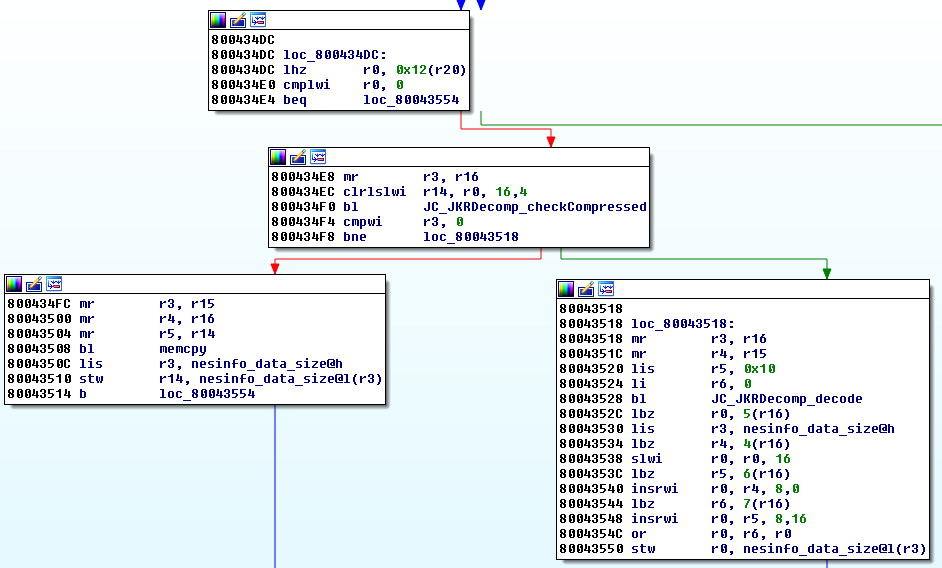
If the determined 16-bit integer value read from the memory card is not zero, then a function is called that checks the compression header in the buffer. It checks for the presence of Nintendo's proprietary compression formats, looking for “Yay0” or “Yaz0” at the beginning of the buffer. If one of these lines is found, the decompression function is called. Otherwise, a simple memory copy function is performed. In any of the cases, the variable named is then updated
nesinfo_data_size. Another hint of context here is that ROM files for NES embedded games use “Yaz0” compression, and this line is present in the headers of their files.
After observing the value that is checked for zero, and for the buffer transferred to the compression check functions, I quickly found out where the game was read in the file on the memory card. A zero check is performed for a portion of the 32-byte buffer copied from the offset
0x640in the file, which is most likely a ROM header. Also this function checks other parts of the file, and it is in them that the name of the game is located (starting with the third byte of the header). In the code execution path I found, the ROM buffer is located immediately after this 32-byte header buffer.

This information is enough to try to create a working ROM file. I just took one of the other Animal Crossing save files and edited it in a hex editor to replace the file name with
DobutsunomoriP_F_TESTand clear all the areas where I wanted to insert the data. For the test run, I used the ROM game Pinball, which is already in the game, and pasted its contents after the 32-byte header. Instead of calculating the checksum value, I set breakpoints just to skip
calcSumand also watch the results of other checks that could lead to a branch skipping the ROM boot process. Finally, I imported a new file through the Dolphin memory card manager, restarted the game, and tried to start the console.

It worked! There were small graphical bugs related to Dolphin parameters, which affected the graphics mode used by the NES emulator, but in general the game was just perfect. (In newer Dolphin builds, it should work by default.)
To make sure that other games will also start, I tried to record several other ROMs that were not in the game. Battletoads was launched, but stopped working after the text of the screen saver (after further settings, I managed to make it playable). On the other hand, Mega Man worked perfectly:
In order to learn how to generate new ROM files that could be loaded without debuggers, I had to start writing code and more deeply understand the parsing of the file format.
External ROM file format
The most important part of parsing files takes place in
memcard_game_load. There are six main sections of the code parsing block in this function:- Check sum
- Save file name
- ROM file header
- Unknown buffer copied without any processing
- Text comment, icon and banner uploader (for creating a new save file)
- ROM Loader
Check sum
The bottom eight bits of the sum of all byte values in the save file must be zero. Here is a simple Python code that generates the required checksum byte:
checksum = 0for byte_val in new_data_tmp:
    checksum += byte_val
    checksum = checksum % (2**32)  # keep it 32 bit
checkbyte = 256 - (checksum % 256)
new_data_tmp[-1] = checkbyte
Probably, there is a special place to store the checksum byte, but adding it to the empty space at the very end of the save file works fine.
File name
Again, the name of the save file must begin with “DobutsunomoriP_F_” and end with something that does not contain “SAVE”. This file name is copied a couple of times, and in one case the letter “F” is replaced with “S”. This will be the name of the save files for the NES game (“DobutsunomoriP_S_NAME”).
ROM header
An immediate copy of the 32-byte header is loaded into memory. Some of the values in this header are used to determine how to handle subsequent sections. Basically these are some 16-bit size values and packed parameter bits.
If you trace the pointer copied by the header, all the way to the beginning of the function, and find the position of its argument, the function signature below shows that it actually has a type
MemcardGameHeader_t*.memcard_game_load(unsigned char *, int, unsigned char **, char *, char *, MemcardGameHeader_t *, unsigned char *, unsigned long, unsigned char *, unsigned long)Unknown buffer
The 16-bit value of the size from the header is checked. If it is not zero, then the corresponding number of bytes is directly copied from the file buffer to the new block of allocated memory. This moves the data pointer in the file buffer so that further copying can proceed from the next section.
Banner, Icon and Comment
Another size value is checked in the header, and if it is not zero, the file compression check function is called. If necessary, the decompression algorithm will be launched, after which it is called
SetupExternCommentImage. This function deals with three things: a “comment”, a banner image and an icon. For each of them, there is a code in the ROM header showing how to process them. There are the following options:
- Use default
- Copy from banner / icon / comment section in ROM file
- Copy from alternate buffer
The default code values cause the icon or banner to be loaded from the resource on disk, and the name of the save file and comment (text description of the file) are assigned the values Animal Crossing and NES Cassette Save Data. Here's what it looks like:

The second code value simply copies the name of the game from the ROM file (some alternative to “Animal Crossing”), and then tries to find the line "] ROM" in the file comments and replace it with "] SAVE". Apparently, the files that Nintendo wanted to release should have been in the format of the names “Game Name [NES] ROM” or something like that.
For the icon and banner, the code tries to determine the image format, obtain a fixed-size value corresponding to that format, and then copy the image.
At the last code value, the file name and description are copied unchanged from the buffer, and the icon and banner are also loaded from the alternative buffer.
ROM
If you look closely at the
memcard_game_loadROM copy screenshot , you can see that the 16-bit value, checked for equality to zero, is shifted to the left by 4 bits (multiplied by 16), and then used as the size of the function memcpyif compression is not detected. This is another size value present in the header. If the size is not zero, then the ROM data is checked for compression and then copied.
Unknown buffer and bug search
Although loading a new ROM is quite curious, the most interesting thing about this ROM loader for me was that it was essentially the only part of the game that received user input of variable size and copied it to different places in memory. Almost everything else uses buffers of constant size. Things like names and letter texts may appear to be different in length, but in fact the empty space is just filled with spaces. Zero-terminated strings are used infrequently, which avoids common memory corruption bugs, such as using
strcpywith a buffer that is too small to copy strings into it. I was very interested in the possibility of finding a game exploit based on save files, and it seemed that this was the best option.
Most of the ROM file operations described above use copies of a constant size, with the exception of an unknown buffer and ROM data. Unfortunately, the code processing this buffer allocates just as much space as is necessary to copy it, so no overflow occurs, and specifying very large sizes of ROM files was not very useful.
But I still wanted to know what was going on with this buffer, which is copied without any processing.
NES Information Tag Handlers
I came back to
famicom_rom_load. After loading a ROM from a memory card or disk, several functions are called:nesinfo_tag_process1nesinfo_tag_process2nesinfo_tag_process3
Tracing the place where the unknown buffer is copied, I made sure that this task is performed by these functions. They begin with a call
nesinfo_next_tagthat performs a simple algorithm:- Checks if the given pointer matches the c
nesinfo_tags_end. If it is less thannesinfo_tags_endornesinfo_tags_endequal to zero, then it checks for the presence of the string "END" in the header of the pointer.- If END is reached, or the pointer has risen to or above
nesinfo_tags_end, then the function returns zero (null). - Otherwise, the byte is
0x3added to the current pointer by the offset of the pointer, and then the value is returned.
- If END is reached, or the pointer has risen to or above
This tells us that there is some label format of a three-letter name, a value for the size of the data, and the data itself. The result is a pointer to the next label, because the current label is skipped (
cur_ptr + 4skips the three-letter name and one byte, and size_byteskips the data). If the result is not zero, then the label processing function performs a series of string comparisons to figure out which label to process. Some of the label names checked in are
nesinfo_tag_process1: VEQ, VNE, GID, GNO, BBR and QDS.
If a match is found for a tag, some handler code is executed. Some of the handlers do nothing but output the label in the debug message. Other handlers are more complex. After processing the label, the function tries to get the next label and continue processing.
Fortunately, there are many detailed debugging messages that appear when tags are detected. All of them are in Japanese, so they must first be decoded from Shift-JIS and translated. For example, a message for QDS might read "Loading disk save area" or "Since this is the first run, create a disk save area." Messages for BBR read "load backup battery" or "since this is the first run, perform a clean."
Both of these codes also load some values from the data section of their label and use them to calculate the offset in the ROM data, and then perform copy operations. Obviously, they are responsible for determining the parts in the ROM memory associated with the preservation of the state.
There is also a “HSC” label with a debugging message saying that it handles record points. It receives the ROM offset from its tag data, as well as the initial value of the record points. These tags can be used to indicate a place in the memory of a NES game for storing record points, possibly for storing and restoring them later.
These tags create a rather complex system of loading metadata about ROM. Moreover, many of them lead to calls
memcpybased on the values passed in the data tags.Hunt for bugs
Most of the labels that lead to memory manipulations are not very useful for exploits, because all of them have maximum offset and size values that are specified as 16-bit integers. This is enough to work with the NES 16-bit address space, but not enough to write useful target values, such as pointers to functions or return addresses on the stack in the 32-bit GameCube address space.
However, there are several cases where the values of the displacements of the sizes transmitted
memcpycan exceed 0xFFFF.QDS
QDS loads a 24-bit offset from its tag data, as well as a 16-bit size value.
The good thing here is that the offset is used to calculate the destination address of the copy operation. The base offset address is the beginning of the downloaded data, the copy source is in the ROM file of the memory card, and the size is specified by the 16-bit size value from the label.
A 24-bit value has a maximum value
0xFFFFFF, which is much larger than what is needed to write beyond the loaded ROM data. However, there are certain problems ... The first is that although the maximum value of the size is equal
0xFFFF, it is initially used to reset the memory section. If the size value is too high (not much larger 0x1000), then it will reset the “QDS” label in the game code.And therein lies the problem, because it
nesinfo_tag_process1is actually called twice. For the first time, she receives some information about the space she needs to prepare for the save data. The QDS and BBR labels are not fully processed on the first run. After the first execution, a place is prepared for these saves, and the function is called again. This time, the QDS and BBR labels are processed completely, but if the lines of the label names are cleared from memory, then it is impossible to match the labels again! This can be avoided by setting a smaller size value. Another problem is that the offset value can only move forward in memory, and the ROM NES data is located in a heap rather close to the end of the available memory.
After them, there are only a few heaps, and none of them have anything particularly useful, like obvious function pointers.
In the usual case, it would be possible to use this for the heap overflow exploit, but the implementation
mallocused for this heap actually added quite a few bytes of health checks in the blocks malloc. We can write over the pointer values in subsequent heap blocks. Without health checks, this could be used to write to an arbitrary area of memory when calling freefor the involved heap block. However, the implementation used here
mallocchecks a particular byte pattern ( 0x7373) at the beginning of the next and previous blocks, which it will manipulate when callingfree. If it does not find these bytes, then it causes OSPanicand the game freezes.
Without having the ability to influence these bytes in some target location, it is not possible to write here. In other words, it is impossible to write something in an arbitrary place without being able to write something near this place. There may be some way to make the value
0x73730000stored on the stack directly in front of the return address and the place to which the value we want to write is assigned to the destination address (it will also be checked as if it were a pointer to the heap block), but this difficult to achieve and use in an exploit.nesinfo_update_highscore
Another feature related to QDS, BBR and HSC labels is
nesinfo_update_highscore. The sizes of the QDS, BBR and OFS labels (offset, offset) are used to calculate the offset to which the recording should be performed, and the HSC label includes the recording to this location. This function is performed for each frame processed by the NES emulator. The maximum offset value for each label in this case, even for QDS, is
0xFFFF. However, during the label processing cycle, the size values from the BBR and QDS labels actually accumulate . This means that several labels can be used to calculate almost any offset value. The limit is the number of labels that can fit into the ROM data section of a file on a memory card, and it also has a maximum size 0xFFFF.The base address to which the offset is added is the
0x800C3180save data buffer. This address is much lower than the ROM data, which gives us more freedom in choosing a place to write. For example, it is enough just to rewrite the return address in the stack at 0x812F95DC. Unfortunately, that didn't work either. It turns out that it
nesinfo_tag_process1also checks the accumulated size of the offsets from these labels, and uses this size to initialize the space:bzero(nintendo_hi_0, ((offset_sum + 0xB) * 4) + 0x40)
With the offset value that I tried to calculate, this led to the fact that
0x48D91EC(76,386,796) memory bytes were cleared , which is why the game failed to perform spectacularly.PAT Mark
I have already begun to lose hope, because all these tags that performed unprotected calls
memcpyled to a failure even before I had time to use them. I decided to just do the documentation of the purpose of each tag, and gradually got to the mark in nesinfo_tag_process2. Most tag handlers
nesinfo_tag_process2never run, because they only work when the pointer is nesinfo_rom_startnon-zero. Nothing in the code assigns a non-zero value to this pointer. It is initialized with a zero value and is never used again. When booting the ROM is set only nesinfo_data_start, so it looks like a dead code. However, there is one label that can still work with non-zero
nesinfo_rom_start: PAT. This is the most difficult label in the function nesinfo_tag_process2.
She also uses as a pointer
nesinfo_rom_start, but never checks it for zero. The PAT label reads its own label data buffer, processing codes that calculate offsets. These offsets are added to the pointer nesinfo_rom_startto calculate the destination address, and then the bytes are copied from the patch buffer to this location. This copying is done with instructions for loading and saving bytes, and not with the help memcpy, so I did not notice it before. Each PAT tag data buffer has an 8-bit type code, an 8-bit patch size, and a 16-bit offset value, followed by the patch data.
- If the code is 2, then the offset value is added to the current sum of offsets.
- If the code is 9, then the offset is shifted up by 4 bits and added to the current sum of offsets.
- If the code is 3, then the sum of the offsets is reset to 0.
The maximum size of the NES information label is 255, that is, the largest PAT patch size is 251 bytes. However, it is allowed to use several PAT tags, that is, you can patch more than 251 bytes, as well as patch non-adjacent places.
As long as we have a series of PAT subtags with code 2 or code 9, the offset of the destination pointer continues to accumulate. When copying patch data, it is reset to zero, but if you use a zero patch size, this can be avoided. It is clear that this can be used to calculate an arbitrary offset with a null pointer
nesinfo_rom_startusing a variety of PAT labels. However, there are two more checks for code values ...
- If the code is between
0x80and0xFF, then it is added to0x7F80, and then shifted up by 16 bits. It is then added to the 16-bit offset value and is used as the destination address for the patch.
This allows us to assign a destination address for the patch in the range from
0x80000000to 0x807FFFFF! It is there that the main part of the Animal Crossing code is in memory. This means that we can patch the Animal Crossing code itself using ROM metadata tags from a file on the memory card. With the help of a small patch downloader, you can even easily download larger patches from any memory card to any address.
As a quick check, I created a patch that includes “zuru mode 2” (the game developer mode described in my previous article) when a user loads a ROM from the game card. It turned out that the cheat combo of the keys only activates the “zuru mode 1” mode, which does not have access to the functions that mode 2. With this patch, thanks to the memory card, we can get full access to the developer mode on the real hardware.
The patch labels will be processed when the ROM is loaded.
After loading the ROM, you need to exit the NES emulator to see the result.

Works!
Patch Tagging Format
Information labels in the save file that execute this patch are as follows:
000000 5a 5a 5a 00 50 41 54 08 a0 04 6f 9c 00 00 00 7d >ZZZ.PAT...o....}<

000010 45 4e 44 00 >END.<
ZZZ \x00: ignored start label.0x00- this is the size of its data buffer: zero.PAT \x08 \xA0 \x04 \x6F\x9C \x00\x00\x00\x7D: patch0x80206F9Cc0x0000007D.0x08Is the size of the label buffer.0xA0when added to0x7F80becomes0x8020, that is, the top 16 bits of the destination address.0x04- This is the size of the patch data (0x0000007D).0x6F9C- This is the bottom 16 bits of the destination address.0x0000007D- this is patch data.
END \x00: end marker.
If you want to experiment with the creation of a patcher or ROM save files, then at https://github.com/jamchamb/ac-nesrom-save-generator I posted a very simple code to generate files. A patch like the one shown above can be generated with the following command:
$ ./patcher.py Patcher /dev/null zuru_mode_2.gci -p 80206F9c 0000007DArbitrary code execution
Thanks to this tag you can achieve the execution of arbitrary code in Animal Crossing.
But the last obstacle arises: the use of patches for data works well, but there are problems when patching code instructions.
When patches are recorded, the game continues to carry out the old instructions that were in its place. This is similar to a caching problem, and in fact it is. The GameCube CPU has instruction caches, as written in the specifications .
To understand how to clear the cache, I began to examine cache-related functions from the GameCube SDK documentation, and discovered
ICInvalidateRange. This function invalidates cached blocks of instructions at a specified address in memory, which allows the modified instruction memory to be executed with updated code.However, without the ability to run the original code, we still can not call
ICInvalidateRange. For the successful execution of the code, we need another trick. Studying the implementation
mallocfor the possibility of using the heap overflow exploit, I learned that the implementation functions malloccan be turned off dynamically using a data structure called my_malloc. my_mallocloads a pointer to the current implementation mallocor freefrom a static memory location, and then calls this function, passing all the arguments passed to my_malloc. The NES emulator is actively used
my_mallocto allocate and free memory for ROM-related NES data, so I was sure that it would be launched several times around the same time that the PAT tags are processed.Since it
my_mallocloads the pointer from memory and performs a transition to it, I can change the process of the program execution by simply overwriting the pointer so that it points to the current function mallocor free. Caching the instruction will not prevent this from being executed, because no changes are required to any of the instructions my_malloc. The developer of the fan project Dōbutsu no Mori e + named Cuyler wrote such a boot loader in PowerPC assembler and demonstrated its use for injecting new code in this video: https://www.youtube.com/watch?v=BdxN7gP6WIc. (Dōbutsu no Mori e + was the last iteration of Animal Crossing on the GameCube, which had the most updates. Released only in Japan.) The patch loads some code that allows the player to create any objects by typing their ID by letter and pressing the Z button.
Thanks to this, you can download mods, cheats and homebrew in a regular copy of Animal
Crossing on this GameCube.