Machine vision for retail. How to read price tags in a store
Machine vision is a very hot topic these days. To solve the problem of recognizing store tags using neural networks, we chose the TensorFlow framework.
The article will discuss exactly how to use it to localize and identify several objects on the same store price tag, as well as to recognize its contents. A similar task of recognizing IKEA price tags has already been solved on Habré using classic image processing tools available in the OpenCV library.
Separately, I would like to note that the solution can work both on the SAP HANA platform in conjunction with Tensorflow Serving, and on the SAP Cloud Platform.
The task of recognizing the price of goods is relevant for buyers who want to "fumble" prices with each other and choose a store for purchases, and for retailers - they want to learn about competitors' prices in real time.
Enough lyrics - go to the technique!
Toolkit
For the detection and classification of images, we used convolutional neural networks implemented in the TensorFlow library and available for control via the Object Detection API.
The TensorFlow Object Detection API is an open-source metaframe based on TensorFlow that simplifies the creation, training, and deployment of models for object detection.
After detecting the desired object, text recognition on it was carried out using Tesseract, a library for character recognition. Since 2006, Tesseract is considered one of the most accurate OCR libraries available in open source.
It is possible that you ask a question - why not all processing is done on TF? The answer is very simple - it would require significantly more time for implementation, but there weren’t a lot of it anyway. It was easier to sacrifice processing speed and assemble a finished prototype than to bother with a home-made OCR.
Creation and preparation of a dataset
To begin with, it was necessary to collect materials for work. We visited 3 stores and took about 400 photos of different price tags on a mobile phone camera in automatic mode.
Examples of photos:
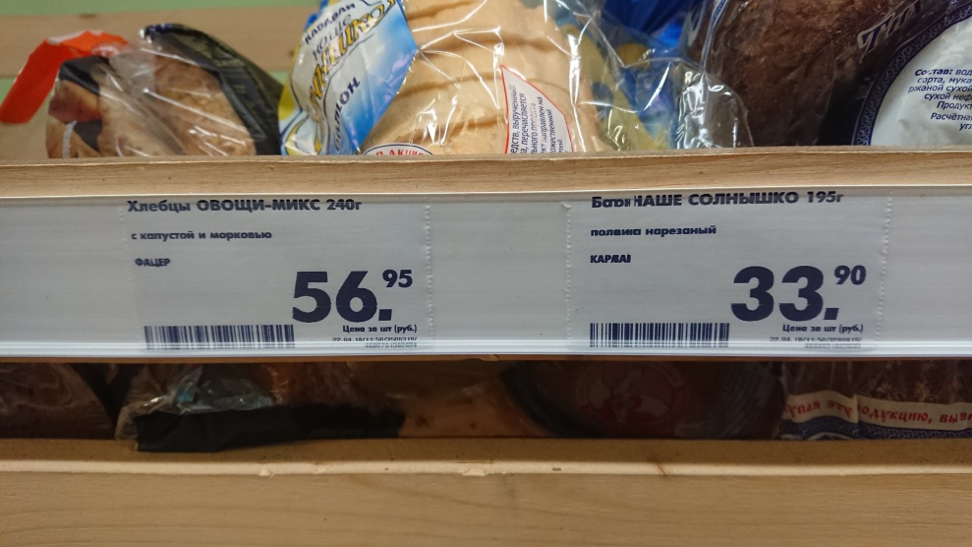
Fig. 1. An example of the image of the price tag
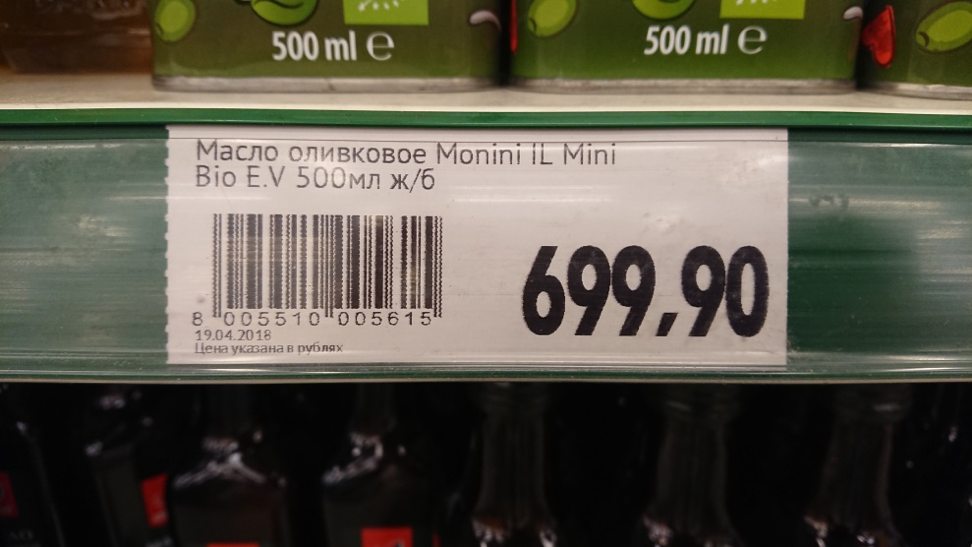
Fig. 2. Example of price tag image
After that you need to process and mark all photos of price tags. In the process of collecting images, we tried to collect high-quality images (without artifacts): price tags of approximately the same format, without blur, significant rotations, etc. This was done to facilitate further comparison of the content on the real price tag and its digital image. However, if we train the neural network only on the available high-quality images, this will very naturally lead to the fact that the model’s confidence in identifying distorted examples will drop significantly. In order to train the neural network to be resistant to such situations, we used the well-known procedure for expanding the training set with distorted versions of images (augmentation). To supplement the training sample, we applied algorithms from the Imgaug library: shifts, small turns, Gaussian blur, noise. Distorted images were added to the sample, which increased it by about 5 times (from 300 to 1,500 images).
For marking the image and selecting objects, the LabelImg program was used, which is available in the public domain. It allows you to select the necessary objects in the image with a rectangle and assign each class to the bounding box. All coordinates and labels of the created frames for each photo are saved in a separate XML file.
The following objects stood out on each photo: product price tag, product price, product name and product barcode on the price tag. In some examples of images, where it was logically justified, the areas were marked with overlapping.

Fig. 3. An example of a photograph of a pair of price tags marked up in LabelImg. Areas with product description, price and barcode are highlighted.
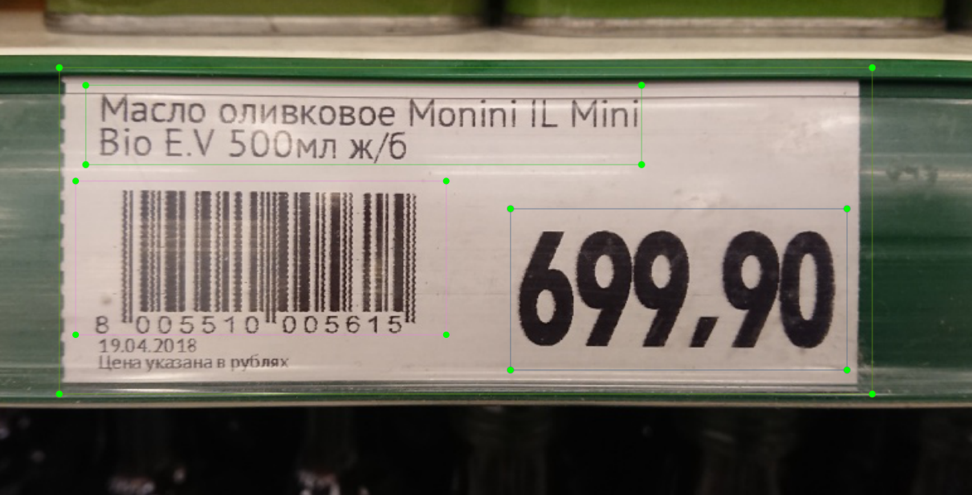
Fig. 4. An example of a photograph of a price tag marked up in LabelImg. Areas with product description, price and barcode are highlighted.
After all the photos have been processed and marked, we prepare the dataset with the separation of all the photos and tag files into a training and test sample. Usually take 80% of the training sample to 20% of the test sample and mix randomly.
Next, on the machine where the model will be trained, it is necessary to install all the necessary libraries. First of all, we install the TensorFlow machine learning library. Depending on the type of your system and you need to install an additional library for computing on the GPU. Next, install the Tensorflow Object Detection API library and additional libraries for working with images and graphs. Below is a list of libraries that we used in our work:
TensorFlow-GPU v1.5, CUDA v9.0, cuDNN v7.0
Protobuf 3+, Python-tk, Pillow 1.0, lxml, tf Slim, Jupyter notebook, Matplotlib
Tensorflow, Cython, Cocoapi; Opencv-python; Pandas
When all installation steps are completed, you can proceed to the preparation of data and the setting of training parameters.
Model training
To solve our problem, we used two options of the pre-trained neural network MobileNet V2 and Faster-RCNN V2 on the coco dataset as image property extractors. Models were retrained into 4 new classes: price tag, product description, price, barcode. As the main one, we chose MobileNet V2, which is a relatively simple model that allows us to provide acceptable quality at a pleasant speed. MobileNet V2 allows you to implement image recognition even on a mobile device.
First, you need to tell the Tensorflow Object Detection API library the number of labels, as well as the names of these labels.
The last thing to do before training is to create a shortcut map and edit the configuration file. The label map informs the model and maps class names to class identifier numbers for each object.

Finally, you need to configure the learning sources for Object Detection to determine which model and which parameters will be used for training. This is the last step before starting training.
The training procedure is started by the command:
If everything is configured correctly, TensorFlow initializes the retraining of the neural network. Initialization can take up to 30 seconds before the actual training starts. As the neural network is retrained at each step, the value of the algorithm error function (loss) will be displayed. For MobileNet V2, the initial value of the loss function is about 20. The model should be trained until the loss function drops to a value of approximately 2. To visualize the learning process of the neural network, you can use the convenient TensorBoard utility.
The command initializes the web interface on the local machine, which will be available at localhost: 6006. After stopping, the training procedure can be resumed later using checkpoints that are saved every 5 minutes.
Recognition of price tags and its elements
When training is completed, the last step is to create a graph of the neural network. This is done by the console command, where under the asterisks you must specify the largest number of cpkt-file existing in the training directory.
After this procedure, the object detection classifier is ready for operation. To check image recognition, it is enough to run a script that comes with the Tensorflow Object Detection library indicating the model that was previously trained and photos for recognition. A standard Python script example is provided here .
In our example, it takes about 1.5 seconds to recognize one photo using the ssd mobilenet model on a simple laptop.

Fig. 5. The result of recognition of the image with price tags in the test sample
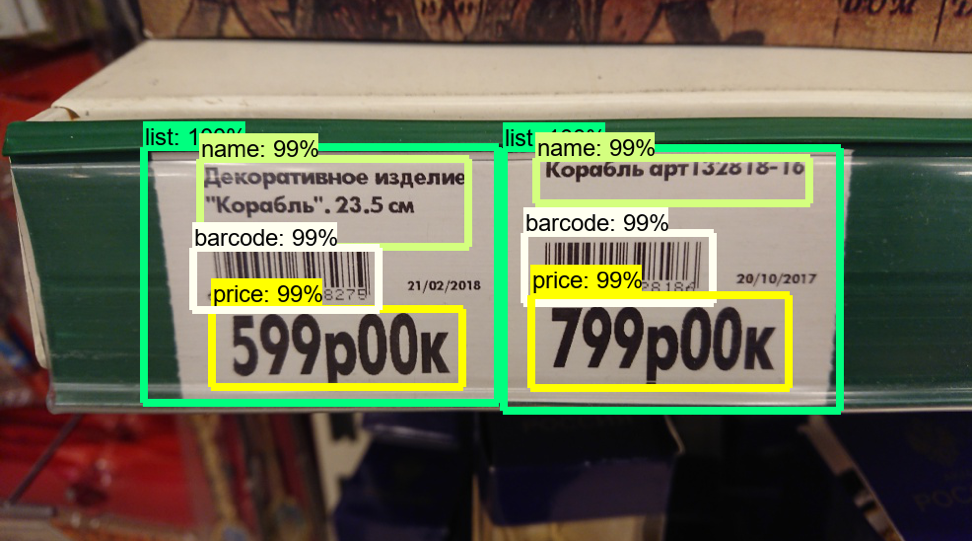
. 6. The result of recognition of images with price tags in the test sample
When we are convinced that the price tags are detected normally, it is necessary to teach the model to read information from individual elements: the price of the goods, the name of the goods, and a bar code. For this, there are libraries available in Python for recognizing characters and barcodes in photographs - Pyzbar and Tesseract.
Before you begin to recognize characters and barcodes in a photo, you need to cut this photo into the elements we need - in order to increase speed and not recognize unnecessary information that is not included in the price tag. It is also necessary to “pull out” the coordinates of objects that the model recognized along with their classes.

Then we use these coordinates to cut our photo into parts to recognize only the necessary area.
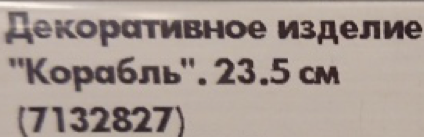


Fig. 7. An example of highlighted parts of the price tag
Next, we transfer all the cut-out areas to the libraries: the product name and the price of the product are transferred to tesseract, and the barcode to pyzbar, and we get the recognition result.


Fig. 8. An example of recognized content is the price tag area.
At this point, text and barcode recognition may cause problems if the original image was in low resolution or blurry. If the price can be recognized normally due to the large numbers on the price tag, then the product name and barcode will be poorly defined or not defined at all. To do this, it is recommended not to use small photos for recognition, and also to upload images without noise and strong distortion - for example, without the lack of proper focus.
Bad Image Recognition Example:


Fig. 9. An example of highlighted parts of a blurred price tag and recognized content.
In this example, you can see that if the price of the goods was more or less correctly recognized in the image of poor quality, the library could not cope with the name of the goods. And the barcode is not subject to recognition at all.
The same text in good quality.


Fig. 10. An example of highlighted parts of the price tag and recognized content
Conclusions
In the end, we managed to get a model of acceptable quality with a low percentage of errors and a high percentage of detection of relevant objects. Faster-RCNN Inception V2 has better recognition quality than MobileNet SSD V2, but is about an order of magnitude inferior in speed, which is a significant limitation.
The obtained accuracy of price tag recognition on a delayed sample of 50 images is 100%, that is, all price tags were successfully identified in all photos. The recognition accuracy of areas with a barcode and price was 90%. Recognition accuracy of the text area is 85%. The accuracy of price reading was about 95%, and the text - 80-85%. Additionally, as an experiment, we present the result of price tag recognition, which is completely different from the price tags in the training sample.

Fig. 11. An example of recognition of atypical price tags that are not in the training set.
As you can see, even with price tags that are significantly different from training price tags, the models are not without errors, but significant objects can be recognized on the price tag.
What else could be done?
1) A cool article about automatic augmentation has recently been released, the approach of which can be used
2) A finished trained model can and should be significantly squeezed
3) Examples of publishing ready-made services in SCP and TFS
The following materials were used to prepare the prototype and this article:
1. Bringing Machine Learning (TensorFlow) to the enterprise with SAP HANA
2. SAP Leonardo ML Foundation - Bring Your Own Model (BYOM)
3. TensorFlow Object Detection gitHub repository
4. IKEA check recognition article
5. MobileNet benefits article
6. TensorFlow Object article Detection
Article prepared by:
Sergey Abdurakipov, Dmitry Buslov, Alexey Khristenko
The article will discuss exactly how to use it to localize and identify several objects on the same store price tag, as well as to recognize its contents. A similar task of recognizing IKEA price tags has already been solved on Habré using classic image processing tools available in the OpenCV library.
Separately, I would like to note that the solution can work both on the SAP HANA platform in conjunction with Tensorflow Serving, and on the SAP Cloud Platform.
The task of recognizing the price of goods is relevant for buyers who want to "fumble" prices with each other and choose a store for purchases, and for retailers - they want to learn about competitors' prices in real time.
Enough lyrics - go to the technique!
Toolkit
For the detection and classification of images, we used convolutional neural networks implemented in the TensorFlow library and available for control via the Object Detection API.
The TensorFlow Object Detection API is an open-source metaframe based on TensorFlow that simplifies the creation, training, and deployment of models for object detection.
After detecting the desired object, text recognition on it was carried out using Tesseract, a library for character recognition. Since 2006, Tesseract is considered one of the most accurate OCR libraries available in open source.
It is possible that you ask a question - why not all processing is done on TF? The answer is very simple - it would require significantly more time for implementation, but there weren’t a lot of it anyway. It was easier to sacrifice processing speed and assemble a finished prototype than to bother with a home-made OCR.
Creation and preparation of a dataset
To begin with, it was necessary to collect materials for work. We visited 3 stores and took about 400 photos of different price tags on a mobile phone camera in automatic mode.
Examples of photos:
Fig. 1. An example of the image of the price tag
Fig. 2. Example of price tag image
After that you need to process and mark all photos of price tags. In the process of collecting images, we tried to collect high-quality images (without artifacts): price tags of approximately the same format, without blur, significant rotations, etc. This was done to facilitate further comparison of the content on the real price tag and its digital image. However, if we train the neural network only on the available high-quality images, this will very naturally lead to the fact that the model’s confidence in identifying distorted examples will drop significantly. In order to train the neural network to be resistant to such situations, we used the well-known procedure for expanding the training set with distorted versions of images (augmentation). To supplement the training sample, we applied algorithms from the Imgaug library: shifts, small turns, Gaussian blur, noise. Distorted images were added to the sample, which increased it by about 5 times (from 300 to 1,500 images).
For marking the image and selecting objects, the LabelImg program was used, which is available in the public domain. It allows you to select the necessary objects in the image with a rectangle and assign each class to the bounding box. All coordinates and labels of the created frames for each photo are saved in a separate XML file.
The following objects stood out on each photo: product price tag, product price, product name and product barcode on the price tag. In some examples of images, where it was logically justified, the areas were marked with overlapping.
Fig. 3. An example of a photograph of a pair of price tags marked up in LabelImg. Areas with product description, price and barcode are highlighted.
Fig. 4. An example of a photograph of a price tag marked up in LabelImg. Areas with product description, price and barcode are highlighted.
After all the photos have been processed and marked, we prepare the dataset with the separation of all the photos and tag files into a training and test sample. Usually take 80% of the training sample to 20% of the test sample and mix randomly.
Next, on the machine where the model will be trained, it is necessary to install all the necessary libraries. First of all, we install the TensorFlow machine learning library. Depending on the type of your system and you need to install an additional library for computing on the GPU. Next, install the Tensorflow Object Detection API library and additional libraries for working with images and graphs. Below is a list of libraries that we used in our work:
TensorFlow-GPU v1.5, CUDA v9.0, cuDNN v7.0
Protobuf 3+, Python-tk, Pillow 1.0, lxml, tf Slim, Jupyter notebook, Matplotlib
Tensorflow, Cython, Cocoapi; Opencv-python; Pandas
When all installation steps are completed, you can proceed to the preparation of data and the setting of training parameters.
Model training
To solve our problem, we used two options of the pre-trained neural network MobileNet V2 and Faster-RCNN V2 on the coco dataset as image property extractors. Models were retrained into 4 new classes: price tag, product description, price, barcode. As the main one, we chose MobileNet V2, which is a relatively simple model that allows us to provide acceptable quality at a pleasant speed. MobileNet V2 allows you to implement image recognition even on a mobile device.
First, you need to tell the Tensorflow Object Detection API library the number of labels, as well as the names of these labels.
The last thing to do before training is to create a shortcut map and edit the configuration file. The label map informs the model and maps class names to class identifier numbers for each object.
Finally, you need to configure the learning sources for Object Detection to determine which model and which parameters will be used for training. This is the last step before starting training.
The training procedure is started by the command:
python train.py --logtostderr --train_dir=training/ --pipeline_config_path=training/mobilenet.configIf everything is configured correctly, TensorFlow initializes the retraining of the neural network. Initialization can take up to 30 seconds before the actual training starts. As the neural network is retrained at each step, the value of the algorithm error function (loss) will be displayed. For MobileNet V2, the initial value of the loss function is about 20. The model should be trained until the loss function drops to a value of approximately 2. To visualize the learning process of the neural network, you can use the convenient TensorBoard utility.
Команда: tensorboard --logdir=trainingThe command initializes the web interface on the local machine, which will be available at localhost: 6006. After stopping, the training procedure can be resumed later using checkpoints that are saved every 5 minutes.
Recognition of price tags and its elements
When training is completed, the last step is to create a graph of the neural network. This is done by the console command, where under the asterisks you must specify the largest number of cpkt-file existing in the training directory.
python export_inference_graph.py --input_type image_tensor --pipeline_config_path training/faster_rcnn_inception_v2.config --trained_checkpoint_prefix training/model.ckpt-**** --output_directory inference_graphAfter this procedure, the object detection classifier is ready for operation. To check image recognition, it is enough to run a script that comes with the Tensorflow Object Detection library indicating the model that was previously trained and photos for recognition. A standard Python script example is provided here .
In our example, it takes about 1.5 seconds to recognize one photo using the ssd mobilenet model on a simple laptop.
Fig. 5. The result of recognition of the image with price tags in the test sample
. 6. The result of recognition of images with price tags in the test sample
When we are convinced that the price tags are detected normally, it is necessary to teach the model to read information from individual elements: the price of the goods, the name of the goods, and a bar code. For this, there are libraries available in Python for recognizing characters and barcodes in photographs - Pyzbar and Tesseract.
Before you begin to recognize characters and barcodes in a photo, you need to cut this photo into the elements we need - in order to increase speed and not recognize unnecessary information that is not included in the price tag. It is also necessary to “pull out” the coordinates of objects that the model recognized along with their classes.
Then we use these coordinates to cut our photo into parts to recognize only the necessary area.
Fig. 7. An example of highlighted parts of the price tag
Next, we transfer all the cut-out areas to the libraries: the product name and the price of the product are transferred to tesseract, and the barcode to pyzbar, and we get the recognition result.
Fig. 8. An example of recognized content is the price tag area.
At this point, text and barcode recognition may cause problems if the original image was in low resolution or blurry. If the price can be recognized normally due to the large numbers on the price tag, then the product name and barcode will be poorly defined or not defined at all. To do this, it is recommended not to use small photos for recognition, and also to upload images without noise and strong distortion - for example, without the lack of proper focus.
Bad Image Recognition Example:
Fig. 9. An example of highlighted parts of a blurred price tag and recognized content.
In this example, you can see that if the price of the goods was more or less correctly recognized in the image of poor quality, the library could not cope with the name of the goods. And the barcode is not subject to recognition at all.
The same text in good quality.
Fig. 10. An example of highlighted parts of the price tag and recognized content
Conclusions
In the end, we managed to get a model of acceptable quality with a low percentage of errors and a high percentage of detection of relevant objects. Faster-RCNN Inception V2 has better recognition quality than MobileNet SSD V2, but is about an order of magnitude inferior in speed, which is a significant limitation.
The obtained accuracy of price tag recognition on a delayed sample of 50 images is 100%, that is, all price tags were successfully identified in all photos. The recognition accuracy of areas with a barcode and price was 90%. Recognition accuracy of the text area is 85%. The accuracy of price reading was about 95%, and the text - 80-85%. Additionally, as an experiment, we present the result of price tag recognition, which is completely different from the price tags in the training sample.
Fig. 11. An example of recognition of atypical price tags that are not in the training set.
As you can see, even with price tags that are significantly different from training price tags, the models are not without errors, but significant objects can be recognized on the price tag.
What else could be done?
1) A cool article about automatic augmentation has recently been released, the approach of which can be used
2) A finished trained model can and should be significantly squeezed
3) Examples of publishing ready-made services in SCP and TFS
The following materials were used to prepare the prototype and this article:
1. Bringing Machine Learning (TensorFlow) to the enterprise with SAP HANA
2. SAP Leonardo ML Foundation - Bring Your Own Model (BYOM)
3. TensorFlow Object Detection gitHub repository
4. IKEA check recognition article
5. MobileNet benefits article
6. TensorFlow Object article Detection
Article prepared by:
Sergey Abdurakipov, Dmitry Buslov, Alexey Khristenko