 January 2, 2012 at 20:04
XMPP-SMS gateway on Android

Introduction
The reason for writing this article was the need to create a program for the Android system, with which you can send order data in the form of SMS messages to the owners of online stores that an order has been made for goods or services. Earlier, I used a system that included a GSM modem and a program written in C ++ that used AT commands to communicate with the modem and the gloox library to receive messages using the XMPP protocol; on the side of the website, the xmpphp library was used, to send order data. With this scheme, I had to keep the computer on all the time, because the order-receiving system worked around the clock, hence the additional energy consumption, noise from the fans at night and constant monitoring of the Internet connection.
The main objective of the program, which we will create throughout the article, is to receive a message of a certain format using the XMPP protocol and the subsequent transmission of the received data via SMS. The development environment will be Eclipse with the ADT plugin installed and the necessary SDKs . For interaction via the XMPP protocol, the SMACK library for Android devices will be used .
1. Sending SMS
First, we’ll create the framework of our application, which we will subsequently build up with the necessary functionality. To do this, create in Eclipse, the Android Project (Ctrl + N - Android - Android Project) with the following data:
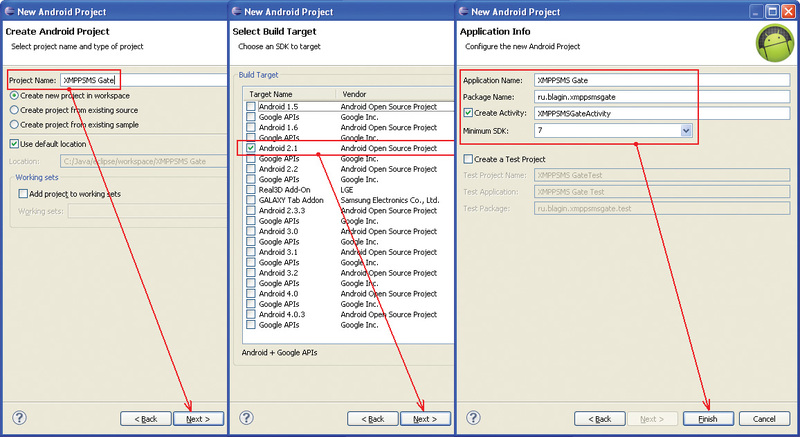
After creating a new project, add the necessary permission (Permission) in the AndroidManifest.xml file to send SMS messages. To do this, open the AndroidManifest.xml file in the Eclipse development environment, go to the Permissions tab, click the "Add ..." button, select the "Uses Permission" item in the window that appears, click the "OK" button, then you will be able to select the resolution, find and select select the item android.permission.SEND_SMS , save our actions. After all the manipulations, the Permissions tab will look like this:

Now, for example, consider the easiest way to send SMS messages, which can be tested in a regular Android emulator. To do this, create two new virtual devices using the Android virtual device manager (Window - AVD Manager) with the following parameters:
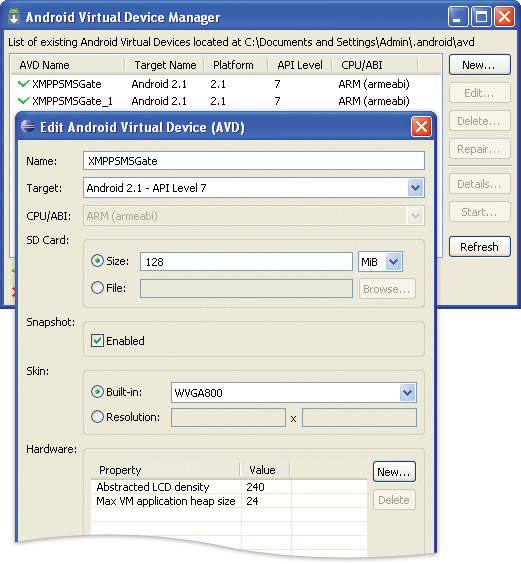
In the project we created, in the onCreate method , add the following code:
package ru.blagin.xmppsmsgate;
import android.app.Activity;
import android.os.Bundle;
import android.telephony.SmsManager;
public class XMPPSMSGateActivity extends Activity
{
    @Override
    public void onCreate(Bundle savedInstanceState)
    {
        super.onCreate(savedInstanceState);
        setContentView(R.layout.main);
        SmsManager sms = SmsManager.getDefault();
        sms.sendTextMessage("5556",null,"Text SMS",null,null);
    }
}
Next, we launch both Android emulators, each of which will have its own number to check sending and receiving SMS messages, when the start and initialization of emulators is completed, we need to run our application on emulator number 5554, after launching the application, emulator number 5556 will receive our SMS message .
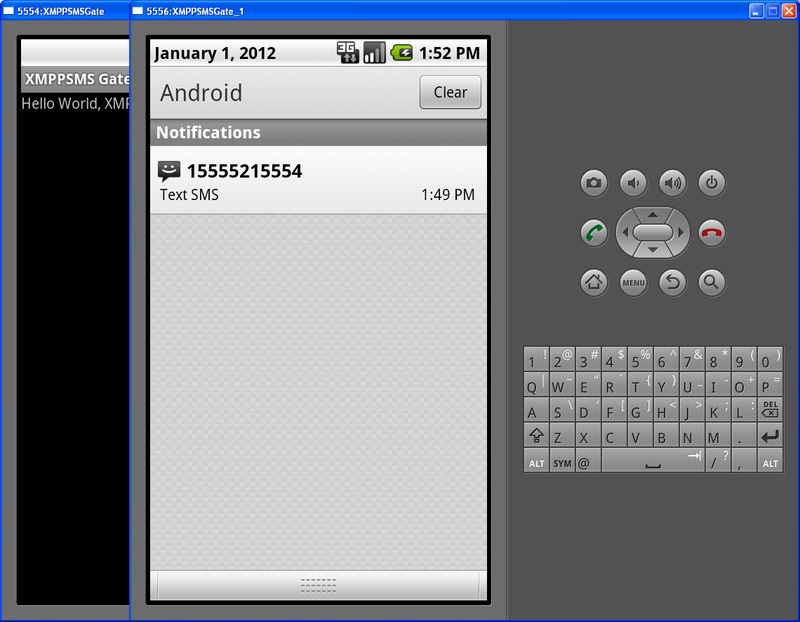
Sending SMS messages was carried out using the SmsManager class , which allows the Android system to perform the necessary actions with SMS messages. To initialize the object of this class, the static method SmsManager.getDefault () was used. Sending SMS messages is done using the sendTextMessage method, where the method parameters are:
destinationAddress - The number to which the message is sent;
scAddress - SMS center number of your mobile operator through which the message is transmitted, if this parameter has a zero value, then the default number is used;
text - SMS message text;
sentIntent - If not a null value, then a PendingIntent object is passed to this parameter to receive messages about the result of sending a message;
deliveryIntent - If not a null value, then a PendingIntent object is passed to this parameter to receive messages about the result of message delivery.
The Android emulator perfectly copes with the tasks assigned to it, but it has a number of limitations, for example, it is not possible to check the result of message delivery on it, for this you will have to use a real device, which will be done in the future. Also, when sending a message using the sendTextMessage method, its length cannot exceed 160 characters. For longer messages, you must use the sendMultipartTextMessage method, which in turn also allows you to send messages less than 160 characters in length.
In the above example, we do not receive notifications about sending SMS messages and their delivery to the recipient, therefore, we will expand the application functionality by adding the necessary processing. To do this, you need to register two receivers of broadcast intentions in the application, which will process the necessary intentions and display the corresponding text messages on the screen.
In the resource editor, add a TextView widget to our main application window to display information on the screen.
The application code after making the changes will take the following form:
package ru.blagin.xmppsmsgate;
import java.util.ArrayList;
import android.app.Activity;
import android.app.PendingIntent;
import android.content.BroadcastReceiver;
import android.content.Context;
import android.content.Intent;
import android.content.IntentFilter;
import android.os.Bundle;
import android.telephony.SmsManager;
import android.widget.TextView;
public class XMPPSMSGateActivity extends Activity
{
    TextView tv = null;
    String SENT      = "SMS_SENT";
    String DELIVERED = "SMS_DELIVERED";
    private BroadcastReceiver sent      = null;
    private BroadcastReceiver delivered = null;
    @Override
    public void onCreate(Bundle savedInstanceState)
    {
        super.onCreate(savedInstanceState);
        setContentView(R.layout.main);
        //Объект TextView для вывода информации на экран
        tv = (TextView) findViewById(R.id.textView);
        //Регистрация широковещательного приемника: Отправка
        IntentFilter in_sent = new IntentFilter(SENT);
        sent = new BroadcastReceiver()
        {
	@Override
	public void onReceive(Context context, Intent intent)
	{
	  tv.append(intent.getStringExtra("PARTS")+": ");
	  tv.append(intent.getStringExtra("MSG")+": ");
                switch(getResultCode())
                {
                    case Activity.RESULT_OK:
                    	tv.append("SMS Отправлено\n");
                    break;
                    case SmsManager.RESULT_ERROR_GENERIC_FAILURE:
                    	tv.append("Общий сбой\n");
                    break;
                    case SmsManager.RESULT_ERROR_NO_SERVICE:
                    	tv.append("Нет сети\n");
                    break;
                    case SmsManager.RESULT_ERROR_NULL_PDU:
                    	tv.append("Null PDU\n");
                    break;
                    case SmsManager.RESULT_ERROR_RADIO_OFF:
                    	tv.append("Нет связи\n");
                    break;
                }
			}
        };
        registerReceiver(sent, in_sent);
        //Регистрация широковещательного приемника: Доставка
        IntentFilter in_delivered = new IntentFilter(DELIVERED);
		delivered = new BroadcastReceiver()
        {
            @Override
            public void onReceive(Context context, Intent intent)
            {
            	tv.append(intent.getStringExtra("PARTS")+": ");
				tv.append(intent.getStringExtra("MSG")+": ");
                switch (getResultCode())
                {
                    case Activity.RESULT_OK:
                    	tv.append("SMS Доставлено\n");
                    break;
                    case Activity.RESULT_CANCELED:
                    	tv.append("SMS Не доставлено\n");
                    break;
                }
            }
        };
        registerReceiver(delivered, in_delivered);
        SendSMS("Ваш_номер","Длинное сообщение > 160 символов.");
    }
    //Метод отправки SMS сообщения
    public void SendSMS(String phone, String message)
    {
    	SmsManager sms = SmsManager.getDefault();
    	ArrayList al_message = new ArrayList();
    	al_message = sms.divideMessage(message);
    	ArrayList al_piSent = new ArrayList();
    	ArrayList al_piDelivered = new ArrayList();
    	for (int i = 0; i < al_message.size(); i++)
              {
    	    Intent sentIntent = new Intent(SENT);
    	    sentIntent.putExtra("PARTS", "Часть: "+i);
    	    sentIntent.putExtra("MSG", "Сообщение: "+al_message.get(i));
                  PendingIntent pi_sent = PendingIntent.getBroadcast(this, i, sentIntent,
                                            PendingIntent.FLAG_UPDATE_CURRENT);
                 al_piSent.add(pi_sent);
                 Intent deliveredIntent = new Intent(DELIVERED);
                deliveredIntent.putExtra("PARTS", "Часть: "+i);
                deliveredIntent.putExtra("MSG", "Сообщение: "+al_message.get(i));
                PendingIntent pi_delivered = PendingIntent.getBroadcast(this, i, deliveredIntent,
                                            PendingIntent.FLAG_UPDATE_CURRENT);
                al_piDelivered.add(pi_delivered);
	}
    	sms.sendMultipartTextMessage(phone, null, al_message, al_piSent, al_piDelivered);
    }
    @Override
    protected void onDestroy()
    {
    	if(sent != null)
    		unregisterReceiver(sent);
    	if(delivered != null)
    		unregisterReceiver(delivered);
    	super.onDestroy();
    }
}
To test sending messages and receive delivery notifications, on a real device, you can use your own cell number, then you can fully test the application. The figure below shows the sending and receiving of a long message.

2. Creating a service to work on the XMPP protocol
Now we need to add to our application the ability to communicate via XMPP. For these purposes, create a service (Service) that will run in the background. The service, using the SMACK library, will receive and process messages. Further, with the help of broadcast intentions, the data from the received message will be transferred to the main class of the application for display and subsequent transmission via SMS.
In order to add a service to our application, you need to define an implementation class for it, for this, in the Eclipse development environment, you need to right-click on the project package name, select New and Class in the menu that appears, as shown in the figure:

In the window that appears fill in the necessary items indicated on the image and click the “Finish” button:

After these steps, the implementation of the class appears in the project, then you need to register the service class in the AndroidManifest.xml file, for this we open the file in the Eclipse development environment, go to the Application tab and click on the “Add” button in the Application Nodes section, in the window that appears, select the Service item and click the "OK" button. After you need to specify the class name of the service, after all the manipulations, the Application tab will look like this:

Now we will add another permission for the application so that it can go online, to do this, follow the same steps as above to allow sending SMS messages, only this time select android.permission.INTERNET .
The next step is to add the SMACK library to the application, download it athttp://code.google.com/p/asmack/ save in the project folder, then open the project properties, for this, right-click on the project name in the Eclipse development environment, select Properties from the menu that appears. In the appeared window of the project settings, select the Java Build Path item in the left list, then click the "Add External JARs ..." button, find the previously saved library in the project folder and add it. After adding an external library, the settings window will take the following form:

The source code of the service is shown below, as you can see in the onCreate method , a separate stream is created in which the main work on interaction via the XMPP protocol using the SMACK library takes place. Received messages, as well as other state of the service, are transmitted by sending broadcast intentions.
package ru.blagin.xmppsmsgate;
import java.util.Collection;
import org.jivesoftware.smack.Chat;
import org.jivesoftware.smack.ChatManager;
import org.jivesoftware.smack.ConnectionConfiguration;
import org.jivesoftware.smack.PacketListener;
import org.jivesoftware.smack.SASLAuthentication;
import org.jivesoftware.smack.XMPPConnection;
import org.jivesoftware.smack.filter.AndFilter;
import org.jivesoftware.smack.filter.PacketFilter;
import org.jivesoftware.smack.filter.PacketTypeFilter;
import org.jivesoftware.smack.packet.Message;
import org.jivesoftware.smack.packet.Packet;
import org.jivesoftware.smack.packet.Presence;
import android.app.Service;
import android.content.Intent;
import android.os.IBinder;
import android.util.Log;
public class XMPPSMSGateService extends Service
{
	private ConnectionConfiguration connConfig;
    private XMPPConnection connection;
	Thread th = null;
	Intent in = new Intent("SMSGate_Service");
	@Override
	public IBinder onBind(Intent arg0){return null;}
	@Override
	public int onStartCommand(Intent intent, int flags, int startId){return Service.START_STICKY;}
	@Override
	public void onCreate()
	{
	    super.onCreate();
	    th= new Thread()
	    {
	    	public void run()
			{
           	 	in.putExtra("Message","The service is started");
                sendBroadcast(in);
                connConfig = new ConnectionConfiguration(/*domen*/,5222,/*server*/);
				SASLAuthentication.supportSASLMechanism("PLAIN");
				connConfig.setCompressionEnabled(false);
				connConfig.setSASLAuthenticationEnabled(true);
				connection = new XMPPConnection(connConfig);
				try
				{
	           	 	in.putExtra("Message","Connect to the XMPP server");
	                sendBroadcast(in);
					connection.connect();
					in.putExtra("Message","Login into the XMPP server");
	                sendBroadcast(in);
					connection.login(/*login*/,/*password*/);
					if(connection.isConnected())
					{
						in.putExtra("Message","SMS Gate online.");
		                sendBroadcast(in);
					}else
					{
						in.putExtra("Message","SMS Gate offline.");
		                sendBroadcast(in);
					}
					Presence presence = new Presence(Presence.Type.available);
					presence.setStatus("SMS Gate");
					presence.setPriority(30);
					connection.sendPacket(presence);
					PacketFilter filter = new AndFilter(new PacketTypeFilter(Message.class));
					PacketListener myListener = new PacketListener()
					{
						public void processPacket(Packet packet)
						{
							if(packet instanceof Message)
							{
								Message message    = (Message) packet;
								String messageBody = message.getBody();
								String JID         = message.getFrom();
								if(messageBody == null)
								{
									messageBody = "";
									Collection bodies = message.getBodies();
									for(Message.Body r:bodies){messageBody += r.getMessage();}
								}
								if(messageBody.equals("ping")){sendMessage(JID,"pong");}
								in.putExtra("Message",messageBody);
								sendBroadcast(in);
							}
						}
					};
					connection.addPacketListener(myListener, filter);
					while(connection.isConnected())
					{
						try{Thread.sleep(1000);}catch(Exception e){Log.e(this.getClass().getName(),e.getMessage());}
					}
				}catch(Exception e)
				{
					Log.e(this.getClass().getName(),e.getMessage());
					in.putExtra("Message","ERROR: "+e.getMessage());
					sendBroadcast(in);
				}
			}
	    	public void sendMessage(String to, String message)
			 {
				 if(!message.equals(""))
				 {
					 ChatManager chatmanager = connection.getChatManager();
					 Chat newChat = chatmanager.createChat(to, null);
					 try{newChat.sendMessage(message);}
					 catch(Exception e)
					 {Log.e(this.getClass().getName(),e.getMessage());}
				 }
			 }
	    };
	    th.start();
	}
	@Override
	public void onDestroy()
	{
		if(connection.isConnected()){connection.disconnect();th = null;}
	    in.putExtra("Message","The service is stopped");
        sendBroadcast(in);
	}
}
To handle broadcast intentions received from the service, you need to register another receiver of broadcast intentions, for this, add the following code to the onCreate method of the main application class:
IntentFilter filter = new IntentFilter();
filter.addAction("SMSGate_Service");
service = new BroadcastReceiver()
{
	@Override
	public void onReceive(Context context, Intent intent)
	{
		if(intent.getAction().equals("SMSGate_Service"))
		{
			String message = intent.getStringExtra("Message");
			tv.append(message+"\n");
			int i = message.indexOf("@");
			if(i != -1)
			{
				String phone = message.substring(0, i);
				if(phone.length() != 0)
				{
					String text = message.substring(i+1,message.length());
					tv.append("Sending SMS...\n");
					SendSMS(phone,text);
				}else{/*phone: 0*/}
			}else{/*not sms message*/}
		}
    }
};
registerReceiver(service, filter);
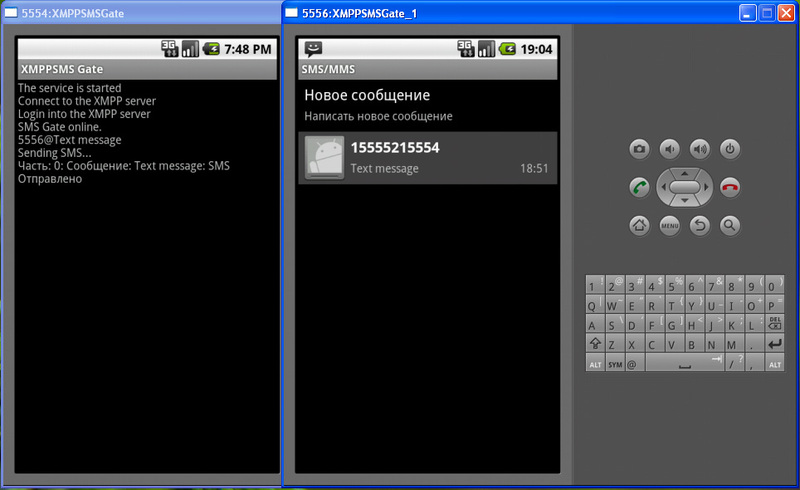
As you can see from the above code, to send SMS, messages that are of type phone_number @ message_text are processed, for example:
5556@Текст сообщенияTo start the service, in the main application class , add the line to the onCreate method :
startService(new Intent(this,XMPPSMSGateService.class));To stop the service, in the main application class in the onDestroy method , add the line:
stopService(new Intent(this,XMPPSMSGateService.class));Now let's try to run the application in the emulator and send a message of a certain type through any IM client. The result is shown in the image:
Conclusion
This article is an introductory article and is designed for beginner programmers, whom I myself am. The created application has a number of drawbacks and limitations, for example, sending SMS messages will be carried out only when the main application window is active. There is no check for Internet access, also if Internet access is only through WI-FI, then when the device goes into sleep mode, WI-FI is turned off to save battery power. This problem can be avoided using the Wi-Fi Keep Alive application or by adding this functionality to the application yourself. There is no logging of received and sent messages.
The range of application of this application is quite wide, from receiving order notifications to creating a full-fledged SMS gateway for processing various data.
The source code of the application.
Bibliography
- Alexey Goloshchapov, Google Android. Programming for mobile devices, 2012
- Alexey Goloshchapov, Google Android. System components and network communications, 2012
- Java XMPP bot using the Smack API ( esin ).









