November 29, 2011 at 12:14
Training course. Implement basic CRUD functionality with Entity Framework in an ASP.NET MVC application
- Transfer
This is an extension to the Entity Framework and ASP.NET MVC 3 development article series. You can find the first chapter at the following link: Creating the Entity Framework Data Model for ASP.NET MVC Application .
In the previous lesson, we created an MVC application that can store and display data using the Entity Framework and SQL Server Compact. In this tutorial, we will look at creating and configuring CRUD (create, read, update, delete) functionality that MVC scaffolding automatically creates for you in controllers and views.
Note A common practice is to implement the “repository” pattern to create an abstraction layer between the controller and the data access layer. But it will be later, in later lessons (Implementing the Repository and Unit of Work Patterns ).
The following pages will be created in this lesson:
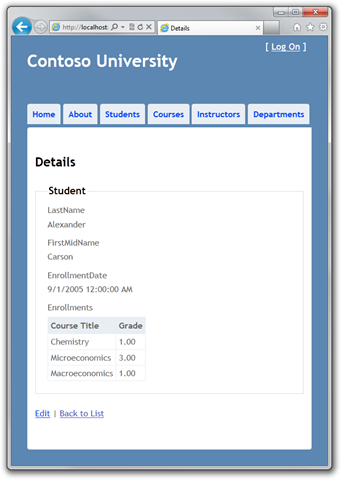
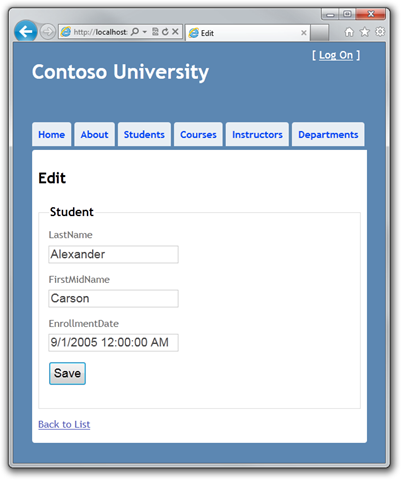
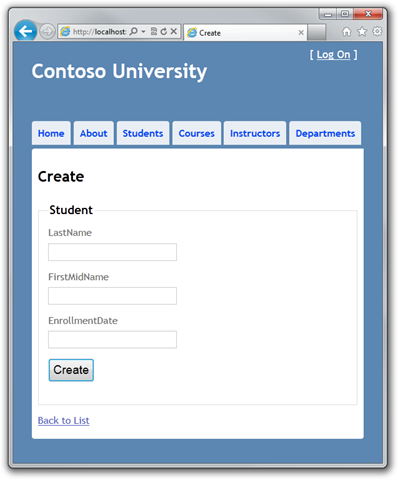

The Details page will display the contents of the Enrollements collection in an HTML table.
In Controllers \ StudentController . The cs method for representing Details is the following code:
The Find method is used to retrieve one Student entity corresponding to the id parameter passed to the method. The id value is taken from the query string located on the Details page of the link.
Open Views \ Student \ Details . cshtml . Each field is displayed by the DisplayFor helper:
To display the list of enrollments, add the following code after the EnrollmentDate field, before the closing fieldset tag:
This code loops through entities in the Enrollments navigation property. For each entity Enrollment, it displays the name of the course and grade. The course name is taken from the Course entity contained in the Course navigation property of the Enrollments entity. All this data is automatically downloaded from the database as needed (in other words, lazy loading is used. You did not specify eager loading for the Courses navigation property, so when you first access this property, a query will be made to the database to get the data. Read more lazy loading and eager loading can be found here Reading Related Data .)
Click on the Students tab and click on the Details link .
In Controllers \ StudentController.cs , replace the HttpPost Create method code:
Thus, we add the Student entity created by the ASP.NET MVC Model Binder to the corresponding set of entities and then save the changes to the database. ( Model binder is ASP.NET MVC functionality that makes it easier to work with data coming from the form. Model binder converts data from the form into the corresponding .NET Framework data types and passes it to the desired method as parameters. In this case, model binder instantiates the Student entity using property values from the Form collection.)
The try-catch block is the only difference between our option and what was automatically created. If an exception inherited from DataException is caught while saving changes, a standard error message is displayed. Such errors are usually caused by something external rather than a programming error, so the user is simply invited to try again. Code in Views \ Student \ Create . cshtml is similar to the code from Details . cshtml with the exception of EditorFor and ValidationMessageFor, used for each field instead of the DisplayFor helper. The following code is an example:
In Create . cshtml there is no need to make changes.
Click on the Students tab and on Create New .
Data validation is enabled by default. Enter the names and some incorrect date and click Create to see the error.
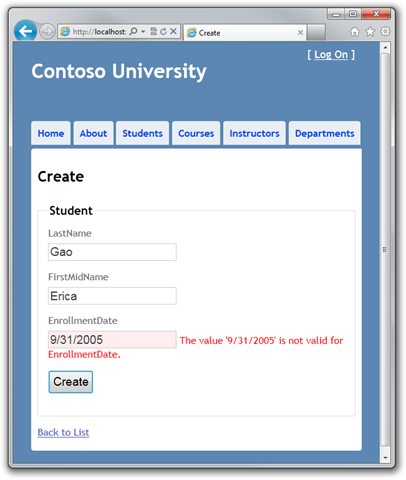
In this case, you see client-side data validation implemented using JavaScript. Server-side data validation is also implemented, and even if client-side data validation skips bad data, it will be caught on the server side and an exception will be thrown.
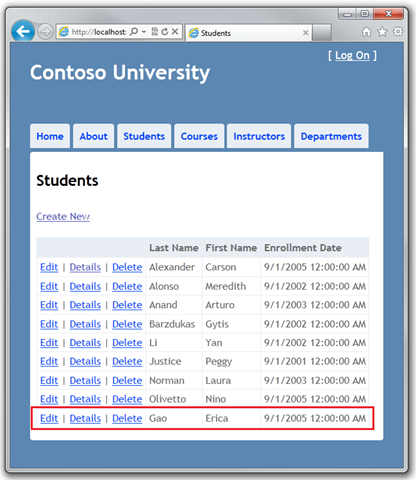
Change the date to the correct one, for example, on 9/1/2005 and click Create to see the new student on the Index page.
In Controllers \ StudentController.cs, the HttpGet Edit method (the one without the HttpPost attribute) uses the Find method to retrieve the selected Student entity. There is no need to change the code for this method.
Replace the HttpPost Edit method code with the following code:
The code is similar to what was in the HttpPost Create method, but instead of adding an entity to the set, this code sets an entity property that determines whether it has been changed. When calling SaveChanges, the Modified property indicates to the Entity Framework that it is necessary to create an SQL query to update the record in the database. All columns of the record will be updated, including those that the user has not touched. Concurrency issues are ignored. (You can read about concurrency issues in Handling Concurrency .)
The database context monitors the synchronization of entities in memory with the corresponding entries in the database, and this information determines what happens when the SaveChanges method is called. For example, when passing a new entity to the Add method, the state of this entity changes to Added. Then, when the SaveChanges method is called, the database context initiates the execution of the SQL INSERT query.
An entity state can be defined as:
However, the algorithm is violated in the web application because the database context instance retrieving the entity is destroyed after the page reloads. When HttpPost Edit a new request occurs and you have a new instance of the context, so you must manually change the state of the entity to Modified. After that, when calling SaveChanges, the Entity Framework will update all the columns of the record in the database, since the context no longer knows which properties have been specifically changed.
If you want Update to modify only user-edited fields, you can somehow save the original values (for example, hidden form fields) by making them available when HttpPost Edit is called. Thus, you can create a Student entity using the original values, call the Attach method with the original version of the entity, update the entity values and call SaveChanges. For more information, see Add / Attach and Entity States and the Entity Framework Local Data development team blog post .
Code in Views \ Student \ Edit . cshtml is similar to the code in Create . cshtml, no need to make changes.
Click on the Students tab and then on the Edit link .
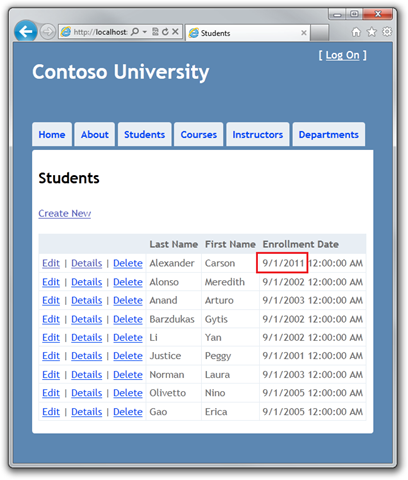
Change the values and click Save .
In Controllers \ StudentController.cs, the HttpGet Delete method uses the Find method to retrieve the selected Student entity, as in Details and Edit earlier. To implement your error message if the SaveChanges call fails, you need to add additional functionality to the method and the corresponding view.
As with update and create operations, the delete operation also needs two methods. The method called in response to the GET request shows the user a view that allows you to confirm or cancel the deletion. If the user confirms the deletion, a POST request is created and the HttpPost Delete method is called.
You need to add a try-catch exception block to the code of the HttpPost Delete method to handle errors that may occur when updating the database. If an error occurs, the HttpPost Delete method calls the HttpGet Delete method, passing it a parameter that signals an error. The HttpGet Delete method again generates a delete confirmation page and an error text.
Replace the HttpGet Delete method code with the following code to handle errors:
This code accepts an optional Boolean type parameter that signals an error. This parameter is null (false) after calling HttpGet Delete and true when calling HttpPost Delete.
Replace the HttpPost Delete (DeleteConfirmed) method code with the following code that removes and processes errors:
The code returns the selected entity and calls the Remove method, changing the state of the entity to Deleted. When calling SaveChanges, an SQL DELETE query is generated.
If performance is a priority, then you can do without unnecessary SQL queries that return a record by replacing the code that calls the Find and Remove methods:
With this code, we instantiate the Student entity using only the primary key value and then define the state of the entity as Deleted. This is all the Entity Framework needs to remove an entity.
As already mentioned, the HttpGet Delete method does not delete data. Deleting data in response to a GET request (or, also, editing, creating and any other action with data) creates a security breach. See ASP.NET MVC Tip # 46 - Don’t use Delete Links because they create Security Holes on Stephen Walther's blog for more information .
In Views \ Student \ Delete . cshtml add the following code between h2 and h3:
Click on the Students tab and then on the Delete link :
Click Delete . The Index page will load, already without the student that we removed (you will see an example of code processing in the method in the Handling Concurrency lesson .)
To be sure that all connections to the database were correctly closed and the resources occupied by them were released, you need to make sure that the context is destroyed. Therefore, you can find the Dispose method at the end of the StudentController controller class in StudentController . cs :
The base class Controller implements the IDisposable interface, so this code simply overrides the Dispose (bool) method to remove the context instance externally.
Now you have everything that implements simple CRUD operations for Student entities. In the next lesson, we will expand the functionality of the Index page by adding sorting and pagination.
Thank you for your help in translating Alexander Belotserkovsky ( ahriman ).
In the previous lesson, we created an MVC application that can store and display data using the Entity Framework and SQL Server Compact. In this tutorial, we will look at creating and configuring CRUD (create, read, update, delete) functionality that MVC scaffolding automatically creates for you in controllers and views.
Note A common practice is to implement the “repository” pattern to create an abstraction layer between the controller and the data access layer. But it will be later, in later lessons (Implementing the Repository and Unit of Work Patterns ).
The following pages will be created in this lesson:
Creating the Details page
The Details page will display the contents of the Enrollements collection in an HTML table.
In Controllers \ StudentController . The cs method for representing Details is the following code:
public ViewResult Details(int id)
{
    Student student = db.Students.Find(id);
    return View(student);
}
The Find method is used to retrieve one Student entity corresponding to the id parameter passed to the method. The id value is taken from the query string located on the Details page of the link.
Open Views \ Student \ Details . cshtml . Each field is displayed by the DisplayFor helper:
LastName
    @Html.DisplayFor(model => model.LastName)
To display the list of enrollments, add the following code after the EnrollmentDate field, before the closing fieldset tag:
@Html.LabelFor(model => model.Enrollments)
@foreach (var item in Model.Enrollments)
{
}
Course Title Grade
@Html.DisplayFor(modelItem => item.Course.Title)
@Html.DisplayFor(modelItem => item.Grade)
This code loops through entities in the Enrollments navigation property. For each entity Enrollment, it displays the name of the course and grade. The course name is taken from the Course entity contained in the Course navigation property of the Enrollments entity. All this data is automatically downloaded from the database as needed (in other words, lazy loading is used. You did not specify eager loading for the Courses navigation property, so when you first access this property, a query will be made to the database to get the data. Read more lazy loading and eager loading can be found here Reading Related Data .)
Click on the Students tab and click on the Details link .
Creating the Create Page
In Controllers \ StudentController.cs , replace the HttpPost Create method code:
[HttpPost]
public ActionResult Create(Student student)
{
    try
    {
        if (ModelState.IsValid)
        {
            db.Students.Add(student);
            db.SaveChanges();
            return RedirectToAction("Index");
        }
    }
    catch (DataException)
    {
        //Log the error (add a variable name after DataException)
        ModelState.AddModelError("", "Unable to save changes. Try again, and if the problem persists see your system administrator.");
    }
    return View(student);
}
Thus, we add the Student entity created by the ASP.NET MVC Model Binder to the corresponding set of entities and then save the changes to the database. ( Model binder is ASP.NET MVC functionality that makes it easier to work with data coming from the form. Model binder converts data from the form into the corresponding .NET Framework data types and passes it to the desired method as parameters. In this case, model binder instantiates the Student entity using property values from the Form collection.)
The try-catch block is the only difference between our option and what was automatically created. If an exception inherited from DataException is caught while saving changes, a standard error message is displayed. Such errors are usually caused by something external rather than a programming error, so the user is simply invited to try again. Code in Views \ Student \ Create . cshtml is similar to the code from Details . cshtml with the exception of EditorFor and ValidationMessageFor, used for each field instead of the DisplayFor helper. The following code is an example:
    @Html.LabelFor(model => model.LastName)

    @Html.EditorFor(model => model.LastName)
    @Html.ValidationMessageFor(model => model.LastName)
In Create . cshtml there is no need to make changes.
Click on the Students tab and on Create New .
Data validation is enabled by default. Enter the names and some incorrect date and click Create to see the error.
In this case, you see client-side data validation implemented using JavaScript. Server-side data validation is also implemented, and even if client-side data validation skips bad data, it will be caught on the server side and an exception will be thrown.
Change the date to the correct one, for example, on 9/1/2005 and click Create to see the new student on the Index page.
Create Edit Page
In Controllers \ StudentController.cs, the HttpGet Edit method (the one without the HttpPost attribute) uses the Find method to retrieve the selected Student entity. There is no need to change the code for this method.
Replace the HttpPost Edit method code with the following code:
[HttpPost]
public ActionResult Edit(Student student)
{
    try
    {
        if (ModelState.IsValid)
        {
            db.Entry(student).State = EntityState.Modified;
            db.SaveChanges();
            return RedirectToAction("Index");
        }
    }
    catch (DataException)
    {
        //Log the error (add a variable name after DataException)
        ModelState.AddModelError("", "Unable to save changes. Try again, and if the problem persists see your system administrator.");
    }
    return View(student);
}
The code is similar to what was in the HttpPost Create method, but instead of adding an entity to the set, this code sets an entity property that determines whether it has been changed. When calling SaveChanges, the Modified property indicates to the Entity Framework that it is necessary to create an SQL query to update the record in the database. All columns of the record will be updated, including those that the user has not touched. Concurrency issues are ignored. (You can read about concurrency issues in Handling Concurrency .)
Entity States and Attach and SaveChanges Methods Methods
The database context monitors the synchronization of entities in memory with the corresponding entries in the database, and this information determines what happens when the SaveChanges method is called. For example, when passing a new entity to the Add method, the state of this entity changes to Added. Then, when the SaveChanges method is called, the database context initiates the execution of the SQL INSERT query.
An entity state can be defined as:
- Added. Entities are not yet in the database. The SaveChanges method initiates an INSERT request.
- Unchanged. When calling SaveChanges, nothing happens. An entity has this state when it is retrieved from the database.
- Modified. Entity property values have been changed; SaveChanges executes an UPDATE query.
- Deleted. An entity is marked for deletion, SaveChanges executes a DELETE request.
- Detached Entity state is not monitored by the database context.
However, the algorithm is violated in the web application because the database context instance retrieving the entity is destroyed after the page reloads. When HttpPost Edit a new request occurs and you have a new instance of the context, so you must manually change the state of the entity to Modified. After that, when calling SaveChanges, the Entity Framework will update all the columns of the record in the database, since the context no longer knows which properties have been specifically changed.
If you want Update to modify only user-edited fields, you can somehow save the original values (for example, hidden form fields) by making them available when HttpPost Edit is called. Thus, you can create a Student entity using the original values, call the Attach method with the original version of the entity, update the entity values and call SaveChanges. For more information, see Add / Attach and Entity States and the Entity Framework Local Data development team blog post .
Code in Views \ Student \ Edit . cshtml is similar to the code in Create . cshtml, no need to make changes.
Click on the Students tab and then on the Edit link .
Change the values and click Save .
Create Delete Page
In Controllers \ StudentController.cs, the HttpGet Delete method uses the Find method to retrieve the selected Student entity, as in Details and Edit earlier. To implement your error message if the SaveChanges call fails, you need to add additional functionality to the method and the corresponding view.
As with update and create operations, the delete operation also needs two methods. The method called in response to the GET request shows the user a view that allows you to confirm or cancel the deletion. If the user confirms the deletion, a POST request is created and the HttpPost Delete method is called.
You need to add a try-catch exception block to the code of the HttpPost Delete method to handle errors that may occur when updating the database. If an error occurs, the HttpPost Delete method calls the HttpGet Delete method, passing it a parameter that signals an error. The HttpGet Delete method again generates a delete confirmation page and an error text.
Replace the HttpGet Delete method code with the following code to handle errors:
public ActionResult Delete(int id, bool? saveChangesError)
{
    if (saveChangesError.GetValueOrDefault())
    {
        ViewBag.ErrorMessage = "Unable to save changes. Try again, and if the problem persists see your system administrator.";
    }
    return View(db.Students.Find(id));
}
This code accepts an optional Boolean type parameter that signals an error. This parameter is null (false) after calling HttpGet Delete and true when calling HttpPost Delete.
Replace the HttpPost Delete (DeleteConfirmed) method code with the following code that removes and processes errors:
[HttpPost, ActionName("Delete")]
public ActionResult DeleteConfirmed(int id)
{
    try
    {
        Student student = db.Students.Find(id);
        db.Students.Remove(student);
        db.SaveChanges();
    }
    catch (DataException)
    {
        //Log the error (add a variable name after DataException)
        return RedirectToAction("Delete",
            new System.Web.Routing.RouteValueDictionary {
                { "id", id },
                { "saveChangesError", true } });
    }
    return RedirectToAction("Index");
}
The code returns the selected entity and calls the Remove method, changing the state of the entity to Deleted. When calling SaveChanges, an SQL DELETE query is generated.
If performance is a priority, then you can do without unnecessary SQL queries that return a record by replacing the code that calls the Find and Remove methods:
Student studentToDelete = new Student() { StudentID = id };
db.Entry(studentToDelete).State = EntityState.Deleted;
With this code, we instantiate the Student entity using only the primary key value and then define the state of the entity as Deleted. This is all the Entity Framework needs to remove an entity.
As already mentioned, the HttpGet Delete method does not delete data. Deleting data in response to a GET request (or, also, editing, creating and any other action with data) creates a security breach. See ASP.NET MVC Tip # 46 - Don’t use Delete Links because they create Security Holes on Stephen Walther's blog for more information .
In Views \ Student \ Delete . cshtml add the following code between h2 and h3:
@ ViewBag.ErrorMessage
Click on the Students tab and then on the Delete link :
Click Delete . The Index page will load, already without the student that we removed (you will see an example of code processing in the method in the Handling Concurrency lesson .)
Make sure there are no open database connections left
To be sure that all connections to the database were correctly closed and the resources occupied by them were released, you need to make sure that the context is destroyed. Therefore, you can find the Dispose method at the end of the StudentController controller class in StudentController . cs :
protected override void Dispose(bool disposing)
{
    db.Dispose();
    base.Dispose(disposing);
}
The base class Controller implements the IDisposable interface, so this code simply overrides the Dispose (bool) method to remove the context instance externally.
Now you have everything that implements simple CRUD operations for Student entities. In the next lesson, we will expand the functionality of the Index page by adding sorting and pagination.
Thank you for your help in translating Alexander Belotserkovsky ( ahriman ).