Asterisk-based government communications!
Turntables

"Pinwheel" is a closed system of party and government telephone communications in the USSR.
It was originally created at the direction of Vladimir Lenin, as the Kremlin’s internal telephone exchange. It got the name “Turntable”, because unlike a regular telephone network, where at that time the connection was through an operator, the subscribers connected to each other using a PBX and a disk dialer (“Turntable”).
The system was expanding intensively, and was also provided with access to other systems of government and military communications, which were also often called “Turntable”, but officially:
ATS-1 is the most prestigious communication system for subscribers of the highest category - the first persons of the state, ministers.
ATS-2 is a wider network of city government communications.
The pinwheel was an important status symbol of the Soviet era. The regularly upgraded system of government telephone exchanges continues to operate to the present.
The “turntable” is not intended for conducting secret negotiations, however, it is linked to other government systems of secure communications of long-term cryptographic strength, including mobile radiotelephone (“Caucasus”) and others.
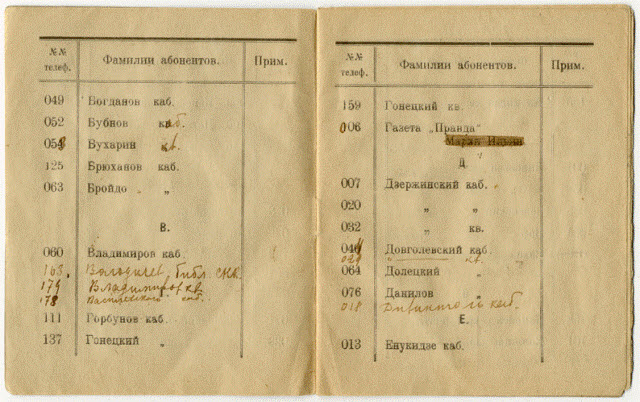
1922 The telephone number of the “Turntable” by F. E. Dzerzhinsky is 007.
Asterisk + OpenVPN "Government Connection" of our time!
It is possible to organize data transfer between offices over a secure communication channel using encryption using OpenVPN.
In addition, when combining branches into one number space and connecting them to Asterisk, often there are problems with setting up NAT and passing voice traffic without interference.
These issues are resolved by combining offices using OpenVPN.
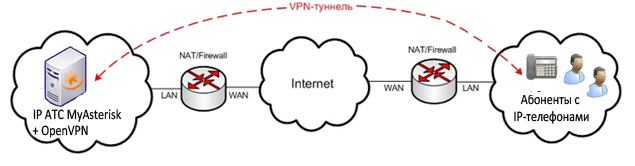
As subscriber devices, it is recommended to use IP phones, for example, Yealink, which support working with OpenVPN. This is an ideal scheme that allows you to configure a VPN tunnel and encryption between offices without the use of expensive gateways with VPN support.
Benefits of Using OpenVPN
Ease of connecting additional offices to Asterisk and the absence of problems with NAT.
Work on secure communication channels. All traffic between offices is under the "seven locks", or rather, under the protection of the OpenSSL library. Thanks to this, the entire set of ciphers available in this library is involved. HMAC batch authorization can also be used to provide greater security, and hardware acceleration to improve encryption performance.
Install OpenVPN
1. Download the OpenVPN distribution kit at swupdate.openvpn.net/community/releases/openvpn-2.1.4.tar.gz:
wget swupdate.openvpn.net/community/releases/openvpn-2.1.4.tar.gz
and unpack the archive :
tar -xf openvpn-2.1.4.tar.gz
2. Download the required LZO compression library, which is necessary to compress the data stream at www.oberhumer.com / opensource / lzo / download / lzo-2.04.tar.gz:
wget www. oberhumer.com/opensource/lzo/download/lzo-2.04.tar.gz
and unpack the archive:
tar -xf openvpn-2.1.4.tar.gz
3. You also need to install the gcc.i386 library.
Install it from the repository:
yum install gcc .i386
Perhaps this library can already be installed, which can be checked with the yum list | grep gcc.i386 command. It should be something like:
gcc.i386 4.1.2-48.el5 installed
libgcc.i386 4.1.2-48.el5 installed
If this library is not installed and you try to install OpenVPN directly, an error will occur during compilation:
configure: error: no acceptable C compiler found in $ PATH
4. Install LZO from the unpacked archive (see section 2):
cd ... / lzo-2.04
./configure
make
make install
5. Install OpenVPN directly from the unpacked folder (see ..1):
cd ... / openvpn-2.1.4
./configure
make
make install
6.For convenience, we create all the necessary folders for OpenVPN (during installation, these folders are not automatically created) and copy the necessary files there from the unpacked archive (see point 1):
mkdir / etc / openvpn
cp ... / openvpn-2.1.4 / easy -rsa / 2.0 / * / etc / openvpn
mkdir / etc / openvpn / keys - create a folder for certificates and keys
7. If desired, edit the file / etc / openvpn / vars in accordance with the necessary parameters so that each time you do not generate keys again the same parameters.
8. We export the variables from the vars file and delete all possibly existing keys:
cd / etc / openvpn
source ./vars
./clean-all
9.We generate the private key and certificate of the certification server (CA) or we will call it in another way - the Certification Authority, on the basis of which all other keys will be created (key and certificate for the VPN server and keys and certificates for VPN clients) (i.e. it is used the usual PKI mechanism is public key infrastructure).
./build-ca
10. Generate the private key and certificate for the server:
./build-key-server name
11. Generate the private key and certificate for the client:
./build-key client1
12. Generate the 1024-bit key using the Diff Hellman, which is used in the key authentication mechanism when establishing a VPN tunnel. This key remains on the server.
Diffie-Hellman algorithm (Diffie-Hellman, DH) - an algorithm that allows two parties to obtain a shared secret key using an unprotected, but protected from spoofing, communication channel.
./build-dh
13. (Optional) We generate a symmetric TLS-key for preliminary protection of the channel, even before the VPN tunnel is established. This key is symmetric and must be located both on the server and on the client. We generate in the folder / etc / openvpn / keys /
openvpn --genkey --secret ./ta.key
- All created keys, certificates and server-side requests are placed in the / etc / openvpn / keys folder for convenience (if they were generated elsewhere). Client keys and certificates are transmitted in a secure manner to client machines. Moreover, for each certificate there is a private key and a certificate request file:
* .key - private key;
* .csr - certificate request;
* .crt - certificate;
Ideally, client private keys should not be generated on the server and then transmitted to the client, but should be generated on the client itself using some installed cryptographic provider (for example, the registry, smart card or flash drive are used as the private key storage). Then, a certificate request file is created based on the generated private key, which is already sent over the network to the certification server (Certification Authority), where the generated certificate is transmitted over the network. (since the certificate request file and the encryption certificate itself do not constitute a value without a private key, they can be transmitted over insecure communication channels).
- 14.Copy the example server.conf VPN server configuration file from the unzipped folder (see point 1) to the / etc / openvpn
cp ..... / openvpn-2.1.4 / sample-config-files / server.conf / etc battle folder /openvpn/server.conf
and edit the necessary parameters:
vi /etc/openvpn/server.conf
15. Copy the sample scripts to start and stop OpenVPN from the unzipped folder (see point 1) to the / etc / openvpn battle folder and edit them in according to your preferences:
cp ..... / openvpn-2.1.4 / sample-config-files / openvpn-startup.sh / etc / openvpn
16. Run the OpenVPN server:
/etc/openvpn/openvpn-startup.sh
and check if the service has started:
netstat -luntp | grep openvp
At this stage, the server part is finished.
We will consider setting up on a Yealink IP phone in the next article.