Timers and multitasking on Arduino
Today we will talk about such a timely topic as timers and multitasking on Arduino. The reason for writing this article was the lectures of Oleg Artamonov @olartamonov for MIREA students as part of the IoT Academy of Samsung , or rather, the statement of Oleg, quote (2nd lecture, 1:13:08):
“There are, for example, tasks for which most arduinschik can be broken, especially beginners, ask them to flash with five different LEDs with different frequency and period and so that another period can be changed individually for each LED ...”
Judging by the statements of Oleg, he has a very wrong idea about the Arduino in general and about the “Arduinschiki” in particular. Flashing with five LEDs in the modes indicated by them is an absolutely trivial task for Arduino, and for the Arduino Mega Server it is not a task at all, but a real misunderstanding - its multi-tasking is organized by its regular means, which easily controls hundreds of different entities (LEDs, servo drives, step motors, etc.). e.) in real time.
Let's work out how to organize multitasking on Arduino, and at the same time help MIREA students get rid of stereotypes of perception imposed on them in relation to the socio-cultural and technological phenomenon of our time called Arduino .
Lectures of Oleg Artamonov
We must pay tribute, Oleg's lectures themselves are good - they give a lot of useful and well-structured information about microcontrollers and I would recommend to all interested in this issue to get acquainted with them. The only drawback of these lectures seemed to me overt techno-snobbery regarding the Arduino, which acts in them in the role of "whipping boy".
In particular, throughout all the lectures, Oleg makes categorical statements about the unsuitability of the Arduino to build complex multi-tasking systems, which simply contradicts the truth and real practice.
Arduino can make stunning multi-tasking systems in which dozens and hundreds of entities (LEDs, sensors, actuators, servo drives, stepping motors, wireless and wired interfaces, etc.) work simultaneously in (pseudo, of course) multitasking mode.
We will not go far for examples. Here is a project of the Winter Garden (“Smart Greenhouse”) in which the following entities work in real time in multitask mode:
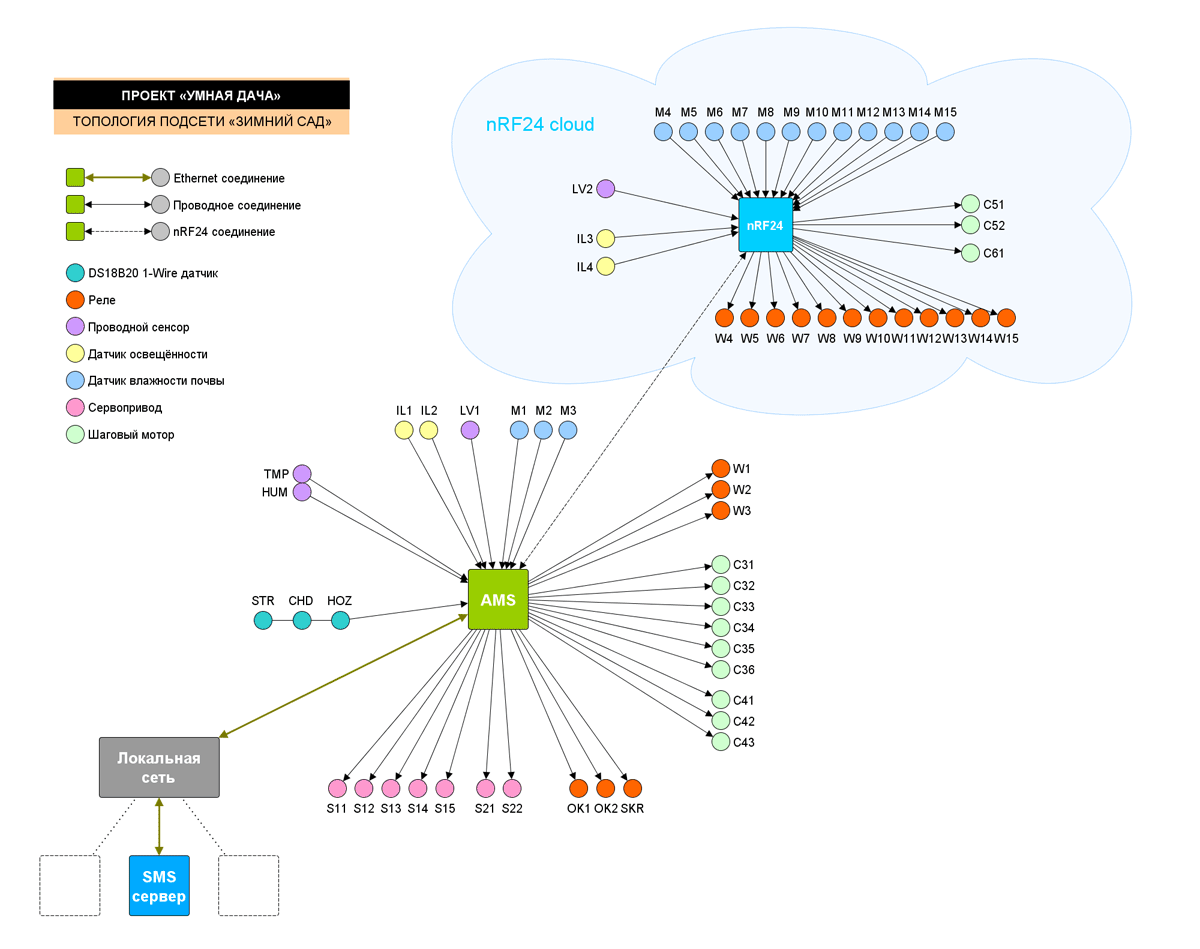
Topology of a distributed nRF24 controller with a huge number of equipment connected and operating in real time. The user deals only with the “base”, the work of the nRF24 partner is completely transparent to him. And, yes, this is the Arduino.
On the “base”:
- 7 servo drives
- 9 stepping motors
- 6 relays
- 3 soil moisture sensors
- 2 light sensors
- Water level sensor
- Humidity sensor and air temperature
At the nRF24 remote part:
- 12 soil moisture sensors
- 12 relays
- 3 stepper motors
- 2 light sensors
- Water level sensor
In addition, in real time The nRF24 itself functions between two distributed parts of the system and the Ethernet interface of the server and the server engine providing the system’s web user interface.
Total, in real time, in multitasking mode, on an 8-bit Mega, at least 60 entities operate (and this is not counting the many services of the AMS operating system itself, with them the number of entities will approach one hundred). What obviously doesn’t agree with the statement that "real multi-tasking is impossible on the Arduino and it is problematic to flash even five LEDs on it".
A couple of words in defense of Arduino
(Although it is obvious that Arduino as a socio-cultural and technological phenomenon with a multimillion army of fans and many thousands of amazing projects does not need protection.)
I have said many times and will repeat that Arduino in its software component is, in fact, just one of the possible levels of abstraction (like any other) with their own advantages and disadvantages. And the user has absolutely no difference what is “spinning” inside his small piece of silicon - the “pure” Arduino, RTOS, RIOT OS, AMS or some other mathematical abstraction of the representation and control of the iron resources of the controller.
It is important for the user to solve his problems - the controller would water the plants, turn on the light, control the curtains, etc. And the main problem is not in the tools used in the design, but in the ability to use them and, trivially, in the imagination and engineering vision of the developer himself.
How it works?
By itself, multitasking on microcontrollers can be organized in different ways, in this case the discussion will be about the simplest - processes take turns in control and voluntarily give it up after using their time slice. This method, of course, is not without obvious flaws, but, as they say, practice is a criterion of truth and it has proven itself well in real conditions: it is used both in standard Arduino Mega Server distributions and in many AMS Pro projects . And these systems work 24/7 and have confirmed uptimes for many months of trouble-free operation.
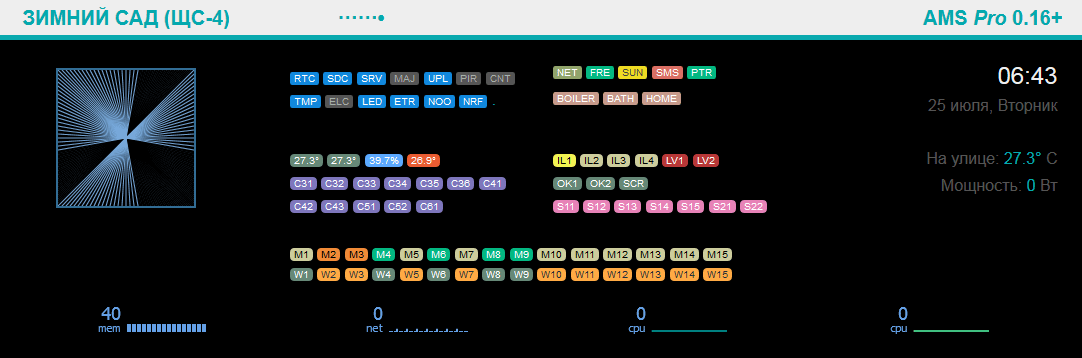
This is an indication of about a hundred entities distributed nRF24 system, managed independently from each other in real time. Pay attention to the last two indicators "CPU" - even on an 8-bit Mega, the processor load is equal to zero (that is, the system is completely free).
Little about timers
To organize the management of complex systems, it is not enough just to transfer control between processes in turn and, along with automatic transfer of control, AMS uses various types of timers: cyclic, cyclic with a given number of repetitions (packet), single, random, mixed, etc. Everything is organized native Arduino means and does not use interrupts or direct programming of microcontroller timers (but interrupts are, of course, used by the system “for their intended purpose”).
Which again comes into direct contradiction with the statement “There will be enough of iron timers for 3 LEDs, with further problems arduinschiki begin.” Will not start. Any types of timers are available to us in any quantity. And, if desired, we can make ourselves some more new and arbitrarily exotic.
Main case
The main case for this type of multitasking organization is to create a so-called “non-blocking” code, that is, code that does not use the delay () function, which simply pauses the execution of the program for a specified time.
Real time
The described way of multitasking can be described as “soft-realtime”, the typical delay time in the system is 10 ms (but the peak delays can be much longer and are not normalized). This imposes certain limitations on the range of application of this solution, but for most “everyday” tasks (and not only) it is perfect, see the example above.
If control is required in a more rigid real time, then this requires special optimization of the code for a specific task, restructuring of the architecture or, in very extreme cases, the allocation of a separate controller for specific functions. As an example, the selection of a separate controller effects smart LED strip.
This is a general theoretical description of the work of multitasking in Arduino in general and in AMS in particular, we now turn to the consideration of practical examples.
Cyclic timers

Consider the implementation of the most simple cyclic timers. These are timers (in the terminology of AMS "cycles"), which are turned on at certain, predetermined time intervals and are used to activate cyclic processes.
In general, it is better to program out timers in the form of objects, but in the standard delivery of the Arduino Mega Server these timers are implemented as functions, therefore, for a start, we will consider them in this aspect.
Using cyclic timers is very simple: just put the code that you need to periodically execute between the brackets of the if statement. If you need to use a different trigger interval, then simply use the desired variable instead of cycle1s. You can do as many different cycles as you want - even on an 8-bit Mega, the system can easily be serviced by literally hundreds of such timers (but, of course, you need to remember that the code you are calling is not blocking).
if (cycle1s) {
    // Код, который необходимо выполнять, например, каждую секунду
  }
Now the organization of the timers. Defining control variables in the main file:
// Cycles
bool cycle1s  = false;
bool cycle5s  = false;
bool cycle20s = false;
bool cycle30s = false;
bool cycle1m  = false;
bool cycle3m  = false;
bool cycle5m  = false;
The set of intervals can be extended to any desired values from tens of milliseconds to days or more.
Module "Timers":
/*
  Module Timers
  part of Arduino Mega Server project
*/// Cycles
unsigned long timeSec;
unsigned long timer1s;
unsigned long timer5s;
unsigned long timer20s;
unsigned long timer30s;
unsigned long timer1m;
unsigned long timer3m;
unsigned long timer5m;
voidtimersInit(){
  unsigned long uptimeSec = millis() / 1000;
  timeSec  = uptimeSec;
  timer1s  = uptimeSec;
  timer5s  = uptimeSec;
  timer20s = uptimeSec;
  timer30s = uptimeSec;
  timer1m  = uptimeSec;
  timer3m  = uptimeSec;
  timer5m  = uptimeSec;
}
voidtimersWorks(){
  timeSec = millis() / 1000;
    if (timeSec - timer1s  >=  1)  {
                                    timer1s  = timeSec; cycle1s  = true;
    if (timeSec - timer5s  >=  5)  {timer5s  = timeSec; cycle5s  = true;}
    if (timeSec - timer20s >= 20)  {timer20s = timeSec; cycle20s = true;}
    if (timeSec - timer30s >= 30)  {timer30s = timeSec; cycle30s = true;}
    if (timeSec - timer1m  >= 60)  {timer1m  = timeSec; cycle1m  = true;}
    if (timeSec - timer3m  >= 180) {timer3m  = timeSec; cycle3m  = true;}
    if (timeSec - timer5m  >= 300) {timer5m  = timeSec; cycle5m  = true;}
  }
}
voideraseCycles(){
  cycle1s  = false;
  cycle5s  = false;
  cycle20s = false;
  cycle30s = false;
  cycle1m  = false;
  cycle3m  = false;
  cycle5m  = false;
}
And then the connection code of these timers in the main loop. At the beginning of the main loop, it is checked whether any of the timers has worked, and at the end all raised timer flags are reset. Any system code is between these two functions and, most importantly, any of the timers can be used repeatedly in any parts of the system code.
voidloop(){
  timersWorks();
  // Код системных процессов
  eraseCycles();
}
Cyclic timers as an object library
Now consider the organization of the same timers, but in a more correct object form, decorated in a ready-made library. Let's call it myCycle.
The header file contains declarations of the class, methods, and some predefined constants:
/*
  myCycle Library
  part of Arduino Mega Server project
*/
#ifndef _MYCYCLE_H
#define _MYCYCLE_H
#define MS_500       500
#define MS_01S      1000
#define MS_02S      2000
#define MS_05S      5000
#define MS_10S     10000
#define MS_13S     13000
#define MS_17S     17000
#define MS_20S     20000
#define MS_30S     30000
#define MS_01M     60000
#define MS_03M    180000
#define MS_05M    300000
#define MS_01H   3600000
#define MS_06H  21600000
#define MS_12H  43200000
#define MS_01D  86400000classmyCycle{
  private:
    bool          _go;
    bool          _active;
    unsigned long _start;
    unsigned long _period;
  public:
    myCycle(unsigned long per, bool act);
    voidreInit(unsigned long per, bool act);
    voidreStart();
    bool check();
    bool go();
    voidclear();
    // activebool active();
    voidsetActive(bool act);
    // periodunsigned longperiod();
    voidsetPeriod(unsigned long per);
}; // class myCycle
#endif // _MYCYCLE_H
And the implementation file in which the library code is located:
/*
  myCycle Library
  part of Arduino Mega Server project
*/
#include "myCycle.h"
#include <Arduino.h>
myCycle::myCycle(unsigned long per, bool act) {
  _go     = false;
  _active = act;
  _period = per;
  _start  = millis();
}
// Methodsvoid myCycle::reInit(unsigned long per, bool act) {
  _go     = false;
  _active = act;
  _period = per;
  _start  = millis();
}
void myCycle::reStart() {
  _start = millis();
}
bool myCycle::check() {
  if (millis() - _start >= _period) {
    _start = millis();
    if (_active) {
      _go = true;
    }
  }
  return _go;
}
bool myCycle::go() {
  return _go;
}
void myCycle::clear() {
  _go = false;
}
// Active
bool myCycle::active() {
  return _active;
}
void myCycle::setActive(bool act) {
  _active = act;
}
// Period
unsigned long myCycle::period() {
  return _period;
}
void myCycle::setPeriod(unsigned long per) {
  _period = per;
}
Using this option is also simple and has some advantages over the "functional" option: here you can very easily declare timers at the right intervals and you do not need to create many timers "just in case" in advance.
In the main file: We
connect the library:
#include "myCycle.h"Create objects:
// CyclesmyCycle cycle500(MS_500, true);
myCycle cycle2s(MS_02S, true);
myCycle cycle5s(MS_05S, true);
We add functions of service of work of timers:
voidtimersWorks(){
  cycle500.check();
  cycle2s.check();
  cycle5s.check();
}
voideraseCycles(){
  cycle500.clear();
  cycle2s.clear();
  cycle5s.clear();
}
In the main loop we use the declared timers in any necessary place of the code:
voidloop(){
  timersWorks();
  // Код системных процессовif (cycle5s.go()) {
    Serial.println(F("cycle5s!"));
  }
  eraseCycles();
}
The library has a slightly wider functionality than the code given in the first version. For example, it contains methods for activating / deactivating timers, setting and retrieving the current value, restarting and reinitializing timers, which further expands the possibilities of using them in practical tasks.
Other types of timers on Arduino
In order not to overload the article, I will not give the code here and analyze the work of all possible types of timers - they are all built according to the same principles. If this topic is interesting, then you can write a separate article about it. Here I will only give a general description of the timers that are used in AMS and have proven themselves well in practice.
Cyclic with a given number of repetitions (batch)
These are timers that work a predetermined number of times. For example, you need to make 3 attempts to send messages over the nRF24 wireless channel. The timer is activated only 3 times and the corresponding number of times attempts are made to send messages.
Various extensions of functionality such as activation / deactivation of the timer depending on certain conditions, etc. are also possible here.
Solitary
These are different variations on the “autoload” theme, when an action is performed at a certain time interval after the controller start or an event.
Random
Sometimes it does not require a strict frequency of performing any actions, but on the contrary, a certain range of operations around a certain average value, so-called random timers are used for these purposes.
For example, you have two distributed controllers that are connected to each other wirelessly. If one system sends its messages to another, consistent with the triggering of a regular timer, for example, once every 20 seconds, these messages will arrive at the second system in a strictly defined “phase”, which may fall into the “problematic” interval of the second controller's cycle, as a result, his work may be unstable. If in this case we use a random timer, then it will “smear” in time the moments of arrival of messages from the first controller and the problem will be avoided.
This is only an abstract example for understanding what random timers are. And you can familiarize yourself with their implementation - the standard distribution kit of the Arduino Mega Server contains the code of such a timer.
Mixed
There is complete freedom of action, you can arbitrarily combine the work of various types of timers, using the launch of some timers from others and their built-in logic such as activation / deactivation according to conditions, changing the response time on the fly, etc.
There are practically no restrictions on the number of timers and the logic of work - there may be hundreds of them, even on an 8-bit controller.
Interprocess communication
Interprocess communication, semaphores, mailboxes and other attributes of multitasking systems are also organized on Arduino without any problems - they can be organized in any way convenient for you - starting with passing parameters through static variables and ending with packaging of logic into any classes and objects, there is no absolutely no restrictions and problems.
A detailed description of interprocess communication is beyond the scope of this article, but you can download the Arduino Mega Server distribution kit for any platform and familiarize yourself with its design and operation.
Conclusion
In general, we can say that Arduino tools can create any kind of timers, run any number of them and use any combination of them, in other words, the Arduino can satisfy every whim of a timer (pseudo) multitasking control of complex microcontroller systems.
And this should not be a secret for MIREA students, as future engineers of microprocessor systems, because these principles can be applied on any platform.
PS
Recently a new, 0.17 version of the Arduino Mega Server for the Arduino Mega, Due, 101 and M0 has been released, which you can download on the official download page . The timers code described in this article is taken from these distributions.