April 6, 2018 at 11:52
Year we measure soil moisture on the ESP8266 and two batteries. Part 2
Hello! In this article, I want to tell you how to make the soil moisture sensor work for two years on two batteries (AAA) and at the same time make everything more or less correct. The first article is about choosing a development environment (Arduino IDE) and the Blynk platform .
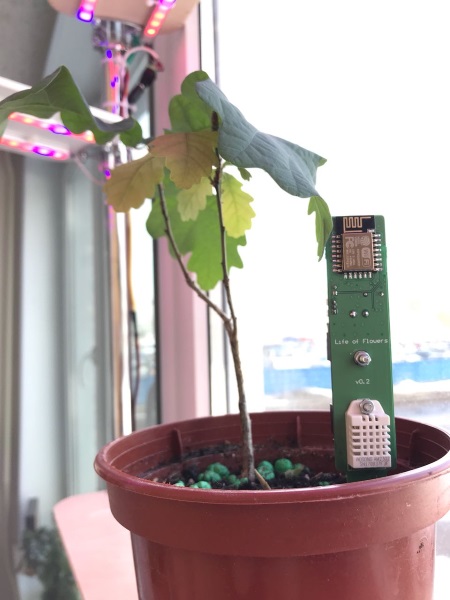
A picture of a home oak to attract attention
To begin with, a little recognition - I'm not a programmer and I'm a home gardener. Both are my hobby. I have shelves made on my windowsills, with a special blue-red LED backlight, under which the plants should grow with more enthusiasm. Without going into the details of photosynthesis and other botany, we can say that LED backlighting created one problem, solving which the device that this article is dedicated to was born.
LED lines (power of about 6 watts), they heat themselves quite strongly and heat the shelf and pot with the plant that stands on it. The plant itself, the heated soil does not bring any discomfort, but there is a problem of quick drying of the soil.
At the same time, the earth in pots that just stand on the windowsill dries more slowly. And on the upper shelves, where the state of the soil is not visible during irrigation, overflows or droughts regularly occur.
Of course, everything has already been invented, and on Ebay you can buy a carriage of different soil moisture meters. For example, one instance of a moisture meter with a beeper was purchased (the price is about 300 rubles).
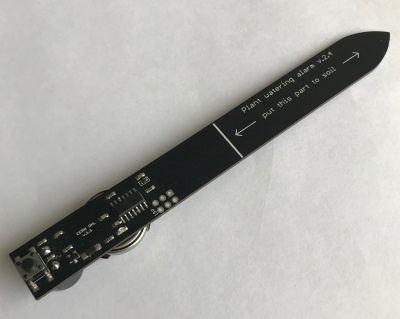
The device works, but there are several but:
And then Ostap suffered, because there is experience ( one and two ). So a device was born capable of measuring soil moisture, light, temperature and air humidity, transmitting the measurement results to a mobile application and working on batteries for quite a long time. About iron here . And I want to talk about software features in more detail in this article.
According to the datasheet, the ESP8266 consumes up to 170 mA in WiFi mode, 15 mA with the modem off (Modem Sleep) and nothing at all in Deep Sleep mode - about 10 μA.
From the consumer in our device, we can single out a WiFi modem, an AM2302 sensor (which is fed 3.3 V via the TPS60240DGKR extension) and a multiplexer (CD74HC4051M96) for switching ADC inputs.
WiFi makes the biggest contribution to power consumption, and so the first thing to do is get the ESP8266 to start with the radio turned off. After booting in Modem Sleep mode, you can take all measurements and only then turn on the modem and transfer data to the Blynk server (MQTT has disabled it for now to optimize consumption), after which it will fall asleep until next time.
Provided that all legs are connected correctly in hardware (RST pin is connected to GPIO16), you can put ESP into Deep Sleep mode with one command:
sleep_time - sleep time in microseconds that can be dynamically changed, and if, say, an attempt to transfer data failed (the router does not work or the blynk server does not respond), then you can set the timer for 5-10 minutes and then try to transfer the data again. And if all is well, then after a successful communication session you can fall asleep for an hour or a day.
WAKE_RF_DISABLED - indicates that the module will wake up with the WiFi module turned off.
This time I also wanted to be able to configure the device without using a computer through the Captive portal. But if, as last time, we took the WiFiManager library, then it will work at least strange with the modem turned off. Therefore, the entire logic of this library had to be tied to a button click. And since we only have one button and that one is used to download software via UART, we had to do this:
Now we can open the Captive portal, save the WiFi and Blynk token settings.
The library will not be used in the next download, and we will connect to WiFi using the ESP itself.
In some ESP8266 power optimization manuals you can find the WiFi.disconnect () command; which should disconnect the modem from the current WiFi network. However, in practice, this command deletes the SSID () and password stored in the modem's memory, so we will not use it.
The Adafruit DHT Sensor Library was also used to work with the temperature / humidity sensor . In order to save money, power to the sensor is not supplied continuously, but only by a signal specially allocated by GPIO. However, it was experimentally established that the sensor enters the operating mode for a rather long time and begins to issue adequate humidity values (other than 99%) approximately 5 seconds after power is supplied to it. On the one hand, such a large delay for the sensor “warming up” is an extra mA, but the ability to control the power of the AM2302 sensor is rather a plus, because we may not use the sensor every time or stop measuring temperature / humidity while reducing battery power.
Our ADC is used to measure three parameters: battery power, light and soil moisture. For switching different signals to the input of a single ADC, a multiplexer (model) is used.
The ESP8266 has an ADC of 10 bits, and the voltage range is 0..1 V. Therefore, resistive dividers are provided in the circuit, which reduces all measured signals to 1 V. When measuring the battery charge, all measurements on the graph look correct. However, it turned out that as the battery charge decreased, the brightness sensor began to decrease.
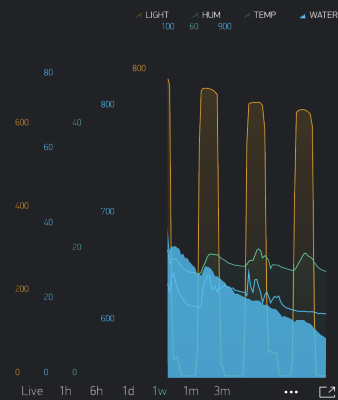
Measurement results 4 days. Brightness decreases with battery power.
As it turned out, with a decrease in the supply voltage, the voltage applied to the brightness sensor is proportionally reduced and, as a result, the measured brightness, too. But fortunately, the dependence in the entire range of input voltages from 3.3V to 2.5V turned out to be linear (within tolerances) and the problem can be fixed by simple normalization of the measurement result.
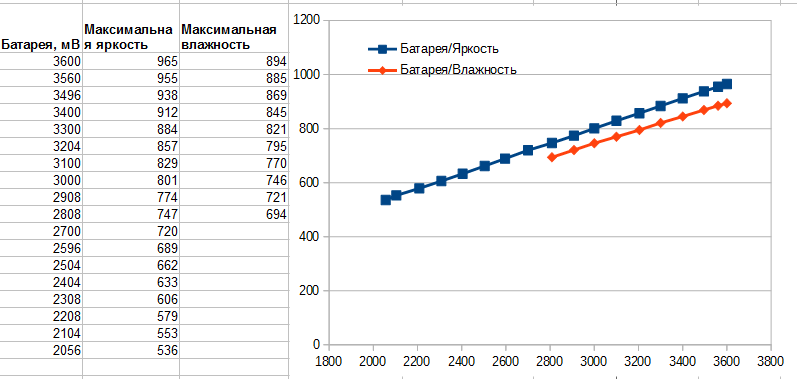
The graph of the dependence of the maximum measured brightness \ humidity depending on the battery charge The
maximum possible value of humidity \ brightness with the current battery charge can be calculated using the formulas:
q_w = (adcbattery * 4) / 15; // soil moisture
q_l = (adcbattery * 25) / 101; // brightness
To take into account possible errors (and random bursts) of ADC measurements, a simple median filter was implemented. We take three measurements with a small interval, then using the quick sort algorithm (thanks to Wikipedia) we find the average value and take it as the result.
In order to measure soil moisture, it is necessary to apply voltage to the earthen electrode and measure how much this voltage has reached and how much has “lost” in the soil at its other end. In practice, it turned out that when applying a “unit”, the range of possible values at the ADC input when the electrode is in very dry and very moist soil is completely insignificant, something about 100 mV. But among the brothers from the Middle Kingdom, it was observed that a PWM signal should be supplied with a frequency of 100 kHz and a duty cycle of 50%, in which case the signal loss in moist soil becomes very noticeable.
The maximum PWM frequency that the ESP8266 is capable of is about 78 kHz, but as practice has shown, at 75 kHz the results of moisture measurements are quite accurate and reflect the state of the soil.
To activate PWM:
At the moment, if all measurements are carried out once a minute, then a set of new batteries (2 pieces of AAA) will last for 4 days or 5760 measurements. If you take 12 measurements a day (once every two hours), then the batteries should last for a year at least (480 days).
But the battery life can be further increased by turning on WiFi not every “waking up”, but a couple of times a day. But in order to realize this, it is necessary to somehow distinguish one inclusion from another. RAM is not suitable for this, because in Deep sleep mode clears. EEPROM could be suitable for this purpose, however, on ESP it is implemented as part of a flash and writing there is often not the best idea (and not the most energy efficient).
But, not everything is so bad and we still have 512 bytes of RTC memory at our disposal, which perfectly stores data while the chip is in Deep sleep mode. I found two new functions for myself and did not manage to implement them in the project yet.
Also in the near future the most important function will be added, namely sending sound (beeper) and mobile (push) notifications in case of drying of the soil. So far, it hasn’t been before. The most important thing you should not forget about is taking into account the current time so as not to start scaring at night.
The project is entirely on github .
Thanks for attention.

Special thanks to my wife for regular watering of the test flower.
PS. There will be a third part.
A picture of a home oak to attract attention
Gardener amateur
To begin with, a little recognition - I'm not a programmer and I'm a home gardener. Both are my hobby. I have shelves made on my windowsills, with a special blue-red LED backlight, under which the plants should grow with more enthusiasm. Without going into the details of photosynthesis and other botany, we can say that LED backlighting created one problem, solving which the device that this article is dedicated to was born.
Spoiler
The LEDs are warming up, the earth is drying, I water somehow.
LED lines (power of about 6 watts), they heat themselves quite strongly and heat the shelf and pot with the plant that stands on it. The plant itself, the heated soil does not bring any discomfort, but there is a problem of quick drying of the soil.
At the same time, the earth in pots that just stand on the windowsill dries more slowly. And on the upper shelves, where the state of the soil is not visible during irrigation, overflows or droughts regularly occur.
Of course, everything has already been invented, and on Ebay you can buy a carriage of different soil moisture meters. For example, one instance of a moisture meter with a beeper was purchased (the price is about 300 rubles).
The device works, but there are several but:
- It is not clear what humidity level the beeper is set to.
- If there will be more than one device, then you will have to walk and listen.
- I can do that too.
And then Ostap suffered, because there is experience ( one and two ). So a device was born capable of measuring soil moisture, light, temperature and air humidity, transmitting the measurement results to a mobile application and working on batteries for quite a long time. About iron here . And I want to talk about software features in more detail in this article.
Analyzing Power Consumption
According to the datasheet, the ESP8266 consumes up to 170 mA in WiFi mode, 15 mA with the modem off (Modem Sleep) and nothing at all in Deep Sleep mode - about 10 μA.
From the consumer in our device, we can single out a WiFi modem, an AM2302 sensor (which is fed 3.3 V via the TPS60240DGKR extension) and a multiplexer (CD74HC4051M96) for switching ADC inputs.
WiFi makes the biggest contribution to power consumption, and so the first thing to do is get the ESP8266 to start with the radio turned off. After booting in Modem Sleep mode, you can take all measurements and only then turn on the modem and transfer data to the Blynk server (MQTT has disabled it for now to optimize consumption), after which it will fall asleep until next time.
Deep sleeep
Provided that all legs are connected correctly in hardware (RST pin is connected to GPIO16), you can put ESP into Deep Sleep mode with one command:
ESP.deepSleep(sleep_time, WAKE_RF_DISABLED);
sleep_time - sleep time in microseconds that can be dynamically changed, and if, say, an attempt to transfer data failed (the router does not work or the blynk server does not respond), then you can set the timer for 5-10 minutes and then try to transfer the data again. And if all is well, then after a successful communication session you can fall asleep for an hour or a day.
WAKE_RF_DISABLED - indicates that the module will wake up with the WiFi module turned off.
Work with WiFi
This time I also wanted to be able to configure the device without using a computer through the Captive portal. But if, as last time, we took the WiFiManager library, then it will work at least strange with the modem turned off. Therefore, the entire logic of this library had to be tied to a button click. And since we only have one button and that one is used to download software via UART, we had to do this:
- Turn on the power (insert the batteries).
- We are waiting for the LED to blink (in the test version we listen to the beeper).
- Press the button and get into WiFiManager.
Now we can open the Captive portal, save the WiFi and Blynk token settings.
The library will not be used in the next download, and we will connect to WiFi using the ESP itself.
//будим модем
WiFi.forceSleepWake();
//устанавливаем режим работы
WiFi.mode(WIFI_STA);
//чуть чуть ждем
delay(100);
//проверяем, что сохранены параметры сети и делаем begin
if (WiFi.SSID()) WiFi.begin();
In some ESP8266 power optimization manuals you can find the WiFi.disconnect () command; which should disconnect the modem from the current WiFi network. However, in practice, this command deletes the SSID () and password stored in the modem's memory, so we will not use it.
Read the AM2302 sensor
The Adafruit DHT Sensor Library was also used to work with the temperature / humidity sensor . In order to save money, power to the sensor is not supplied continuously, but only by a signal specially allocated by GPIO. However, it was experimentally established that the sensor enters the operating mode for a rather long time and begins to issue adequate humidity values (other than 99%) approximately 5 seconds after power is supplied to it. On the one hand, such a large delay for the sensor “warming up” is an extra mA, but the ability to control the power of the AM2302 sensor is rather a plus, because we may not use the sensor every time or stop measuring temperature / humidity while reducing battery power.
Measuring readings on the ADC
Our ADC is used to measure three parameters: battery power, light and soil moisture. For switching different signals to the input of a single ADC, a multiplexer (model) is used.
The ESP8266 has an ADC of 10 bits, and the voltage range is 0..1 V. Therefore, resistive dividers are provided in the circuit, which reduces all measured signals to 1 V. When measuring the battery charge, all measurements on the graph look correct. However, it turned out that as the battery charge decreased, the brightness sensor began to decrease.
Measurement results 4 days. Brightness decreases with battery power.
As it turned out, with a decrease in the supply voltage, the voltage applied to the brightness sensor is proportionally reduced and, as a result, the measured brightness, too. But fortunately, the dependence in the entire range of input voltages from 3.3V to 2.5V turned out to be linear (within tolerances) and the problem can be fixed by simple normalization of the measurement result.
The graph of the dependence of the maximum measured brightness \ humidity depending on the battery charge The
maximum possible value of humidity \ brightness with the current battery charge can be calculated using the formulas:
q_w = (adcbattery * 4) / 15; // soil moisture
q_l = (adcbattery * 25) / 101; // brightness
To take into account possible errors (and random bursts) of ADC measurements, a simple median filter was implemented. We take three measurements with a small interval, then using the quick sort algorithm (thanks to Wikipedia) we find the average value and take it as the result.
float adcRead[3];
void quickSort(float *s_arr, int first, int last){
  if (first < last){
      int left = first, right = last, middle = s_arr[(left + right) / 2];
      do{
        while (s_arr[left] < middle) left++;
        while (s_arr[right] > middle) right--;
        if (left <= right){
          int tmp = s_arr[left];
          s_arr[left] = s_arr[right];
          s_arr[right] = tmp;
          left++;
          right--;
        }
      }
      while (left <= right);
      quickSort(s_arr, first, right);
      quickSort(s_arr, left, last);
  }
}
void analogReadMedian(){
  adcRead[0] = analogRead(ADCPin);
  delay(10);
  adcRead[1] = analogRead(ADCPin);
  delay(10);
  adcRead[2] = analogRead(ADCPin);
}
void readADC_median(int input){
  switch(input){
    case 1 :
      digitalWrite(BPin, HIGH);
      digitalWrite(C_DHTPin, LOW);
      delay(50);
      analogReadMedian();
      quickSort(adcRead, 0, 2);
      adcbattery = adcRead[1] * 4;
      q_w = (adcbattery * 4) / 15;
      q_l = (adcbattery * 25) / 101;
      digitalWrite(BPin, LOW);
      break;
    case 2 :
      digitalWrite(BPin, LOW);
      digitalWrite(C_DHTPin, LOW);
      analogWrite(PWMPin, 412);
      delay(50);
      analogReadMedian();
      quickSort(adcRead, 0, 2);
      adcwater = 5*(100 - 100*(adcRead[1] / q_w));
      if (adcwater > 100) adcwater = 100;
      if (adcwater < 0) adcwater = 0;
      analogWrite(PWMPin, 0);
      break;
    case 3 :
      digitalWrite(BPin, LOW);
      digitalWrite(C_DHTPin, HIGH);
      delay(50);
      analogReadMedian();
      quickSort(adcRead, 0, 2);
      adclight = 100*(adcRead[1] / q_l);
      if (adclight > 100) adclight = 100;
      if (adclight < 0) adclight = 0;
      break;
    default :
      delay(1);
   }
}
Soil moisture measurement
In order to measure soil moisture, it is necessary to apply voltage to the earthen electrode and measure how much this voltage has reached and how much has “lost” in the soil at its other end. In practice, it turned out that when applying a “unit”, the range of possible values at the ADC input when the electrode is in very dry and very moist soil is completely insignificant, something about 100 mV. But among the brothers from the Middle Kingdom, it was observed that a PWM signal should be supplied with a frequency of 100 kHz and a duty cycle of 50%, in which case the signal loss in moist soil becomes very noticeable.
The maximum PWM frequency that the ESP8266 is capable of is about 78 kHz, but as practice has shown, at 75 kHz the results of moisture measurements are quite accurate and reflect the state of the soil.
To activate PWM:
//инициализируем GPIO на выход
pinMode(PWMPin, OUTPUT);
//устанавливаем частоту ШИМ в Герцах
analogWriteFreq(75000);
//включаем ШИМ, значение 512 соответствует скважности 50%
analogWrite(PWMPin, 512);
//Делаем замеры
//выключаем ШИМ
analogWrite(PWMPin, 0);
Future plans
At the moment, if all measurements are carried out once a minute, then a set of new batteries (2 pieces of AAA) will last for 4 days or 5760 measurements. If you take 12 measurements a day (once every two hours), then the batteries should last for a year at least (480 days).
But the battery life can be further increased by turning on WiFi not every “waking up”, but a couple of times a day. But in order to realize this, it is necessary to somehow distinguish one inclusion from another. RAM is not suitable for this, because in Deep sleep mode clears. EEPROM could be suitable for this purpose, however, on ESP it is implemented as part of a flash and writing there is often not the best idea (and not the most energy efficient).
But, not everything is so bad and we still have 512 bytes of RTC memory at our disposal, which perfectly stores data while the chip is in Deep sleep mode. I found two new functions for myself and did not manage to implement them in the project yet.
ESP.rtcUserMemoryWrite(offset, &data, sizeof(data))
ESP.rtcUserMemoryRead(offset, &data, sizeof(data))
Also in the near future the most important function will be added, namely sending sound (beeper) and mobile (push) notifications in case of drying of the soil. So far, it hasn’t been before. The most important thing you should not forget about is taking into account the current time so as not to start scaring at night.
Conclusion
The project is entirely on github .
Thanks for attention.
Special thanks to my wife for regular watering of the test flower.
PS. There will be a third part.