Stereo is just
Hi% username%.
In this article I want to talk about how you can independently create a stereo image using a graphical editor and a small program.

First, let's look at how a stereo image works and how to look at it. First of all, it consists of repeating fragments.
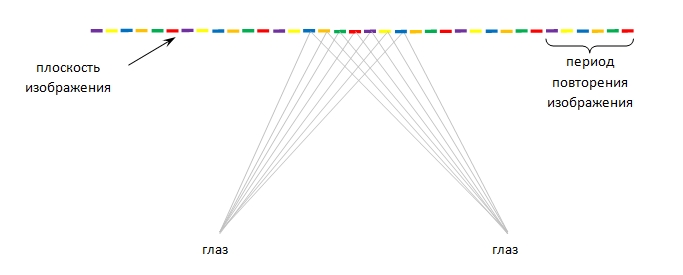
Figure 1.
It is very important that the width of the repeating fragment is less than the distance between the eyes. For comfortable viewing of stereo images, the width should vary from 1/3 to 2/3 of this value. The larger the width, the deeper (volumetric) image can be obtained. The smaller the width, the less tired your eyes are when viewing a stereo image.
To see the three-dimensional image, it is necessary to focus the view behind the plane of the picture so that the images for the left and right eyes coincide. For an image consisting entirely of repeating fragments, you will observe exactly the same imaginary image (flat plane). The only difference is that it will seem to you that the drawing began to settle down further.
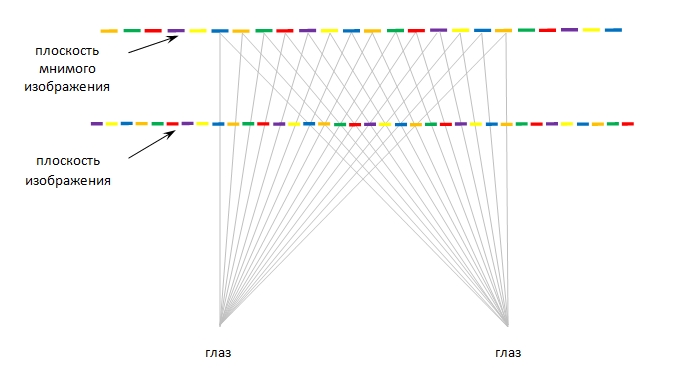
fig 2.
For the image to become voluminous, some parts of it must be perceived as closer, others as more distant. This effect can be achieved by shifting image elements.
Figure 3 shows how the imaginary image changed after shifting two elements (red and purple) of the real image by one position to the left.
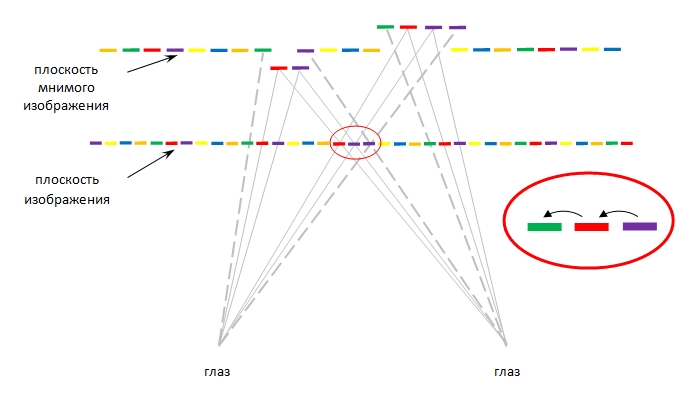
fig 3.
Two artifacts of the same size equal to the size of the shifted elements formed on the imaginary image. The artifact located to the left of the place of the shift is perceived as being located closer to the observer (in front of the plane of the imaginary image). The artifact on the right, on the contrary, is perceived as being located behind the plane of the imaginary image. On the position of the elements of the imaginary image, which are simultaneously visible to only one eye (marked with a dashed line), the brain "thinks out" on its own.
I note that the shift should not exceed half the width of the repeating part. When the shear size is close to this boundary, it is difficult for the eye to determine whether the observed region is convex or depressed.
If we want to depict objects located just in front of the plane of the imaginary image, we need to be able to deal with unwanted artifacts. For this, it is enough to carry out a shift of elements in each period located to the right of the first place of the shift (Figure 4).

Figure 4. It
remains to show how objects with different degrees of remoteness are formed on the imaginary image. For a clear example, this time we will shift three elements to the left, but not by one position, but by two. Comparing Figures 4 and 5, we see that in the last figure due to a shift by a larger number of positions, we got an object located closer than when shifted by one position.

fig 5.
A stereo image was created with the following function written in C #:
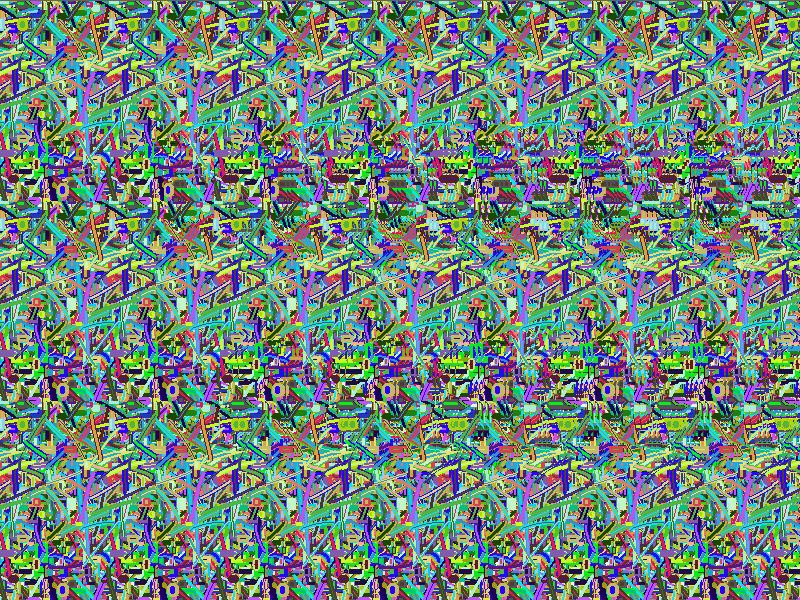
At the input, the function accepts an image mask created in a graphics editor. First, a text label was created, to which then a gradient fill was applied (the very first picture in the article).
Black points are treated by the function as points with zero shift, i.e. they form the plane of the imaginary image. The brighter the color of the point, the greater its shift, the closer it will seem to the observer. Since the image is made in gray, I used the brightness of the red RGB component divided by 32 to determine the brightness of the point. Thus, the maximum possible shift is 255/32 = 7.
After forming an array of shifts, the function creates an image with a width of w + s pixels, a height of h pixels and a width of the repeating part s = 100 pixels. As a repeating part, I generate a random image consisting of a random number of random shapes (ellipse, rectangle, arc, curve) of a random size and color. You can come to this stage creatively and prepare some beautiful background in advance.
At the final, most important stage, each pixel of the image is shifted in accordance with the array of shifts.
PS I would be very happy if this article helps someone even learn how to watch stereo images, since I myself could not immediately learn it.
In this article I want to talk about how you can independently create a stereo image using a graphical editor and a small program.
Introduction
First, let's look at how a stereo image works and how to look at it. First of all, it consists of repeating fragments.
Figure 1.
It is very important that the width of the repeating fragment is less than the distance between the eyes. For comfortable viewing of stereo images, the width should vary from 1/3 to 2/3 of this value. The larger the width, the deeper (volumetric) image can be obtained. The smaller the width, the less tired your eyes are when viewing a stereo image.
To see the three-dimensional image, it is necessary to focus the view behind the plane of the picture so that the images for the left and right eyes coincide. For an image consisting entirely of repeating fragments, you will observe exactly the same imaginary image (flat plane). The only difference is that it will seem to you that the drawing began to settle down further.
fig 2.
How is a three-dimensional image obtained?
For the image to become voluminous, some parts of it must be perceived as closer, others as more distant. This effect can be achieved by shifting image elements.
Figure 3 shows how the imaginary image changed after shifting two elements (red and purple) of the real image by one position to the left.
fig 3.
Two artifacts of the same size equal to the size of the shifted elements formed on the imaginary image. The artifact located to the left of the place of the shift is perceived as being located closer to the observer (in front of the plane of the imaginary image). The artifact on the right, on the contrary, is perceived as being located behind the plane of the imaginary image. On the position of the elements of the imaginary image, which are simultaneously visible to only one eye (marked with a dashed line), the brain "thinks out" on its own.
I note that the shift should not exceed half the width of the repeating part. When the shear size is close to this boundary, it is difficult for the eye to determine whether the observed region is convex or depressed.
If we want to depict objects located just in front of the plane of the imaginary image, we need to be able to deal with unwanted artifacts. For this, it is enough to carry out a shift of elements in each period located to the right of the first place of the shift (Figure 4).
Figure 4. It
remains to show how objects with different degrees of remoteness are formed on the imaginary image. For a clear example, this time we will shift three elements to the left, but not by one position, but by two. Comparing Figures 4 and 5, we see that in the last figure due to a shift by a larger number of positions, we got an object located closer than when shifted by one position.
fig 5.
Actually implementation
A stereo image was created with the following function written in C #:
private Bitmap GenerateStereoPicture(Bitmap bitmapMask)
{
  // Переводим маску в массив сдвигов
  int w = bitmapMask.Width;
  int h = bitmapMask.Height;
  int[][] mask = new int[w][];
  for (int x = 0; x < w; x++)
  {
    mask[x] = new int[h];
    for (int y = 0; y < h; y++)
      mask[x][y] = bitmapMask.GetPixel(x, y).R / 32;
  }
  // Cоздаем фон
  int s = 100;
  Bitmap stereoImg = GetNewStereoPicture(w + s, h, s);
  // Сдвигаем каждый пиксел
  for (int y = 0; y < h; y++)
    for (int x = 0; x < w; x++)
      if (mask[x][y] > 0)
      {
        Color pixel = stereoImg.GetPixel(x + mask[x][y], y);
        for (int i = x + s; i < w + s; i += s)
          stereoImg.SetPixel(i, y, pixel);
      }
  return stereoImg;
}
At the input, the function accepts an image mask created in a graphics editor. First, a text label was created, to which then a gradient fill was applied (the very first picture in the article).
Black points are treated by the function as points with zero shift, i.e. they form the plane of the imaginary image. The brighter the color of the point, the greater its shift, the closer it will seem to the observer. Since the image is made in gray, I used the brightness of the red RGB component divided by 32 to determine the brightness of the point. Thus, the maximum possible shift is 255/32 = 7.
After forming an array of shifts, the function creates an image with a width of w + s pixels, a height of h pixels and a width of the repeating part s = 100 pixels. As a repeating part, I generate a random image consisting of a random number of random shapes (ellipse, rectangle, arc, curve) of a random size and color. You can come to this stage creatively and prepare some beautiful background in advance.
At the final, most important stage, each pixel of the image is shifted in accordance with the array of shifts.
PS I would be very happy if this article helps someone even learn how to watch stereo images, since I myself could not immediately learn it.