April 11, 2011 at 17:34
"Eat me" ... no, not so ... "Follow me!"
I periodically have different needs for solving small pressing problems in Mac OS X. For these purposes, I usually make small programs that "close" the need privately. But sometimes you want the program to be universal, and other people could use it if necessary (for example, “Relator” ). It happened this time too ...
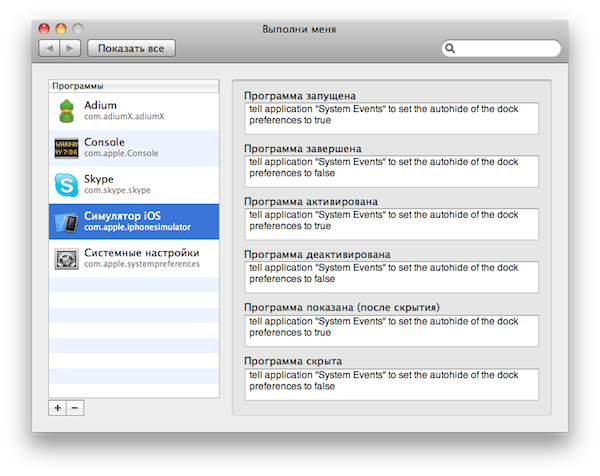
I love when the Dock is always displayed on the screen. But when launching the iOS Simulator, I had to constantly turn on automatic hiding so that the simulator could fully fit on the screen. There was a task - to automate this process. For a couple of days I sketched a universal program with which you can set AppleScript for a specific action of any program: “The program is running”, “The program is completed”, “The program is activated”, “The program is deactivated”, etc.
I will divide this topic into two parts. One for users who just want to use the program (or familiarize themselves). The second for beginning developers - I will describe the scheme of the program and provide the source code. Despite the apparent simplicity of the program itself, the source code covers many nuances from various topics, which can save a significant amount of time in the future.
You can download the program from the link (only for 10.6+) (at 18.51 I updated the program and source codes thanks to a bug report. I fixed a small bug due to which the assistant did not receive messages after removing the program from the list. Costs of makeshift testing ...) .
The program is very easy to use (if you have skills with AppleScript). This is not a separate application, but a panel for "System Preferences." Double-click on it with the mouse and get a new panel “Follow me” in the “System Preferences”. On the left side is a list of programs. And in the right scripts set for the selected program.
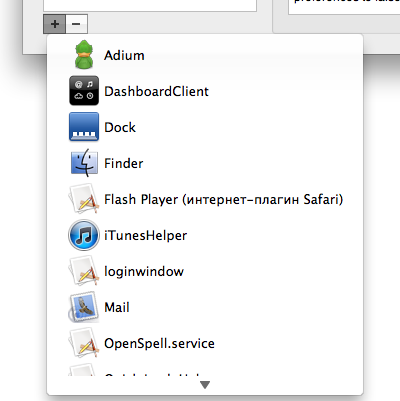
When you click on the "+" button , a list of running programs (having an identifier - Bundle identifier) will open, from which we can select the desired program to add (if the desired program is not running, it must first be started). All that remains is to set scripts for the actions that are required. For example, enable Dock auto-hide mode: Or run some program:
Or execute some console script: The
possibilities are practically unlimited - AppleScript allows you to do a lot.
In fact, the program consists of two parts. System Settings Panel. And a special hidden assistant program - “Execute me (assistant)”, which automatically registers at startup. It is so scanty that it actually does not consume system resources, but it is she who is responsible for executing the scripts prescribed in the settings panel.
To uninstall a program, simply right-click (or Ctrl + click / on the touchpad) on the name of the “Execute Me” panel and select “Delete Panel”.

Here is a link to the source code of the project.
Here is an option on github .
The program consists of two parts - the settings panel and the assistant program. For each of them I made a separate project (in this case, it was more convenient for me). If necessary, two projects can be combined into one with two targets.
Creating a panel for "System Preferences" is not much different from creating a regular program. Xcode already has a template for this System Plug-in> Preference Pane. In which the class based on NSPreferencePane and the interface (xib) file have already been added. Everyone decides for himself how to test this module. For example, you can do everything in the form of a regular program and only at the final stage transfer everything to the Preference Pane.
It is important to understand that this is not an independent program, but a module for "System Settings". This means that all methods that are bound to the main bundle will not execute correctly (since the main bundle is “System Preferences”).
We cannot use the following macro:
Need to use:
Or we cannot use the NSImage method:
You need to use, for example:
Etc.
An object of class NSPreferencePane has a method:
It must be used.
The project uses two buttons "+" and "-" to edit the list of programs.
Initialization of the delete button is simple and banal:
But the add button is already more complicated. Two subclasses of NSPopUpButton and NSPopUpButtonCell must be entered for it. Formally, for the button with a drop-down list, the NSPopUpButton class is used. But in its naked form, it does not suit us. Firstly, it does not allow you to set a static picture for the button (more precisely, it allows, but the actual size of the button does not correspond to the actual size of the static picture, which is unacceptable in our case, since we have two buttons side by side) - we bypass this using a subclass NSPopUpButtonCell. Secondly, NSPopUpButton does not allow you to dynamically change the contents of the menu at the time it is clicked (our menu should be formed at the moment the button is clicked) - we bypass this using the NSPopUpButton subclass.
In order for the button to have a one-to-one size with the given picture, create the PopUpCell class:
What does all this code mean? It's simple - we create an object of class NSButtonCell and draw it instead of NSPopUpButtonCell. Those. the program draws an NSButtonCell (the size of which can match one to one with the given picture) instead of NSPopUpButtonCell, but functionally it is NSPopUpButton.
Now the menu ... With the dynamic menu, proceed as follows - add a delegate to NSPopUpButton, which will give us a menu at the moment when the left mouse button is clicked on the button.
We create a subclass of NSPopUpButton: Thus, we announced the delegate protocol, which has only one method: Implementation: When you click the mouse, before the event begins to be processed by an object of the NSPopUpButton class, we set the delegate menu to this object.
Now we can add our "+" button to our panel: Pay attention to "addButton.delegate = self". We assigned our main class a delegate to addButton. To do this, we additionally implement the method: in our main class. How to get a list of running programs for the menu? An object of the NSWorkspace class has a method: which will give us an array of all running programs (with full information on them: name, identifier, icon, etc.). From this object, apps will be formed (see source code) menu for the add button. Our NSTableView object displays cells with a picture, title, and subtitle. There is no standard cell of this type, it must be done independently. Declare the AppCell class:
The most important thing is to reassign the cell rendering method: The cell class is ready, it remains only to add it to our NSTableView object. There are two ways. 1). If the number of objects in the table is small, then you can use the delagate method (which is our main class NSPreferencePane) to NSTableView: 2). If there are many objects, then you can specify a universal cell for the entire column:
and put down the necessary values in the delegate method to NSTableView: Data (a file with a list of programs and scripts and icons) is stored in the corresponding Application Support folder (user Library). You can (and need) to get the path to this folder as follows: We will store the icons in PNG format. There are several ways to get PNG data from NSImage, I will give one of them (the most universal) that is used in the program. For the NSImage class, we will introduce a new method. Here's what its implementation looks like: Data is saved automatically when a cell in a table changes. Or 3 seconds after the user has changed a script. To do this, we will use the delegate method to NSTextView and delayed execution:
If the user changes any data, then after 3 seconds it will automatically save. If during this period the user continues to edit the data, the previous save request is canceled and a new one is created. It is convenient to use a similar mechanism, for example, when searching (so that the search only works some time after the end of editing).
After saving, we inform the assistant that the data has changed: Our program can independently launch the assistant (if it is not running) and is able to add it to autoload. Launching is very simple (our helper is inside bundle):
The LaunchServices framework is responsible for managing the elements of autostart programs (Login Items). It is written in C. We will make a convenient Objective-C wrapper for our tasks. Declare the LoginItems class: These are class methods. They are not tied to any object; they can be called simply [LoginItems addApplication: path]. The full implementation of these methods can be found in the source code. Here's how, for example, the add method is implemented: Here, in principle, our entire panel. Now the assistant ... he is very simple. Because the assistant should not be visible to the user, in the program description file we set the LSBackgroundOnly key in YES. This means that the program will not be displayed in the dock, in the Force Quit window, it will not display the menu, etc.
The most important part of initializing the assistant is receiving messages from the panel that the settings have been changed (to reboot them), and receiving NSWorkspace messages about the status of programs: And the main method that AppleScript executes if the program and its action matches the settings: Here’s such a small project, but there are a lot of interesting things inside. I hope that this material will be useful to someone. I already got my benefit - the Dock is automatically hidden when the iOS Simulator is activated :).
I love when the Dock is always displayed on the screen. But when launching the iOS Simulator, I had to constantly turn on automatic hiding so that the simulator could fully fit on the screen. There was a task - to automate this process. For a couple of days I sketched a universal program with which you can set AppleScript for a specific action of any program: “The program is running”, “The program is completed”, “The program is activated”, “The program is deactivated”, etc.
I will divide this topic into two parts. One for users who just want to use the program (or familiarize themselves). The second for beginning developers - I will describe the scheme of the program and provide the source code. Despite the apparent simplicity of the program itself, the source code covers many nuances from various topics, which can save a significant amount of time in the future.
You can download the program from the link (only for 10.6+) (at 18.51 I updated the program and source codes thanks to a bug report. I fixed a small bug due to which the assistant did not receive messages after removing the program from the list. Costs of makeshift testing ...) .
The program is very easy to use (if you have skills with AppleScript). This is not a separate application, but a panel for "System Preferences." Double-click on it with the mouse and get a new panel “Follow me” in the “System Preferences”. On the left side is a list of programs. And in the right scripts set for the selected program.
When you click on the "+" button , a list of running programs (having an identifier - Bundle identifier) will open, from which we can select the desired program to add (if the desired program is not running, it must first be started). All that remains is to set scripts for the actions that are required. For example, enable Dock auto-hide mode: Or run some program:
tell application "System Events" to set the autohide of the dock preferences to truetell application "iTunes" to activateOr execute some console script: The
do shell script "…"possibilities are practically unlimited - AppleScript allows you to do a lot.
In fact, the program consists of two parts. System Settings Panel. And a special hidden assistant program - “Execute me (assistant)”, which automatically registers at startup. It is so scanty that it actually does not consume system resources, but it is she who is responsible for executing the scripts prescribed in the settings panel.
To uninstall a program, simply right-click (or Ctrl + click / on the touchpad) on the name of the “Execute Me” panel and select “Delete Panel”.
FOR BEGINNERS
Here is a link to the source code of the project.
Here is an option on github .
The program consists of two parts - the settings panel and the assistant program. For each of them I made a separate project (in this case, it was more convenient for me). If necessary, two projects can be combined into one with two targets.
Creating a panel for "System Preferences" is not much different from creating a regular program. Xcode already has a template for this System Plug-in> Preference Pane. In which the class based on NSPreferencePane and the interface (xib) file have already been added. Everyone decides for himself how to test this module. For example, you can do everything in the form of a regular program and only at the final stage transfer everything to the Preference Pane.
It is important to understand that this is not an independent program, but a module for "System Settings". This means that all methods that are bound to the main bundle will not execute correctly (since the main bundle is “System Preferences”).
We cannot use the following macro:
NSLocalizedString(NSString *key, NSString *comment)Need to use:
NSLocalizedStringFromTableInBundle(NSString *key, NSString *tableName, NSBundle *bundle, NSString *comment)Or we cannot use the NSImage method:
+ (id)imageNamed:(NSString *)nameYou need to use, for example:
- (id)initWithContentsOfFile:(NSString *)filenameEtc.
An object of class NSPreferencePane has a method:
- (NSBundle *)bundleIt must be used.
The project uses two buttons "+" and "-" to edit the list of programs.
Initialization of the delete button is simple and banal:
removeButton = [[NSButton alloc] initWithFrame:NSMakeRect(43, 19, 22, 22)];


[removeButton setButtonType:NSMomentaryChangeButton];


[removeButton setImage:buttonImage];


[removeButton setImagePosition:NSImageOnly];


[removeButton setBordered:NO];


[removeButton setTarget:self];


[removeButton setAction:@selector(removeButtonAction:)];


[[self mainView] addSubview:removeButton];
But the add button is already more complicated. Two subclasses of NSPopUpButton and NSPopUpButtonCell must be entered for it. Formally, for the button with a drop-down list, the NSPopUpButton class is used. But in its naked form, it does not suit us. Firstly, it does not allow you to set a static picture for the button (more precisely, it allows, but the actual size of the button does not correspond to the actual size of the static picture, which is unacceptable in our case, since we have two buttons side by side) - we bypass this using a subclass NSPopUpButtonCell. Secondly, NSPopUpButton does not allow you to dynamically change the contents of the menu at the time it is clicked (our menu should be formed at the moment the button is clicked) - we bypass this using the NSPopUpButton subclass.
In order for the button to have a one-to-one size with the given picture, create the PopUpCell class:
@interface PopUpCell : NSPopUpButtonCell


{


    NSButtonCell *buttonCell;


}


- (id)initWithimage:(NSImage *)image;


@end


…


@implementation PopUpCell


- (id)initWithimage:(NSImage *)image


{


    self = [super initTextCell:@"" pullsDown:YES];


    buttonCell = [[NSButtonCell alloc] initImageCell:image];


    [buttonCell setButtonType:NSPushOnPushOffButton];


    [buttonCell setImagePosition:NSImageOnly];


    [buttonCell setImageDimsWhenDisabled:YES];


    [buttonCell setBordered:NO];


    return self;


}


...


- (void)drawWithFrame:(NSRect)cellFrame inView:(NSView *)controlView


{


    [buttonCell drawWithFrame:cellFrame inView:controlView];


}


- (void)highlight:(BOOL)flag withFrame:(NSRect)cellFrame inView:(NSView *)controlView


{


    [buttonCell highlight:flag withFrame:cellFrame inView:controlView];


}


@end
What does all this code mean? It's simple - we create an object of class NSButtonCell and draw it instead of NSPopUpButtonCell. Those. the program draws an NSButtonCell (the size of which can match one to one with the given picture) instead of NSPopUpButtonCell, but functionally it is NSPopUpButton.
Now the menu ... With the dynamic menu, proceed as follows - add a delegate to NSPopUpButton, which will give us a menu at the moment when the left mouse button is clicked on the button.
We create a subclass of NSPopUpButton: Thus, we announced the delegate protocol, which has only one method: Implementation: When you click the mouse, before the event begins to be processed by an object of the NSPopUpButton class, we set the delegate menu to this object.
@protocol PopUpDelegate


@optional


- (NSMenu *)menuForPopUp;


@end


@interface PopUpButton : NSPopUpButton


{


    id delegate;


}


@property (assign) id delegate;


@end
- (NSMenu *)menuForPopUp
@implementation PopUpButton


@synthesize delegate;


- (void)mouseDown:(NSEvent *)event


{


    if([delegate respondsToSelector:@selector(menuForPopUp)])


    {


        [self setMenu:[delegate menuForPopUp]];


    }


    [super mouseDown:event];


}


@end
Now we can add our "+" button to our panel: Pay attention to "addButton.delegate = self". We assigned our main class a delegate to addButton. To do this, we additionally implement the method: in our main class. How to get a list of running programs for the menu? An object of the NSWorkspace class has a method: which will give us an array of all running programs (with full information on them: name, identifier, icon, etc.). From this object, apps will be formed (see source code) menu for the add button. Our NSTableView object displays cells with a picture, title, and subtitle. There is no standard cell of this type, it must be done independently. Declare the AppCell class:
addButton = [[PopUpButton alloc] initWithFrame:NSMakeRect(20, 19, 23, 22) pullsDown:YES];


addButton.delegate = self;


[addButton setCell:[[[PopUpCell alloc] initWithimage:buttonImage] autorelease]];


[addButton setMenu:[self menuForPopUp]];


[[self mainView] addSubview:addButton];
- (NSMenu *)menuForPopUp


{


    ...


}
- (NSArray *)runningApplications
NSArray *apps = [[NSWorkspace sharedWorkspace] runningApplications];
@interface AppCell : NSTextFieldCell


{


    NSImage *image;


    NSString *title;


    NSString *subtitle;


}


...


@end
The most important thing is to reassign the cell rendering method: The cell class is ready, it remains only to add it to our NSTableView object. There are two ways. 1). If the number of objects in the table is small, then you can use the delagate method (which is our main class NSPreferencePane) to NSTableView: 2). If there are many objects, then you can specify a universal cell for the entire column:
- (void)drawInteriorWithFrame:(NSRect)inCellFrame inView:(NSView*)inView


{


    //рисуем image


    //рисуем title


    //рисуем subtitle


    …


}
- (NSCell *)tableView:(NSTableView *)tableView dataCellForTableColumn:(NSTableColumn *)tableColumn row:(NSInteger)row


{


    AppCell* cell = [[[AppCell alloc] init] autorelease];


    [cell setEditable:NO];


    cell.title = [[tableDataSource objectAtIndex:row] objectForKey:@"name"];


    cell.subtitle = [[tableDataSource objectAtIndex:row] objectForKey:@"ID"];


    cell.image = [[tableDataSource objectAtIndex:row] objectForKey:@"icon"];


    return cell;


}
NSTableColumn * column = [[appTable tableColumns] objectAtIndex: 0];
[column setDataCell: [[[AppCell alloc] init] autorelease]];
and put down the necessary values in the delegate method to NSTableView: Data (a file with a list of programs and scripts and icons) is stored in the corresponding Application Support folder (user Library). You can (and need) to get the path to this folder as follows: We will store the icons in PNG format. There are several ways to get PNG data from NSImage, I will give one of them (the most universal) that is used in the program. For the NSImage class, we will introduce a new method. Here's what its implementation looks like: Data is saved automatically when a cell in a table changes. Or 3 seconds after the user has changed a script. To do this, we will use the delegate method to NSTextView and delayed execution:
- (void)tableView:(NSTableView *)aTableView willDisplayCell:(id)aCell forTableColumn:(NSTableColumn *)aTableColumn row:(NSInteger)rowIndex


{


    AppCell* cell = (AppCell *)aCell;


    [cell setEditable:NO];


    cell.title = [[tableDataSource objectAtIndex:row] objectForKey:@"name"];


    cell.subtitle = [[tableDataSource objectAtIndex:row] objectForKey:@"ID"];


    cell.image = [[tableDataSource objectAtIndex:row] objectForKey:@"icon"];


}
NSArray *paths = NSSearchPathForDirectoriesInDomains(NSApplicationSupportDirectory, NSUserDomainMask, YES);


NSString *appSupportPath = [paths objectAtIndex:0];


NSString *prefDir = [appSupportPath stringByAppendingPathComponent:@"info.yuriev.OnAppBehaviour"];
@implementation NSImage (PNGExport)


- (NSData *)PNGData


{


    [self lockFocus];


    NSBitmapImageRep *rep = [[NSBitmapImageRep alloc] initWithFocusedViewRect:NSMakeRect(0, 0, [self size].width, [self size].height)];


    [self unlockFocus];


    NSData *PNGData = [rep representationUsingType:NSPNGFileType properties:nil];


    [rep release];


    return PNGData;


}


@end
- (void)textDidChange:(NSNotification *)aNotification


{


    [NSObject cancelPreviousPerformRequestsWithTarget:self];


    [self performSelector:@selector(saveCurrentData) withObject:nil afterDelay:3.0];


    saved = NO;


}
If the user changes any data, then after 3 seconds it will automatically save. If during this period the user continues to edit the data, the previous save request is canceled and a new one is created. It is convenient to use a similar mechanism, for example, when searching (so that the search only works some time after the end of editing).
After saving, we inform the assistant that the data has changed: Our program can independently launch the assistant (if it is not running) and is able to add it to autoload. Launching is very simple (our helper is inside bundle):
NSString *observedObject = @"info.yuriev.OnAppBehaviourHelper";


NSDistributedNotificationCenter *center = [NSDistributedNotificationCenter defaultCenter];


[center postNotificationName:@"OABReloadScripts" object:observedObject userInfo:nil deliverImmediately:YES];
[[NSWorkspace sharedWorkspace] launchApplicationAtURL:[NSURL fileURLWithPath:helperPath] options:NSWorkspaceLaunchDefault configuration:nil error:NULL];
The LaunchServices framework is responsible for managing the elements of autostart programs (Login Items). It is written in C. We will make a convenient Objective-C wrapper for our tasks. Declare the LoginItems class: These are class methods. They are not tied to any object; they can be called simply [LoginItems addApplication: path]. The full implementation of these methods can be found in the source code. Here's how, for example, the add method is implemented: Here, in principle, our entire panel. Now the assistant ... he is very simple. Because the assistant should not be visible to the user, in the program description file we set the LSBackgroundOnly key in YES. This means that the program will not be displayed in the dock, in the Force Quit window, it will not display the menu, etc.
@interface LoginItems : NSObject


{


}


+ (void)addApplication:(NSString *)path;


+ (void)removeApplication:(NSString *)path;


+ (BOOL)findApplication:(NSString *)path;


@end
+ (void)addApplication:(NSString *)path


{


    LSSharedFileListRef loginItemsRef = LSSharedFileListCreate(NULL, kLSSharedFileListSessionLoginItems, NULL);


    if (loginItemsRef)


    {


        LSSharedFileListItemRef itemRef = LSSharedFileListInsertItemURL(loginItemsRef, kLSSharedFileListItemLast, NULL, NULL, (CFURLRef)[NSURL fileURLWithPath:path], NULL, NULL);


        if (itemRef) CFRelease(itemRef);


        CFRelease(loginItemsRef);


    }


}
The most important part of initializing the assistant is receiving messages from the panel that the settings have been changed (to reboot them), and receiving NSWorkspace messages about the status of programs: And the main method that AppleScript executes if the program and its action matches the settings: Here’s such a small project, but there are a lot of interesting things inside. I hope that this material will be useful to someone. I already got my benefit - the Dock is automatically hidden when the iOS Simulator is activated :).
NSNotificationCenter *notificationCenter = [[NSWorkspace sharedWorkspace] notificationCenter];


[notificationCenter addObserver:self selector:@selector(didLaunchApplication:) name:NSWorkspaceDidLaunchApplicationNotification object:nil];


[notificationCenter addObserver:self selector:@selector(didTerminateApplication:) name:NSWorkspaceDidTerminateApplicationNotification object:nil];


[notificationCenter addObserver:self selector:@selector(didHideApplication:) name:NSWorkspaceDidHideApplicationNotification object:nil];


[notificationCenter addObserver:self selector:@selector(didUnhideApplication:) name:NSWorkspaceDidUnhideApplicationNotification object:nil];


[notificationCenter addObserver:self selector:@selector(didActivateApplication:) name:NSWorkspaceDidActivateApplicationNotification object:nil];


[notificationCenter addObserver:self selector:@selector(didDeactivateApplication:) name:NSWorkspaceDidDeactivateApplicationNotification object:nil];


NSString *observedObject = @"info.yuriev.OnAppBehaviourHelper";


NSDistributedNotificationCenter *dNotificationCenter = [NSDistributedNotificationCenter defaultCenter];


[dNotificationCenter addObserver: self selector: @selector(loadPreferences:) name:@"OABReloadScripts" object:observedObject];
- (void)preformScriptOnApp:(NSRunningApplication *)app forKey:(NSString *)key


{


    if ((!app) || (![app bundleIdentifier])) return;


    NSString *bundleID = [app bundleIdentifier];


    for (int i = 0; i < [preferences count]; i++)


    {


        if ([[[preferences objectAtIndex:i] objectForKey:@"ID"] isEqualToString:bundleID])


        {


            NSString *script = [[preferences objectAtIndex:i] objectForKey:key];


            if (script && ([script length] > 0))


            {


                NSAppleScript *AScript = [[NSAppleScript alloc] initWithSource:script];


                [AScript executeAndReturnError:NULL];


                [AScript release];


            }


            break;


        }


    }


}