Localization in Silverlight
Localization once comes to your international home. Whatever you build - a large skyscraper or Uncle Tom's hut - you must be able to speak the language of the inhabitants of this house.
If your Silverlight house needs localization, you are welcome, I will try to give some paint and a brush, and draw the posters yourself.
There are no problems in using resources for developing a desktop application, it has long been possible to create ResX files and use secondary (satellite) assemblies for a particular language. Silverlight inherited these functions, but unlike desktop applications, you must remember that by increasing the number of localized resources you increase the assembly size. So it turns out that the user is waiting for downloads, and he does not need part of the downloaded information at all. On the other hand, I'm talking about the server, the larger the file, the greater the load on the server. Imagine, you need to fix the resources, which means that you need to once again collect and lay out the complete assembly and users will download it again, because it will not work to pull from the cache. And the resources would lie separately, changed everything.
Summarize: any extra build resource requires extra time of the user, server, developer.
There are general approaches that I use in my decision and with which I would like to introduce you.
Creating a resource is simple, but still briefly about it:
- add a new item from the context menu on the desired folder in Solution Explorer (Add -> New Item);
- select the General tab;
- select the element Resources Files (or look in the full list for an element with that name);
- enter the name - ProjectResources;
- click add (or just press Enter).
A resource was created in the desired folder. Open the resource file designer by double-clicking on the file in Solution Explorer. In the grid that appears, in the first column we write the name of our resource - “Message”, in the next column we enter the value - “Hello World!”.
Sure!do not forget to make our Public resource, for which, in the “Access Modifier”, change the Internal state to Public.
On this, the creation of the main (neutral) resource ends and we can move on to the next part of the Merlezonsky Ballet - the creation of a provider for the resources. This approach has already been mentioned in the topic Programming Reversi on Silverlight and consists in creating a class with a set of properties that are resources.
Used in markup it is like this:
Moreover, if you need to use this provider for the entire application, you simply define it at the Application level, that is, in App.xaml.
The main resource is ready, the provider is, now we need to expand the resource with additional languages.
For those who asked “How?”:
- call the context menu on the desired folder in Solution Explorer (Add -> New Item);
- select the General tab;
- create Resources Files with the name of the main resource (in our case ProjectResources);
- at the end add the name of the desired culture - ProjectResources.ru-Ru.resx;
- click Add.
A file with the desired name will be created. We open the resource in the designer, in the first column we write the name coinciding with the base resource, in our case it is “Message”, the second column we fill in with the translated value - “Hello World!”.
I didn’t come up with anything new; in fact, with my post I described two documents:
For those who carefully read the first (or have already encountered it), from the above documents, I’ll say that I specially kept silent about adding a special section to the xml project, which defines the list of language assemblies required to be included in the compiled xap file. If you add this section, then you will not get away from the problem with which I started the story - from the use of extra resources.
The method that I developed, unfortunately, is not suitable for those who want to enable support for lazy (lazy) resource loading in one state of the checkbox. Oh, how I twisted it. In short - you have to work hard to drain the pond and get to the desired fish.
First, download the latest version of the ResourceExtension library from codeplex and add it to the references to the Silverlight project.
Creating resources does not differ from the above, so I will omit it. The only resource required is to add a pre-build event. We call the Silverlight properties of the project. Open the Build Events tab. In the Pre-build, add:
This action automatically replaces the ResourceManager class with the ResourceXManager implemented in the ResourceExtension library in all project resources.
Unfortunately, this code does not work without an additional section.False in the project file. Add this code to the section.
Markup has not undergone any changes, everything remains in place.
But the provider has changed, now it is the heir of the CultureResourceProvider class and acquired metadata on the properties:
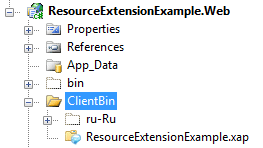
The final chord. We collect. Turn on the checkbox to view all the files and find the bin \ Debug \ ru-RU folder, which we must move to the ClientBin folder and put it next to the xap file.
And, “easy turning into elegant shorts”:
Allows you to conveniently download resources with Russian locale.
If you didn’t succeed. You can download an example and see how everything is implemented there.
The component is in the alpha stage, so no claims, you use it at your own risk.
In this implementation, only strings resources work.
Why was this approach chosen? What's inside? How does it work? I will try to talk about this in the second article, “Silverlight Resource Extension. Part 2. Descriptive ”, which I plan to finish in the foreseeable future.
If your Silverlight house needs localization, you are welcome, I will try to give some paint and a brush, and draw the posters yourself.
Problem.
There are no problems in using resources for developing a desktop application, it has long been possible to create ResX files and use secondary (satellite) assemblies for a particular language. Silverlight inherited these functions, but unlike desktop applications, you must remember that by increasing the number of localized resources you increase the assembly size. So it turns out that the user is waiting for downloads, and he does not need part of the downloaded information at all. On the other hand, I'm talking about the server, the larger the file, the greater the load on the server. Imagine, you need to fix the resources, which means that you need to once again collect and lay out the complete assembly and users will download it again, because it will not work to pull from the cache. And the resources would lie separately, changed everything.
Summarize: any extra build resource requires extra time of the user, server, developer.
Overview
There are general approaches that I use in my decision and with which I would like to introduce you.
Creating a resource is simple, but still briefly about it:
- add a new item from the context menu on the desired folder in Solution Explorer (Add -> New Item);
- select the General tab;
- select the element Resources Files (or look in the full list for an element with that name);
- enter the name - ProjectResources;
- click add (or just press Enter).
A resource was created in the desired folder. Open the resource file designer by double-clicking on the file in Solution Explorer. In the grid that appears, in the first column we write the name of our resource - “Message”, in the next column we enter the value - “Hello World!”.
Sure!do not forget to make our Public resource, for which, in the “Access Modifier”, change the Internal state to Public.
On this, the creation of the main (neutral) resource ends and we can move on to the next part of the Merlezonsky Ballet - the creation of a provider for the resources. This approach has already been mentioned in the topic Programming Reversi on Silverlight and consists in creating a class with a set of properties that are resources.
- public class ResProvider : INotifyPropertyChanged
- {
- static ProjectResources resources = new ProjectResources();
-
- public ProjectResources ProjectResources
- {
- get
- {
- return resources;
- }
- }
-
- #region INotifyPropertyChanged Members
- // Implemention of interface.
- #endregion
- }
* This source code was highlighted with Source Code Highlighter.Used in markup it is like this:
-
-
-
-
-
-
* This source code was highlighted with Source Code Highlighter.Moreover, if you need to use this provider for the entire application, you simply define it at the Application level, that is, in App.xaml.
The main resource is ready, the provider is, now we need to expand the resource with additional languages.
For those who asked “How?”:
- call the context menu on the desired folder in Solution Explorer (Add -> New Item);
- select the General tab;
- create Resources Files with the name of the main resource (in our case ProjectResources);
- at the end add the name of the desired culture - ProjectResources.ru-Ru.resx;
- click Add.
A file with the desired name will be created. We open the resource in the designer, in the first column we write the name coinciding with the base resource, in our case it is “Message”, the second column we fill in with the translated value - “Hello World!”.
I didn’t come up with anything new; in fact, with my post I described two documents:
For those who carefully read the first (or have already encountered it), from the above documents, I’ll say that I specially kept silent about adding a special section to the xml project
Decision
The method that I developed, unfortunately, is not suitable for those who want to enable support for lazy (lazy) resource loading in one state of the checkbox. Oh, how I twisted it. In short - you have to work hard to drain the pond and get to the desired fish.
First, download the latest version of the ResourceExtension library from codeplex and add it to the references to the Silverlight project.
Creating resources does not differ from the above, so I will omit it. The only resource required is to add a pre-build event. We call the Silverlight properties of the project. Open the Build Events tab. In the Pre-build, add:
@ECHO off

DEL "$(TargetPath)"

FOR /F "delims=" %%i IN ('findstr /M /L /S /C:"global::System.Resources.ResourceManager temp = new global::System.Resources.ResourceManager" "$(ProjectDir)*.Designer.cs"') DO (

DEL resource.gen

  FOR /F "usebackq delims=" %%j IN ("%%i") DO (

    ECHO. %%j > resourcecurrentrow.gen

    FOR /F "tokens=1,2* delims=(=" %%k IN (resourcecurrentrow.gen) DO (

      IF "%%l" == " new global::System.Resources.ResourceManager" (ECHO %%k = new ResourceExtension.ResourceXManager(%%m)>>resource.gen ELSE (ECHO. %%j) >>resource.gen

      ))

XCOPY resource.gen "%%i" /Q /Y /R /K

)


* This source code was highlighted with Source Code Highlighter.
This action automatically replaces the ResourceManager class with the ResourceXManager implemented in the ResourceExtension library in all project resources.
Unfortunately, this code does not work without an additional section.
Markup has not undergone any changes, everything remains in place.
But the provider has changed, now it is the heir of the CultureResourceProvider class and acquired metadata on the properties:
- using ResourceExtension;
- using ResourceExtension.Implementation;
-
- namespace ResourceExtensionExample.Resources
- {
- public class ResProvider: CultureResourcesProvider
- {
- private static ProjectResources projectResources = new ProjectResources();
-
- [ResourceProperty]
- public ProjectResources ProjectResources
- {
- get { return projectResources; }
- }
- }
- }
* This source code was highlighted with Source Code Highlighter.The final chord. We collect. Turn on the checkbox to view all the files and find the bin \ Debug \ ru-RU folder, which we must move to the ClientBin folder and put it next to the xap file.
And, “easy turning into elegant shorts”:
- public partial class MainPage : UserControl
- {
- public MainPage()
- {
- InitializeComponent();
- }
-
- private void Switch_Click(object sender, RoutedEventArgs e)
- {
- ((ResProvider) Resources["ResProvider"]).Options.CultureInfo = new CultureInfo("ru-Ru");
- }
- }
* This source code was highlighted with Source Code Highlighter.Allows you to conveniently download resources with Russian locale.
If you didn’t succeed. You can download an example and see how everything is implemented there.
The component is in the alpha stage, so no claims, you use it at your own risk.
In this implementation, only strings resources work.
Why was this approach chosen? What's inside? How does it work? I will try to talk about this in the second article, “Silverlight Resource Extension. Part 2. Descriptive ”, which I plan to finish in the foreseeable future.