Letters from social networks: is your privacy good enough? Two problems and their solution
- Tutorial
When using social networks, there are various problems that go beyond the scope of this article. But there are two problems that are usually forgotten. Social networks periodically send their users letters about recent events: friends' posts, replies, likes, private messages, etc. These two letters are connected with these letters.

Firstly, the letter can be read by someone else. Let's say you took part in the discussion, and today a new utterance has appeared in it. Or someone gave you confidential information. And the social network sent you an e-mail letter with the message text. Or you requested a link to reset your forgotten password (or an attacker requested it). A letter along the way to you will go through different nodes of the world wide network, and anyone who has access to any of these nodes can read it.
Secondly, an attacker can send you a letter simulating a letter from a social network (for example, to prompt you to enter your password to a social network on a fraudulent website or send money as if to a friend). Yes, looking at the letter more closely, you can understand that it is not real; but do you carefully examine any emails you receive?
Now imagine that the social network sends you its letters encrypted, and on your computer they are automatically decrypted: you read these letters, and no one else can read them. Imagine also that the social network signs its letters to you, and when you open the signed letter, you see a short notice above the text, a real signature, or a fake one. Wouldn't that be great? As for the availability of such functionality in different social networks, I have three news for you. Bad news: Habr has no such functionality. Another bad news: most social networks do not have this functionality either. And finally, the good news: one of the social networks has such functionality; this social network is facebook.
Next, I explain how to take advantage of these great features. The text is written so as to be understandable even to inexperienced users; knowledge of foreign languages is not required. Yes, I know that Habr’s audience is not like that; The article is addressed not so much to the Khabrovsk citizens as to their friends and acquaintances. (Note for very inexperienced users. The word “browser” is mentioned several times. This is the name of the program for viewing sites, including the program in which you are reading this article.)
My preferred email program is Mozilla Thunderbird . Next, I'm based on the assumption that you use it too. You need to install a Thunderbird add-on called Enigmail. Do not worry: nothing complicated.
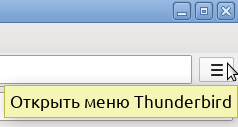 Note. Next, I list the actions using the menu bar. The same functions are available by pressing the button with three dashes, located just below the upper right corner of the window. Experienced users can easily figure it out. But if you are an inexperienced user, and the menu bar is turned off, then I advise you to enable it. To do this, press the mentioned button, then “Settings”, then “Menu bar”.
 Go to Enigmail’s website (do not pay attention to the English language of the site - if Thunderbird is in Russian, then Enigmail will also be in Russian). On the page you will see a clearly visible link "Download Enigmail Now".
 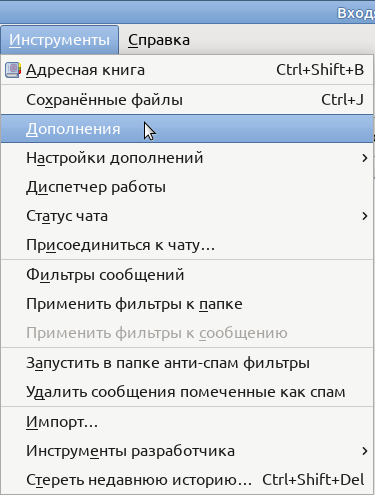 Click on it with the right mouse button; in the menu that opens, left-click on the command “Save object as ...” (or, depending on the browser you use, “Save link as ...” or something similar; in both cases without quotes) and download the file without changing its name (remember where you downloaded it). You no longer need to go to the Enigmail website (unless to broaden your horizons).
If you suspect that I am trying to slip a virus into you, then check the downloaded file with fifteen antiviruses. And if you understand in English, then for complete confidence you can check the file of fifty antiviruses .
Switch to Thunderbird. Open the "Tools" menu, and in it select the "Add-ons" item.
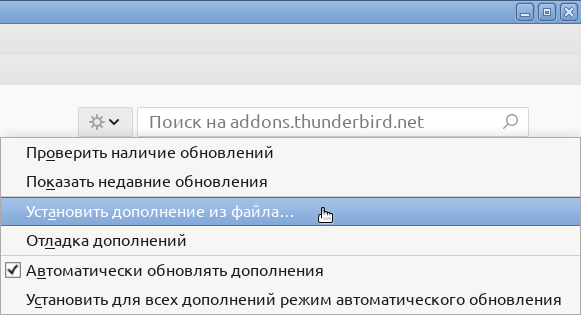 In the tab that opens, click on the button with the wheel, in the menu that opens, select the option "Install add-on from file ...". Point to the file you downloaded (just in case, let me remind you that the file name starts with enigmail- , the extension .xpi ). A prompt will be displayed; in the request window, click on the "Install Now" button.
One more appears in the list of installed add-ons, and the title of another menu appears in the menu bar. Close the Add-ons Management tab.

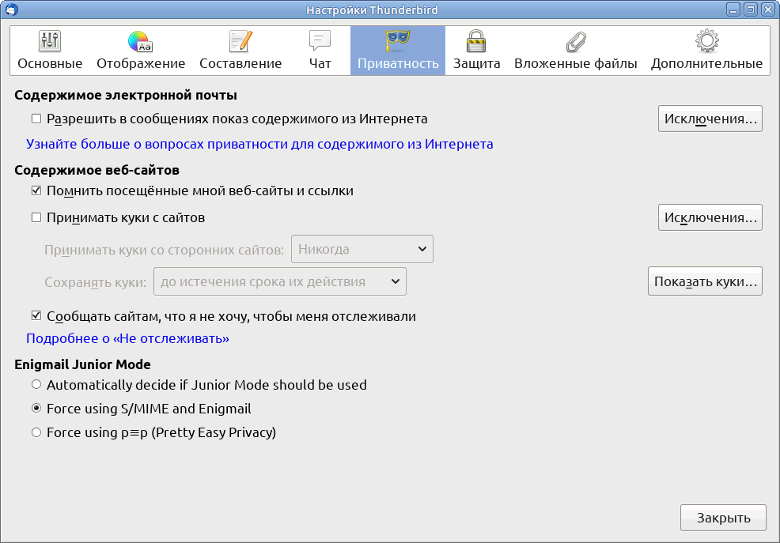
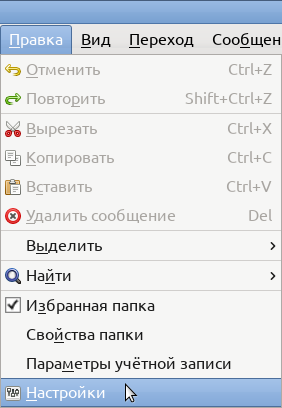 Open the "Edit" menu, and in it select the "Settings" item. In the "Thunderbird Settings" window that opens, go to the "Privacy" tab.
Make sure that the “Allow display of content from the Internet in messages” section is disabled in the “Email Content” section: if there is no checkmark in the corresponding box, then leave it and if so, remove it.
In the Enigmail Junior Mode section, select Force using S / MIME and Enigmail (the name of the Enigmail / p≡p menu will change to Enigmail).
Click the Close button at the bottom of the Thunderbird Settings window. Close Thunderbird, wait a few seconds, and start it again.

Open the Enigmail menu, and in it select the Key Manager item.
The Enigmail Key Management window opens (do not close it until I tell you to do this).
Open the "View" menu and make sure that the "Show keys to other people" item is not checked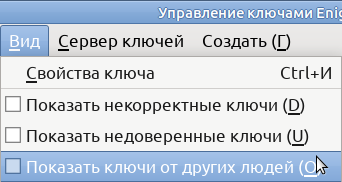 (and if checked, click on it to clear the checkmark).
Your keys may have been created automatically when you installed Enigmail; If you see your name and email address in the “Name” column, skip the “Creating keys” section.
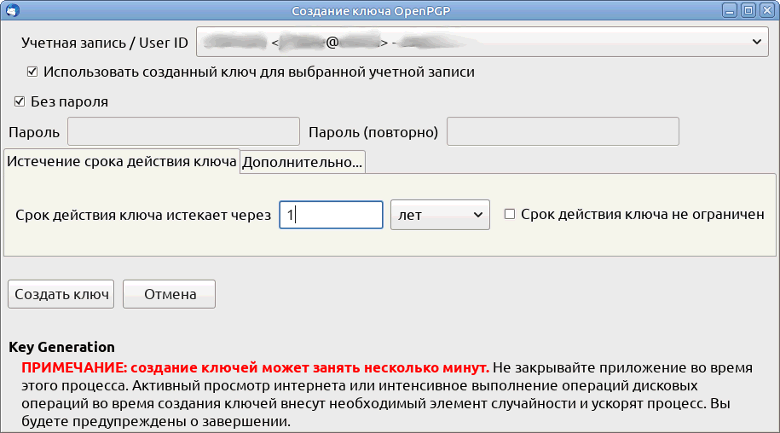
 To create keys, open the "Create" menu, in it select "New key pair". The "Create OpenPGP Key" window opens.
Put a checkmark in front of the words “No password”, and after the words “The key expires in”, correct “5” to “1”. Carefully read the text at the bottom of the window and click on the "Create Key" button.
Do other things; after the key creation is complete, return to the Enigmail Key Management window (the OpenPGP Key Creation window will close by then).
So, you have a pair of keys. Yes, there are two of them: a private key (English private key ) and a public key (English public key ). I believe that you understand the meaning of the words “private conversation” and “public statement”: the contents of a private conversation should not be known to outsiders,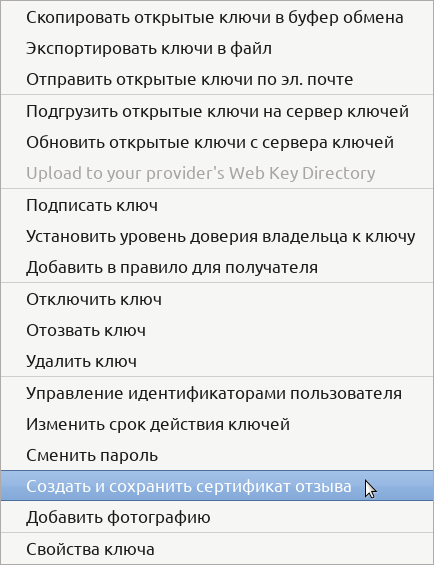 but the contents of a public statement should become known to a wide circle of people. The difference between the private key and the public key is the same: the private key should be hidden and not shown to anyone, and the public key can be published (these words are not coincidentally derived). A private key is also called a private or secret key, and a public key is called a public key.
Right-click your key pair, in the menu that opens, left-click the command "Create and save certificate of revocation." Choose a place to save (it makes sense to change the proposed file name to a more self-evident one for you; for example, revoke-key.txt ) and click "Save". A message will be displayed in English;

here is his translation: “The certificate of revocation has been successfully created. You can use it to invalidate your public key; for example, if you lost your secret key. "
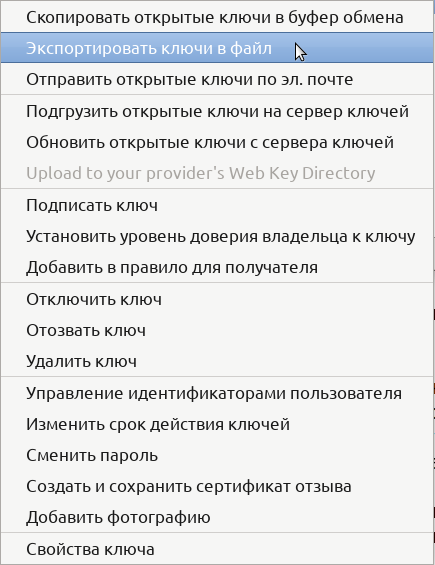
Right-click again your key pair, in the menu that opens, left-click the "Export keys to file" command.
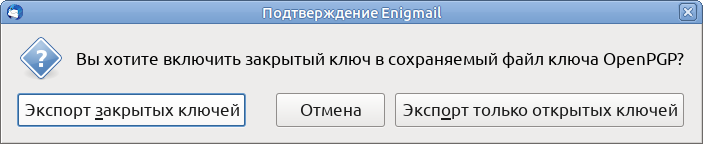
A small window opens asking “Do you want to include the private key in the saved OpenPGP key file?”
Click in the window "Export Private Keys";
select a place to save (here you can also change the proposed file name to a more self-evident one for you; for example, private-key.txt ) and click "Save".
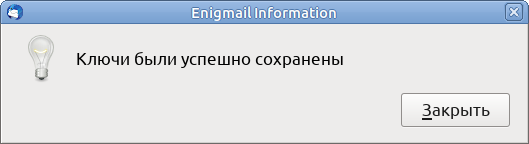 The message “Keys were saved successfully” will be displayed; click the Close button in it.
Hide the two files you just saved somewhere where you can easily find them, and someone else is unlikely. For example, if in the depths of your desk or cabinet you have a flash drive that you don’t carry anywhere and on which you store important sensitive files, then move these two files to this flash drive (if you do not already have such a flash drive, then it will be useful to have it).
Right-click again your key pair, in the menu that opens, left-click the "Export keys to file" command again. But this time, click the "Export only public keys" button; choose a place to save (here you can also change the proposed file name to a more self-evident one for you; for example, public-key.txt ) and click "Save". The message “Keys were saved successfully” will be displayed; click the Close button in it. Unlike the previous two, this file is not required to be hidden.
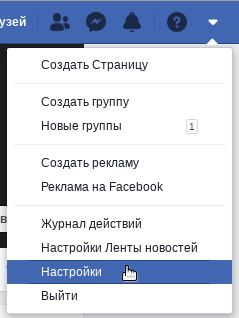
So, the climax. Switch to the browser and go to Facebook . At the top of the page on the right you see several icons. Click on the far right of them, which looks like a small triangle pointing down. Move the pointer down and press the line with the word “Settings”.
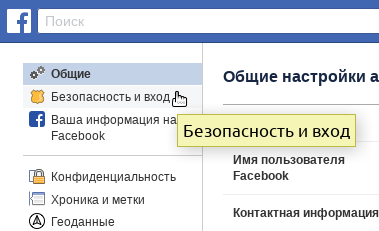 On the next page is a table of contents on the left; Click the "Security and Login" line. Scroll to the end of the next page; at the very bottom of the page is the Advanced Settings group, in it click on the line “Encrypted Notifications Emails”.
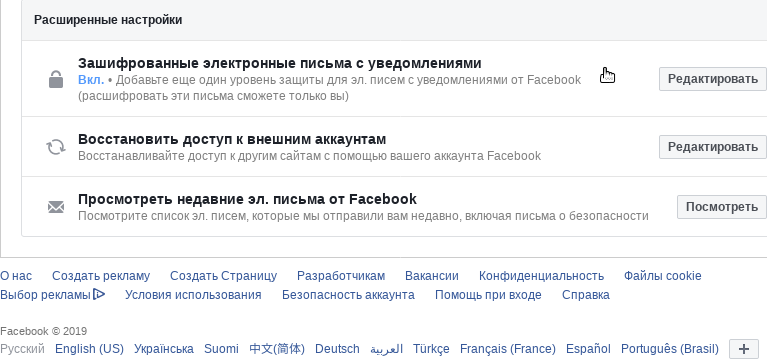
An input field will appear. At the bottom of the page, above the “Save Changes” button, is the phrase “You can download the Facebook public key here”, in which the word “here” is a link; right-click on this link, then left-click on the “Copy Link” command (or, depending on the browser you use, “Copy Link Address” or similar).

 Switch to the Enigmail Key Management window.
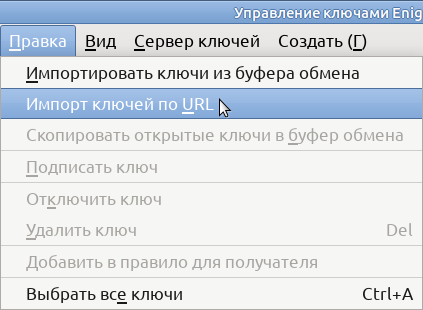
Open the "Edit" menu and select "Import keys by URL".
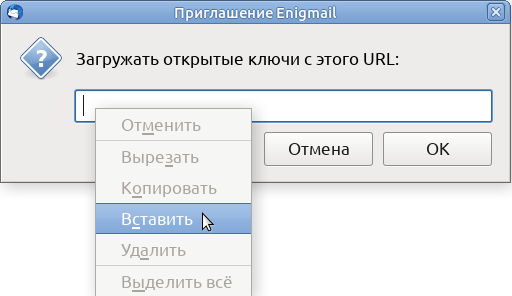
In the prompt that appears, right-click in the input field, then left-click the "Paste" command.
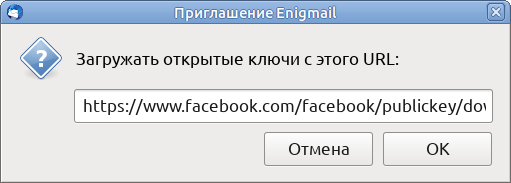
Click OK.
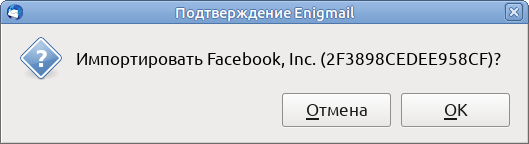
Click OK.
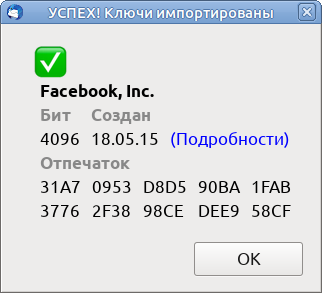
Click OK.
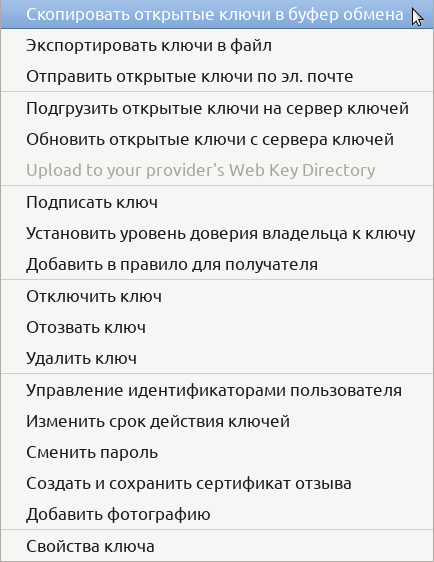
Again, right-click your key pair, in the menu that opens, left-click the "Copy public keys to clipboard" command.
Close the Enigmail Key Management window and switch to the browser.
Right-click in the input field, then select the "Paste" command. Scroll down the page; make sure that the check mark is next to the words “Use this public key to encrypt notifications that Facebook sends to your email. address? ”(if it’s not there, put it). Click the “Save Changes” button.

Soon, Facebook will send you a letter; above the text of the letter you will see: “Decrypted message; Good signature from Facebook, Inc.. ”

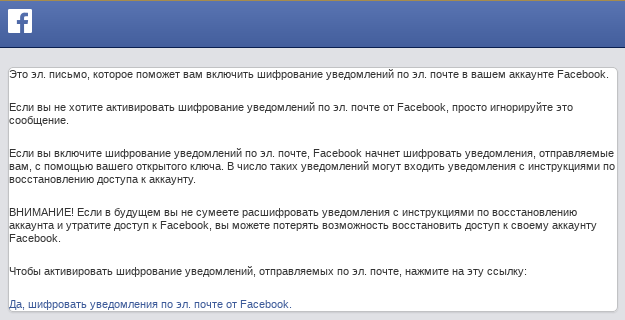
Read the letter carefully. If you have not changed your mind, click on the link “Yes, encrypt notifications by email. email from Facebook. ” Now, letters will be sent to you by Facebook with your private key and encrypted with your public key.
I have one more good news for you: not only Facebook can sign and encrypt letters. Any of your friends can send you a letter signed with his private key and encrypted with your public key - of course, if he has Enigmail (or another program with such functionality) and your public key; only you can read this letter. In the same way, you can send someone a letter signed with your private key and encrypted with his public key. About this - in the second part of the article.
The second part has not yet been written. In order not to miss it, it makes sense for you to subscribe to me (if you are registered on Habré). It will also be useful to tell your friends about this article.
Firstly, the letter can be read by someone else. Let's say you took part in the discussion, and today a new utterance has appeared in it. Or someone gave you confidential information. And the social network sent you an e-mail letter with the message text. Or you requested a link to reset your forgotten password (or an attacker requested it). A letter along the way to you will go through different nodes of the world wide network, and anyone who has access to any of these nodes can read it.
Secondly, an attacker can send you a letter simulating a letter from a social network (for example, to prompt you to enter your password to a social network on a fraudulent website or send money as if to a friend). Yes, looking at the letter more closely, you can understand that it is not real; but do you carefully examine any emails you receive?
Now imagine that the social network sends you its letters encrypted, and on your computer they are automatically decrypted: you read these letters, and no one else can read them. Imagine also that the social network signs its letters to you, and when you open the signed letter, you see a short notice above the text, a real signature, or a fake one. Wouldn't that be great? As for the availability of such functionality in different social networks, I have three news for you. Bad news: Habr has no such functionality. Another bad news: most social networks do not have this functionality either. And finally, the good news: one of the social networks has such functionality; this social network is facebook.
Next, I explain how to take advantage of these great features. The text is written so as to be understandable even to inexperienced users; knowledge of foreign languages is not required. Yes, I know that Habr’s audience is not like that; The article is addressed not so much to the Khabrovsk citizens as to their friends and acquaintances. (Note for very inexperienced users. The word “browser” is mentioned several times. This is the name of the program for viewing sites, including the program in which you are reading this article.)
My preferred email program is Mozilla Thunderbird . Next, I'm based on the assumption that you use it too. You need to install a Thunderbird add-on called Enigmail. Do not worry: nothing complicated.
Note. Next, I list the actions using the menu bar. The same functions are available by pressing the button with three dashes, located just below the upper right corner of the window. Experienced users can easily figure it out. But if you are an inexperienced user, and the menu bar is turned off, then I advise you to enable it. To do this, press the mentioned button, then “Settings”, then “Menu bar”.Install Enigmail
Go to Enigmail’s website (do not pay attention to the English language of the site - if Thunderbird is in Russian, then Enigmail will also be in Russian). On the page you will see a clearly visible link "Download Enigmail Now". Click on it with the right mouse button; in the menu that opens, left-click on the command “Save object as ...” (or, depending on the browser you use, “Save link as ...” or something similar; in both cases without quotes) and download the file without changing its name (remember where you downloaded it). You no longer need to go to the Enigmail website (unless to broaden your horizons). If you suspect that I am trying to slip a virus into you, then check the downloaded file with fifteen antiviruses. And if you understand in English, then for complete confidence you can check the file of fifty antiviruses .
Switch to Thunderbird. Open the "Tools" menu, and in it select the "Add-ons" item.
In the tab that opens, click on the button with the wheel, in the menu that opens, select the option "Install add-on from file ...". Point to the file you downloaded (just in case, let me remind you that the file name starts with enigmail- , the extension .xpi ). A prompt will be displayed; in the request window, click on the "Install Now" button. One more appears in the list of installed add-ons, and the title of another menu appears in the menu bar. Close the Add-ons Management tab.
Open the "Edit" menu, and in it select the "Settings" item. In the "Thunderbird Settings" window that opens, go to the "Privacy" tab. Make sure that the “Allow display of content from the Internet in messages” section is disabled in the “Email Content” section: if there is no checkmark in the corresponding box, then leave it and if so, remove it.
In the Enigmail Junior Mode section, select Force using S / MIME and Enigmail (the name of the Enigmail / p≡p menu will change to Enigmail).
Click the Close button at the bottom of the Thunderbird Settings window. Close Thunderbird, wait a few seconds, and start it again.
The keys
Open the Enigmail menu, and in it select the Key Manager item.
The Enigmail Key Management window opens (do not close it until I tell you to do this).
Open the "View" menu and make sure that the "Show keys to other people" item is not checked
(and if checked, click on it to clear the checkmark). Your keys may have been created automatically when you installed Enigmail; If you see your name and email address in the “Name” column, skip the “Creating keys” section.
Key Creation
To create keys, open the "Create" menu, in it select "New key pair". The "Create OpenPGP Key" window opens. Put a checkmark in front of the words “No password”, and after the words “The key expires in”, correct “5” to “1”. Carefully read the text at the bottom of the window and click on the "Create Key" button.
Do other things; after the key creation is complete, return to the Enigmail Key Management window (the OpenPGP Key Creation window will close by then).
Private and public keys
So, you have a pair of keys. Yes, there are two of them: a private key (English private key ) and a public key (English public key ). I believe that you understand the meaning of the words “private conversation” and “public statement”: the contents of a private conversation should not be known to outsiders,
but the contents of a public statement should become known to a wide circle of people. The difference between the private key and the public key is the same: the private key should be hidden and not shown to anyone, and the public key can be published (these words are not coincidentally derived). A private key is also called a private or secret key, and a public key is called a public key.Key usage
Right-click your key pair, in the menu that opens, left-click the command "Create and save certificate of revocation." Choose a place to save (it makes sense to change the proposed file name to a more self-evident one for you; for example, revoke-key.txt ) and click "Save". A message will be displayed in English;
here is his translation: “The certificate of revocation has been successfully created. You can use it to invalidate your public key; for example, if you lost your secret key. "
Right-click again your key pair, in the menu that opens, left-click the "Export keys to file" command.
A small window opens asking “Do you want to include the private key in the saved OpenPGP key file?”
Click in the window "Export Private Keys";
select a place to save (here you can also change the proposed file name to a more self-evident one for you; for example, private-key.txt ) and click "Save".
The message “Keys were saved successfully” will be displayed; click the Close button in it. Hide the two files you just saved somewhere where you can easily find them, and someone else is unlikely. For example, if in the depths of your desk or cabinet you have a flash drive that you don’t carry anywhere and on which you store important sensitive files, then move these two files to this flash drive (if you do not already have such a flash drive, then it will be useful to have it).
Right-click again your key pair, in the menu that opens, left-click the "Export keys to file" command again. But this time, click the "Export only public keys" button; choose a place to save (here you can also change the proposed file name to a more self-evident one for you; for example, public-key.txt ) and click "Save". The message “Keys were saved successfully” will be displayed; click the Close button in it. Unlike the previous two, this file is not required to be hidden.
Setting up emails from Facebook
So, the climax. Switch to the browser and go to Facebook . At the top of the page on the right you see several icons. Click on the far right of them, which looks like a small triangle pointing down. Move the pointer down and press the line with the word “Settings”.
On the next page is a table of contents on the left; Click the "Security and Login" line. Scroll to the end of the next page; at the very bottom of the page is the Advanced Settings group, in it click on the line “Encrypted Notifications Emails”.An input field will appear. At the bottom of the page, above the “Save Changes” button, is the phrase “You can download the Facebook public key here”, in which the word “here” is a link; right-click on this link, then left-click on the “Copy Link” command (or, depending on the browser you use, “Copy Link Address” or similar).
Switch to the Enigmail Key Management window. Open the "Edit" menu and select "Import keys by URL".
In the prompt that appears, right-click in the input field, then left-click the "Paste" command.
Click OK.
Click OK.
Click OK.
Again, right-click your key pair, in the menu that opens, left-click the "Copy public keys to clipboard" command.
Close the Enigmail Key Management window and switch to the browser.
Right-click in the input field, then select the "Paste" command. Scroll down the page; make sure that the check mark is next to the words “Use this public key to encrypt notifications that Facebook sends to your email. address? ”(if it’s not there, put it). Click the “Save Changes” button.
Soon, Facebook will send you a letter; above the text of the letter you will see: “Decrypted message; Good signature from Facebook, Inc.. ”
Read the letter carefully. If you have not changed your mind, click on the link “Yes, encrypt notifications by email. email from Facebook. ” Now, letters will be sent to you by Facebook with your private key and encrypted with your public key.
To be continued
I have one more good news for you: not only Facebook can sign and encrypt letters. Any of your friends can send you a letter signed with his private key and encrypted with your public key - of course, if he has Enigmail (or another program with such functionality) and your public key; only you can read this letter. In the same way, you can send someone a letter signed with your private key and encrypted with his public key. About this - in the second part of the article.
The second part has not yet been written. In order not to miss it, it makes sense for you to subscribe to me (if you are registered on Habré). It will also be useful to tell your friends about this article.