Manage the local administrator password using LAPS
One of the most common problems that almost every system administrator faces is managing local administrator passwords.
There are several options for solving this problem:
One such system is LAPS, the installation and configuration of which we will discuss in this article.

LAPS stands for Local Administrator Password Solution and is the successor to the AdmPwd solution, which was acquired by Microsoft and renamed LAPS. LAPS is free and does not require additional infrastructure costs, as it uses Active Directory as a database. Support is available through Microsoft Premier Support Services.
Product official page.
The author of the original AdmPwd has developed a new product, AdmPwd.E, but the free version is limited to 20 PCs, so it’s not suitable for everyone. The official site .
LAPS comes with extensive documentation (in English only) and generally leaves the impression of an extremely thoughtful and reliable solution.
The system consists of the following components:
The agent is called each time Group Policy is updated and performs the following tasks:
The password can be read by administrators and also marked as requiring replacement the next time the policy is updated.
The full LAPS operation diagram is shown in the following image.

First, install the LAPS controls on the computer from which we will configure.
Launch the msi package and install all the Managemnt Tools, which include the LAPS UI, PowerShell module and Group Policy Templates.

If you have set up a centralized repository for group policy templates, then immediately transfer the files "Admpwd.admx" and "En-us \ AdmPwd.adml" from "% SystemRoot% \ PolicyDefinitions" to "\\ contoso.com \ SYSVOL \ contoso.com \ policies \ PolicyDefinitions ".
The next step is to add new attributes to the AD schema. To do this, open the PowerShell console on behalf of an account with “Schema Admin” rights and first import the module with the “Import-module AdmPwd.PS” command and then update the scheme with the “Update-AdmPwdADSchema” command.


Then you need to make sure that only administrators have access to the newly created attributes. This is necessary because the passwords are stored in AD in the clear, and access to them is regulated by the AD ACL. To do this, use the command “Find-AdmPwdExtendedrights -identity| Format-Table. "

This command returns a list of accounts / groups that will have access to passwords stored in AD. If you find “redundant” accounts / groups, then use the ADSIEdit utility to correctly configure access rights. Make sure that the “All extended rights” permission is not checked for groups that should not have access to passwords.

If you want to give access to passwords to additional groups or accounts, use the command "Set-AdmPwdReadPasswordPermission -OrgUnit-AllowedPrincipals <Users or Groups>. "
Access rights to force the change of an unexpired password during the next group policy update are issued with the following command: "Set-AdmPwdResetPasswordPermission -Identity-AllowedPrincipals <Users or groups> »


Then you need to give rights to the computers themselves to modify these attributes. To do this, use the command "Set-AdmPwdComputerSelfPermission -OrgUnit»

The next step is to configure Group Policy. We can control the complexity and expiration dates of passwords whose account name the password will change, as well as turn LAPS on and off.


The name of the account should be indicated only if it is a specially created account. If this is a built-in scientific account, then this parameter must be left in “Not configured” (even if the account is renamed), since the built-in account will be found by the well-known SID.

The next step is to install the Group Policy extension on the PC. This can be assigned to group policies, to SCCM, or to another application deployment tool. It should be noted that by default the msi package installs only the client part, so the deployment does not require passing additional parameters to the installer. A reboot of the PC is only required when deploying through group policies.
The easiest way to view your password is to use the LAPS UI. Enter the computer name in the appropriate field and click "Search". If we did everything correctly, then you will see the password in the corresponding field.

This article covered the basic steps for deploying LAPS. More information is available in the documentation that came with the product. LAPS also has a means of logging its actions, which was not discussed in this article, but described in the documentation.
There are several options for solving this problem:
- Use a single password on all computers. The password can be set either during the deployment using MDT or SCCM, or using the preferences of the group policies after the deployment. Usually, with this approach, the password never changes, which means it will leak sooner or later (when the administrator is fired or the user can peep the password), while the compromised password gives access to all PCs in the organization.
- One-time setting of a unique password on each PC. Usually occurs with a deploy. There are a lot of options - from manual generation of a random password and saving it in a password accounting system (Keepass, OnePassword, Excel), ending with automatic password generation according to an algorithm known to administrators, where the input is the name of the PC. Knowing the algorithm, the administrator can calculate the password on the spot and log in to any PC. Cons are approximately the same as in option 1: A fired administrator retains the ability to log on to any PC, but when a user compromises a password, he gets access to only one PC, and not to all at once.
- Using a system that will automatically generate random passwords for each PC and change them according to the established schedule. The disadvantages of the previous options are excluded here - the compromised password will be changed according to the schedule, and the dismissed administrator after some time will not be able to log into the PC even if he steals the password database valid at the time of dismissal.
One such system is LAPS, the installation and configuration of which we will discuss in this article.

LAPS
LAPS stands for Local Administrator Password Solution and is the successor to the AdmPwd solution, which was acquired by Microsoft and renamed LAPS. LAPS is free and does not require additional infrastructure costs, as it uses Active Directory as a database. Support is available through Microsoft Premier Support Services.
Product official page.
The author of the original AdmPwd has developed a new product, AdmPwd.E, but the free version is limited to 20 PCs, so it’s not suitable for everyone. The official site .
LAPS comes with extensive documentation (in English only) and generally leaves the impression of an extremely thoughtful and reliable solution.
Architecture
The system consists of the following components:
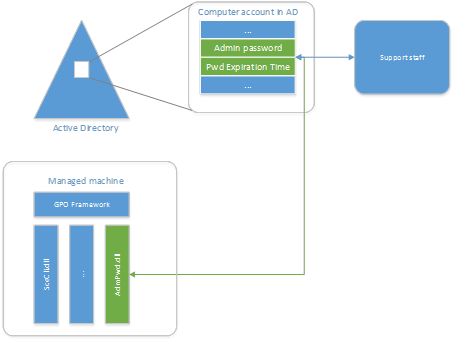
- Agent - Group Policy Extension installed on all managed PCs via MSI. It is responsible for generating the password and saving it in the corresponding AD object.
- PowerShell module. Used to configure LAPS.
- Active Directory Stores the password of the local administrator.
The agent is called each time Group Policy is updated and performs the following tasks:
- Checks if the local administrator password has expired
- Generates a new password if the current one has expired or is required to be replaced before the expiration date
- Changes the local administrator password
- Saves the password in the corresponding attribute of the AD object
- Stores password expiration date in the corresponding attribute of the AD object
The password can be read by administrators and also marked as requiring replacement the next time the policy is updated.
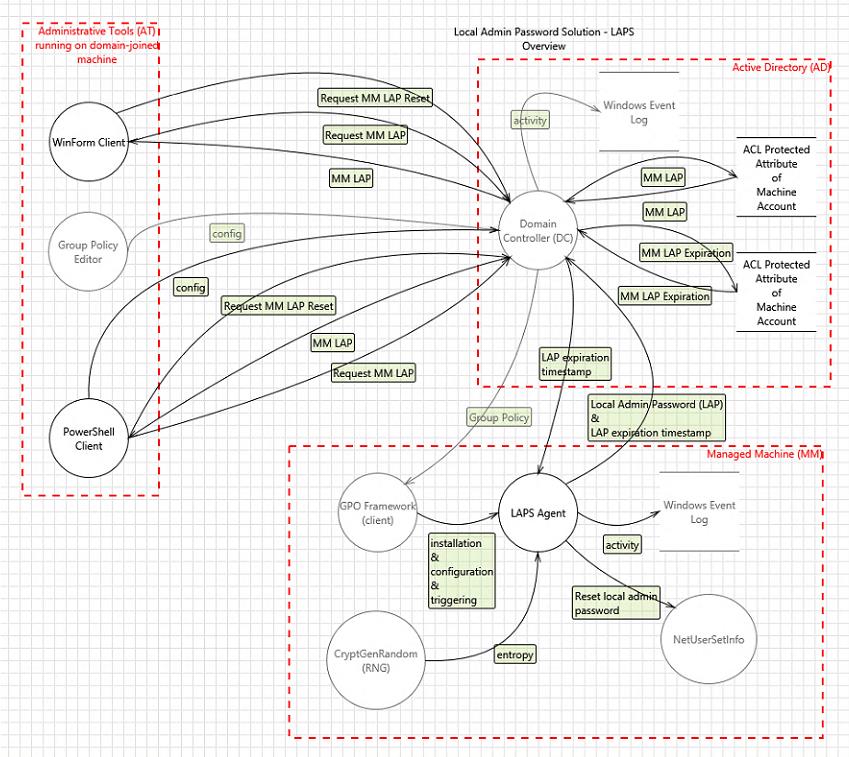
The full LAPS operation diagram is shown in the following image.

Install and configure LAPS
First, install the LAPS controls on the computer from which we will configure.
Launch the msi package and install all the Managemnt Tools, which include the LAPS UI, PowerShell module and Group Policy Templates.

If you have set up a centralized repository for group policy templates, then immediately transfer the files "Admpwd.admx" and "En-us \ AdmPwd.adml" from "% SystemRoot% \ PolicyDefinitions" to "\\ contoso.com \ SYSVOL \ contoso.com \ policies \ PolicyDefinitions ".
The next step is to add new attributes to the AD schema. To do this, open the PowerShell console on behalf of an account with “Schema Admin” rights and first import the module with the “Import-module AdmPwd.PS” command and then update the scheme with the “Update-AdmPwdADSchema” command.


Then you need to make sure that only administrators have access to the newly created attributes. This is necessary because the passwords are stored in AD in the clear, and access to them is regulated by the AD ACL. To do this, use the command “Find-AdmPwdExtendedrights -identity

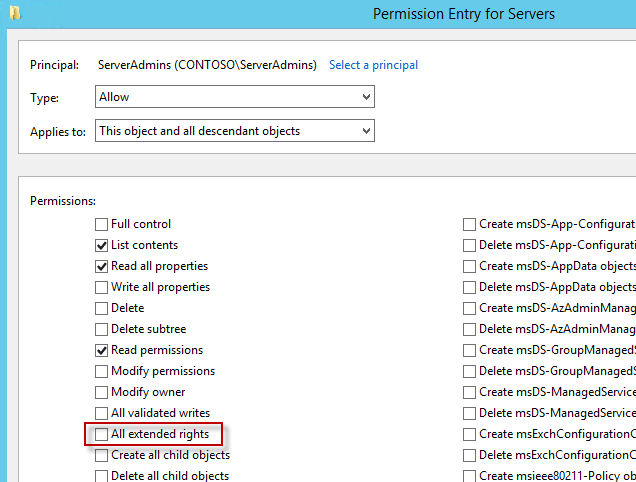
This command returns a list of accounts / groups that will have access to passwords stored in AD. If you find “redundant” accounts / groups, then use the ADSIEdit utility to correctly configure access rights. Make sure that the “All extended rights” permission is not checked for groups that should not have access to passwords.

If you want to give access to passwords to additional groups or accounts, use the command "Set-AdmPwdReadPasswordPermission -OrgUnit
Access rights to force the change of an unexpired password during the next group policy update are issued with the following command: "Set-AdmPwdResetPasswordPermission -Identity


Then you need to give rights to the computers themselves to modify these attributes. To do this, use the command "Set-AdmPwdComputerSelfPermission -OrgUnit

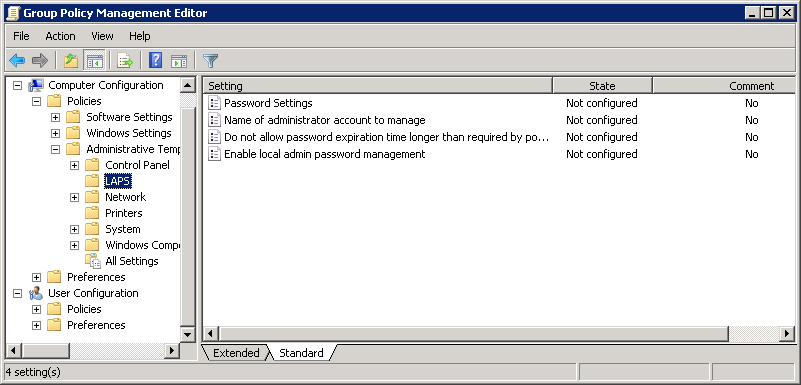
The next step is to configure Group Policy. We can control the complexity and expiration dates of passwords whose account name the password will change, as well as turn LAPS on and off.


The name of the account should be indicated only if it is a specially created account. If this is a built-in scientific account, then this parameter must be left in “Not configured” (even if the account is renamed), since the built-in account will be found by the well-known SID.

The next step is to install the Group Policy extension on the PC. This can be assigned to group policies, to SCCM, or to another application deployment tool. It should be noted that by default the msi package installs only the client part, so the deployment does not require passing additional parameters to the installer. A reboot of the PC is only required when deploying through group policies.
The easiest way to view your password is to use the LAPS UI. Enter the computer name in the appropriate field and click "Search". If we did everything correctly, then you will see the password in the corresponding field.

Conclusion
This article covered the basic steps for deploying LAPS. More information is available in the documentation that came with the product. LAPS also has a means of logging its actions, which was not discussed in this article, but described in the documentation.
