Postcard maze. A gift that cannot be opened without solving the puzzle
Once I brought a birthday friend a gift wrapped in paper with a maze pattern. A friend joked that it would be great if you really had to find a way to open a gift. We began to discuss how to build a mechanical labyrinth, without using any electronics.
So the idea was born for the next holiday to create a puzzle card. In this article I will tell you how to make it and what subtleties you need to consider.
Labyrinth in the process of passing.
The labyrinth is a multi-layer construction. The bottom layer is a dense cardboard base; the middle layer is the labyrinth itself, made up of matches glued to cardboard; top layer - thin plexiglass. Top glass is closed with a sheet of paper with windows at the start and finish. An opaque sheet makes passage difficult.

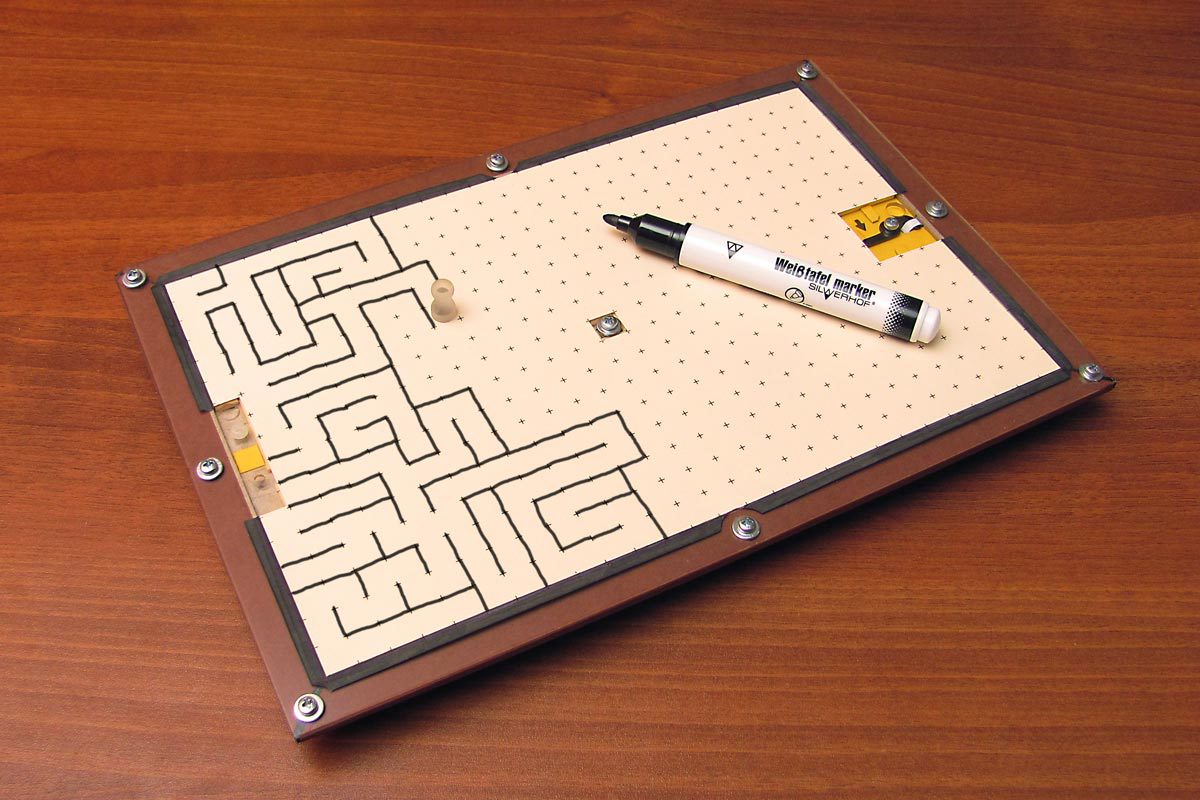
Labyrinth with the top layer removed.
A flat magnet is laid in the hole at the start. The task is to lead him through the maze blindly, moving another magnet on the surface. A player with a magnet in his hands feels well how the magnet moves inside: when it moves freely along the corridor, and when it rests against the wall. In the process of passing, the player gradually draws the structure of the maze on a piece of paper, step by step studying its passages, branches and dead ends.

At the finish is a lock that needs to be opened with a magnet. The hook holds the loop, and that in turn fixes the bar on the back of the maze. If you turn the hook and release the loop, you can raise the bar and open the envelope with a gift.


1. A chip with a glued magnet. 2. Walls of a maze of matches. 3. Glass. 4. Moving magnet. 5. Cardboard base. 6. Screw, nut and washers. 7. Cardboard frame.
The arrows with the symbol "K" indicate glued joints.
To base the maze, you need to take a piece of very dense cardboard or thin plywood. I had a sheet of cardboard 20x30 cm and a thickness of 2 mm.
The base is drawn in 10 mm increments. Match walls are glued along the grid, and a frame of the same thickness as matches is glued around the perimeter, i.e. 2 mm. Matches should be selected with a square or close to square section. The heads are cut in advance with a clerical knife.

On top of the labyrinth is covered with a sheet of plexiglass. I took out the glass from the backlight of a cracked laptop screen. Its thickness is about 1.5 mm. Do not take too thick glass, otherwise the magnets will be weakly attracted through it.
The design is pulled together around the perimeter and in the center by nine M3 screws. If the maze is small, then you can do with less. It is important that no significant gaps remain between the matches and the glass, in which the magnet may get stuck.
It is advisable to place large washers under the screw and nut to reduce pressure. Nuts are best taken self-locking, with a nylon ring inside. Such a nut is tightly screwed onto the screw, it can only be tightened with a wrench. But she does not unscrew by itself. Thus, it is not necessary to tighten it much so as not to push cardboard and glass.
A magnet wandering through a maze has a diameter of 5 mm and a thickness of 1 mm. With such dimensions, it moves freely along corridors 2 mm high and 8 mm wide. The outer magnet can be taken a little larger to increase the attraction. For convenience, it is glued inside the chip printed on a 3D printer.
You can buy a magnet in radio parts stores or in specialized online magnet stores.

The hook is made of fiberglass 1.5 mm thick with a hacksaw and a file. The thickness should be less than the height of the corridors (2 mm), but the remaining clearance should be less than the height of the magnet (1 mm). The hook is painted with a black marker for a more accurate look.
Near the hook in the photo you can see a hole in the glass. It is made so that from the outside you can easily turn the hook into the closed position, and open it only with a magnet from the inside.
The loop that the hook fixes is made of a narrow strip of paper covered with tape. This strip is quite thin and very durable.
As it turned out later, such a castle design is not the most successful. If the loop hangs freely, the hook may open from a slight push. If the loop is tight, then for the hook it will be difficult to turn the magnet. For those who want to assemble their labyrinth, I recommend making a weak free loop, and fit a spring on the hook to lock the lock in the closed position.
To give a finished look, the frame and the back wall can be pasted over with colored paper.
In conclusion, a sheet of light paper with cut out windows at the start and finish is glued to the maze. Marking is printed on the sheet with a pitch of 10 mm, so that it is easier to navigate and understand where walls and walkways can be located. Without a grid, it is much more difficult to draw the studied areas. The paper can be fixed into small pieces of double-sided tape in the corners and in the middle.
Be sure to attach a bag with spare magnets and chips to the gift. Small parts are lost very easily.

Labyrinth assembly.
Designing a puzzle for passing blindly differs from drawing a regular maze on paper.
1. As in any maze, a good solution is to make many long false branches ending in dead ends.

2. When the maze on the paper lies in front of the eyes, the player will go with a pencil past all the small dead ends without stopping. However, with blind passage, they are easy to please, and they also take a lot of time.

3. A person intuitively seeks to move towards the finish line. Therefore, you should insert more places in the labyrinth where the player wants to take the magnet directly, although the right path goes the other way.

Work on the puzzle took me a week, 30-40 minutes every evening, not counting thinking about the idea and selecting materials.
I gave the labyrinth to that same friend for the wedding. According to the newlyweds, it took about an hour to get to the contents of the envelope.
The game can be played more than once. The used sheet of paper is easy to remove and replace with a new one, and then offer the maze to friends and acquaintances.
So the idea was born for the next holiday to create a puzzle card. In this article I will tell you how to make it and what subtleties you need to consider.
Labyrinth in the process of passing.
Description
The labyrinth is a multi-layer construction. The bottom layer is a dense cardboard base; the middle layer is the labyrinth itself, made up of matches glued to cardboard; top layer - thin plexiglass. Top glass is closed with a sheet of paper with windows at the start and finish. An opaque sheet makes passage difficult.
Labyrinth with the top layer removed.
A flat magnet is laid in the hole at the start. The task is to lead him through the maze blindly, moving another magnet on the surface. A player with a magnet in his hands feels well how the magnet moves inside: when it moves freely along the corridor, and when it rests against the wall. In the process of passing, the player gradually draws the structure of the maze on a piece of paper, step by step studying its passages, branches and dead ends.
At the finish is a lock that needs to be opened with a magnet. The hook holds the loop, and that in turn fixes the bar on the back of the maze. If you turn the hook and release the loop, you can raise the bar and open the envelope with a gift.
Manufacture
1. A chip with a glued magnet. 2. Walls of a maze of matches. 3. Glass. 4. Moving magnet. 5. Cardboard base. 6. Screw, nut and washers. 7. Cardboard frame.
The arrows with the symbol "K" indicate glued joints.
To base the maze, you need to take a piece of very dense cardboard or thin plywood. I had a sheet of cardboard 20x30 cm and a thickness of 2 mm.
The base is drawn in 10 mm increments. Match walls are glued along the grid, and a frame of the same thickness as matches is glued around the perimeter, i.e. 2 mm. Matches should be selected with a square or close to square section. The heads are cut in advance with a clerical knife.
On top of the labyrinth is covered with a sheet of plexiglass. I took out the glass from the backlight of a cracked laptop screen. Its thickness is about 1.5 mm. Do not take too thick glass, otherwise the magnets will be weakly attracted through it.
The design is pulled together around the perimeter and in the center by nine M3 screws. If the maze is small, then you can do with less. It is important that no significant gaps remain between the matches and the glass, in which the magnet may get stuck.
It is advisable to place large washers under the screw and nut to reduce pressure. Nuts are best taken self-locking, with a nylon ring inside. Such a nut is tightly screwed onto the screw, it can only be tightened with a wrench. But she does not unscrew by itself. Thus, it is not necessary to tighten it much so as not to push cardboard and glass.
A magnet wandering through a maze has a diameter of 5 mm and a thickness of 1 mm. With such dimensions, it moves freely along corridors 2 mm high and 8 mm wide. The outer magnet can be taken a little larger to increase the attraction. For convenience, it is glued inside the chip printed on a 3D printer.
You can buy a magnet in radio parts stores or in specialized online magnet stores.
The hook is made of fiberglass 1.5 mm thick with a hacksaw and a file. The thickness should be less than the height of the corridors (2 mm), but the remaining clearance should be less than the height of the magnet (1 mm). The hook is painted with a black marker for a more accurate look.
Near the hook in the photo you can see a hole in the glass. It is made so that from the outside you can easily turn the hook into the closed position, and open it only with a magnet from the inside.
The loop that the hook fixes is made of a narrow strip of paper covered with tape. This strip is quite thin and very durable.
As it turned out later, such a castle design is not the most successful. If the loop hangs freely, the hook may open from a slight push. If the loop is tight, then for the hook it will be difficult to turn the magnet. For those who want to assemble their labyrinth, I recommend making a weak free loop, and fit a spring on the hook to lock the lock in the closed position.
To give a finished look, the frame and the back wall can be pasted over with colored paper.
In conclusion, a sheet of light paper with cut out windows at the start and finish is glued to the maze. Marking is printed on the sheet with a pitch of 10 mm, so that it is easier to navigate and understand where walls and walkways can be located. Without a grid, it is much more difficult to draw the studied areas. The paper can be fixed into small pieces of double-sided tape in the corners and in the middle.
Be sure to attach a bag with spare magnets and chips to the gift. Small parts are lost very easily.
Labyrinth assembly.
Features
Designing a puzzle for passing blindly differs from drawing a regular maze on paper.
1. As in any maze, a good solution is to make many long false branches ending in dead ends.
2. When the maze on the paper lies in front of the eyes, the player will go with a pencil past all the small dead ends without stopping. However, with blind passage, they are easy to please, and they also take a lot of time.
3. A person intuitively seeks to move towards the finish line. Therefore, you should insert more places in the labyrinth where the player wants to take the magnet directly, although the right path goes the other way.
Conclusion
Work on the puzzle took me a week, 30-40 minutes every evening, not counting thinking about the idea and selecting materials.
I gave the labyrinth to that same friend for the wedding. According to the newlyweds, it took about an hour to get to the contents of the envelope.
The game can be played more than once. The used sheet of paper is easy to remove and replace with a new one, and then offer the maze to friends and acquaintances.