Reverse engineering of device firmware using the example of a flashing “rhino”. Part 1
- Tutorial
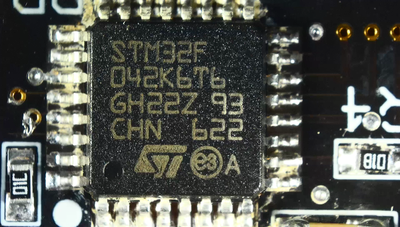
April 26, 2018 the company INFORION held a conference for students of MSTU. Bauman SMARTRHINO-2018 . A small device based on the STM32F042 microcontroller was specially prepared for the conference.
This rhino became the
The first part of the article was compiled based on the master class and was designed for beginners - attention is paid to the basic approaches to reverse firmware and the features of working with the IDA disassembler.
The second part is a bit more complicated, it pays attention to the features of the operation of devices based on real-time operating systems.
Caution, under the cat flashing rhino and its firmware!
Legend
The following legend was proposed to the seminar participants.
You got the device and a little instruction for it.
Lighting device "Rhino"
Operating Instructions
Lighting device "Rhinoceros" is intended for lighting rooms of a small area. The device combines a stylish compact design, bright LEDs with low current consumption and a USB interface for connecting power.
The device is equipped with a Bluetooth module for remote control. Provides ample opportunities to control the light, allowing you to set the hue and saturation for each LED individually.
Device control is carried out through special software “Sinezubik”.
Have a nice use!
You do not have the mentioned software for device management and you need to write it from scratch . In addition, you must ensure the safety of using this device.
That is, all that a researcher has is a device that can be turned on. If you have a device, then you can try to get its firmware by subtracting it from the flash drive of the microcontroller. This step was skipped to simplify and speed up the master class - participants received a ready-made firmware image in the form of a binary file rhino_fw42k6.bin (as if they received the firmware, for example, from updates).
An interested reader can also download the firmware for independent research.
The master class was held in an interactive mode - with the ability to ask, propose their own solutions. For the participants, 4 Rhino workers were available.
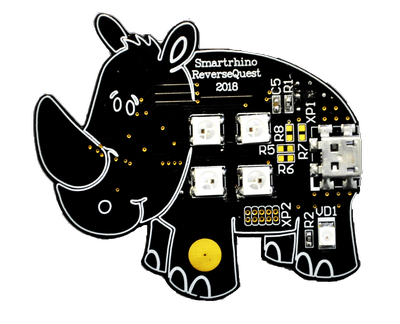
Visual inspection
Briefly: at this stage, an external examination of the device is performed in order to search for markings, available connectors.
At the beginning of the seminar, emphasis was placed on first examining the device externally, and then proceeding to reverse the firmware.

First of all, the microcontroller is of interest, then peripheral devices and connectors.
External inspection of the device allowed to establish the following:
- STM32F042 microcontroller - here you should immediately turn to the documentation for the microcontroller (if any), where you can find out the architecture, the capacity of the microcontroller and much more (in our case, a 32-bit microcontroller based on the ARM architecture);
- On the back there is a connector without designations - those who worked with microcontrollers can make the correct assumption that this is a connector for firmware of the device (firstly, it is not marked; secondly, it has 5 contacts, which corresponds to the required number of contacts for microcontroller alteration);
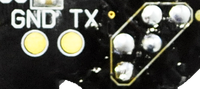
- GND, TX contacts;
- USB-connector for powering the device (this is stated in the "Instructions");
- Unknown XP2 connector on the front of the device;

- The incomprehensible yellow blamb on the rhino’s foot is probably a touch button.

The smartest participants immediately connected the devices to power and saw the following:

It was also discovered that there were available Bluetooth devices with the names RHINOCEROS-220x , when connected to which a virtual COM port is created in the system. It turned out to be convenient to connect to the device via Bluetooth from a smartphone and interact through the Serial Bluetooth Terminal mobile application or similar.
It was found that when sending arbitrary text to the COM port, the device returns a response
Unknown command.Initial firmware research
Briefly: at this stage, a preliminary analysis of the firmware is performed. View lines. Download firmware to IDA Pro.
Before parsing the firmware code, it makes sense to check if the code is packed. There may be different approaches, in the simple case it is enough to use the strings utility to get the binary file lines (given in abbreviation):
../Drivers/STM32F0xx_HAL_Driver/Src/stm32f0xx_hal_cortex.c
../Drivers/STM32F0xx_HAL_Driver/Src/stm32f0xx_hal_dma.c
…
Hardware init done... Starting FreeRTOS
sendMsg error %s
TSC %d
SET AUTH %d
cmd[%d] %s
UART task
Bluetooth task
AT+AB ShowConnection
…
AT-AB -BypassMode-
state bypass
ERROR: Wrong header length
cmd: %s
led idx %d hue %d sat %d val %d
msg %s
addr=%x, size=%x
User auth pass %s
Congrats amigo!
Wrong won't give up!
ERROR: Unk cmd
I've got a super power and now I'm seeing invisible tactical combatant nano-ants everywhere
…
uartRxTask
watchdogTask
sensorTask
bluetoothTask
ledsTask
There were many lines - you can make the assumption that the firmware is not compressed and not encrypted. Already at this stage, you can pay attention to some noteworthy lines, for example, format lines, lines with a description of errors and an indication of the operating system ( did you see them? ). The presence of meaningful lines, by and large, can be considered half the successful reverse.
Well, let's try downloading the firmware into the most popular disassembler. We will use IDA version 6.9 for 32-bit code (since the microcontroller is 32-bit).
When you open the firmware file, the IDA cannot automatically determine the architecture and entry point - you need to help it.
At this stage, you must again refer to the documentation for the STM32F042x4 STM32F042x6 microcontrollerand look at section 5 “Memory mapping”:
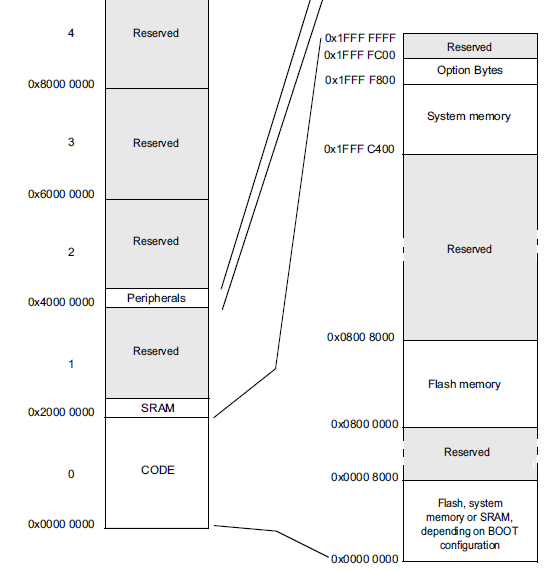
as a Processor Type, select ARM Little endian , select the Manual load checkbox , click OK:

In the " Do you want to change the processor type " window , click Yes, after which the IDA offers us to create segments of RAM (ROM) and ROM (ROM), put a dummy ROM.
Now we need to specify the start address of the ROM. On the diagram, you need to look at the Flash section - these are the addresses 0x08000000 - 0x08008000 . We also indicate that we want to download the firmware file to the same address: Loading address = 0x08000000 .
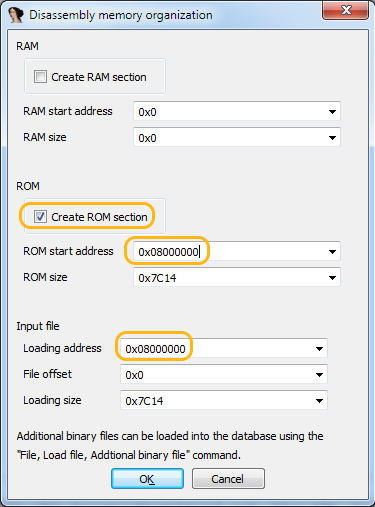
In the " ARM and Thumb mode switching instructions " window , click OK.
Further, the IDA says that it knows nothing about arbitrary binary files and the entry point - the main function - you must determine yourself. Click OK.
Download done. You can study the firmware.
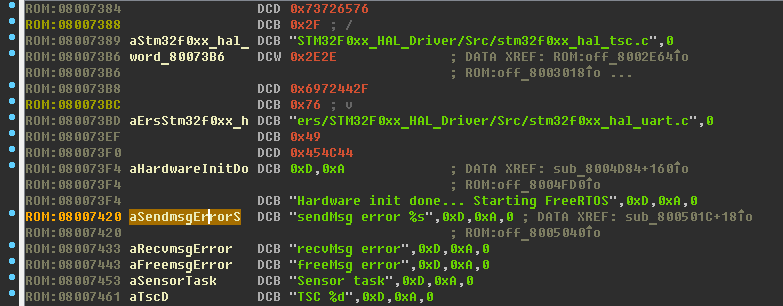
Open the row window (Shift + F12). You can pay attention to the fact that not all lines coincide with the results from the strings utility - the IDA did not recognize everything, unfortunately. A little later we will help her ...
Note for beginners
- Any program / firmware is a set of binary data. IDA Pro can interpret this data in the source file in different ways (present data in the form of commands or data in one format or another). However, there is no Back button (Ctrl + Z) to cancel the selected display - you need to know how to switch between different display modes. ( IDA Pro Hotkey Cheat Sheet )
- The reverse engineer from the apparent chaos of binary data restores logic, structure and readability.
- Lines - important information when reversing! Since, in fact, among the entire set of binary data are most simply and quickly perceived by man. Lines allow you to draw conclusions about the purpose of functions, variables, and code blocks.
- Name watched functions ! By default, the IDA gives the functions names at their start addresses. When analyzing, it’s very difficult to keep these addresses in mind, it’s much easier to use meaningful names. In order to name a function, at least a quick analysis is enough - this will already be an important help for further analysis.
- Name the recognized variables! In order to more efficiently analyze code blocks and functions, it makes sense to name the variables that the IDA recognized in accordance with their purpose (everything, as in the best programming practices).
- Leave comments so as not to forget the important. By analogy with programming, comments during reverse allow you to further clarify the logic of the program or its individual sections.
- If possible, create structures ! IDA in its arsenal has a tool for working with structures, it makes sense to master this tool and apply it if necessary. If there are structures, the code under investigation will become even easier to understand.
String Analysis
Briefly: String analysis can help draw up a rough binary file exploration plan.
So, the lines.
Hardware init done... Starting FreeRTOS
sendMsg error %s
…
cmd[%d] %s
rsp[%d] %s
UART task
Bluetooth task
…
AT+AB SPPDisconnect
AT+AB DefaultLocalName RHINOCEROS-2205
…
Only on the basis of the lines can you already get a lot of information:
- Operating System - FreeRTOS;
- The presence of format strings - most likely printf-like functions are used, it will be possible to set the purpose of registers / variables;
- Names of tasks (tasks) - we can assume the purpose of these same tasks and related functions;
- Using AT-commands - presumably this is how the interaction of the microcontroller and the Bluetooth module is built.
It is far from always that everything is so rosy when analyzing firmware — there may not be any lines or debug information at all or they are uninformative, but when creating the firmware we intentionally did not complicate the reverse development process.
Identification of standard features
Briefly: at this stage, you need to make sure that the lines are really recognized, and then you need to identify some standard functions of the C language.
After downloading the firmware and automatic analysis, the IDA recognized the bodies of the functions (not all, by the way), but among the function names there is not one “normal” (only automatic names from the IDA), which can be a little complicated compared to reversing an ELF or PE file.

Thus, during the study, it is necessary to determine the purpose of not only the specific functions of a particular firmware, but also to identify standard C-functions. A reasonable question may arise - where is the guarantee that such functions are in the firmware and that they are standard? Here it is worth saying that usually when creating software (including firmware), in 9 cases out of 10 they do not bother with creating their own unique libc library, but use what has already been written and tested by time. That is why in 90% of cases it is possible to put forward the assumption that there are standard C-functions.
Since Hex-Rays Decompiler can turn ARM-assembler into C-code, we will use this nice opportunity. It is worth noting thatthe presence of decompiled listing does not eliminate the need to understand assembler , moreover, decompile does not exist for all platforms.
Open the row window in the IDA (Shift + F12).
Select the line sendMsg error% s , open the links to this line (X key - Xrefs - Cross References) - the IDA recognized the links to the line, this is good:

However, among the lines highlighted in green in the disassembler, there are just bytes highlighted in red. However, some lines are clearly not fully recognized . So, for example, if you set the cursor to the address
0x080074E6and press the A key (then accept the sentence “Directly convert to string?”), you get the string “No device connected”. In the same way, you can go through all the string-like data and turn them into strings (or, for example, write a Python script that will go over the specified range of addresses and create strings). The next obstacle that may arise is unrecognized string references (even if the string was recognized). Try to go through the lines by pressing the X key. So, for example, in my case, the link to the “recvMsg error” line was not found. An object reference may not be found for two obvious reasons:
- there is no code that refers to the current object;
- IDA did not recognize the link.
We will try to exclude the first of them by performing a binary search on the firmware. Open the binary search window (Alt + B), enter the address of the line, do not forget to check the box “Find all occurrences”:

We got one occurrence:

Let's go to it (address
0x0800506С): 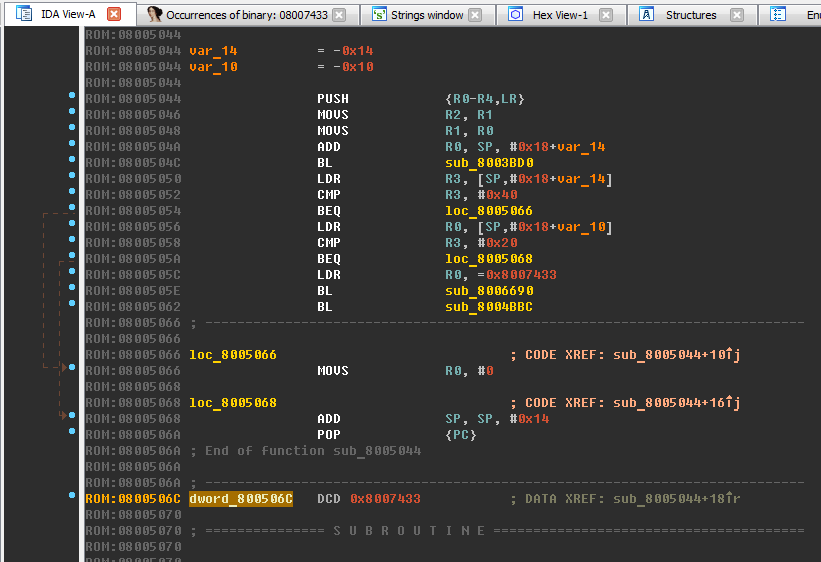
Turn the DWORD number into offset by pressing the O key. A link to the line appeared:

Why are double line references created?
Это связано с особенностью архитектуры ARM – длина команды фиксирована и составляет 32 бита, следовательно, нет возможности в команде передать полный адрес объекта (также 32-битный). Поэтому в коде используется короткое смещение на адрес, расположенный рядом с функцией, где уже хранится полный 32-битный адрес объекта.
Set the cursor a little higher - inside the function sub_8005070 (range
0x08005070-0x08005092). Switch to the decompiled listing by pressing Tab: 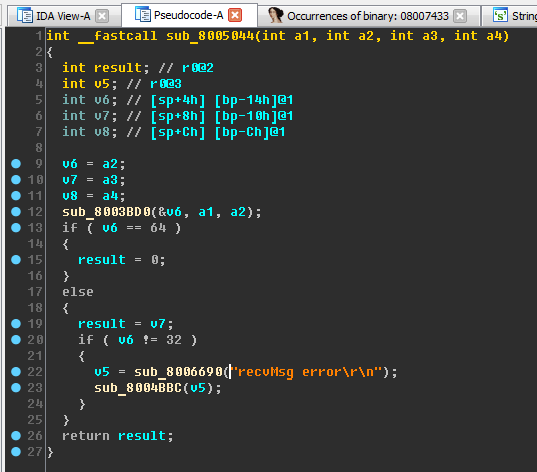
Pay attention to the sub_8006690 function . If you return to the line “sendMsg error% s”, you can see that it is also passed to the sub_8006690 function. Namely strings with formatting characters may lead to the assumption that the sub_8006690 function is a standard printf . Now let it be printf at the assumption level (even if our assumption turns out to be wrong, it will still allow us to advance in the study).
Put the cursor on the name sub_8006690, press the N key, enter the new name x_printf. We add the prefix “x_” for convenience (from the word “eXecutable”) - this way it will be possible to distinguish the functions we renamed from the functions that IDA gave automatically.
We can consider the preparatory part to be completed, now we turn to the analysis of the task responsible for processing the Bluetooth connection. You can go to it again through the lines. In many IDA windows, you can search by Ctrl + F. So, you can immediately select the lines with the word "bluetooth":

What is task?
Таск (task, задача) – понятие из мира операционных систем реального времени (RTOS). Если по-простому, то таск можно представлять как отдельный процесс. Подробнее можно почитать в цикле статей о FreeRTOS
Bluetooth task
Briefly: identify and analyze the function of processing commands transmitted via Bluetooth. You will need to create an additional memory segment in the IDA.
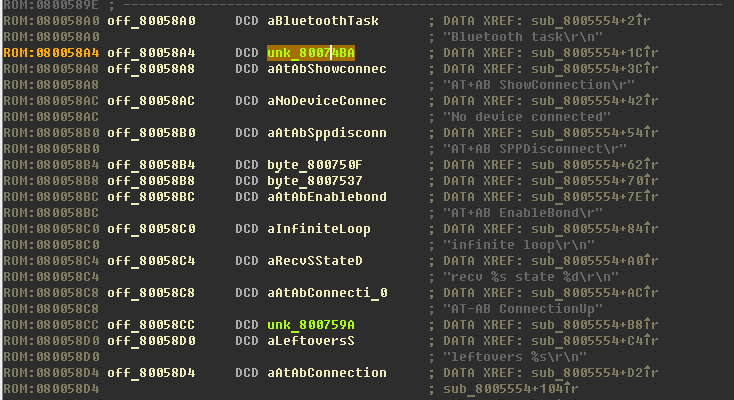
The line “Bluetooth task \ r \ n” does not have cross-references - we will use binary search again, get the address where it is used
0x080058A0, go there and see a list of partially recognized links: 
Create full links from them (by clicking the O key, or by writing Python script for IDA).
Perhaps links will not be created everywhere (addresses highlighted in green): If you
click on the links highlighted in green, you will see that no lines are created there. Correcting - helping Ide.
Let's go back to the line “Bluetooth task \ r \ n”. Now in the code at the address
0x08005556there is a link to this line: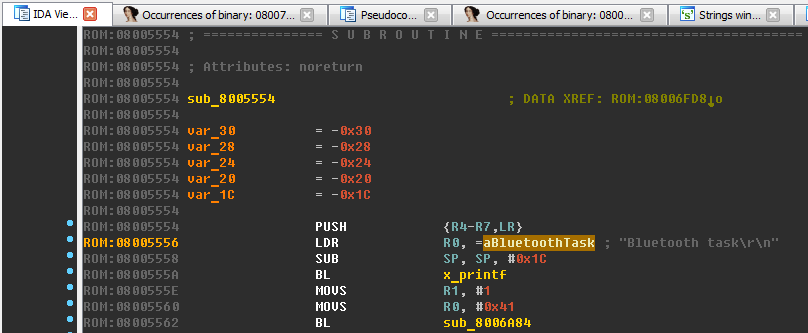
Here we see that this line is passed as an argument to the x_printf function we have already seen. Do not forget to give the talking name of the current function "sub_8005554", for example, "x_bluetooth_task".
Switch to the decompile and see the full function. Let's pay attention to line 132, where a certain number is passed to the x_printf function. If you change the display of a number from decimal to hexadecimal (key H), then we will see a number
0x8007651that is very similar to the address. 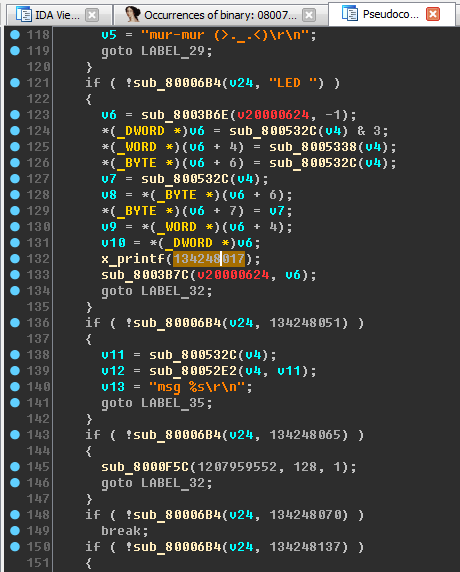
An already familiar situation - the IDA did not recognize the link. We help her, however, for this we need to switch from the decompile to the disassembler (Tab key): do offset, go through it, create a line. Go back to the decompile, press F5 (update).
We are happy to improve the code:

Let us again pay attention to line 132. Obviously, in addition to the format string, x_printf must also contain a list of arguments of variable length (va_list), the IDA did not recognize this ... Well, you understand, right? We will help her.
Set the cursor on the function name x_printf, press Y - the window for changing the prototype of the object opens. Enter the correct prototype of the printf function :
intx_printf( constchar *format, ... )Um, sorry, you have an error in the prototype printf ...
Согласен, правильно будет
voidx_printf( constchar *format, ... )The IDA will display the arguments for the format string:


It's time to set the assignment (names) of the variables (again, the lines help us):
x_printf("recv %s state %d\r\n", v0, v25);-x_printf("recv %s state %d\r\n", recv_data, state);x_printf("cmd: %s\r\n", v24);-x_printf("cmd: %s\r\n", cmd);x_printf("addr=%x, size=%x\r\n", v14, v15);-x_printf("addr=%x, size=%x\r\n", addr, size);
Other names are not so obvious, but not super-hard to understand.
For example, let's pay attention to a section of code: The

variable v3 is compared with the number 3, then a message appears about the length of the header being incorrect. Logically rename:
- v3 variable in header_len ;
- sub_80006C8 function in x_strlen (you can go into this function and check our assumption).
Next, pay attention to the following code block:

The sub_80006B4 function is used several times. Inside, it looks like this:

Did you recognize her?
strcmp. Переименовываем. Создаём из хаоса и разрозненности стройный читаемый код.
Now let's look at the variables
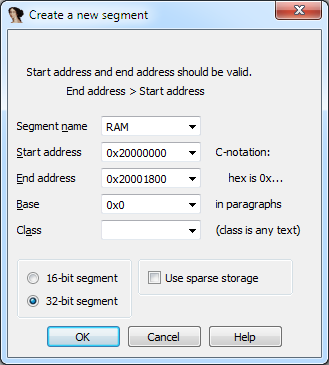
v20000624, v20000344, v20000348. IDA highlighted them in red. That's because they refer to addresses that are not in the current disassembler database. If you again turn to the documentation for the microcontroller, you can see that the address range 0x20000000-0x20001800refers to RAM.Why is 0x20001800?
0x1800 — это 6Kb RAM, а это указано в документации
If a variable refers to a non-existent memory area, xrefs will be unavailable for it - the study will cause discomfort ... For convenience and performance, it makes sense to create an additional memory segment . Open the segment window (Shift + F7), add the RAM segment:
Update the decompile. We draw attention to the variable unk_20000344:
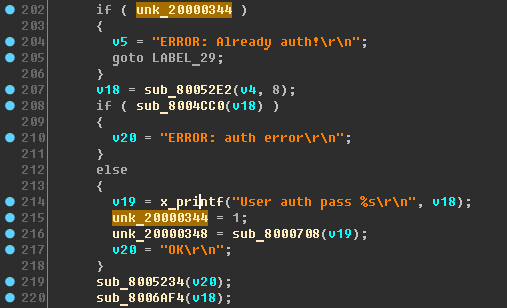
It looks like it is a kind of auth_flag (authorization flag). We’ll write it down, that is, we will call this variable. In my case, there were no cross-links - we use binary search and create links.
Device Verification
Briefly: check individual assumptions on a working device.
Static analysis is a cool thing, but even better if it is possible to examine the code in dynamics. There is also room for creativity, but if you do not complicate it, the simplest thing is to connect to the device via Bluetooth, send some kind of command and look at the result.
So, for example, when sending the string “ZZZ”, the device will respond with the string
ERROR: Wrong header length\r\n, when sending “MEOW” (this string is in the code under study, passed to the strcmp function) we will see mur-mur (>._.<)\r\n, and when sending “ZZZZ” - ERROR: Unk cmd. Thus, the function sub_8005234 can be renamed to x_bluetooth_send .I’ll make a list of commands that are possibly supported by the device, and immediately check them. Here's what happened:
“ECH1”- returns “OK”, turns on the echo mode - the command is duplicated to the sender;“ECH0”- turns off the echo mode;“MEOW”- returns "mur-mur (> ._. <) \ R \ n" - either the easter egg, or the debug command;“LED “- turns off one of the bright LEDs;“UART”- returns "OK";“BLE “- flashes once with a red LED;“READ”- returns "ERROR: Not auth!"“WRIT”- returns "ERROR: Not auth!"“AUTP”- returns "ERROR: auth error!"“SETP”- returns "ERROR: Not auth!"“VIP “- returns "Wrong won't give up!"
Intermediate conclusions regarding the protocol:
- a team consists of at least 4 characters;
- there are rather strange commands, somehow related to authorization (why authorization on a lighting device?).
Code improvement. Structure creation
Briefly: if possible, it makes sense to create data structures - a great help for analysis.
Go ahead. The minimum task for us is to learn how to control LEDs.
The experiment showed that the LED command is associated with large LEDs - at least it allowed one of the four large LEDs to be turned off. Let's see what is in this thread:

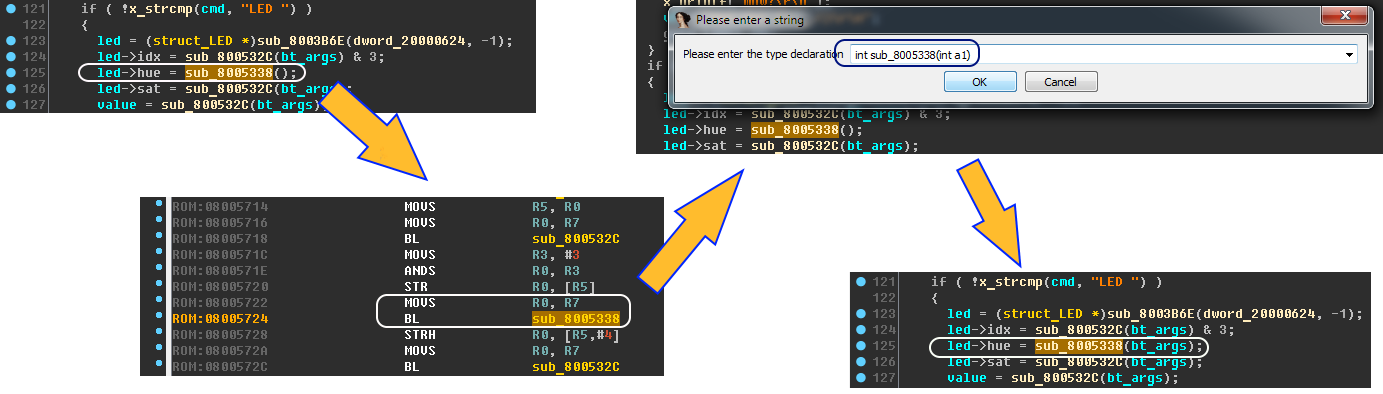
Here it would be possible to rename the variables, only constructions like
*(_WORD *)(v6 + 4) = sub_8005338(v4);In most cases, the v6 variable is a pointer to a structure. For convenience, we also create this structure . Context menu for the v6 variable - select "Create new struct type".
The IDA offers the following definition for a structure:

Here, we will confide in the automation regarding the types of fields in the structure, but set readable names based on data from the format string:
structstruct_LED
{
_DWORD idx;
_WORD hue;
_BYTE sat;
_BYTE val;
};
After creating the structure, the code became even nicer:

In the process, the variable v6 was renamed to led . Additional variables v7 and v8 have also been renamed for convenience. Let the appearance of additional variables not bother you - the compiler knows better.
According to the information from the format string, we can conclude that the color is set in the HSV format (Hue, Saturation, Value). To convert colors from RGB, you can use the table .
It is still difficult to say something about the v4 variable for sure, except that it is a structure and is created in the sub_8005298 function:


We can assume that the v4 variable represents the arguments to the command that came via Bluetooth. Let's call it that:
- v4 - bt_args
- sub_8005298 - x_get_bt_args
Decompilation may cause loss of previously recognized information
При манипулировании именами и типами данных в декомпиле могут пропадать или появляться аргументы функций. В этом случае нужно для таких функций явно указывать их прототип (клавиша Y на заголовке функции). Из-за того, что в ARM’е первые 4 аргумента передаются через регистры, IDA при декомпиле может эти аргументы «терять», в этом случае… спешим на помощь ИДЕ. Если по декомпилу непонятно, какие аргументы передаются в функцию, идём в дизассемблерный листинг и смотрим на регистры R0-R3 – не заносятся ли в них какие-то значения перед обращением к интересуемой функции. Если заносятся, то в 90% случаев – это аргументы функции, и нужно прописать эти аргументы в прототипе.
LED Command
Briefly: the study of LED-commands, we continue to rename functions and variables.
Let's make a few renames for ease of perception:
- sub_8003B6E - x_create_struct
- sub_800532C - x_get_value_1
- sub_8005338 - x_get_value_2
Let's go to the function x_get_value_1:
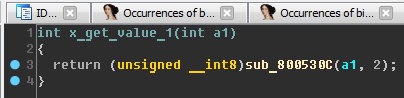
Rename sub_800530C to x_get_value_3 . Now compare the functions x_get_value_1 and x_get_value_2:

They use the same function x_get_value_3, but with a different second argument (2 and 4). In this case, x_get_value_1 returns a 1-byte number, and x_get_value_2 - 2-byte.
We analyze the work with x_get_value_3:
- work is done with the bt_args string (or a structure containing the string);
- when the number 2 is input, the output is a 1 byte size;
- when the number 4 is input, the output is a 2-byte number.
Comparing these facts, we can speculate that the function x_get_value_3 forms a number from the hex string of the specified size.
Rename
- x_get_value_1 - x_get_byte ;
- x_get_value_2 - x_get_word ;
- x_get_value_3 - x_unhexlify .
Check if the x_unhexlify function is used elsewhere.
Used. The sub_8005344 function looks like this:

You can rename it to x_get_dword .
An interested reader can dive into a static analysis of the x_unhexlify function and the bt_args structure - this will surely be fun.
At the moment, we can form a team to control the LEDs:

The question remains - are separators between the individual fields needed?
Taking advantage of the availability of the device, I will check 2 options:
- spaces as delimiters;
- without delimiters.
To turn on the zero LED in red (following the conversion table), you must set the following values:
- LED Index (idx) = 0x00;
- Hue (hue) = 0x00;
- Saturation = 0xFF;
- Value (value) = 0xFF.
Command with spaces:
"LED 00 0000 FF FF"- The LED lights up in a bright light blue color. Command without spaces:
"LED 000000FFFF"(the space after the “LED” characters is needed by the command format) - the LED lights up in red. Thus, we can conclude that the parameters of the command should be transmitted without spaces. And here you can build the assumption (which can be confirmed by those comrades who have carried out a full static analysis of the x_unhexlify function) that the x_unhexlify function is used to stream read information with the size from a certain base buffer.
- Turn on the first LED in green:
"LED 010078FF80" - Turn on the second LED in blue:
"LED 0200F0FFFF" - Turn on the third LED in purple:
"LED 03012СFF80"
The function sub_8003B7C remained unexplored in the LED branch . It accepts a certain dword_20000624 variable as input . Let's see where this variable is used - just in case, we immediately use the binary search (Alt + B):

Pay attention to the addresses
0x08004FF0, 0x08005D40. I wanted to hide! Help Idea - create links. Now let's see where the links lead
off_8004FF0and off_8005D40:- function sub_8004D84 is clearly the starting function of the firmware, since the line “\ r \ nHardware init done ... Starting FreeRTOS \ r \ n” is used inside - rename this function to x_main ;
- sub_8005A08 function - at the very beginning uses the string "LED task \ r \ n" - rename this function to x_leds_task .
So the dword_20000624 variable is used:
- near the end of the main function;
- after receiving data via Bluetooth in x_bluetooth_task;
- at the beginning of the x_leds_task function loop.
Those who programmed threads in a regular OS or worked with RTOS tasks will see in this variable a pointer to a queue for exchanging data between tasks - and they will do it right. Let's do some more renaming:
- dword_20000624 - leds_queue ;
- sub_8003BD0 - x_queue_recv ;
- sub_8003B7C - x_queue_send .
Additionally, you can verify the correctness of the names, if you look at the places where these functions are used:


Rename:
- sub_800501C - x_sendMsg ;
- sub_8005044 - x_recvMsg .
Now, to make sure that we are fully able to control the LEDs, we examine the x_leds_task function .
On this we will stop a little, drink tea with chocolate and continue in the second part of the article.
Stage One Results
- An external inspection of the device.
- The firmware is loaded in the disassembler.
- Found useful strings for research.
- It was found that the "rhino" is controlled via Bluetooth via a simple text protocol.
- Partially investigated is the task of processing the commands of the exchange protocol via Bluetooth.
In the second part, you will find a complete analysis of all the tasks of the flashing rhinoceros. Search for non-obvious functionality and a little homework.