Image Processing: Tensorflow Object Detection API
- Tutorial
Over the past few years, a real revolution has occurred in the development of deep neural networks: new architectures are emerging, frameworks for developers are being improved, and hardware for experiments can be obtained absolutely free of charge - for example, as part of the Google colaboratory project . Anyone who is interested in how to apply pre- trained models from the Tensorflow Object Detection API repository to solve their problem using the power of the Colaboratory - welcome to cat.
If you do not want to read the article, you can immediately get acquainted with the laptop in the repository
For training neural networks on large amounts of data, it is better to use a GPU: the learning and inference speeds will be higher than on a CPU due to the efficient parallelization of operations across thousands of cores. Until recently, you could use cards in your calculations, for example, using Amazon cloud instances. However, why pay for something that you can get for free? Google Colaboratory provides access to the Tesla K80 card .
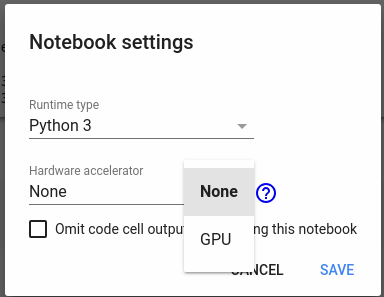
Access to the map can be obtained through the menu Edit-> Notebook setttings-> Hardware accelerator:
With this card you can quickly conduct experiments with neural networks - for example, take a cool course in NLPfrom guys from DeepPavlov. The only minus of the service is your card for only 12 hours, this needs to be saved somewhere in between — if you need to use them in the future.
In this article I will tell you how to use Colaboratory to train a model and save it for future use. There will be little code in the article - all the code that educates the model and interacts with Google Drive (to save intermediate results) is available in my repository .
Go!
For experiments, I will use the Deep Fashion dataset - this is 800k images of clothing items.

Images contain tags, as well as bounding boxes on the photo. We will train the neural network to detect images of clothes in the photo - draw a bounding box and classify one of three classes: upper-body, lower-body and full-body.
First, copy DeepFashion to your GoogleDrive dataset from the Category and Attribute Prediction Benchmark directory into the root directory. We will work a lot with GoogleDrive as a file storage - copy data from there and upload the results of work (for example, model checkpoint) to Disk.
First, copy the repository with the code and install the dependencies:
You also need to create an auxiliary object for working with the Google Drive file system.
For more information, see the utils.colab_fs.py file in the repository.
Now you need to download the DeepFashion dataset:
There are three directories in the dataset
Our task is to prepare this data for feeding the neural network: description of files in a special format, splitting into train and test.
Google in 2017 launched the Object Detection API - a set of models and tools for image detection. The repository has a lot of scripts for preparing training data, training models and visualizing results - for example, drawing bounding boxes.
The code below installs the TF Object Detection API from the github repository into the GoogleColaboratory environment.
Now you need to prepare the data. Img has a complex structure of subdirectories, where each class of clothing has its own category. The code below copies all the photos into one directory, and also prepares a description for each file in the form tf.train.Example - the detection model will be trained on all this stuff .
The code has the model name ssd_mobilenet_v2_coco_2018_03_29 - the appropriate model can be downloaded in Detection Zoo . You can download another modelka - but then you will need to rewrite the file /content/data_dir/tf_api.config.
After the execution of the cell is over, you can download the pre-trained model and start training the model. Frozen inference graph from Turnip Object Detetetion will allow you to quickly train your detector. The path to the directory with the model graph will need to be passed to the training script /object_detection/train.py.
If everything was done correctly, we will see how the logs run and the loss will decrease at each iteration. When you see that the loss function has stopped decreasing, you can stop learning. The model graph is saved in the / content / data_dir / checkpoints directory - it will need to be saved for future experiments. Model training needs to be done once, then use the resulting graph for inference.
When the model is trained, you need to save it to Google disk
Download from Google disk in the same way
For example, we will choose a random photo and feed it to our network for detection:
We see the results of detection - lower_body garment

TF Object Detection API is a cool technology that allows you to use mesh architectures in your State-of-the-Art models. And Google Colaboratory is an excellent platform for experiments, which allows you to train networks on powerful hardware. The code from the article is available here .
If you do not want to read the article, you can immediately get acquainted with the laptop in the repository
Top GPUs - for everyone
For training neural networks on large amounts of data, it is better to use a GPU: the learning and inference speeds will be higher than on a CPU due to the efficient parallelization of operations across thousands of cores. Until recently, you could use cards in your calculations, for example, using Amazon cloud instances. However, why pay for something that you can get for free? Google Colaboratory provides access to the Tesla K80 card .
Access to the map can be obtained through the menu Edit-> Notebook setttings-> Hardware accelerator:
With this card you can quickly conduct experiments with neural networks - for example, take a cool course in NLPfrom guys from DeepPavlov. The only minus of the service is your card for only 12 hours, this needs to be saved somewhere in between — if you need to use them in the future.
In this article I will tell you how to use Colaboratory to train a model and save it for future use. There will be little code in the article - all the code that educates the model and interacts with Google Drive (to save intermediate results) is available in my repository .
Go!
Dataset DeepFashion
For experiments, I will use the Deep Fashion dataset - this is 800k images of clothing items.
Images contain tags, as well as bounding boxes on the photo. We will train the neural network to detect images of clothes in the photo - draw a bounding box and classify one of three classes: upper-body, lower-body and full-body.
Data preparation
First, copy DeepFashion to your GoogleDrive dataset from the Category and Attribute Prediction Benchmark directory into the root directory. We will work a lot with GoogleDrive as a file storage - copy data from there and upload the results of work (for example, model checkpoint) to Disk.
First, copy the repository with the code and install the dependencies:
!rm -r TFFashionDetection
!git clone https://github.com/Dju999/TFFashionDetection.git
!pip install lxml
!pip install -U -q PyDrive
!pip install tqdm
You also need to create an auxiliary object for working with the Google Drive file system.
from TFFashionDetection.utils.colab_fs import GoogleColabFS
fs = GoogleColabFS()
For more information, see the utils.colab_fs.py file in the repository.
Now you need to download the DeepFashion dataset:
!python3 /content/TFFashionDetection/utils/dataset_download.pyThere are three directories in the dataset
- Img - with images of garments
- Eval - contains a text file with splitting the dataset into train, test, valid
- Anno - here are the files with tags, bounding boxes and other service information
Our task is to prepare this data for feeding the neural network: description of files in a special format, splitting into train and test.
Tensorflow Image Detection
Google in 2017 launched the Object Detection API - a set of models and tools for image detection. The repository has a lot of scripts for preparing training data, training models and visualizing results - for example, drawing bounding boxes.
The code below installs the TF Object Detection API from the github repository into the GoogleColaboratory environment.
! cd /content; git clone https://github.com/tensorflow/models.git
# установка зависимостей для object detection тут
# https://github.com/tensorflow/models/blob/master/research/object_detection/g3doc/installation.md
!apt-get install protobuf-compiler python-pil python-lxml python-tk
!pip install Cython
!cd /content; git clone https://github.com/cocodataset/cocoapi.git; cd cocoapi/PythonAPI; make; cp -r pycocotools /content/models/research/
!cd /content/models/research; protoc object_detection/protos/*.proto --python_out=.
# проверка - запускаем тесты
!cd /content/models/research; export PYTHONPATH=$PYTHONPATH:`pwd`:`pwd`/slim; python object_detection/builders/model_builder_test.py
Now you need to prepare the data. Img has a complex structure of subdirectories, where each class of clothing has its own category. The code below copies all the photos into one directory, and also prepares a description for each file in the form tf.train.Example - the detection model will be trained on all this stuff .
The code has the model name ssd_mobilenet_v2_coco_2018_03_29 - the appropriate model can be downloaded in Detection Zoo . You can download another modelka - but then you will need to rewrite the file /content/data_dir/tf_api.config.
import sys
import os
import numpy as np
API_PATH = os.path.join('/content', 'models/research')
sys.path.append(API_PATH)
DETECTOR_PATH = os.path.join('/content', 'TFFashionDetection')
sys.path.append(DETECTOR_PATH)
from TFFashionDetection.data_preparator import DataPreparator
from TFFashionDetection.utils.ssd_config import write_config
data_preparator = DataPreparator()
data_preparator.build()
write_config('ssd_mobilenet_v2_coco_2018_03_29')
After the execution of the cell is over, you can download the pre-trained model and start training the model. Frozen inference graph from Turnip Object Detetetion will allow you to quickly train your detector. The path to the directory with the model graph will need to be passed to the training script /object_detection/train.py.
# скачиваем модель (предобученную)
!python /content/TFFashionDetection/utils/download_tf_zoo_model.py --name ssd_mobilenet_v2_coco_2018_03_29 --dir /content
# запускаем обучение модели
!export PYTHONPATH=$PYTHONPATH:/content/models/research/slim:/content/models/research/;python /content/models/research/object_detection/train.py --logtostderr --pipeline_config_path=/content/data_dir/tf_api.config --train_dir=/content/data_dir/checkpoints
If everything was done correctly, we will see how the logs run and the loss will decrease at each iteration. When you see that the loss function has stopped decreasing, you can stop learning. The model graph is saved in the / content / data_dir / checkpoints directory - it will need to be saved for future experiments. Model training needs to be done once, then use the resulting graph for inference.
When the model is trained, you need to save it to Google disk
!cd /content/data_dir; zip -r checkpoint_save_20180514.zip checkpoints/*
import os
fs = GoogleColabFS()
file_name = os.path.join('/content/data_dir', 'checkpoint_save_20180514.zip')
fs.load_to_drive(file_name)
Download from Google disk in the same way
import os
fs.load_file_from_drive('/content', 'checkpoint_save_20180514.zip')
fs.unzip_file('/content', 'checkpoint_save_20180514.zip')
!mkdir /content/deep_detection_model
# экспортируем модель
!export PYTHONPATH=$PYTHONPATH:/content/models/research/slim:/content/models/research/;python /content/models/research/object_detection/export_inference_graph.py --input_type image_tensor --pipeline_config_path=/content/data_dir/tf_api.config --trained_checkpoint_prefix=/content/checkpoints/model.ckpt-2108 --output_directory inference_graph
For example, we will choose a random photo and feed it to our network for detection:
import sys
import os
import matplotlib.pyplot as plt
plt.switch_backend('agg')
sys.path.append(os.path.join('/content', 'models/research'))
from object_detection.utils import visualization_utils as vis_util
from PIL import Image as Pil_image
%matplotlib inline
boxes = np.array([oject_detector.img_detections[3]['category_box']])
def load_image_into_numpy_array(image):
  (im_width, im_height) = image.size
  return np.array(image.getdata()).reshape(
      (im_height, im_width, 3)).astype(np.uint8)
# загружаем картинку и превращаем в массив
image = Pil_image.open(file_path)
image_np = load_image_into_numpy_array(image)
# накладываем на массив bounding boxes
vis_util.draw_bounding_boxes_on_image_array(image_np, boxes)
# сохраняем картинку на диск
result_file_path = os.path.join('/content', 'test.png')
vis_util.save_image_array_as_png(image_np, result_file_path)
# виуализируем картинку, которую сохранили
from IPython.display import Image
Image(result_file_path)
We see the results of detection - lower_body garment
Conclusion
TF Object Detection API is a cool technology that allows you to use mesh architectures in your State-of-the-Art models. And Google Colaboratory is an excellent platform for experiments, which allows you to train networks on powerful hardware. The code from the article is available here .