 February 22, 2018 at 14:47
Using ReSwift: Writing a Memory Game Application
- Transfer
- Tutorial
Note. This article uses Xcode 8 and Swift 3 .
As the size of iOS applications continues to increase, the MVC pattern gradually loses its role as a “suitable” architectural solution.
For iOS developers, more effective architectural patterns are available, such as MVVM, VIPER, and Riblets . They are very different, but they have a common goal: to break the code into blocks according to the principle of a single responsibility with a multidirectional data stream. In a multidirectional stream, data moves in different directions between different modules.
Sometimes you don’t want (or you don’t need) to use a multidirectional data stream — instead, you want the data to be transmitted in one direction: it is a unidirectional data stream. In this article about ReSwift, you will turn off the beaten track and learn how to use the ReSwift framework to implement a unidirectional data stream when creating a Memory Game application called MemoryTunes .
But first, what is ReSwift?
Introduction to ReSwift
ReSwift is a small framework that will help you implement the Redux architecture with Swift.
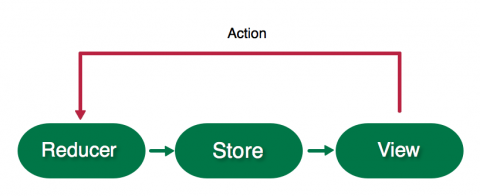
ReSwift has four main components:
- Views : Reacts to changes in the Store and displays them on the screen. Views sends Actions.
- Actions : Initiates a state change in the application. Actions are handled by Reducer.
- Reducers : Directly changes the state of an application that is stored in the Store .
- Store : Stores the current state of the application. Other modules, such as Views , can plug in and respond to changes.
ReSwift has a number of interesting advantages:
- Very strong limitations : it is tempting to place small pieces of code in a convenient place where in reality it should not be. ReSwift prevents this by setting very strong limits on what happens and where it happens.
- Unidirectional data flow : Applications that implement multidirectional data flow can be very difficult to read and debug. One change can lead to a chain of events that send data throughout the application. Unidirectional flow is more predictable and significantly reduces the cognitive load required to read code.
- Ease of testing : most of the business logic is contained in Reducers, which are pure functions.
- Platform independence: all ReSwift elements - Stores, Reducers and Actions - are platform independent. They can be easily reused for iOS, macOS or tvOS.
Multidirectional or unidirectional flow
To clarify what I mean by data flow, I will give the following example. An application created using VIPER supports multidirectional data flow between modules:

VIPER - multidirectional data stream
Compare it with a unidirectional data stream in an application built on the basis of ReSwift:
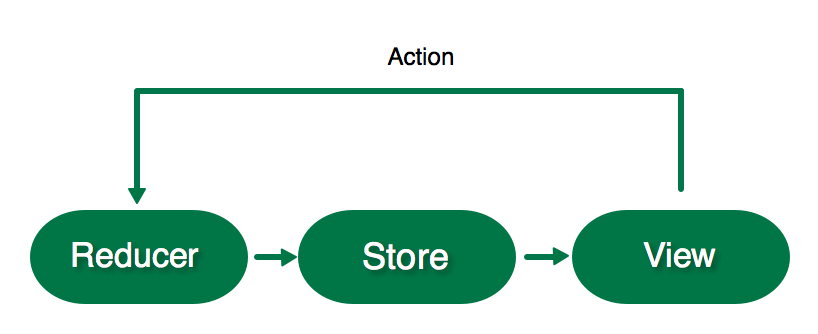
ReSwift - unidirectional data stream
Since data can be transmitted in only one direction, it is much easier to visually follow the code and identify any problems in the application.
Getting started
Start by downloading a project that currently contains some source code and a set of frameworks, including ReSwift, which you will learn more about as you read this article.
First, you will need to set up work with ReSwift. Start by creating the core of the application: its state.
Open AppState.swift and create an AppState structure that corresponds to StateType:
import ReSwift
struct AppState: StateType {
}
This structure determines the state of the application.
Before you create a Store that will contain an AppState value, you need to create the main Reducer .

Reducer directly changes the current value of the AppState stored in the Store . Only Action can run Reducer to change the current state of the application. Reducer generates the current AppState value depending on the Action it receives.
Note. There is only one Store in the application and it has only one main Reducer.
Create the main reducer application function in AppReducer.swift
import ReSwift
func appReducer(action: Action, state: AppState?) -> AppState {
   return AppState()
}
appReducer is a function that takes an Action and returns a modified AppState. The state parameter is the current state of the application. This function should change state accordingly depending on the received action. Now just a new AppState value is created - you will return to it as soon as you configure the Store.
It's time to create a Store that stores the state of the application, and reducer, in turn, could change it.

The Store stores the current state of the entire application: this is the value of your AppState structure. Open AppDelegate.swift and replace import UIKit with the following:
import ReSwift
var store = Store(reducer: appReducer, state: nil)
This creates a global store variable initialized by appReducer. appReducer is the main Reducer of the Store block, which contains instructions on how the store should change when an Action is received. Since this is the original creation, not an iterative change, you are passing an empty state.
Compile and run the application to make sure that we did everything right:

This is not very interesting ... But at least it works:]
Interface navigation
It's time to create the first real state of the application. You will start by navigating the interface (routing).
Navigating into an application (or routing) is a daunting task for every architecture, not just ReSwift. You have to use a simple approach in MemoryTunes, where you define the entire list of screens in enum and AppState will contain the current value. AppRouter will respond to changes in this value and display the current status on the screen.
Open AppRouter.swift and replace import UIKit with the following:
import ReSwift
enum RoutingDestination: String {
  case menu = "MenuTableViewController"
  case categories = "CategoriesTableViewController"
  case game = "GameViewController"
}
This enum defines all the controllers represented in the application.
Now you have something to store in the State application. In this case, there is only one main state structure (AppState), but you can divide the state of the application into sub-states indicated in the main state.
Since this is good practice, you will group state variables into sub-state structures. Open RoutingState.swift and add the following sub-state structure for navigation:
import ReSwift
struct RoutingState: StateType {
  var navigationState: RoutingDestination
  init(navigationState: RoutingDestination = .menu) {
    self.navigationState = navigationState
  }
}
RoutingState contains a navigationState that represents the current destination on the screen.
Note: menu is the default value for navigationState. This value is indirectly set by default when the application starts, unless you specify another one when initializing the RoutingState.
In AppState.swift, add the following to the structure:
let routingState: RoutingState
AppState now contains a sub-state of RoutingState.
Launch the application and you will see the problem:

The appReducer function no longer compiles! This is because you added routingState to AppState but didn’t pass anything to the default initializer call. To create a RoutingState you need reducer.
There is only one core function in Reducer, but like state, reducers must be sub-reducers divided.

Add the following Reducer to navigate to RoutingReducer.swift :
import ReSwift
func routingReducer(action: Action, state: RoutingState?) -> RoutingState {
  let state = state ?? RoutingState()
  return state
}
Like the main Reducer, routingReducer changes state based on the action it receives and then returns it. You have no actions yet, so a new RoutingState is created if state is nil and this value is returned.
Sub-reducers are responsible for initializing the initial values of the corresponding sub-states.
Return to AppReducer.swift to fix the compiler warning. Modify the appReducer function to match this:
return AppState(routingState: routingReducer(action: action, state: state?.routingState))
We have added the routingState argument to the AppState initializer. The action and state from the main reduser are passed to routingReducer to determine the new state. Get used to this routine because you will have to repeat this for every sub-state and sub-reducer you create.
Subscribing
Remember that the default menu is set to RoutingState? This is actually the current state of the application! You just never subscribed to it.
Any class can subscribe to the Store, not just Views. When a class subscribes to the Store, it receives information about all changes that occur in the current state or sub-state. You need to do this in the AppRouter so that it can change the current screen for the UINavigationController when changing the routingState.
Open the AppRouter.swift file and replace AppRouter with the following:
final class AppRouter {
  let navigationController: UINavigationController
  init(window: UIWindow) {
    navigationController = UINavigationController()
    window.rootViewController = navigationController
    // 1
    store.subscribe(self) {
      $0.select {
        $0.routingState
      }
    }
  }
  // 2
  fileprivate func pushViewController(identifier: String, animated: Bool) {
    let viewController = instantiateViewController(identifier: identifier)
    navigationController.pushViewController(viewController, animated: animated)
  }
  private func instantiateViewController(identifier: String) -> UIViewController {
    let storyboard = UIStoryboard(name: "Main", bundle: nil)
    return storyboard.instantiateViewController(withIdentifier: identifier)
  }
}
// MARK: - StoreSubscriber
// 3
extension AppRouter: StoreSubscriber {
  func newState(state: RoutingState) {
    // 4
    let shouldAnimate = navigationController.topViewController != nil
    // 5
    pushViewController(identifier: state.navigationState.rawValue, animated: shouldAnimate)
  }
}
In the above code, you updated the AppRouter class and added extension. Let's take a closer look at what we did:
- AppState is now subscribed to the global store. In the closure expression, select indicates that you are subscribed to the changes to routingState.
- pushViewController will be used to instantiate and add it to the navigation stack. It uses the instantiateViewController method, which loads the controller based on the passed identifier.
- Create an AppRouter that matches StoreSubscriber so that newState receives callbacks as soon as routingState changes.
- You do not want to power the root view controller, so check if the current destination is the root.
- When the state changes, you add a new destination to the UINavigationController using rawValue for state.navigationState, which is the name of the view controller.
AppRouter will now respond to the initial value of menu and display a MenuTableViewController.
Compile and run the application to verify that the error has disappeared:

MenuTableViewController is currently displayed, which is empty. You will display a menu in it that will redirect the user to other screens.
View
Anything can be StoreSubscriber, but most of the time it will be a view that responds to state changes. Your task is to make MenuTableViewControleller display two options of a submenu (or menu). The time has come for the State / Reducer procedure!
Go to MenuState.swift and create a state for the menu as follows:
import ReSwift
struct MenuState: StateType {
  var menuTitles: [String]
  init() {
    menuTitles = ["New Game", "Choose Category"]
  }
}
The MenuState structure consists of an array of menuTitles, which you initialize with the headers that will appear in a table.
In MenuReducer.swift, create a Reducer for this state with the following code:
import ReSwift
func menuReducer(action: Action, state: MenuState?) -> MenuState {
  return MenuState()
}
Since MenuState is static, you do not need to worry about handling state changes. Thus, the new MenuState is simply returned.
Return to AppState.swift . Add a MenuState to the end of the AppState.
let menuState: MenuState
It will not compile because you changed the default initializer again. In AppReducer.swift, change the AppState initializer as follows:
return AppState(
  routingState: routingReducer(action: action, state: state?.routingState),
  menuState: menuReducer(action: action, state: state?.menuState))
Now that you have the MenuState, it's time to subscribe to it and use it to render the menu.
Open MenuTableViewController.swift and replace the code with the following:
import ReSwift
final class MenuTableViewController: UITableViewController {
  // 1
  var tableDataSource: TableDataSource?
  override func viewWillAppear(_ animated: Bool) {
    super.viewWillAppear(animated)
    // 2
    store.subscribe(self) {
      $0.select {
        $0.menuState
      }
    }
  }
  override func viewWillDisappear(_ animated: Bool) {
    super.viewWillDisappear(animated)
    // 3
    store.unsubscribe(self)
  }
}
// MARK: - StoreSubscriber
extension MenuTableViewController: StoreSubscriber {
  func newState(state: MenuState) {
    // 4
    tableDataSource = TableDataSource(cellIdentifier:"TitleCell", models: state.menuTitles) {cell, model in
      cell.textLabel?.text = model
      cell.textLabel?.textAlignment = .center
      return cell
    }
    tableView.dataSource = tableDataSource
    tableView.reloadData()
  }
}
The controller is now subscribed to the MenuState changes and declaratively displays the state on the user interface.
- TableDataSource is included in the startup system and acts as a declarative data source for the UITableView.
- Subscribe to menuState in viewWillAppear. Now you will receive callbacks in newState every time the menuState changes.
- If necessary, unsubscribe.
- This is the declarative part. Here you populate the UITableView. You can clearly see in the code how the state is converted to view.
Note. As you may have noticed, ReSwift supports immutability - it actively uses structures (values), not objects. It also encourages you to create declarative user interface code. What for?
The newState callback defined in StoreSubscriber passes state changes. You may be tempted to fix the state value in a parameter, for example,
final class MenuTableViewController: UITableViewController {
 var currentMenuTitlesState: [String]
 ...
But writing declarative user interface code that clearly shows how state is transformed into a view is more straightforward and much easier to use. The problem with this example is that the UITableView does not have a declarative API. This is why I created a TableDataSource to eliminate the difference. If you are interested in the details, take a look at TableDataSource.swift .
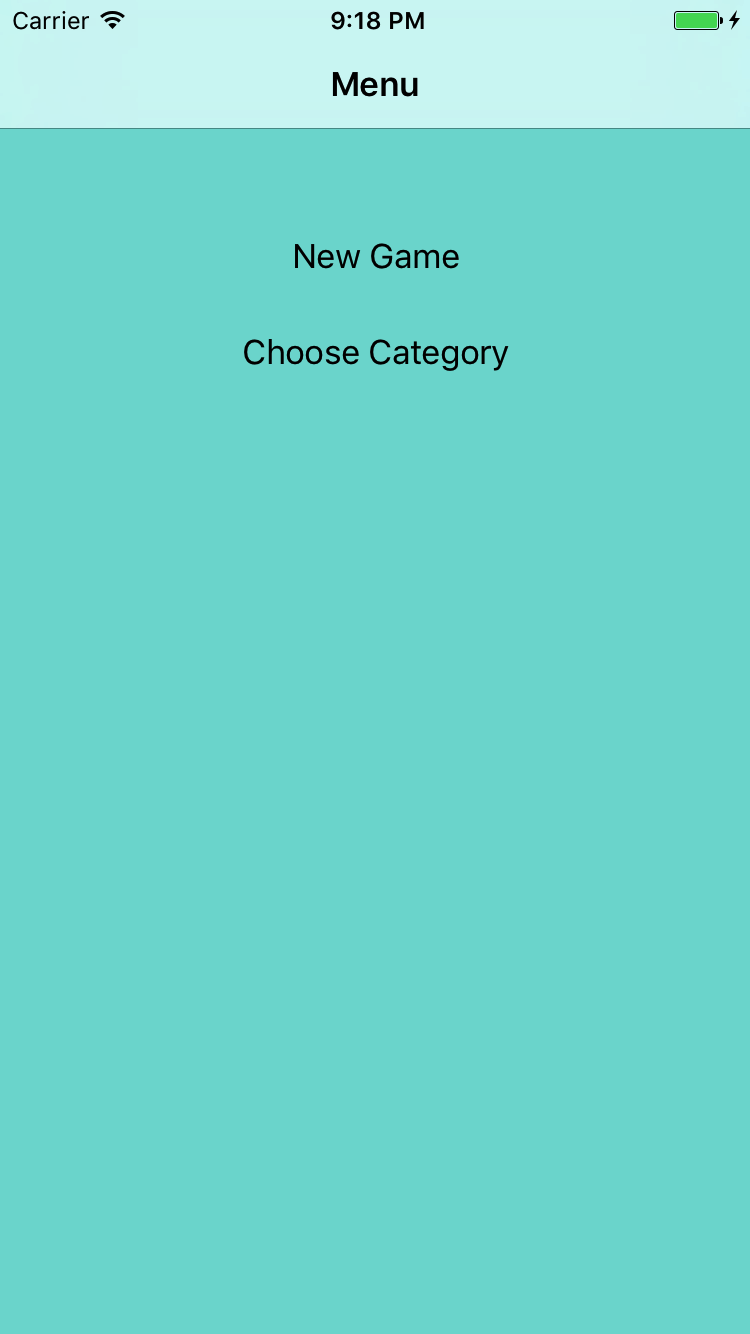
Compile and run the application and you will see a menu:
Actions
Now that you have a ready-made menu, it would be great if we could use it to switch / open new screens. It's time to write your first Action.
Actions initiate a change to the Store. An action is a simple structure that can contain variables: Action parameters. Reducer processes the generated Action and changes the state of the application depending on the type of action and its parameters.
Create an action in RoutingAction.swift :
import ReSwift
struct RoutingAction: Action {
  let destination: RoutingDestination
}
RoutingAction changes the current destination.
Now you are going to execute RoutingAction when you select a menu item.
Open MenuTableViewController.swift and add the following to MenuTableViewController:
override func tableView(_ tableView: UITableView, didSelectRowAt indexPath: IndexPath) {
  var routeDestination: RoutingDestination = .categories
  switch(indexPath.row) {
  case 0: routeDestination = .game
  case 1: routeDestination = .categories
  default: break
  }
  store.dispatch(RoutingAction(destination: routeDestination))
}
This will set the routeDestination value based on the row you selected. Then dispatch is applied to pass the RoutingAction to the Store.
Action is ready for execution, but not supported by any reducer. Open RoutingReducer.swift and replace the contents of routingReducer with the following code, which will update the state:
var state = state ?? RoutingState()
switch action {
case let routingAction as RoutingAction:
  state.navigationState = routingAction.destination
default: break
}
return state
switch checks if the passed action is a RoutingAction action. If so, then its destination is used to change the RoutingState, which then returns back.
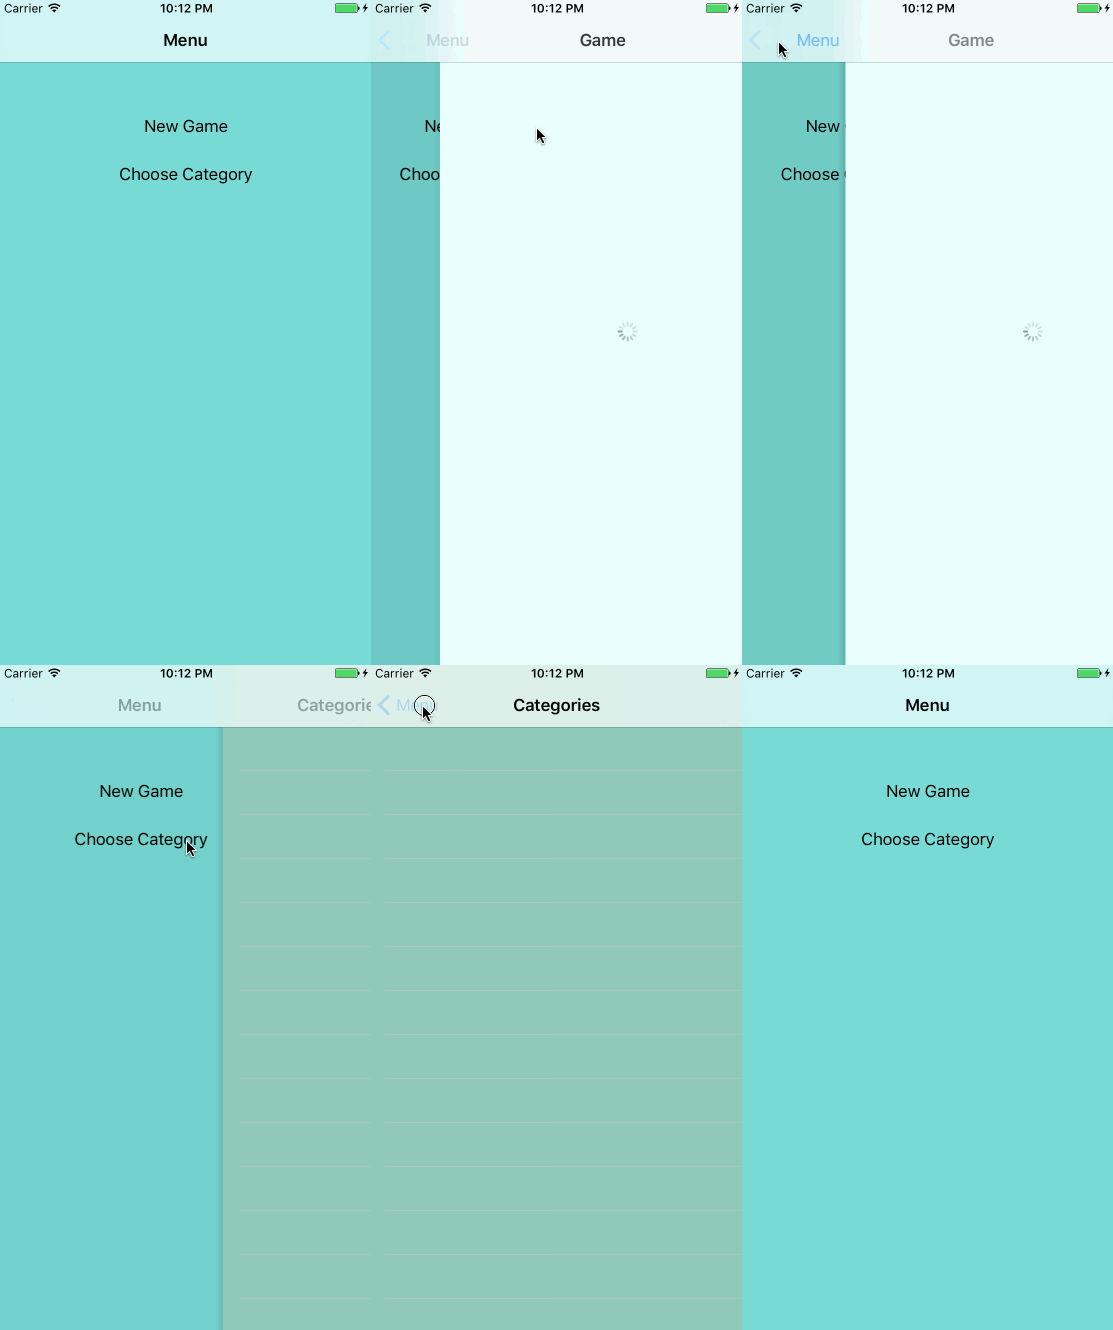
Compile and run the application. Now, when you select a menu item, the corresponding view controller will appear on top of the menu controller.
Status update
You may have noticed an error in the current navigation implementation. When you click on the New Game menu item, the navigationState in the RoutingState changes from menu to game. But when you press the return button to return to the menu, navigationState does not update anything!
In ReSwift, it is important to maintain a state that is synchronized with the current state of the user interface. It is easy to forget about it when something is completely controlled by UIKit, for example, navigation to return or fill a text field by a user in UITextField.
We can fix this if we update the navigationState when the MenuTableViewController appears.
In MenuTableViewController.swift add this line to the bottom of viewWillAppear:
store.dispatch(RoutingAction(destination: .menu))
If the user clicked on the disgrace button, this code will update the store.
Launch the app and check your navigation again. III ... now the navigation is completely defective. Nothing is displayed.
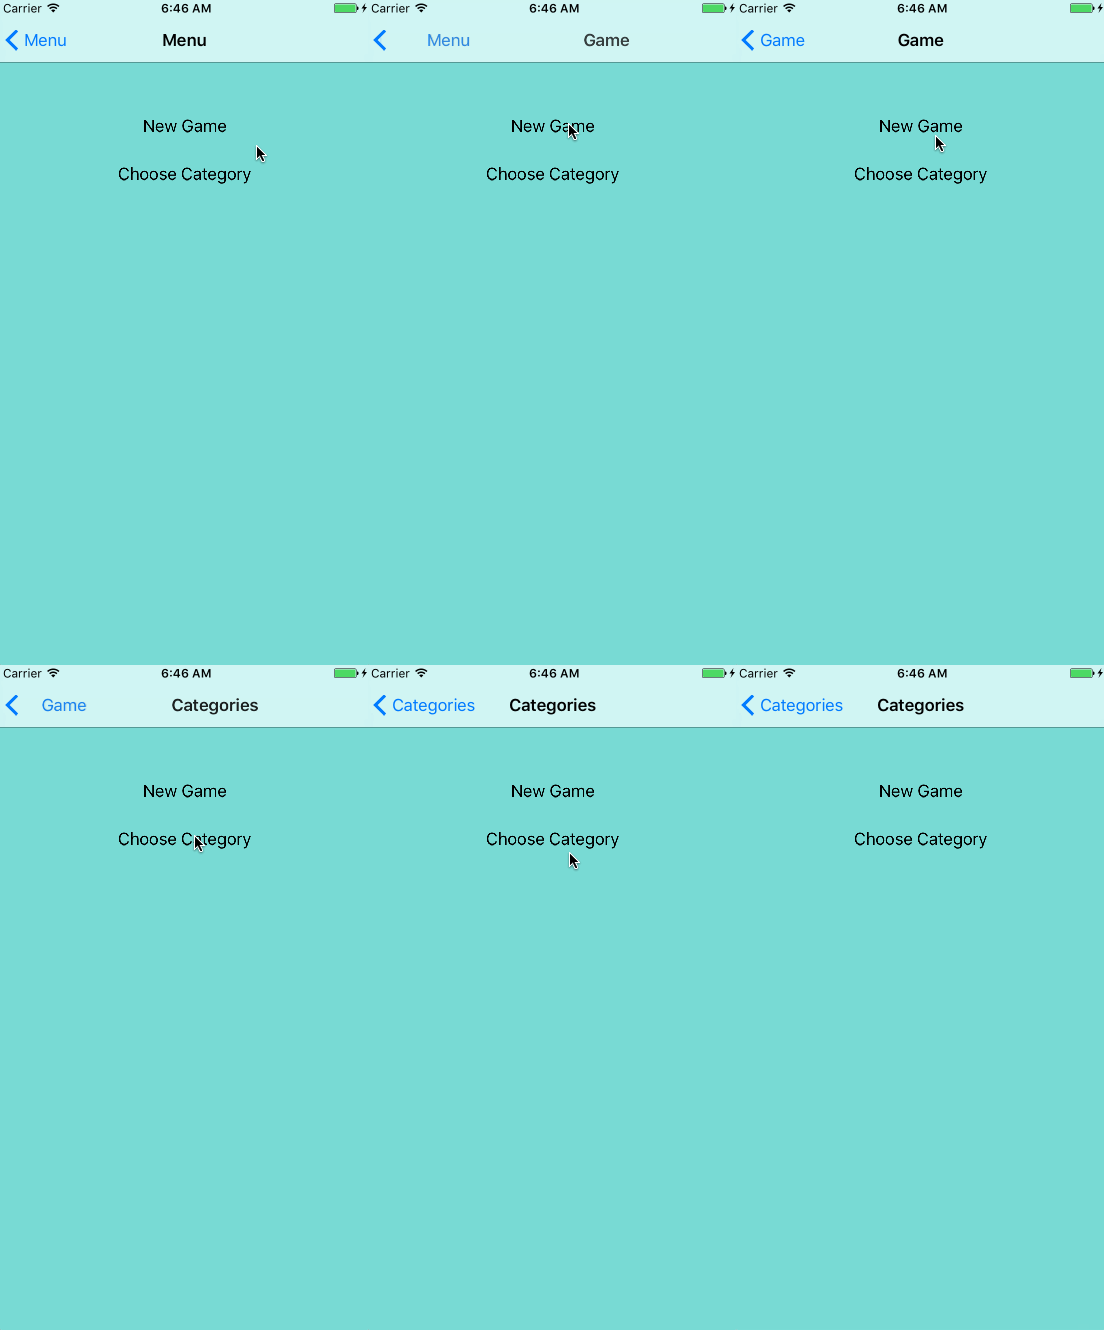
Open AppRouter.swift . Remember that pushViewController is called every time a new navigationState is received. This means that you are updating the RoutingDestination menu by clicking on it again!
You must perform an additional check if the MenuViewController is not displayed. Replace the contents of pushViewController with:
let viewController = instantiateViewController(identifier: identifier)
let newViewControllerType = type(of: viewController)
if let currentVc = navigationController.topViewController {
  let currentViewControllerType = type(of: currentVc)
  if currentViewControllerType == newViewControllerType {
    return
  }
}
navigationController.pushViewController(viewController, animated: animated)
You call the type (of :) function for the last view controller and compare it with the new one that appears when clicked. If they match, then return two values.
Compile and run the application and the navigation should work fine if the menu settings are correct, when you change the stack.
Updating state using the user interface and dynamically checking the current state are usually complex. This is one of the challenges you have to overcome when working with ReSwift. Fortunately, this does not have to happen very often.
Categories
Now you will take a step forward and implement a more complex screen: CategoriesTableViewController. You must allow users to select a music category so that they can enjoy playing Memory while listening to their favorite artists. Start by adding states to CategoriesState.swift :
import ReSwift
enum Category: String {
  case pop = "Pop"
  case electronic = "Electronic"
  case rock = "Rock"
  case metal = "Metal"
  case rap = "Rap"
}
struct CategoriesState: StateType {
  let categories: [Category]
  var currentCategorySelected: Category
  init(currentCategory: Category) {
    categories = [ .pop, .electronic, .rock, .metal, .rap]
    currentCategorySelected = currentCategory
  }
}
enum defines several categories of music. CategoriesState contains an array of available categories, as well as currentCategorySelected for status tracking.
In ChangeCategoryAction.swift add the following:
import ReSwift
struct ChangeCategoryAction: Action {
  let categoryIndex: Int
}
This triggers an action that can change CategoryState using categoryIndex to reference categories of music.
Now you need to implement Reducer, which accepts ChangeCategoryAction and saves the updated state. Open CategoriesReducer.swift and add the following:
import ReSwift
private struct CategoriesReducerConstants {
  static let userDefaultsCategoryKey = "currentCategoryKey"
}
private typealias C = CategoriesReducerConstants
func categoriesReducer(action: Action, state: CategoriesState?) -> CategoriesState {
  var currentCategory: Category = .pop
  // 1
  if let loadedCategory = getCurrentCategoryStateFromUserDefaults() {
    currentCategory = loadedCategory
  }
  var state = state ?? CategoriesState(currentCategory: currentCategory)
  switch action {
  case let changeCategoryAction as ChangeCategoryAction:
    // 2
    let newCategory = state.categories[changeCategoryAction.categoryIndex]
    state.currentCategorySelected = newCategory
    saveCurrentCategoryStateToUserDefaults(category: newCategory)
  default: break
  }
  return state
}
// 3
private func getCurrentCategoryStateFromUserDefaults() -> Category? {
  let userDefaults = UserDefaults.standard
  let rawValue = userDefaults.string(forKey: C.userDefaultsCategoryKey)
  if let rawValue = rawValue {
    return Category(rawValue: rawValue)
  } else {
    return nil
  }
}
// 4
private func saveCurrentCategoryStateToUserDefaults(category: Category) {
  let userDefaults = UserDefaults.standard
  userDefaults.set(category.rawValue, forKey: C.userDefaultsCategoryKey)
  userDefaults.synchronize()
}
As in the case with other reducers, a method for completely updating the state through actions is formed. In this case, you also save the selected category to UserDefaults . More details on how this happens:
- The current category is loaded from UserDefaults, if available, and used to create the CategoriesState image if it has not already been created.
- Responding to ChangeCategoryAction by updating the state and saving the new category in UserDefaults.
- getCurrentCategoryStateFromUserDefaults is a helper function that loads a category from UserDefaults.
- saveCurrentCategoryStateToUserDefaults is a helper function that saves a category in UserDefaults.
Helper functions are also pure global functions. You can put them in a class or structure, but they should always stay clean.
Naturally, you need to update AppState with a new state. Open AppState.swift and add the following to the end of the structure:
let categoriesState: CategoriesState
categoryState is now part of AppState. You have already mastered it!
Open AppReducer.swift and change the return value accordingly:
return AppState(
  routingState: routingReducer(action: action, state: state?.routingState),
  menuState: menuReducer(action: action, state: state?.menuState),
  categoriesState: categoriesReducer(action:action, state: state?.categoriesState))
Here you added categoryState to appReducer, passing action and categoriesState.
Now you need to create a category screen, similar to MenuTableViewController. You sign it to the Store and use TableDataSource.
Open CategoriesTableViewController.swift and replace the contents with the following:
import ReSwift
final class CategoriesTableViewController: UITableViewController {
  var tableDataSource: TableDataSource?
  override func viewWillAppear(_ animated: Bool) {
    super.viewWillAppear(animated)
    // 1
    store.subscribe(self) {
      $0.select {
        $0.categoriesState
      }
    }
  }
  override func viewWillDisappear(_ animated: Bool) {
    super.viewWillDisappear(animated)
    store.unsubscribe(self)
  }
  override func tableView(_ tableView: UITableView, didSelectRowAt indexPath: IndexPath) {
    // 2
    store.dispatch(ChangeCategoryAction(categoryIndex: indexPath.row))
  }
}
// MARK: - StoreSubscriber
extension CategoriesTableViewController: StoreSubscriber {
  func newState(state: CategoriesState) {
    tableDataSource = TableDataSource(cellIdentifier:"CategoryCell", models: state.categories) {cell, model in
      cell.textLabel?.text = model.rawValue
      // 3
      cell.accessoryType = (state.currentCategorySelected == model) ? .checkmark : .none
      return cell
    }
    self.tableView.dataSource = tableDataSource
    self.tableView.reloadData()
  }
}
This is pretty similar to MenuTableViewController. Here are some highlights:
- In viewWillAppear, subscribe to categoriesState changes and unsubscribe in viewWillDisappear.
- ChangeCategoryAction is called when the user selects a cell.
- In newState, check the box for the category currently selected
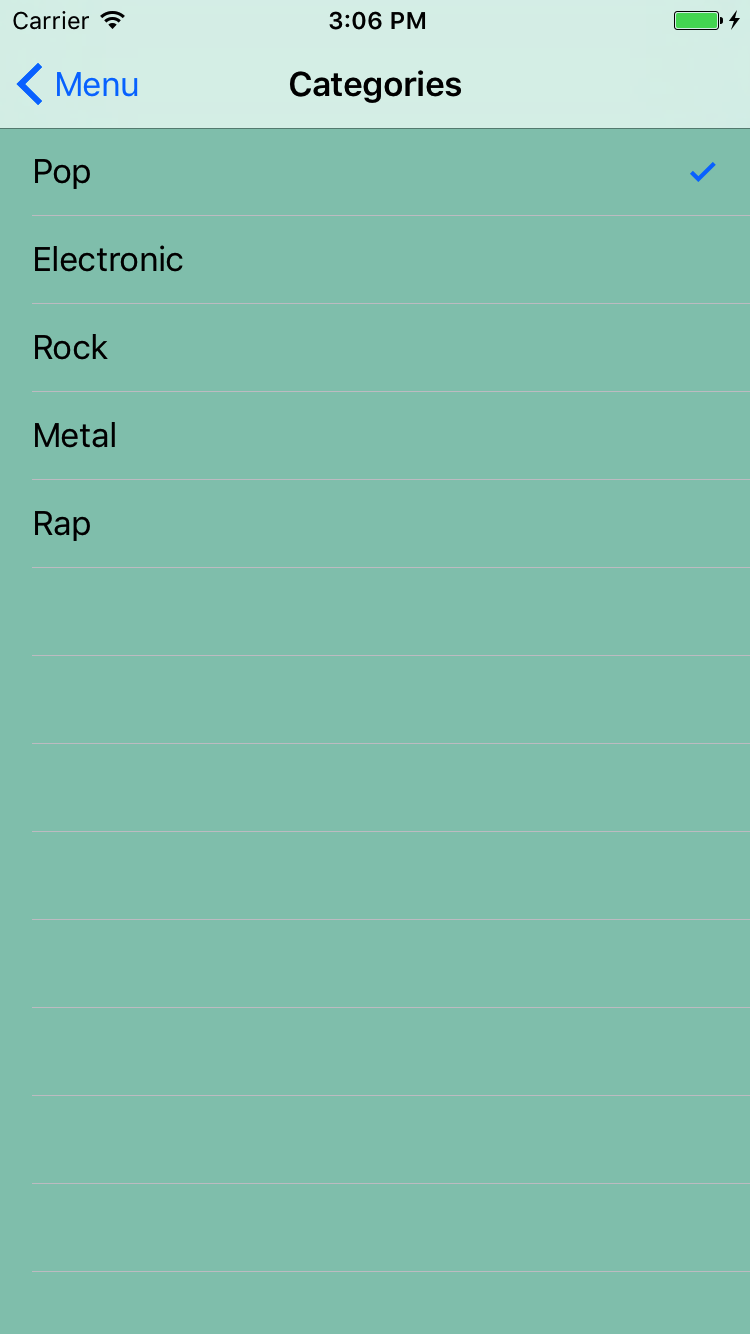
Everything is configured. Now you can select a category. Compile and run the application and select Choose Category to make sure that you work correctly.
Asynchronous tasks
Is asynchronous programming a difficult task? Yes! But not for ReSwift.
You get images for Memory card from iTunes API. But first you need to create a game state, reducer and the action associated with it.
Open GameState.swift and you will see the MemoryCard structure representing the game card. It includes imageUrl, which will be displayed on the map. isFlipped indicates whether the face of the card is visible, and isAlreadyGuessed indicates whether the card was guessed.
You will add the game state to this file. Start by importing ReSwift at the top of the file:
import ReSwift
Now add the following code to the end of the file:
struct GameState: StateType {
  var memoryCards: [MemoryCard]
  // 1
  var showLoading: Bool
  // 2
  var gameFinished: Bool
}
This determines the state of the game. In addition to the contents of the array of available memoryCards, specify the parameters:
- Download indicator, visible or not.
- Game over.
Add game Reducer to GameReducer.swift :
import ReSwift
func gameReducer(action: Action, state: GameState?) -> GameState {
    let state = state ?? GameState(memoryCards: [], showLoading: false, gameFinished: false)
    return state
}
At the moment, just creating a new GameState. You will come back to this later.
In the AppState.swift file , add gameState at the end of the AppState:
let gameState: GameState
In AppReducer.swift , update the initializer for the last time:
return AppState(
  routingState: routingReducer(action: action, state: state?.routingState),
  menuState: menuReducer(action: action, state: state?.menuState),
  categoriesState: categoriesReducer(action:action, state: state?.categoriesState),
  gameState: gameReducer(action: action, state: state?.gameState))
Note. Pay attention to how predictable, understandable, and simple to work after executing the Action / Reducer / State procedure. This procedure is convenient for programmers, due to the unidirectional nature of ReSwift and the strict restrictions that it sets for each module. As you know, only Reducers can change the Store in the application and only Actions can initiate this change. You will immediately know where to look for problems and where to add new code.
Now define the action for updating the maps by adding the following code to SetCardsAction.swift :
import ReSwift
struct SetCardsAction: Action {
  let cardImageUrls: [String]
}
Action sets the image URL for maps in GameState.
Now you are ready to create the first asynchronous action. In FetchTunesAction.swift add the following:
import ReSwift
func fetchTunes(state: AppState, store: Store) -> FetchTunesAction {
  iTunesAPI.searchFor(category: state.categoriesState.currentCategorySelected.rawValue) { imageUrls in
    store.dispatch(SetCardsAction(cardImageUrls: imageUrls))
  }
  return FetchTunesAction()
}
struct FetchTunesAction: Action {
}
The fetchTunes method retrieves images using the iTunesAPI (included in the starter project). With a closure, you send SetCardsAction with the result. Asynchronous tasks in ReSwift are very simple: just submit the action later when done. That's all.
The fetchTunes method returns FetchTunesAction, which will be used to indicate the start of the selection.
Open GameReducer.swift and add support for two new actions. Replace the contents of gameReducer with the following:
var state = state ?? GameState(memoryCards: [], showLoading: false, gameFinished: false)
switch(action) {
// 1
case _ as FetchTunesAction:
  state = GameState(memoryCards: [], showLoading: true, gameFinished: false)
// 2
case let setCardsAction as SetCardsAction:
  state.memoryCards = generateNewCards(with: setCardsAction.cardImageUrls)
  state.showLoading = false
default: break
}
return state
You changed state to a constant, and then launched the action switch, which performs the following actions:
- The FetchTunesAction sets showLoading to true.
- In SetCardsAction, cards are randomly selected and showLoading is set to false. generateNewCards can be found in the file MemoryGameLogic.swift - the file that is included in the starter project.
It's time to lay out cards in GameViewController. Start by creating a cell.
Open the CardCollectionViewCell.swift file and add the following method to the end of the CardCollectionViewCell:
func configureCell(with cardState: MemoryCard) {
  let url = URL(string: cardState.imageUrl)
  // 1
  cardImageView.kf.setImage(with: url)
  // 2
  cardImageView.alpha = cardState.isAlreadyGuessed || cardState.isFlipped ? 1 : 0
}
The configureCell method performs the following actions:
- Uses the excellent Kingfisher library for caching images.
- Shows a card if it is guessed or turned upside down.
Then do a collection view to display the maps. As with table views, there is a declarative wrapper for the UICollectionView named CollectionDataSource included in the launcher you are using.
Open GameViewController.swift and first replace UIKit with:
import ReSwift
In the GameViewController, add the following code directly above the showGameFinishedAlert method:
var collectionDataSource: CollectionDataSource?
override func viewWillAppear(_ animated: Bool) {
  super.viewWillAppear(animated)
  store.subscribe(self) {
    $0.select {
      $0.gameState
    }
  }
}
override func viewWillDisappear(_ animated: Bool) {
  super.viewWillDisappear(animated)
  store.unsubscribe(self)
}
override func viewDidLoad() {
  // 1
  store.dispatch(fetchTunes)
  collectionView.delegate = self
  loadingIndicator.hidesWhenStopped = true
  // 2
  collectionDataSource = CollectionDataSource(cellIdentifier: "CardCell", models: [], configureCell: { (cell, model) -> CardCollectionViewCell in
    cell.configureCell(with: model)
    return cell
  })
  collectionView.dataSource = collectionDataSource
}
Note that this will result in several compiler warnings until you select StoreSubscriber. The view subscribes to the gameState in viewWillAppear and unsubscribes in viewWillDisappear. The following actions are performed in viewDidLoad:
- FetchTunes is executed to start receiving images from the iTunes API.
- Cells are configured using CollectionDataSource, which gets the appropriate model for configureCell.
Now you need to add the extension to run StoreSubscriber. Add the following to the bottom of the file:
// MARK: - StoreSubscriber
extension GameViewController: StoreSubscriber {
  func newState(state: GameState) {
    collectionDataSource?.models = state.memoryCards
    collectionView.reloadData()
    // 1
    state.showLoading ? loadingIndicator.startAnimating() : loadingIndicator.stopAnimating()
    // 2
    if state.gameFinished {
      showGameFinishedAlert()
      store.dispatch(fetchTunes)
    }
  }
}
This activates newState to handle state changes. The data source is updated, as well as:
- The status of the download indicator is updated depending on the status.
- Restarting the game and displaying a warning when the game is over.
Compile and run the game, select New Game and now you can see the maps.
Play
The logic of the game allows the player to flip two cards. If they are the same, then they remain open; if not, then they burrow again. The player's goal is to open all the cards using the minimum number of attempts.
To do this, you need the flip action. Open FlipCardAction.swift and add the following:
import ReSwift
struct FlipCardAction: Action {
  let cardIndexToFlip: Int
}
FlipCardAction uses cardIndexToFlip to update the GameState when the card is flipped.
Modify gameReducer to support FlipCardAction and do the magic of the game algorithm. Open GameReducer.swift and add the following block before default:
case let flipCardAction as FlipCardAction:
  state.memoryCards = flipCard(index: flipCardAction.cardIndexToFlip, memoryCards: state.memoryCards)
  state.gameFinished = hasFinishedGame(cards: state.memoryCards)
For FlipCardAction, flipCard, changing the state of Memory cards is based on cardIndexToFlip and other game logic. hasFinishedGame is called to determine if the game has ended and update the state accordingly. Both functions can be found in MemoryGameLogic.swift .
The final part of the puzzle is to send the flip action when choosing a card. This will trigger the game logic and make the corresponding state changes.
In the GameViewController.swift file , find the UICollectionViewDelegate extension. Add the following to collectionView (_: didSelectItemAt :):
store.dispatch(FlipCardAction(cardIndexToFlip: indexPath.row))
When a map is selected in the collection view, the associated indexPath.row is sent using FlipCardAction.
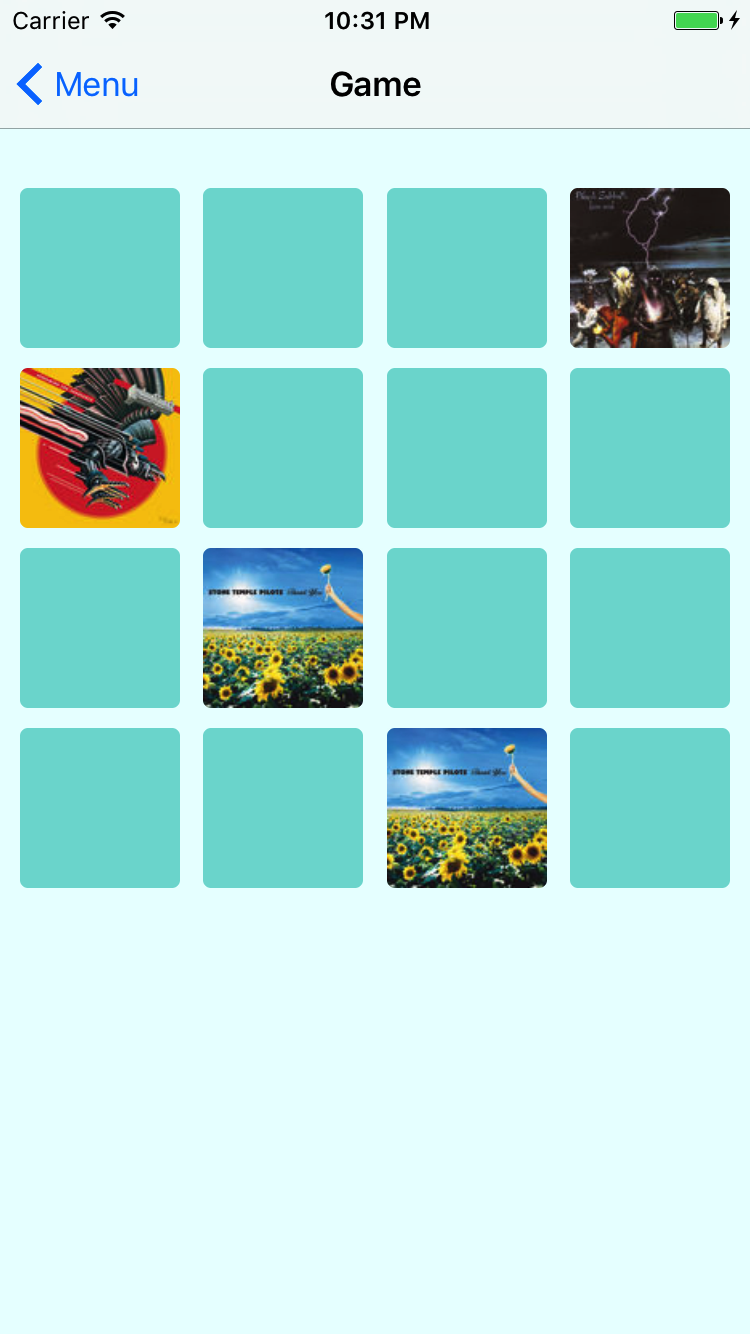
Launch the game. Now you can play. Come back and have fun! :]
What's next?
You can download the final version of MemoryTunes here .
There is still much to learn about ReSwift.
- Software : There is currently no good way to handle Cross CuttingConcern in Swift. At ReSwift, you will get it for free! You can solve various problems using the Middleware function available in ReSwift. This makes it easy to deal with logging, statistics, caching.
- Навигация по интерфейсу. Вы реализовали собственную навигацию для приложения MemoryTunes. Можно использовать более общее решение, такое как ReSwift-Router. Это по-прежнему открытая проблема и может быть вы будете одним из тех, кто решит ее?:]
- Тестирование: ReSwift, вероятно, самая простая архитектура для создания тестов. Reducers содержат код, необходимый для тестирования и они являются чистыми функциями. Чистые функции всегда дают один и тот же результат для того же входа, не полагаются на состояние приложения и не имеют побочных эффектов.
- Отладка: при условии, что состояние ReSwift определено в одной структуре и однонаправленном потоке, отладка намного проще. Вы даже можете записывать этапы состояния, приводящие к сбою.
- Persistence. Поскольку все состояние вашего приложения находится в одном месте, вы можете легко его сериализовать и сохранять. Кэширование контента для автономного режима — сложная архитектурная проблема. С ReSwift вы получаете его почти бесплатно.
- Другие реализации: Архитектура подобная Redux не является библиотекой: это парадигма. Вы можете реализовать ее самостоятельно используя ReSwift или другие библиотеки, такие как Katana или ReduxKit.
If you want to expand your knowledge on this topic, listen to ReSwift talk - conversations by Benjamin Encz, creator of ReSwift
. ReSwift’s also has many interesting examples of projects. Finally, Christian Tietze's blog features new topics about ReSwift.
If you have any questions, comments or ideas, join the discussion on the forums below!









