Build under stm32duino using CMake (and rake off the linker)
Hello! How often do you think how code written in a beautiful IDE turns into a set of bytes, digestible for a processor or microcontroller? So I personally do not often. It works well for itself. I clicked the Add File button - the IDE itself added the source to the project, it calls the compiler and linker itself. Write yourself a code and don’t think about trifles.
But sometimes all these implicit things come to the surface and begin to dream in nightmares. It turns out that even in the simplest Hello World, a lot of different and very interesting gears are spinning under the hood, which provide a smooth and comfortable movement. The world of microcontrollers is no exception.
Today we will focus on replacing the build system for my project. For various reasons, I was closely with Arduino and had to look for something where I could turn around. Under the cat, my experience of the transition from the Arduino system build to the firmware assembly for the STM32 microcontroller and the stm32duino framework using CMake is described.
Build system Arduino
I like Arduino because it allows you to smoothly enter the world of microcontrollers. But, as many say, this is all for beginners and for a more or less serious project, the arduino is not suitable. I do not want to be categorical and say that arduino sucks and all that jazz. Let's better sort things out.
So, I would highlight the following things in Arduino:
- Arduino IDE - editor, compiler and a set of libraries in one bottle. It allows you to quickly start with a small project or to assemble a project downloaded from the Internet. There is no need to install additional funds - everything is out of the box.
- Arduino boards - open source design of boards based on ATMega processors (or others from Atmel). The boards are more or less standardized and there are many shields and peripherals for them.
- Arduino framework - a set of C ++ classes, interfaces and libraries that hide the low-level logic and registers of the microcontroller. The user is provided with a convenient, fairly high-level interface for work.
Each of these parts is independent of the rest. So in ArduinoIDE you can write under other microcontrollers (for example, under ESP8266), or vice versa, abandon ArduinoIDE and learn all the charms of Arduino somewhere in Atmel Studio, Eclipse or even vim. Some boards are not quite similar to Arduino boards (for example, quadcopter flight controllers), but you can easily add Arduino sketches to them. And vice versa, Arduino boards can be programmed in bare C or assembler. As for the Arduino framework, it can be noted that it is ported to many microcontrollers ( STM32 , TI ), which lowers the threshold for entering this world to an acceptable level.
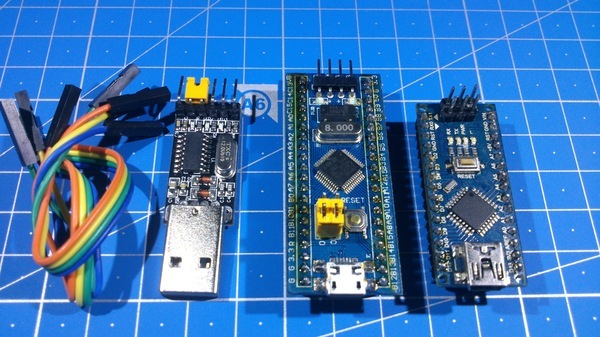
In the middle is the board on stm32f103c6 (in fact stm32f103cb), on the right is the arduino nano. Photo from here( here the question of stm32duino is touched a little more deeply)
In my project I almost immediately abandoned the Arduino IDE in favor of the more familiar Atmel Studio. I also refused Arduino boards in favor of STM32 as a more powerful platform with a bit more peripherals and memory. I really would not want to refuse the Arduino framework - it is quite beautiful, convenient and provides everything you need. I use stm32duino - an arduino port for STM32 microcontrollers. But SPL (Orthodox abstraction over the registers and the controller stuffing from ST itself) somehow didn’t enter - the code is too bulky and ugly.
But there is another very implicit part of arduino - build system. This implicitness is a big plus for small projects when you don’t want to think and understand how it all works. You just add files and libraries and it collects everything. For beginners, this is the most. But when the project grows even a little, several libraries are added and a fine tuning of the compiler is required, the build system of the arduino begins to interfere. Here is a list of things that interfered with my project
- Inability to sort the source into directories
If the source code is just a couple of pieces, then it’s easy to navigate them. If the number of files in a project exceeds several tens, then dumping them all in a heap is not a good idea. It is convenient to decompose different components or independent parts of the project into different directories and, if necessary, register include paths.
Unfortunately, in Arduino, the sources cannot be decomposed into different directories, or at least somehow group files in the IDE. The Arduino build system implies that all files are in the same directory. Moreover, the source code is connected to the project precisely by the fact of finding the file in the same directory as the main sketch file. By the way, the directory itself, in which the sketch lies, should also not be called anyhow - it should be called exactly like the sketch. - Libraries need to be installed
And although this is a one-time operation, you need to write separate instructions for building the project: download the libraries from here, put them there, configure them like this.
Sometimes you need to make some kind of change in the library (to fix an error or to work on your own), then at least you need to fork on the github. And in the assembly instructions for the project in capital letters, write that the original library will not work.
But in another way. Libraries cannot be put in the version control system next to the sources of your project - you simply can’t connect them to the project. - Setting library parameters is performed in the library itself.
In libraries for large computers, everything is configured with defines. The whole library is supplied, and the client uses it at his discretion.
With arduino libraries, this is not so. Usually a library contains some kind of header file that you need to file for yourself, enable or disable certain settings, and correct links to peripherals. But what if I have several projects that use this library, but with different parameters? After all, the library is installed in a shared directory and changes for one project will affect another.
And, again, the question of version control of the configuration file remains open - The project is always reassembled in its entirety.
Even if some small change in one file has changed, you still need to wait until all files are recompiled. In my case, it is about a minute.
All this is compounded by the absence of any visible progress. Whether it works, or if it’s not, it’s not clear. In case of a successful build, the build system writes the size of the firmware. But if an error occurs (for example, the size of flash memory is exceeded), then the build system will not report this at all. - Finally, you cannot flexibly change compilation keys.
Even optimization settings cannot be changed. And you can forget about fine tuning. What can I say - you cannot register include path or define!
Examining the patient

So, the problems of the Arduino build system are clear. Clear business here it is necessary to think up something better. But before moving on to another build system, you first need to figure out how Arduino itself builds its projects. And it works very interestingly.
First of all, the build system tries to build a sketch file (.ino) with the -o nul key (we don’t write anything, we collect only compilation errors). If the compiler does not find any header, the build system will look for this header in the installed libraries. If there is, it adds the -I switch (additional include path) and tries to build one more time. If the build system does not find another header, the operation is repeated. A line with paths for the -I switch is accumulated and applied to the next file in the project.
In addition to the trick with the -I switch, the build system will also assemble the library itself. To do this, she tries to compile all * .c and * .cpp files in the library directory. Header dependencies for libraries are resolved in the manner already described. The library is compiled as a whole, even if not all files from it are used. And it is good if the linker then throws the excess. And if not?
So, if a global object is declared in the library (for example, the Serial or SPI class), then the code for this object always gets into the firmware, even if this code is not actually used. Those. The accidentally added #include directive can add a couple extra kilos to the firmware.
But that is not all. When all the dependencies are compiled, the compilation process starts one more time, already with the correct keys for compilation, code generation, optimization, and all that jazz. In general, each file is compiled at least 2 times, and particularly unsuccessful files (such as .ino) can be compiled as many times as many libraries are included in the project.
All sorts of system things (interrupt vectors, basic initialization of the board) are also compiled with the project. Fortunately, some of the files that are compiled are then compiled into .a static libraries. But this, in fact, is shamanism from the creators of stm32duino - for other libraries everything is going file-by-file.
I think for a small Arduino project with 1-2 libraries this approach to assembly does not create too much overhead. But my project of 25 cpp files and 5 libraries began to compile for almost a minute. Do you know how many times the compiler, linker and other programs from the toolchain are launched? 240 times !!!
Nevertheless, there is nothing military in the assembly itself. I was afraid of some hidden assembly mechanisms that without arduino could not be repeated. In fact, everything is collected by a sequential call to the compiler and linker with a specific set of keys. So all the same can be repeated in another build system.
It is worth noting that I investigated the work of the build system when building under STM32 and the stm32duino framework. But when assembling for classic arduino on an ATMega controller, everything is almost the same (only a little simpler)
Trying CMake

A colleague in the workshop recommended looking at CMake - they already have ready-made tools for assembling Arduino projects. So, I installed CMake, took the minimal project from the examples, filed a bit CMakeList.txt. But when I started CMake, I got a crash in ld.exe at the configuration stage (when compilers, linkers and the like are checked). An attempt to understand exactly what was happening was unsuccessful - the same online command launched separately was executed without problems. I did not understand how to go around this.
In search of a solution, I carefully studied the toolchain files and realized that I was not digging there at all. While a real arduino has a plug-in system into which you can add any boards with compilers (not necessarily AVR), one of the toolchains I have studiedsharpened exclusively for AVR. Moreover, only 2-3 types of standard boards are available.
The second toolchain looked better. He parsed Arduino files like boards.txt and rummaged through the options directories, collecting all available assembly options, boards and processors. Nevertheless, something confused me in this. It seemed that at the exit I would again get a monolith in the arduino style. It was not very clear whether the ARM compiler would work instead of the AVR. In addition, it is still not clear how to control the libraries.
In general, I can’t say anything bad about this toolchain. Simply, without defeating the crash when generating make-up files, I decided to look for a solution elsewhere.
Coocox
I love writing code in a good IDE. The Internet is often referred to the most popular IDEs for STM32 - Keil, IAR and CooCox. The first 2 are paid and with unflattering reviews on the topic of usability. But CooCox is highly praised. Bribed also by the fact that it is built on the basis of Eclipse, and I have long wanted to meet him. It seemed to me that this allows you to fine-tune the build process. Looking ahead, I’ll say that alas, I was mistaken.
Having installed CooCox I was very surprised that it goes without a compiler. In general, this is understandable - the IDE is separate and the compiler separately. It's just as unusual after many years in Visual Studio. Well, all right, this is simply solved by installing the compiler as a separate installer , although I, at first, took the compiler from Atmel Studio.
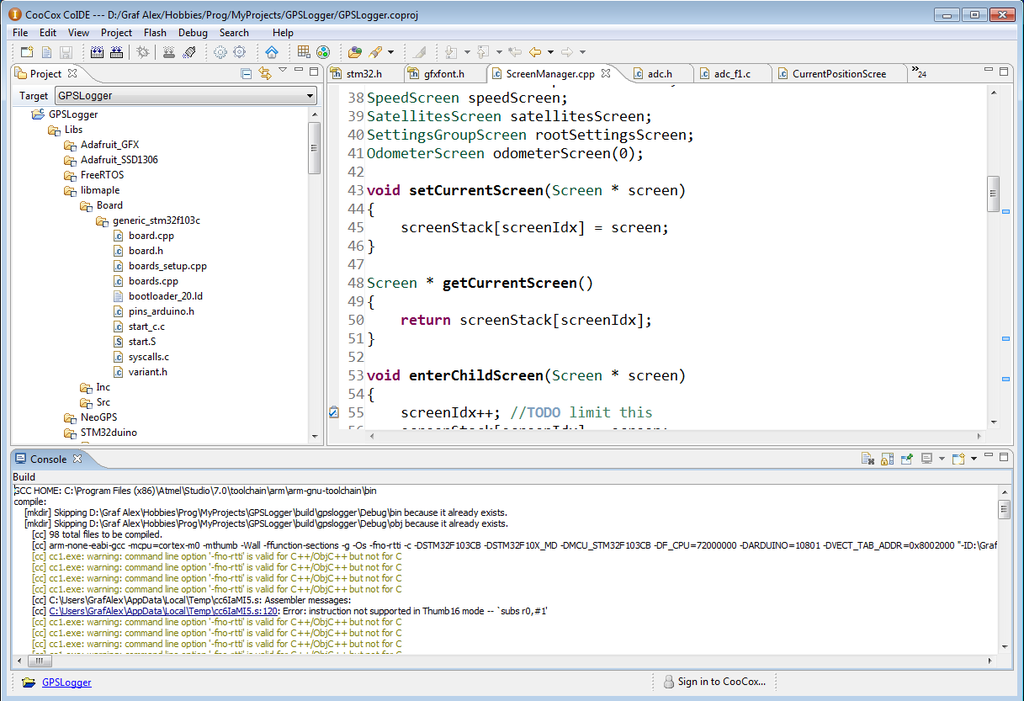
And then the problems began. For an hour I tried to start a blinker on the LED. On the Internet, I found about a dozen options of varying degrees of compilation. It would seem, where can one be mistaken? Oh no. Compile, fill - does not work. I recreated the project several times - it did not help. As a result, he went according to the Nubian instruction itself, clearly and verbatim following all the instructions. The firmware was uploaded via UART and the system bootloader and the light bulb blinked joyfully.
I would like to blame the stm32duino / libmaple USB bootloader, which was the cause of the problem, but it is more reasonable to admit my misunderstanding of the initialization process on STM32 controllers. Having understood the question, I described my “discoveries” in a separate article. In a nutshell, the problem was in the incorrect starting address of the firmware. When using the bootloader, firmware must be collected with a different starting address. This parameter, in fact, is not in the classic arduino, but it is very important for STM32 microcontrollers.
Thoughts on STM32 bootloaders
It is possible to flash through UART, of course, but this is still hemorrhoids. You need to constantly switch Boot jumpers and click a lot with the mouse in ST Flash Demonstrator. I have a Chinese ST-Link, I could connect it, sew through it and debazed. I guess I’ll get to this when I really need in-circuit debugging.
But at the moment, I see the firmware via USB as the most convenient for several reasons. Anyway, I have connected a USB cable for power and USB serial. I'm also going to actively pick USB Mass Storage soon. In the end, USB will also be output in the finished device. So why use additional components instead of flashing through USB?
But at the moment, I see the firmware via USB as the most convenient for several reasons. Anyway, I have connected a USB cable for power and USB serial. I'm also going to actively pick USB Mass Storage soon. In the end, USB will also be output in the finished device. So why use additional components instead of flashing through USB?
Returning to the topic of configuration management, and more specifically where and how to store libraries. I gravitate to the option "I carry everything with me." I would like to version all library changes (including their configuration) in my repository. Of course there are classic Unix patches, but it looks like the last century. But what to use in return? I would like a solution in the style of “pulled the source code with one team, built it, uploaded it to MK”.
For a long time I tried to deal with submodules and subtrees in a git. To me, as a person who has never worked tightly with a git, nothing is clear. I even read the first few chapters of Git Book, but got even more confused. I asked for help from colleagues more experienced in these matters, but they bent their fingers even more and it became even less clear. I decided to do through the subtrees. I can’t imagine what this threatens me with.
I liked the subtrees because I got the necessary files directly in my repository. And with the ability to edit them. Submodule, however, involves storing changes somewhere in another repository. If for bug fixes this is reasonable (you can easily fork and then push fixes to the main repository), then for storing the library settings this is at least strange. Versioning of changes for one project in different repositories would not be desirable.
So I pulled stm32duino for the STM32F1xx series controllers to my repo. Tightened entirely, with examples and libraries. To be honest, I don’t like the structure, and certainly I don’t need everything from there. But I do not know how to do it differently and how to hold it later. Compensated by the fact that I laid out all the files as I like in the CooCox project.
As a result, I pulled all the necessary files into the project, set the same defines as Arduino, and then the linking process began. Went by mistake. If there was no symbol, I looked in which source it was declared and added only this source. It was a very interesting experience, because along the way I figured out what and where it is (I mean stm32duino / libmaple) and how it works there.
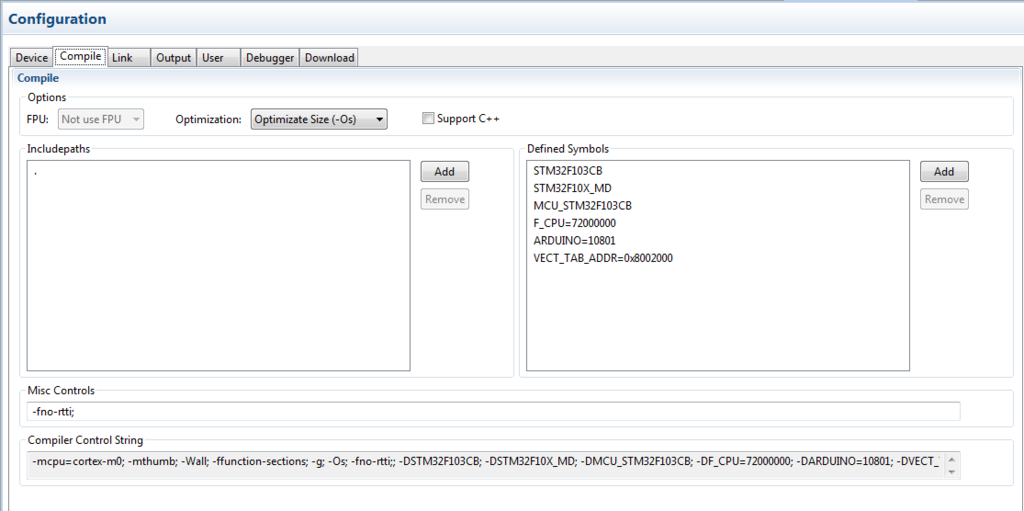
As I said, assembly under ARM (which is STM32) is more complicated than assembly under AVR. The thing is that the compiler is more general there and allows you to configure yourself very finely. On the one hand, this is good and you can tune the assembly process, on the other, it greatly complicates the configuration. So, linker scripts are additionally used here - special files that describe which sections should be in the resulting binary, where these sections are located and how much space they take.
It turned out low-level code can refer to characters that are declared in linker scripts and vice versa. If the linker is called with standard settings, then these characters are not found. To solve this problem, on the linker settings page, I unchecked 'Use Memory Layout from Memory Window ”- the scatter file field opened. There I registered a linker script that was used in the Arduino build system ( STM32F1 / variants / generic_gd32f103c / ld / bootloader_20.ld ). After that, everything was immediately linked.
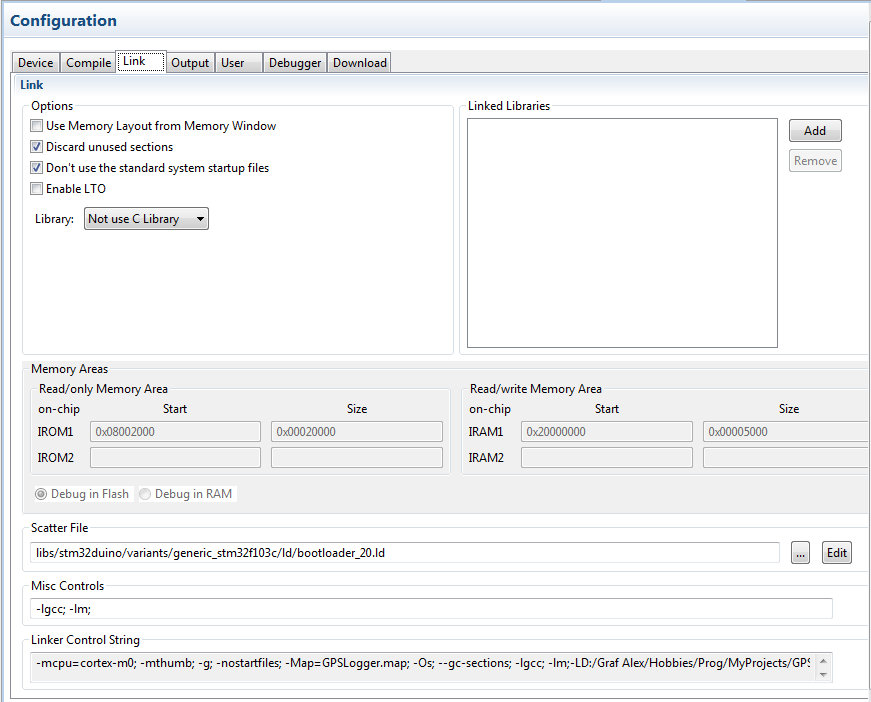
But here an unpleasant surprise awaited me - the assembled firmware immediately took 115kb (on the arduino it was 56k). Moreover, all the characters were mixed up there, and the firmware contained a lot of C ++ runtimes - rtti, manglers, abi, actions, and a bunch of unnecessary things. I had to compare the linker commandlines that Arduino and CooCox make and smoke documentation for each key.
It turned out in CooCox you can not choose between C and C ++ compilers. Because of this, it is not possible to separately configure each of the compilers. So C ++ code is compiled using gcc (and not g ++) and by default it generates a ton of code, links to rtti, ABI and something else. And it seems that it’s not so easy to bones. There is a field for additional flags of the compiler, but if you add something like -fno-rtti there, then gcc immediately starts to swear, saying that you slip flags from g ++ to me?
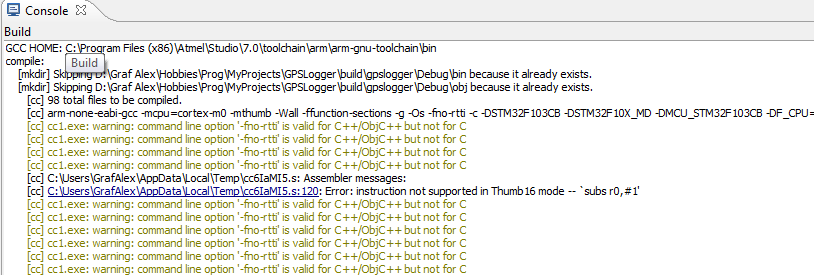
On the Internet, people offered CooCox the second version - it already has more settings, can distinguish between C and C ++ code and calls the correct compiler for each of the file types. But at the same time, you still cannot configure the keys separately for each of the compilers. So the -fno-rtti key still cannot be added only for g ++ - it is also transmitted to gcc, which is viciously cursing at it.
In general, the second CooCox somehow did not enter - too much glamorous UI, while at the expense of convenience. The first, by the way, is also not super in terms of UI - a million settings, and the font in the build console cannot be changed (despite the fact that in full Eclipse it is possible).
CMake again
Since such well-known tools like CooCox do not allow trivial configuration of compilers, then nafig it. We will go down to the lowest level and write everything with our hands. Well, with your hands ... With makefiles, of course.
Last time I wrote naked makefiles almost 10 years ago. I have already forgotten all the subtleties, but I remember for sure that this is an extremely thankless task. Wacky syntax and very easy to make mistakes. And it’s extremely not portable. I decided to try CMake again, but not with the arduino toolchain, but with STM32. With all the rules, I installed the eclipse, compiler, CMake, MinGW32 for make separately.
I didn’t look at the tulchains. I came across it , where I learned the general idea, but he took tulcheyn here. I decided not to install it in a common pile, but to carry it with me. In addition, I don’t need everything there, but only 2 files - gcc_stm32.cmake where common variables and procedures are declared, and gcc_stm32f1.cmake where my controller parameters are described.
All the libraries I have are in directories that (theoretically) I will synchronize with the main repositories (when I figure out how :)). Therefore, adding CMakeList.txt to each library was somehow uncomfortable. I decided to make one general CMakeList.txt in the library directory and describe the assembly of all the libraries in it. Each library is collected in an archive (static library) and then everything is linked together in a binary.
CMake script for building libraries (one script for all libraries)
# Not pushing this file down to libraries in order to keep source tree as is (not populating with extra files, such as CMakeList.txt)
#
# Below each section represents a library with its own settings
###################
# NeoGPS
###################
SET(NEOGPS_SRC
	NeoGPS/DMS.cpp
	NeoGPS/GPSTime.cpp
	NeoGPS/Location.cpp
	NeoGPS/NeoTime.cpp
	NeoGPS/NMEAGPS.cpp
)
ADD_LIBRARY(NeoGPS STATIC ${NEOGPS_SRC})
###################
# FreeRTOS
###################
SET(FREERTOS_SRC_DIR ${CMAKE_CURRENT_SOURCE_DIR}/STM32duino/libraries/FreeRTOS821)
SET(FREERTOS_SRC
	${FREERTOS_SRC_DIR}/MapleFreeRTOS821.cpp
	${FREERTOS_SRC_DIR}/utility/heap_1.c
	${FREERTOS_SRC_DIR}/utility/list.c
	${FREERTOS_SRC_DIR}/utility/port.c
	${FREERTOS_SRC_DIR}/utility/queue.c
	${FREERTOS_SRC_DIR}/utility/tasks.c
)
ADD_LIBRARY(FreeRTOS STATIC ${FREERTOS_SRC})
###################
# Adafruit GFX library
###################
ADD_LIBRARY(AdafruitGFX STATIC
	AdafruitGFX/Adafruit_GFX.cpp
)
###################
# Adafruit SSD1306 library
###################
ADD_LIBRARY(AdafruitSSD1306 STATIC
	STM32duino/libraries/Adafruit_SSD1306/Adafruit_SSD1306_STM32.cpp
)
TARGET_INCLUDE_DIRECTORIES(AdafruitSSD1306 PRIVATE
	STM32duino/libraries/Wire
	STM32duino/libraries/SPI/src  	#In fact it should not depend on it
	AdafruitGFX
)
There are several non-trivial things in the main body assembly that I described below. So far I will give the whole CMakeLists.txt .
Build script for the main part of the project
# Build rules for GPS logger target.
# App specific compiler/linker settings are also defined here
SET(SOURCE_FILES
	# Screens and screen management stuff
	Screens/AltitudeScreen.cpp
	Screens/AltitudeScreen.h
	Screens/CurrentPositionScreen.cpp
	Screens/CurrentPositionScreen.h
	Screens/CurrentTimeScreen.cpp
	Screens/CurrentTimeScreen.h
	Screens/DebugScreen.cpp
	Screens/DebugScreen.h
	Screens/OdometerActionScreen.cpp
	Screens/OdometerActionScreen.h
	Screens/OdometerScreen.cpp
	Screens/OdometerScreen.h
	Screens/ParentScreen.cpp
	Screens/ParentScreen.h
	Screens/SatellitesScreen.cpp
	Screens/SatellitesScreen.h
	Screens/Screen.cpp
	Screens/Screen.h
	Screens/ScreenManager.cpp
	Screens/ScreenManager.h
	Screens/SelectorScreen.cpp
	Screens/SelectorScreen.h
	Screens/SettingsGroupScreen.cpp
	Screens/SettingsGroupScreen.h
	Screens/SpeedScreen.cpp
	Screens/SpeedScreen.h
	Screens/TimeZoneScreen.cpp
	Screens/TimeZoneScreen.h
	8x12Font.cpp
	Buttons.cpp
	FontTest.cpp
	GPSDataModel.cpp
	GPSLogger.cpp
	GPSOdometer.cpp
	GPSSatellitesData.cpp
	GPSThread.cpp
	IdleThread.cpp
	TimeFont.cpp
	Utils.cpp
)
INCLUDE_DIRECTORIES(
	.
	${GPSLOGGER_LIBS_DIR}/AdafruitGFX
	${GPSLOGGER_LIBS_DIR}/NeoGPS
	${GPSLOGGER_LIBS_DIR}/STM32duino/libraries/Adafruit_SSD1306
	${GPSLOGGER_LIBS_DIR}/STM32duino/libraries/SPI/src
	${GPSLOGGER_LIBS_DIR}/STM32duino/libraries/FreeRTOS821
	)
# Do not link to libc or newlib-nano - we are not using anything from that
SET(CMAKE_EXE_LINKER_FLAGS "${CMAKE_EXE_LINKER_FLAGS} --specs=nosys.specs")
ADD_EXECUTABLE(GPSLogger ${SOURCE_FILES})
TARGET_LINK_LIBRARIES(GPSLogger
	NeoGPS
	FreeRTOS
	AdafruitGFX
	AdafruitSSD1306
	ArduinoLibs
	STM32duino
)
STM32_SET_TARGET_PROPERTIES(GPSLogger)
STM32_PRINT_SIZE_OF_TARGETS(GPSLogger)
# Additional handy targets
STM32_ADD_HEX_BIN_TARGETS(GPSLogger)
STM32_ADD_DUMP_TARGET(GPSLogger)
As for the parameters of CMake itself. In stm32-cmake examples, it is suggested to specify which tool chain file to use. This is done with a separate key during a CMake call to generate makefiles. But I do not plan to build the project for different platforms and compilers. Therefore, I just registered a link to the necessary toolchain file in the main CMakeLists.txt.
# Load the toolchain file that uses vars above
SET(CMAKE_TOOLCHAIN_FILE cmake/gcc_stm32.cmake)
But the compiler does not automatically guess. More precisely, I would have guessed on the Unix (it is searched by the default path in / usr), but it must be specified explicitly on Windows. In general, my command line (do not forget to change Windows slashes to Unix - CMake does not like them):
cmake -G "MinGW Makefiles" "-DTOOLCHAIN_PREFIX=C:/Program Files (x86)/GNU Tools ARM Embedded/5.4 2016q3" .Make-up files are generated and you can start building the project. There were no special problems with compilation. But then the struggle with strong linker magic began, where I was stuck for a week. Below is a list of individual problems that I solved along the way.
Problem: cross dependencies between libraries
The stm32duino framework is pretty big. Even at the stage of creating CMakeList.txt for libraries, I tried to divide it into 2 separate libraries - one part that emulates the Arduino API (stm32duino itself) and libmaple, which is a Hardware Abstraction Layer (HAL) and hides the low-level pieces of the microcontroller. In any case, it seemed logical to me. But it turned out to be problematic to link. I thought that stm32duino was built on top of libmaple, but in the second there were also calls to the top layer.
The joke is that the linker collects libraries one at a time and does not return to the previous ones. If the second library has a call to the first library, then the linker does not understand that it is necessary to link the first library again. Therefore, unresolved characters arise. I had to combine two libraries into one in the project.
Then I, however, found out that the linker has special keys -Wl, - start-group / --end-group that change the behavior of the linker. They just make him go through the libraries several times. I have not tried it yet.
CMake script to build stm32duino and libmaple
###################
# STM32duino, libmaple and system layer
# Has to be as a single library, otherwise linker does not resolve all crossreferences
# Unused files are commented on the list
###################
SET(LIBMAPLE_SRC
	STM32duino/variants/generic_stm32f103c/board.cpp
	STM32duino/variants/generic_stm32f103c/wirish/boards.cpp
	STM32duino/variants/generic_stm32f103c/wirish/boards_setup.cpp
	STM32duino/variants/generic_stm32f103c/wirish/start.S
	STM32duino/variants/generic_stm32f103c/wirish/start_c.c
 	STM32duino/variants/generic_stm32f103c/wirish/syscalls.c
	STM32duino/cores/maple/cxxabi-compat.cpp
#	STM32duino/cores/maple/ext_interrupts.cpp
	STM32duino/cores/maple/HardwareSerial.cpp
#	STM32duino/cores/maple/HardwareTimer.cpp
#	STM32duino/cores/maple/IPAddress.cpp
	STM32duino/cores/maple/main.cpp
#	STM32duino/cores/maple/new.cpp
	STM32duino/cores/maple/Print.cpp
#	STM32duino/cores/maple/pwm.cpp
#	STM32duino/cores/maple/Stream.cpp
#	STM32duino/cores/maple/tone.cpp
	STM32duino/cores/maple/usb_serial.cpp
#	STM32duino/cores/maple/wirish_analog.cpp
	STM32duino/cores/maple/wirish_digital.cpp
#	STM32duino/cores/maple/wirish_math.cpp
#	STM32duino/cores/maple/wirish_shift.cpp
	STM32duino/cores/maple/wirish_time.cpp
#	STM32duino/cores/maple/WString.cpp
#	STM32duino/cores/maple/hooks.c
	STM32duino/cores/maple/itoa.c
#	STM32duino/cores/maple/stm32f1/util_hooks.c
#	STM32duino/cores/maple/stm32f1/wiring_pulse_f1.cpp
	STM32duino/cores/maple/stm32f1/wirish_debug.cpp
	STM32duino/cores/maple/stm32f1/wirish_digital_f1.cpp
	STM32duino/cores/maple/libmaple/adc.c
	STM32duino/cores/maple/libmaple/adc_f1.c
#	STM32duino/cores/maple/libmaple/bkp_f1.c
#	STM32duino/cores/maple/libmaple/dac.c
#	STM32duino/cores/maple/libmaple/dma.c
#	STM32duino/cores/maple/libmaple/dma_f1.c
#	STM32duino/cores/maple/libmaple/exc.S
#	STM32duino/cores/maple/libmaple/exti.c
#	STM32duino/cores/maple/libmaple/exti_f1.c
	STM32duino/cores/maple/libmaple/flash.c
#	STM32duino/cores/maple/libmaple/fsmc_f1.c
	STM32duino/cores/maple/libmaple/gpio.c
	STM32duino/cores/maple/libmaple/gpio_f1.c
	STM32duino/cores/maple/libmaple/i2c.c
	STM32duino/cores/maple/libmaple/i2c_f1.c
	STM32duino/cores/maple/libmaple/iwdg.c
	STM32duino/cores/maple/libmaple/nvic.c
#	STM32duino/cores/maple/libmaple/pwr.c
	STM32duino/cores/maple/libmaple/rcc.c
	STM32duino/cores/maple/libmaple/rcc_f1.c
#	STM32duino/cores/maple/libmaple/spi.c
#	STM32duino/cores/maple/libmaple/spi_f1.c
	STM32duino/cores/maple/libmaple/systick.c
	STM32duino/cores/maple/libmaple/timer.c
#	STM32duino/cores/maple/libmaple/timer_f1.c
	STM32duino/cores/maple/libmaple/usart.c
	STM32duino/cores/maple/libmaple/usart_f1.c
	STM32duino/cores/maple/libmaple/usart_private.c
	STM32duino/cores/maple/libmaple/util.c
	STM32duino/cores/maple/libmaple/stm32f1/performance/isrs.S
	STM32duino/cores/maple/libmaple/stm32f1/performance/vector_table.S
	STM32duino/cores/maple/libmaple/usb/stm32f1/usb.c
	STM32duino/cores/maple/libmaple/usb/stm32f1/usb_cdcacm.c
	STM32duino/cores/maple/libmaple/usb/stm32f1/usb_reg_map.c
	STM32duino/cores/maple/libmaple/usb/usb_lib/usb_core.c
	STM32duino/cores/maple/libmaple/usb/usb_lib/usb_init.c
	STM32duino/cores/maple/libmaple/usb/usb_lib/usb_mem.c
	STM32duino/cores/maple/libmaple/usb/usb_lib/usb_regs.c
)
ADD_LIBRARY(STM32duino STATIC ${LIBMAPLE_SRC})
TARGET_INCLUDE_DIRECTORIES(STM32duino PRIVATE
	STM32duino/system/libmaple/usb/stm32f1
	STM32duino/system/libmaple/usb/usb_lib
)
TARGET_COMPILE_DEFINITIONS(STM32duino PRIVATE
	-DVECT_TAB_ADDR=${VECT_TAB_ADDR}
	-DGENERIC_BOOTLOADER
	-DBOARD_maple
)
Problem: system calls do not link
Further it was not possible to link normally with the standard library - _sbrk (), _open () / _ close (), _read () / _ write (), and some others that somehow stick out of the standard library were missing.
In fact, they have a trivial implementation in STM32duino \ variants \ generic_stm32f103c \ wirish \ syscalls.c , but it did not link for the same reason: at the time of linking stm32duino these functions (they are declared weak) are not needed and are thrown away. The standard library is implicitly connected at the very end of the linking process and begins to require these characters, but the linker does not return back. You can, of course, link the syscalls.c file separately after all the others, but purely out of sporting interest, I began to figure out where it comes from.
Trivial implementation of some system calls
__weak int _open(const char *path, int flags, ...) {
    return 1;
}
__weak int _close(int fd) {
    return 0;
}
__weak int _fstat(int fd, struct stat *st) {
    st->st_mode = S_IFCHR;
    return 0;
}
__weak int _isatty(int fd) {
    return 1;
}
__weak int isatty(int fd) {
    return 1;
}
__weak int _lseek(int fd, off_t pos, int whence) {
    return -1;
}
__weak unsigned char getch(void) {
    return 0;
}
__weak int _read(int fd, char *buf, size_t cnt) {
    *buf = getch();
    return 1;
}
__weak void putch(unsigned char c) {
}
As I understand it, the arm-gcc compiler is quite powerful and can compile for a good half of existing microcontrollers and processors. But since it can be small microcontrollers with a small amount of memory, as well as thick “stones” on which Linux can be twisted, then you need to assemble it taking into account the capabilities of the platform. Therefore, complete with the linker there is a set of * .specs files that describe what exactly needs to be linked for a particular platform (this is in addition to the linker scripts).
So, by default, the standard library is linked to the project, in this case newlib-nano. Only if libc relies on system calls and the kernel on large computers, then in the case of newlib-nano the user must provide these system calls. Therefore, the linker requires the declaration of these same _sbrk (), _open () / _ close (), _read () / _ write ().
The problem was solved by adding the --specs = nosys.specs key to the linker settings. This key indicates to the linker the specs file where the linking of part of the standard library is disabled.
# Do not link to libc or newlib-nano - we are not using anything from that
SET(CMAKE_EXE_LINKER_FLAGS "${CMAKE_EXE_LINKER_FLAGS} --specs=nosys.specs")
Problem: initialization code does not link
At some point, the problem with the _init () function got out. From newlib-nano there is a call to this function, but in the code this symbol is not declared anywhere. I think the idea of design here is as follows.
- After a reset or power-up, the lowest level start is performed. In the case of libmaple, this is STM32duino \ variants \ generic_stm32f103c \ wirish \ start.S . The task of this code is to transfer control to the initialization functionstart.S
.type __start__, %function __start__: .fnstart ldr r1,=__msp_init mov sp,r1 ldr r1,=start_c bx r1 .pool .cantunwind .fnend - The next step is to prepare the memory. Here we clean the .bss section (variables filled with zeros) and fill in the variables from the .data section with initial values. The code is in the file STM32duino \ variants \ generic_stm32f103c \ wirish \ start_c.cstart_c.c
void __attribute__((noreturn)) start_c(void) { struct rom_img_cfg *img_cfg = (struct rom_img_cfg*)&_lm_rom_img_cfgp; int *src = img_cfg->img_start; int *dst = (int*)&__data_start__; int exit_code; /* Initialize .data, if necessary. */ if (src != dst) { int *end = (int*)&__data_end__; while (dst < end) { *dst++ = *src++; } } /* Zero .bss. */ dst = (int*)&__bss_start__; while (dst < (int*)&__bss_end__) { *dst++ = 0; } /* Run initializers. */ __libc_init_array(); /* Jump to main. */ exit_code = main(0, 0, 0); if (exit) { exit(exit_code); } /* If exit is NULL, make sure we don't return. */ for (;;) continue; } - After that, control is transferred to the __libc_init_array () function from newlib-nano . In this function, initializers are called, including the premain () and init () functions to initialize the board, as well as global object constructors.__libc_init_array ()
/* Iterate over all the init routines.  */
void
__libc_init_array (void)
{
  size_t count;
  size_t i;
  count = __preinit_array_end - __preinit_array_start;
  for (i = 0; i < count; i++)
    __preinit_array_start[i] ();
  _init ();
  count = __init_array_end - __init_array_start;
  for (i = 0; i < count; i++)
    __init_array_start[i] ();
}
premain () and init ()// Force init to be called *first*, i.e. before static object allocation. // Otherwise, statically allocated objects that need libmaple may fail. __attribute__(( constructor (101))) void premain() { init(); } void init(void) { setup_flash(); setup_clocks(); setup_nvic(); systick_init(SYSTICK_RELOAD_VAL); wirish::priv::board_setup_gpio(); setup_adcs(); setup_timers(); wirish::priv::board_setup_usb(); wirish::priv::series_init(); boardInit(); } - At the same time, __libc_init_array () allows you to make a hook and call a user-defined function between certain stages of initialization. And this function should be called _init (). As with other system calls from the previous section, it is expected that this function should be provided by someone else.
- Next comes the call to main (), but we are not interested in this right now.
As I understand it, the _init () function should be substituted according to the chosen platform, for example, its implementation is here:
void __attribute__ ((weak)) _init(void) {}In a good way, this function should not be empty. It should do what premain () does - initialize the board. But the authors of stm32duino decided differently.
In general, everything was linked, but the firmware was still very bold - more than 120kb. It was necessary to understand what was superfluous there. To do this, you had to carefully study the scripts of the toolchain and disassemble what was already assembled.
Problem: code sections are incorrectly defined
The first thing that caught my eye was the starting address. The starting address was either 0x00000000, or 0x00008000, but definitely not as it should be - 0x08002000. After a careful study of the STM32 CMake toolchain, I realized that the necessary parameters are set in the linker script, which also comes with the toolchain . Only this script is not used by default, but is included in a separate command STM32_SET_TARGET_PROPERTIES (). The starting address was fixed, and the firmware even lost weight to 100k.
# Flash offset due to bootloader
SET(VECT_TAB_ADDR "0x08002000")
SET(STM32_FLASH_ORIGIN "0x08002000")
ADD_EXECUTABLE(GPSLogger ${SOURCE_FILES})
STM32_SET_TARGET_PROPERTIES(GPSLogger)
Now the code did not have a table of interrupt vectors at the beginning of the firmware. Judging by the description of the sections in the file, the table is located in a separate section .isr_vector, but for some reason its size is zero.
For an hour I was trying to figure out linker scripts. But some very strong low-level witchcraft takes place there: some sections are determined, there is some kind of reference to the code. In particular, as I understand it, a section with a table of interrupt vectors should be described in a certain way somewhere in the code (most likely in CMSIS , which I somehow do not have). Those. my mistake was that I was trying to use a generic linker script with the initialization code from libmaple, and their code and data sections are named and arranged differently.
The solution was to explicitly specify the link script from libmaple ( STM32duino / variants / generic_stm32f103c / ld / bootloader_20.ld )
# Using Maple's linker script that corresponds maple/stm32duino code
SET(STM32_LINKER_SCRIPT ${GPSLOGGER_LIBS_DIR}/STM32duino/variants/generic_stm32f103c/ld/bootloader_20.ld)
LINK_DIRECTORIES(${GPSLOGGER_LIBS_DIR}/STM32duino/variants/generic_stm32f103c/ld)
Problem: Incorrect optimization settings
But here's a bummer. The linker said that he couldn’t fit the generated code into my flash drive. In addition to the fact that a bunch of unnecessary muck gets into the firmware, it turned out that CMake collects by default in a debug configuration. And in the debug configuration, the optimization is -O2 (optimization in speed), whereas in the release configuration, -Os (optimization in size). I switched to the release configuration, but it still didn’t work out with it: the toolchain sets the -flto flag (Link Time Optimization), which half of stm32duino does not build with.
In general, I took all the best from two configurations. From the release configuration, I took the -Os switch. From the debugging I took -g, which adds debugging information to the binar. This information does not go into the firmware anyway, but it is much more convenient to disassemble it.
# TODO: It would be nice to use -flto for all of these 3 settings (except for asm one)
SET(CMAKE_C_FLAGS_RELEASE "-Os -g" CACHE INTERNAL "c compiler flags release")
SET(CMAKE_CXX_FLAGS_RELEASE "-Os -g" CACHE INTERNAL "cxx compiler flags release")
SET(CMAKE_ASM_FLAGS_RELEASE "-g" CACHE INTERNAL "asm compiler flags release")
SET(CMAKE_EXE_LINKER_FLAGS_RELEASE "" CACHE INTERNAL "linker flags release")
A further reduction in the size of the firmware lay in the selection of the correct compilation and code generation keys, as well as the repetition of all the necessary defines that the original build system exhibited. Once again, I compared the entire list of keys and decided to add a couple to my project:
- -DDEBUG_LEVEL = DEBUG_NONE disables logging inside libmaple. Defining removes approximately kilobytes from the resulting firmware
- -fno-rtti -fno-exceptions - removes a huge pile of code (the same RTTI, exceptions, ABI and much more). Naturally, I fed these flags only g ++
- The combination -fno-unroll-loops -ffast-math -ftree-vectorize simply generates a bit more compact code (100-200 bytes for the entire firmware)
Here are my keys, which I eventually pass to the compiler:
SET(CMAKE_C_FLAGS "-mthumb -fno-builtin -mcpu=cortex-m3 -Wall -std=gnu99 -ffunction-sections -fdata-sections -fomit-frame-pointer -mabi=aapcs -fno-unroll-loops -ffast-math -ftree-vectorize -nostdlib -march=armv7-m --param max-inline-insns-single=500" CACHE INTERNAL "c compiler flags")
SET(CMAKE_CXX_FLAGS "-mthumb -fno-builtin -mcpu=cortex-m3 -Wall -std=c++11 -ffunction-sections -fdata-sections -fomit-frame-pointer -mabi=aapcs -fno-unroll-loops -ffast-math -ftree-vectorize -fno-rtti -fno-exceptions -nostdlib -fno-use-cxa-atexit -march=armv7-m --param max-inline-insns-single=500" CACHE INTERNAL "cxx compiler flags")
SET(CMAKE_ASM_FLAGS "-mthumb -mcpu=cortex-m3 -x assembler-with-cpp" CACHE INTERNAL "asm compiler flags")
SET(CMAKE_EXE_LINKER_FLAGS "-Wl,--gc-sections -mthumb -mcpu=cortex-m3 -march=armv7-m -mabi=aapcs -Wl,--warn-common -Wl,--warn-section-align" CACHE INTERNAL "executable linker flags")
Victory over the build system
The result is 48 kilobytes for firmware. The Arduino version was 56kb. The difference is due to the lack of malloc / free and related functions, which I still did not use. A complete rebuild takes 17s versus a minute on an arduino. Incremental assembly in only 1-2 seconds.
The moment of truth and try to fill in what happened in the chip. To be honest, I was VERY surprised that after such a long dance in the company of a tambourine, Google and CMake, the firmware started immediately. I expected another week of hard debugging in black box mode in an attempt to understand why this piece of iron does not want to blink at least with a light bulb.
For the sake of beauty, I added the call STM32_PRINT_SIZE_OF_TARGETS () - now, after assembly, statistics on memory are written to the console. You can immediately see if the memory consumption jumped.

I also added a target for disassembling the firmware (at the moment it is already contributed in the main branch stm32-cmake ). It is very convenient to build and immediately check what the compiler has done there, that the firmware has suddenly grown stout.
FUNCTION(STM32_ADD_DUMP_TARGET TARGET)
    IF(EXECUTABLE_OUTPUT_PATH)
      SET(FILENAME "${EXECUTABLE_OUTPUT_PATH}/${TARGET}")
    ELSE()
      SET(FILENAME "${TARGET}")
    ENDIF()
    ADD_CUSTOM_TARGET(${TARGET}.dump DEPENDS ${TARGET} COMMAND ${CMAKE_OBJDUMP} -x -D -S -s ${FILENAME} | ${CMAKE_CPPFILT} > ${FILENAME}.dump)
ENDFUNCTION()
QtCreator
I did the entire assembly process described above simply in the console. Now it's time to connect the IDE. I already mentioned that I would like to get acquainted with Eclipse, but when I installed it it seemed terribly monster to me. But most importantly, I didn’t understand the concept of workshops. In my understanding, if I open a project, I immediately see all the files from this project. Eclipse had to do a lot of extra body movements. In short, he just did not go, but I plan to definitely return to him another time.
I remembered that I once programmed in Qt Creator and that, it seems, was not bad. Having installed Qt Creator 4.2.2, I began to google how to connect a CMake project. According to the instructions on the Internet, it was suggested to simply open the CMakeLists.txt file and follow the instructions in the wizard. First of all, he suggested installing tools (kits). It is quite reasonable, given the terrible custom assembly.
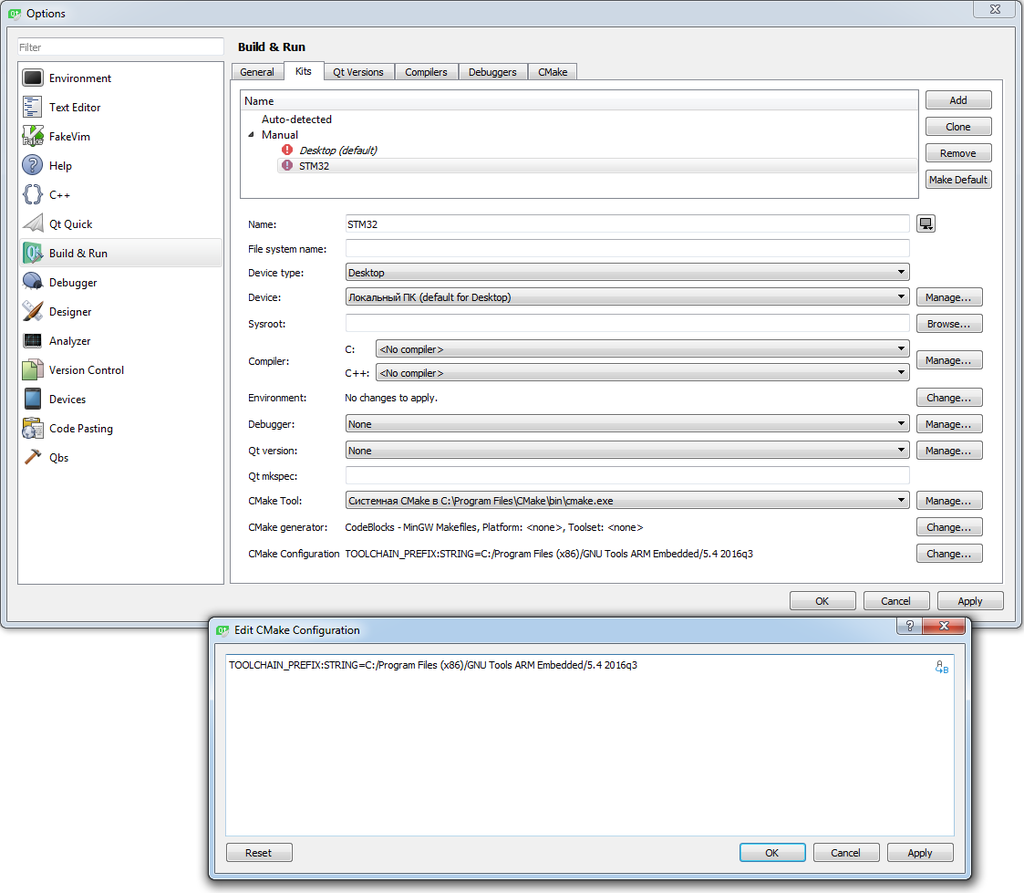
Qt Creator swears on such a kit, they say the compiler is not exposed. But if you set it, it still swears - the compiler that sets CMake itself (arm-gcc) does not match the one selected in the corresponding field (even if it is the same). However, he builds everything normally.
When setting up the project, one very non-trivial moment arose. When importing a CMake project, only CMakeLists.txt was imported. No source code was added to the project. I studied the Internet for several evenings - to no avail. Everything works for everyone, but not for me. I thought the problem was in the custom toolchain, but the simplest hello world under MinGW32 was not imported in the same way.
The solution was suggested by QtCreator itself. The tooling of the toolkit I created said that I chose the wrong type of CMake generator. You need to choose Code Blocks - without this, Qt Creator cannot parse projects. After installing the correct generator, all files and subdirectories appeared in the project window.
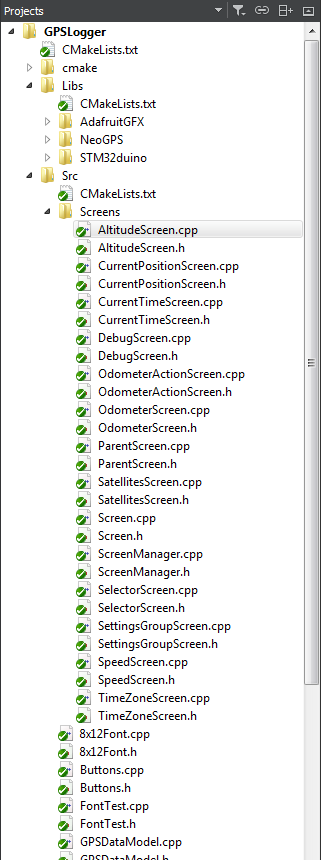
Now you can conveniently navigate through the files, but the autocomplete has not yet worked. In fact, no matter how strange it may sound, Qt Creator simply ignored the inclusion passes specified in CMakeLists.txt. Those. the assembly goes fine, and in the editor, most of the #includes include highlighted as an error (No such file). Only includes from the same directory work. I climbed all the settings, googled for several hours, but could not find an answer.
UPDATE : in the comments they suggested that the autocomplete works through the compiler. Therefore, it is important to set the correct compiler in the kit settings. Qt Creator, however, still swears, but the autocomplete works.
One of the most convenient things that make a text editor a full-fledged IDE is automatic filling and starting the firmware. I did it like that. The main build for me is the GPSLogger.bin target, not the classic all. This target makes a .bin file from an .elf file, which can already be injected into the controller. The Deployment procedure launches the firmware “polisher”.
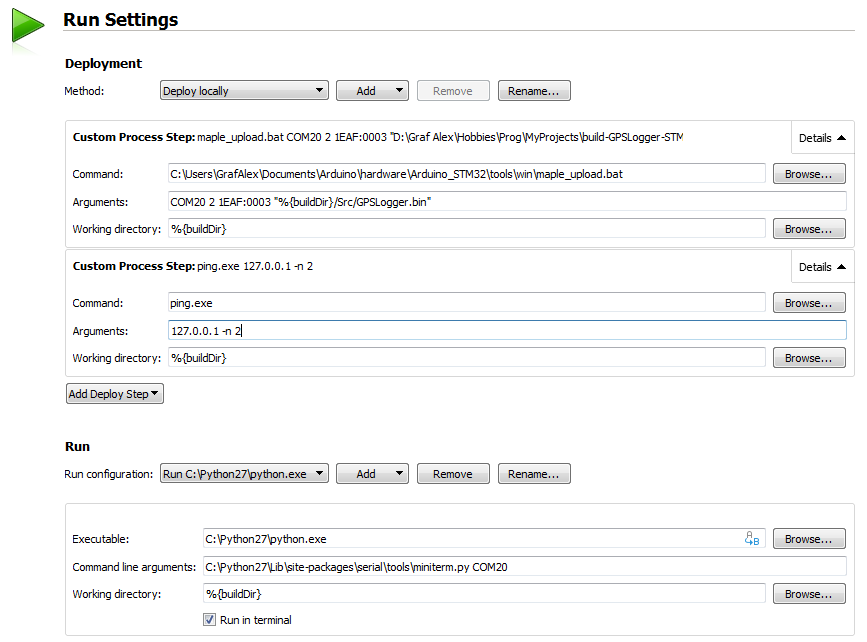
Note the ping call trick. Its task is to provide a pause of 1 second between filling and starting. Otherwise, the microcontroller does not have time to reboot and initialize the USB.
Oddities QtCreator
By the way, this is the only way to organize a delay from the ones suggested here that worked in QtCreator. Neither powershell nor timeout wanted to work.
As a “runner” (Run), it turned out to be convenient to use a terminal emulator. This thing allows you to catch the debug output in serial. Those. firmware after loading, in fact, starts itself. We only choose whether we want to watch what is written in the series or not.
But about debugging today will not. Firstly, it has already been written about this many times, I do not think that I will invent anything new. Secondly, I do not use debuggers - in this project I do not use heaped peripherals that require in-circuit debugging. I only use a couple of UARTs and I2C. So it is quite possible to debase prints in the log. And thirdly, I haven’t written the code for a month already - I’m all dealing with build systems and IDEs. I would not want to spend another week or two diving into debuggers. Who needs - google. There are many articles about screwing debuggers to different IDEs.
Conclusion
I did not set myself the goal of writing an assembly tutorial. Rather, my pain and suffering are described here in an attempt to find a good build system for my project. In this article, I told my experience of switching to CMake to build my project on the STM32 controller.
I use the stm32duino framework, which is based on libmaple. This is not a very standard framework, and therefore I had a number of difficulties and non-trivial moments. In the course of work, I figured out some of the intricacies of the linker: how the board is initialized, the libc structure and what it depends on, who distributes the memory in the code sections and how. Usually these things are hidden in the bowels of the CRT, compiler and IDE, but in this case I had to explicitly dig into these nuances.
It is worth noting that most of the shamanism described in this article relates to the assembly specifically for STM32. The classic arduino and assembly for ATMega is simpler. But many ideas remain the same regardless of platform. I think a thoughtful reader will also find many useful things in my article.
Probably, I didn’t fully disclose some things or make erroneous judgments. Well, I do not exclude the possibility of errors. In any case, I am open to constructive criticism.









