 November 9, 2016 at 12:00
Level Design Basics
- Transfer
For eight years now, I have been creating multi-user maps for the Call of Duty modding community. Over the years, I have mastered various design rules and principles that I successfully apply in the level design process. I will tell you in stages about how to create an interesting multiplayer map.
In this article, I will talk about developing a multi-player map for Call of Duty: Modern Warfare. Let's call her Tugurios. It will be created in the surroundings of slums. Now we’ll talk a little about the history and setting of the map.
- Tugurios means slum in Spanish. The map is visually based on the appearance of slums in Venezuela.
- Gold was found in the hills, so slums appeared next to them, supplying gold miners with labor.
- Years later, the source of gold was depleted. With unemployment, slums have become a transit point for weapons and drugs.
- When the situation got out of control, the government sent a special forces unit to solve the problem.
- The action takes place at noon. One team spawns in the slums, and the other on the road on the other side of the map.
Here is a top view of the map:
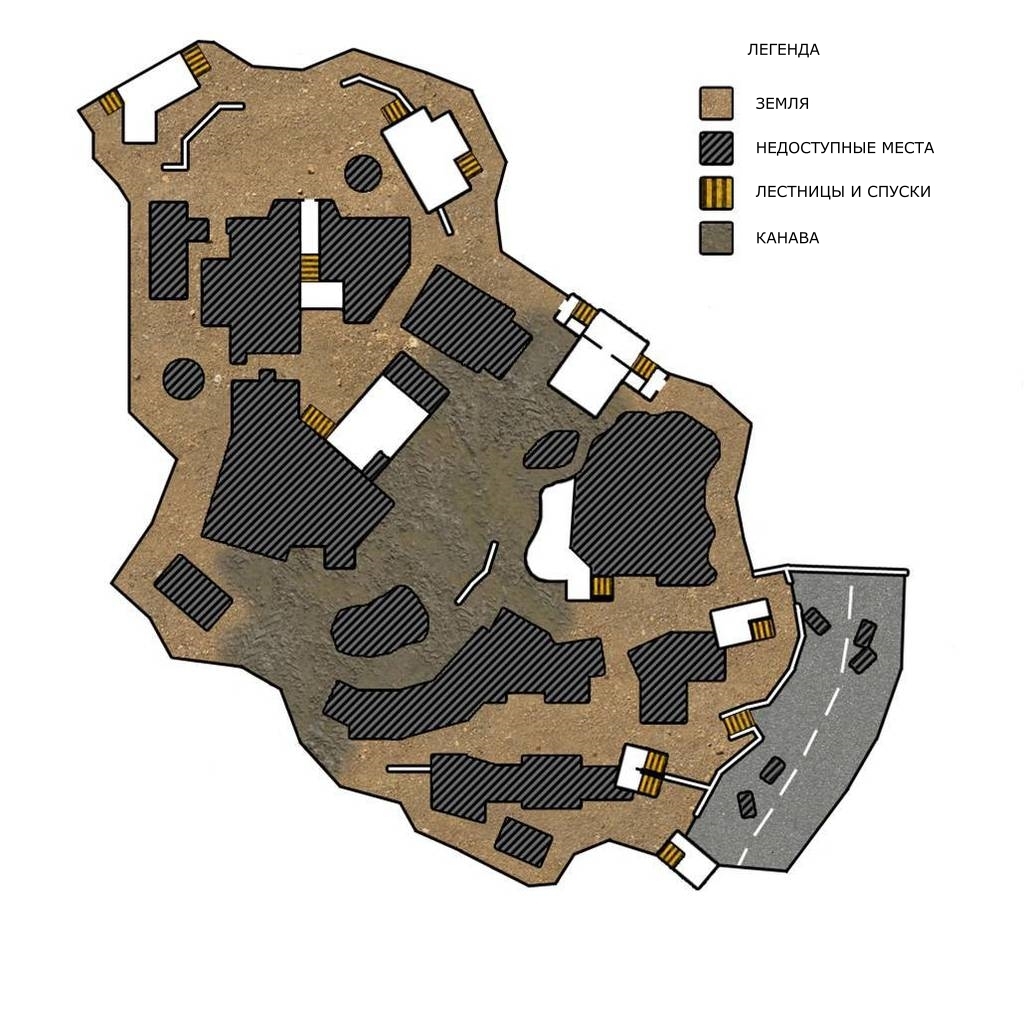
The map has the following areas:
Hills
- The hills and surrounding areas will be shown dry and dusty, with many angles and notches showing the effect of gold mining.
- All buildings in this area will resemble rusted metal sheds with windows that were previously used as office space.
Ditch
- The ditch has a mud bottom with water flowing in the middle and vegetation on the slopes and banks. To provide shelter at the bottom, we will place several large stones.
Slum
- Small huts made of red brick, cinder blocks and rusty sheets of metal.
- Piles of rubbish and waste that can be used as shelters are everywhere.
- Some shacks have 2-3 floors.
- Electric cables hang everywhere.
- The walls are full of stubborn dirt and graffiti.
- Underfoot or broken concrete with open drains, or green grass with lush vegetation.
Road
- Place spawn team A. It consists of broken dirty asphalt. In different places there are cars providing shelter.
- It is half a floor or a whole floor above the ground level, therefore it is invisible from the ground. The player must either climb the stairs or climb a certain point to see it.
Foundation crane
- The massive concrete foundation of the crane used in gold mining. The crane has already been removed, but the foundation remains in place.
- It looks like a concrete bunker with reinforcement rods and rivets sticking out of broken corners and surfaces.
- At the top there is a large rounded pedestal hiding one entry point from another.
- The foundation resembles the concrete foundations of heavy anti-aircraft guns from World War II.
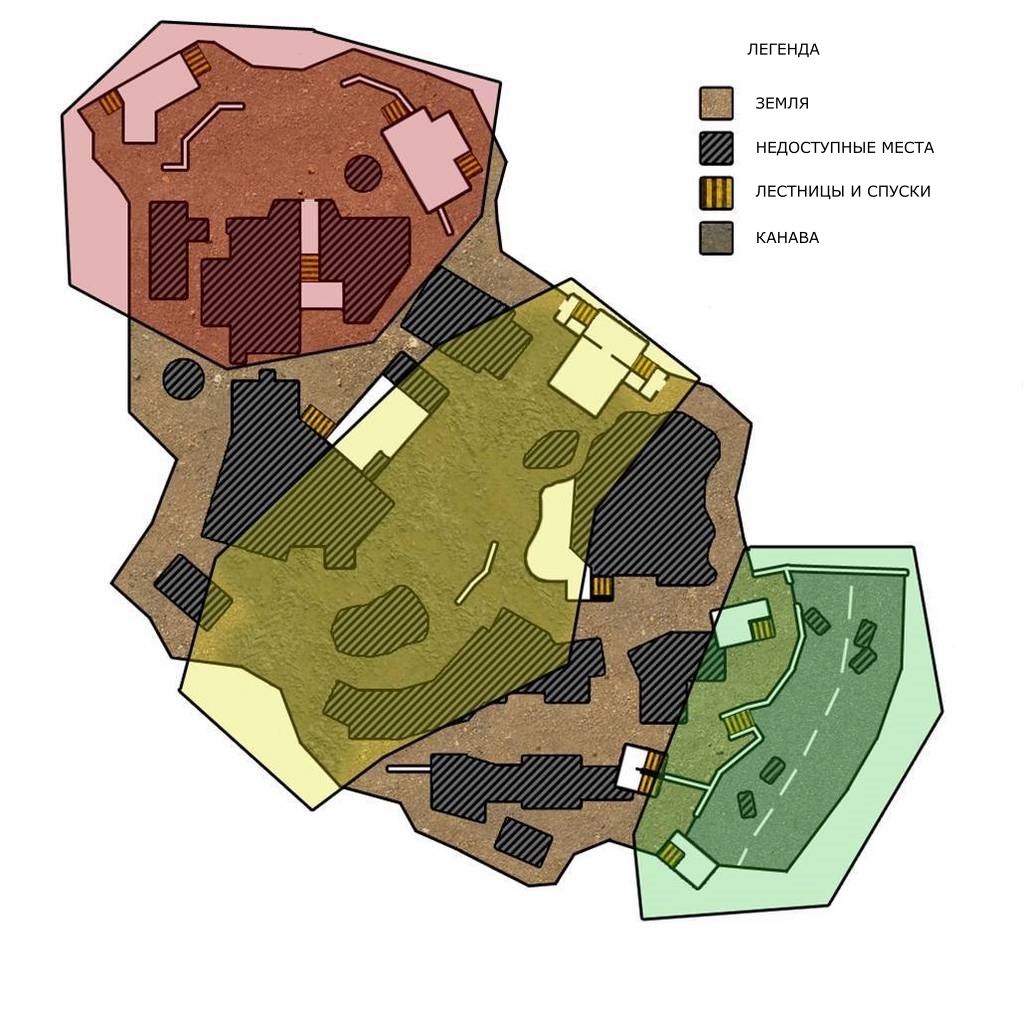
- The slum zone is marked in red.
- Small, randomly scattered huts are piled one on top of the other, reaching three floors in height.
- Green indicates the area of the road near the hills. Due to gold mining, the hills have rugged slopes.
- The two zones are separated by a deep ditch marked in yellow. It has a depth of one floor. You must cross it to get to the other side of the map.
Height variations
There are many variations of heights on the map. They are used to overlap the scope and make the map more interesting.
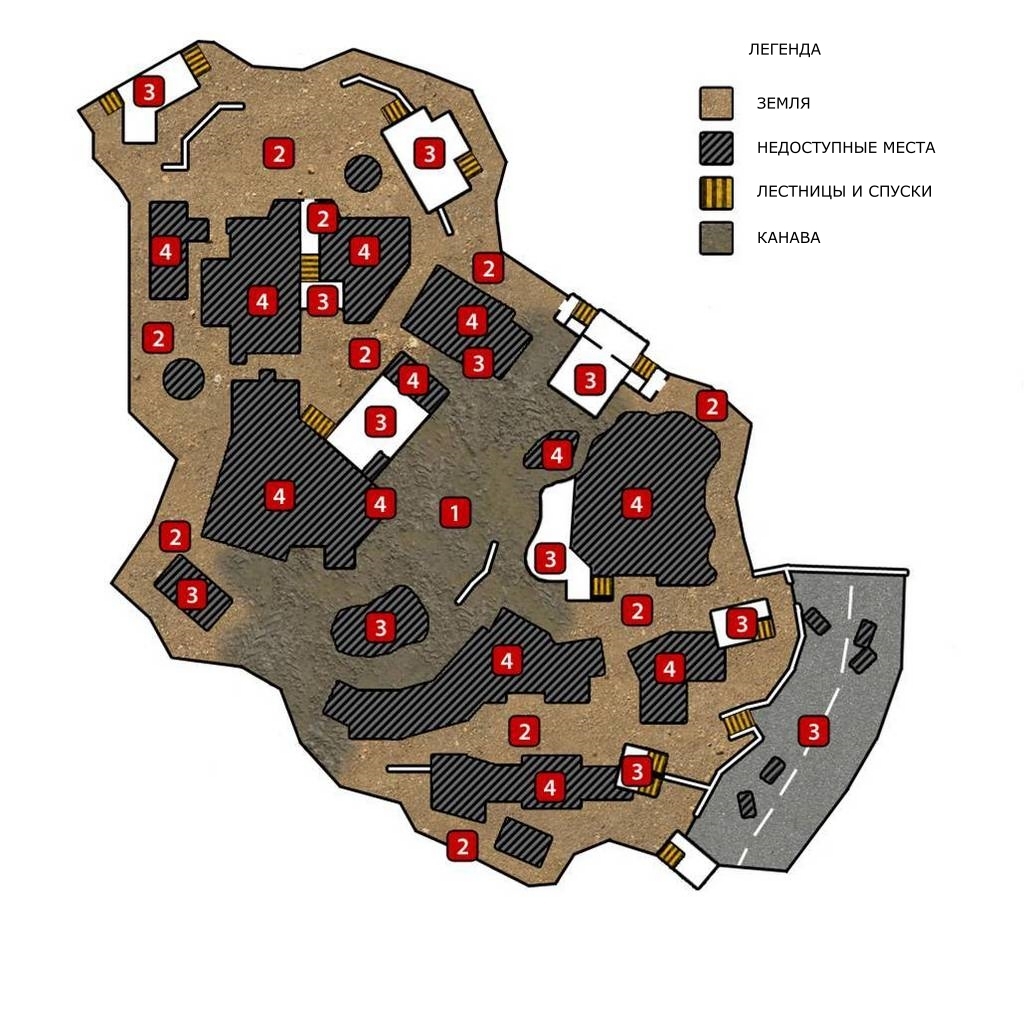
- The unit indicates the level of the ground or first floor, which from floor to ceiling has a height of 10 feet (about 3 meters). This will be our reference size. The ditch is located at a height of 1.
- Other numbers indicate the height in the number of floors.
- For example, a road 3 floors above a ditch.
Team spawn points
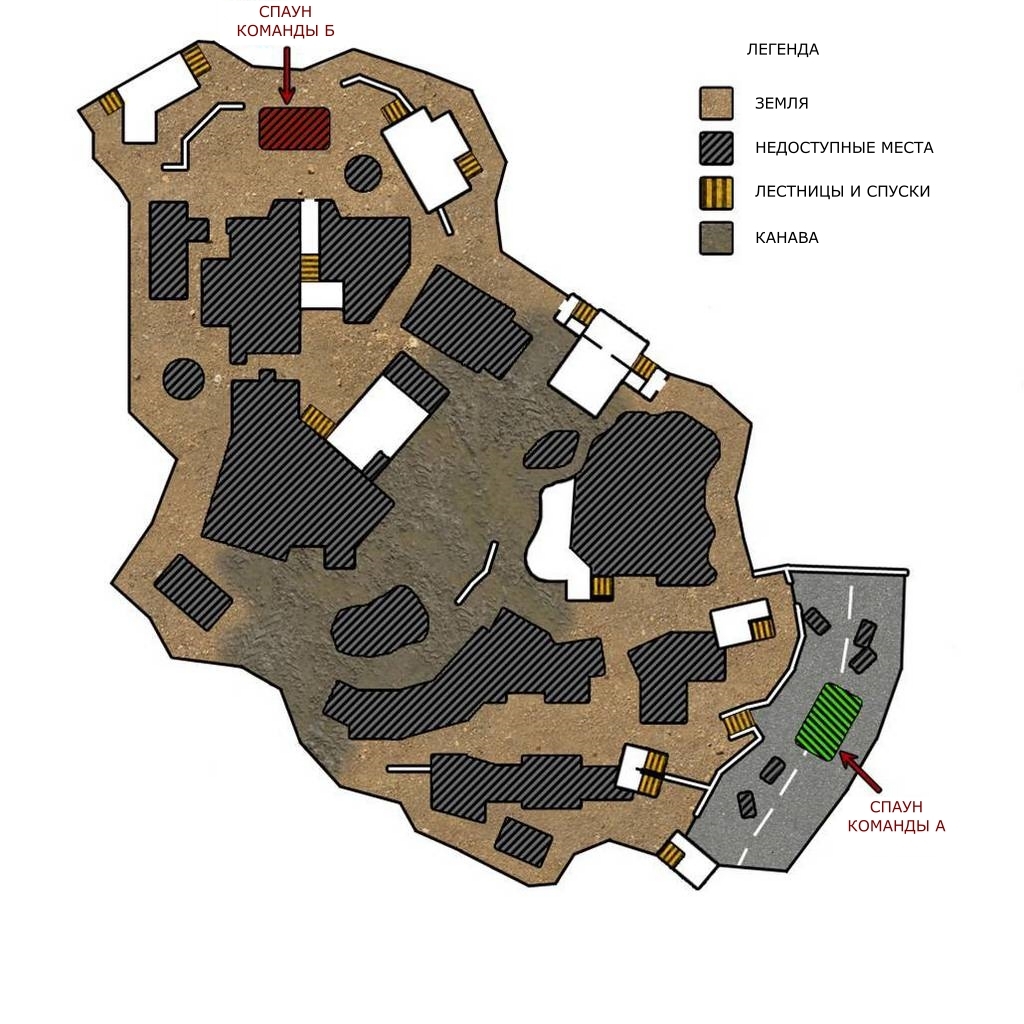
- Special Forces (Team A) spawn in the area on the road marked with a green spot.
- The militants (Team B) spawn in the hut area marked with a red spot.
Goals
I have always developed Call of Duty: Modern Warfare multiplayer maps, taking into account the Domination mode. This helps a lot in creating a well-balanced card on which one team will not have an unfair advantage over another.
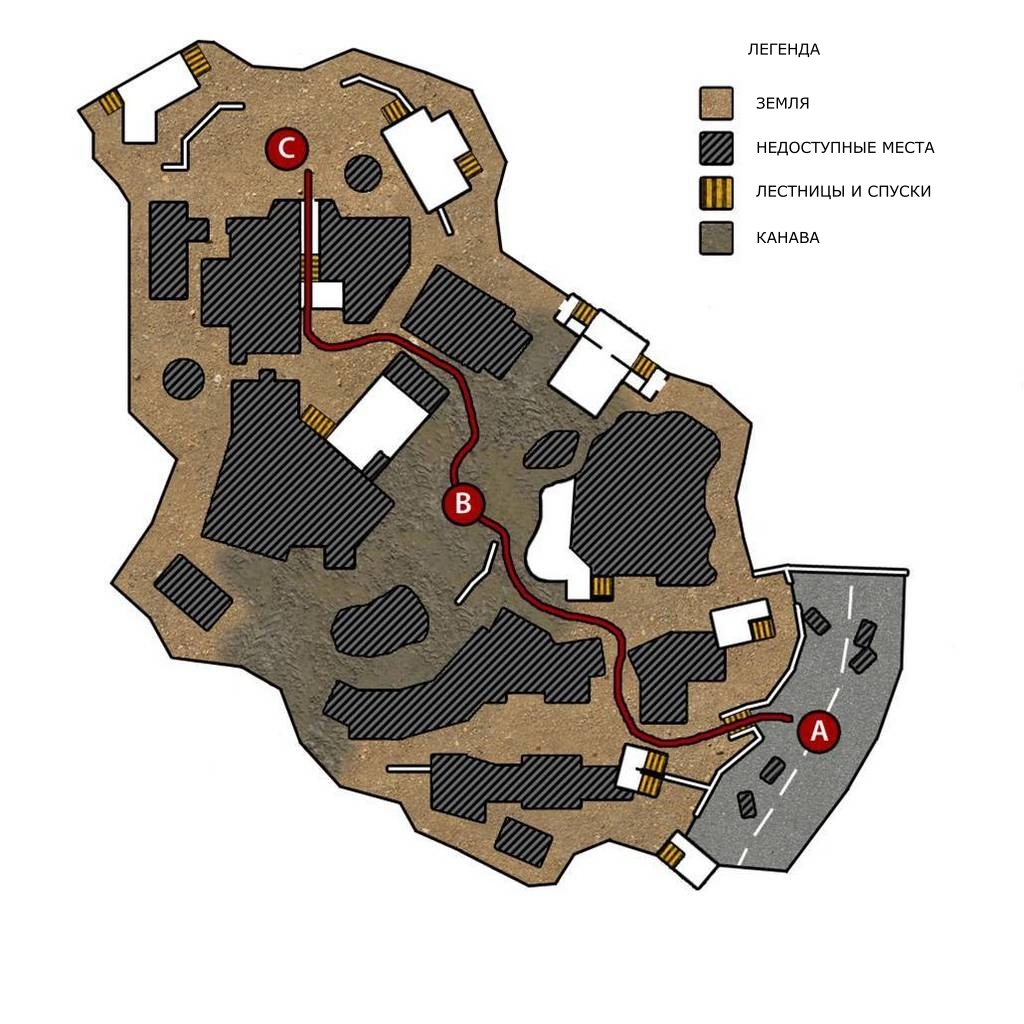
- Three points on the map, marked as A, B, and C, indicate three flags for Domination-style gameplay.
- Teams can easily capture A and C because they are close to spawn points.
- Point B will be the hardest to capture and hold. It is located in the middle of the map and is shot from many positions.
The way
Critical path
- The red line connecting the two parts of the map indicates the critical, or shortest, path.
- This path is the shortest, but passes through the most dangerous areas of the map.
Flanks
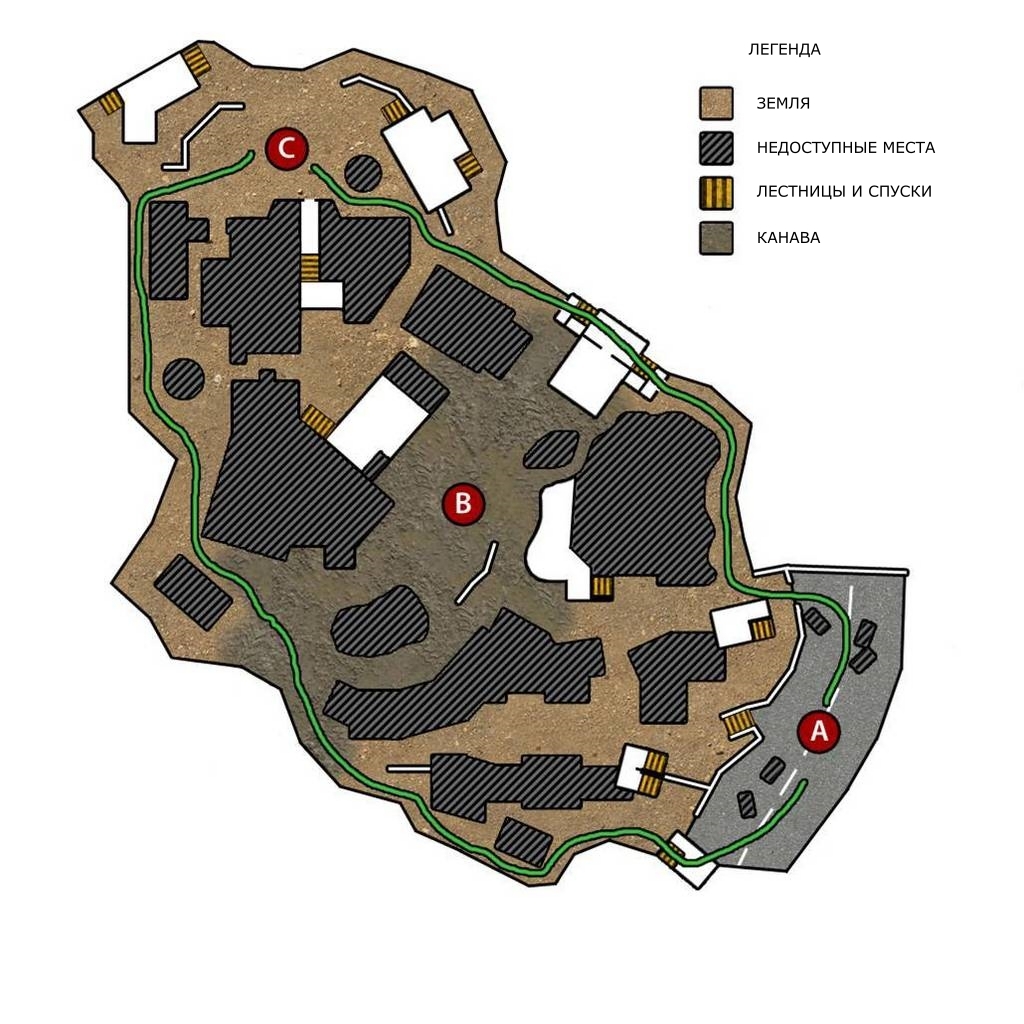
- Green lines indicate secondary paths.
- Both of these paths are longer than critical, but provide flanking positions and bypass the core in the center.
- However, these paths have large limits of line of sight. It is easier for snipers to “shoot” targets on them.
Important points
There are several important or “hot spots” on the map that give an advantage to the team that occupied them.
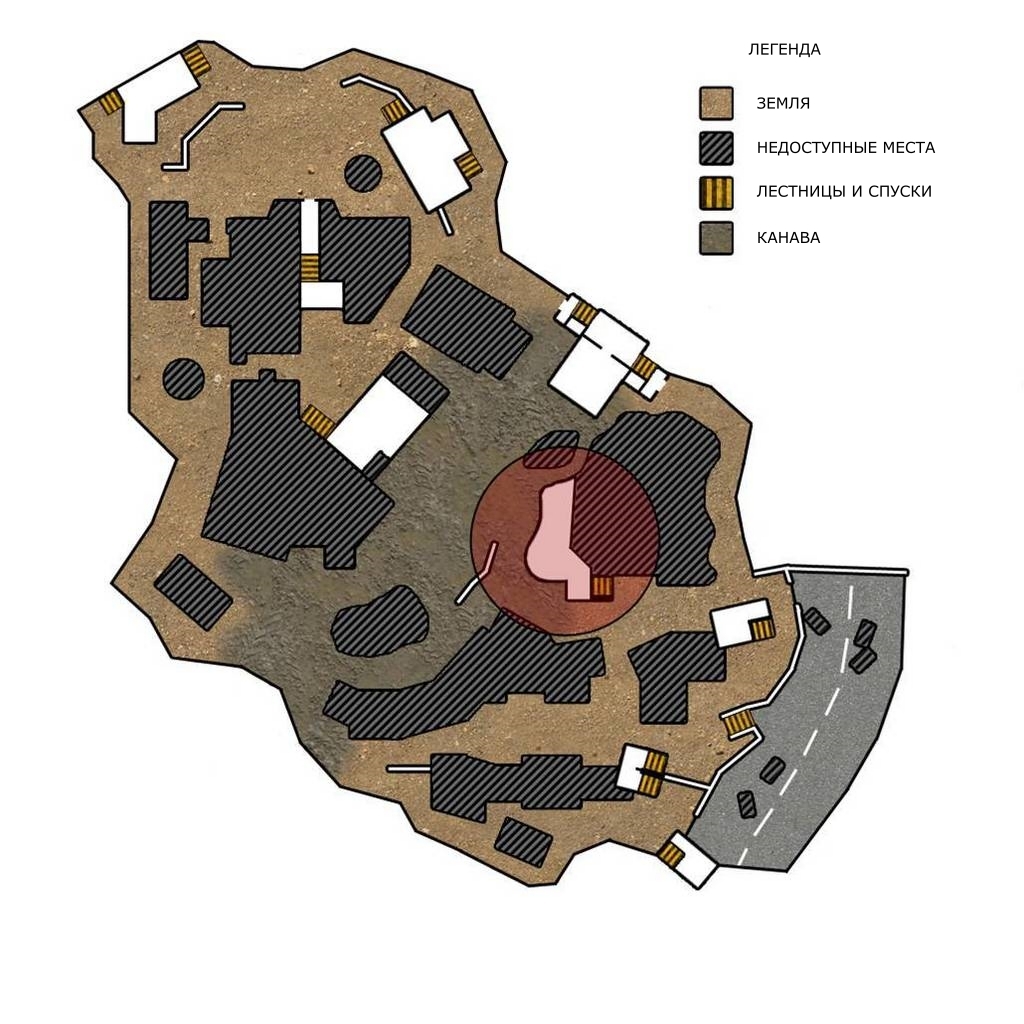
- The first point is highlighted in a red circle. This is a ledge with a good view of the ditch. It is three floors above the ditch.
- Players can watch the ditch from here and from two more “hot spots”, which will be shown below.
- This point is more accessible for Team A, which spawns on the road.
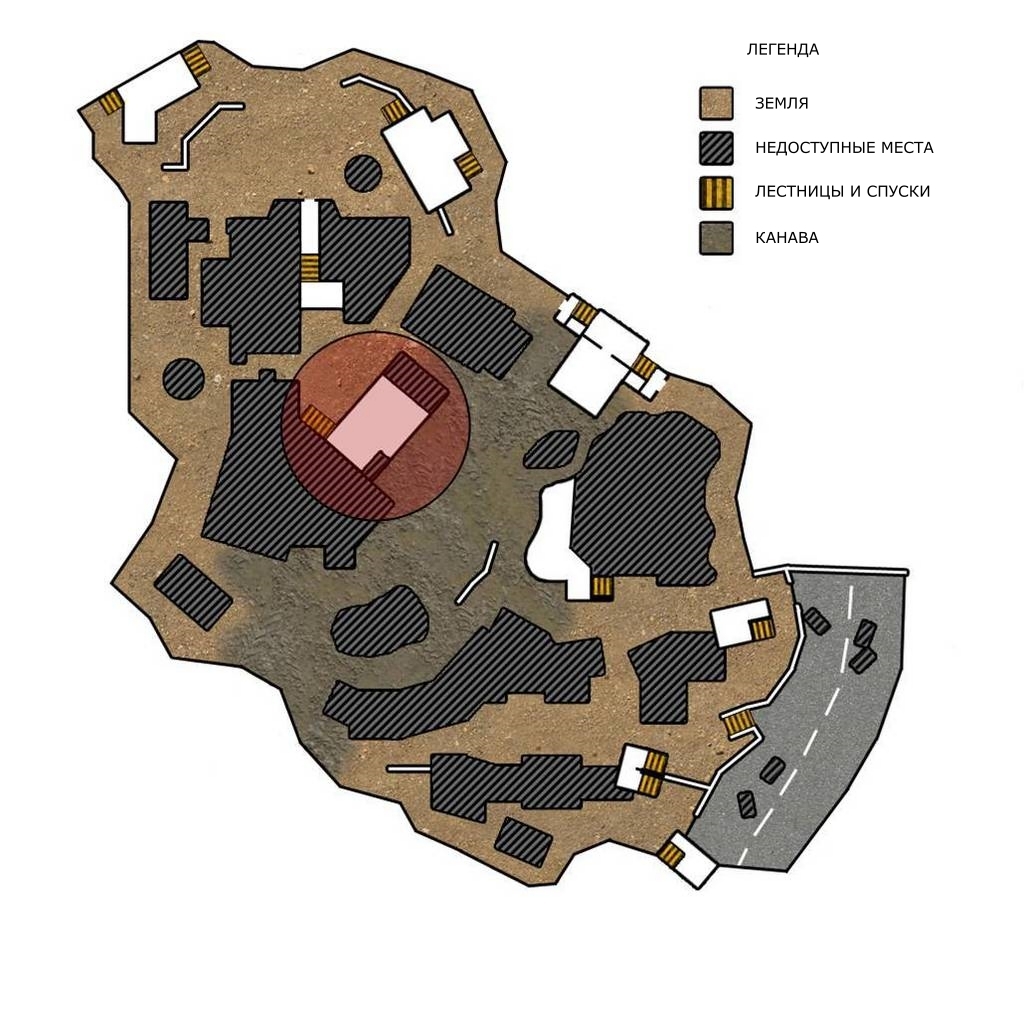
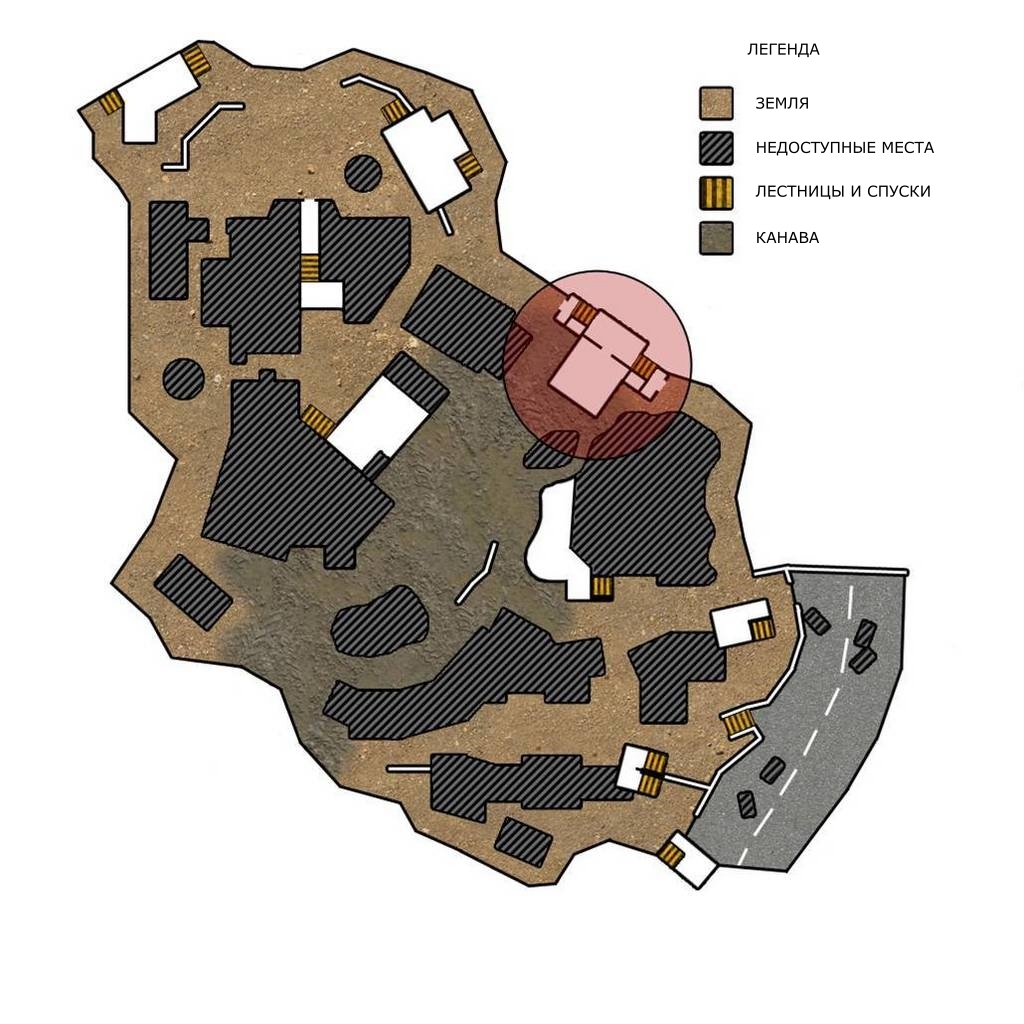
- The point is highlighted in red and is located three floors above the ditch.
- It is only accessible from behind, so gang players can quickly occupy it.
- At this point, you can follow the ditch, the point on the opposite side, and the point on the upper right side shown in the following image.
- The point is highlighted in red. This is a massive crane foundation used in gold mining.
- This point is accessible on both sides by stairs.
- At the point you can follow the ditch and it is three floors higher.
- From here, players can watch the entire length of the ditch and two other “hot spots” shown in previous images.
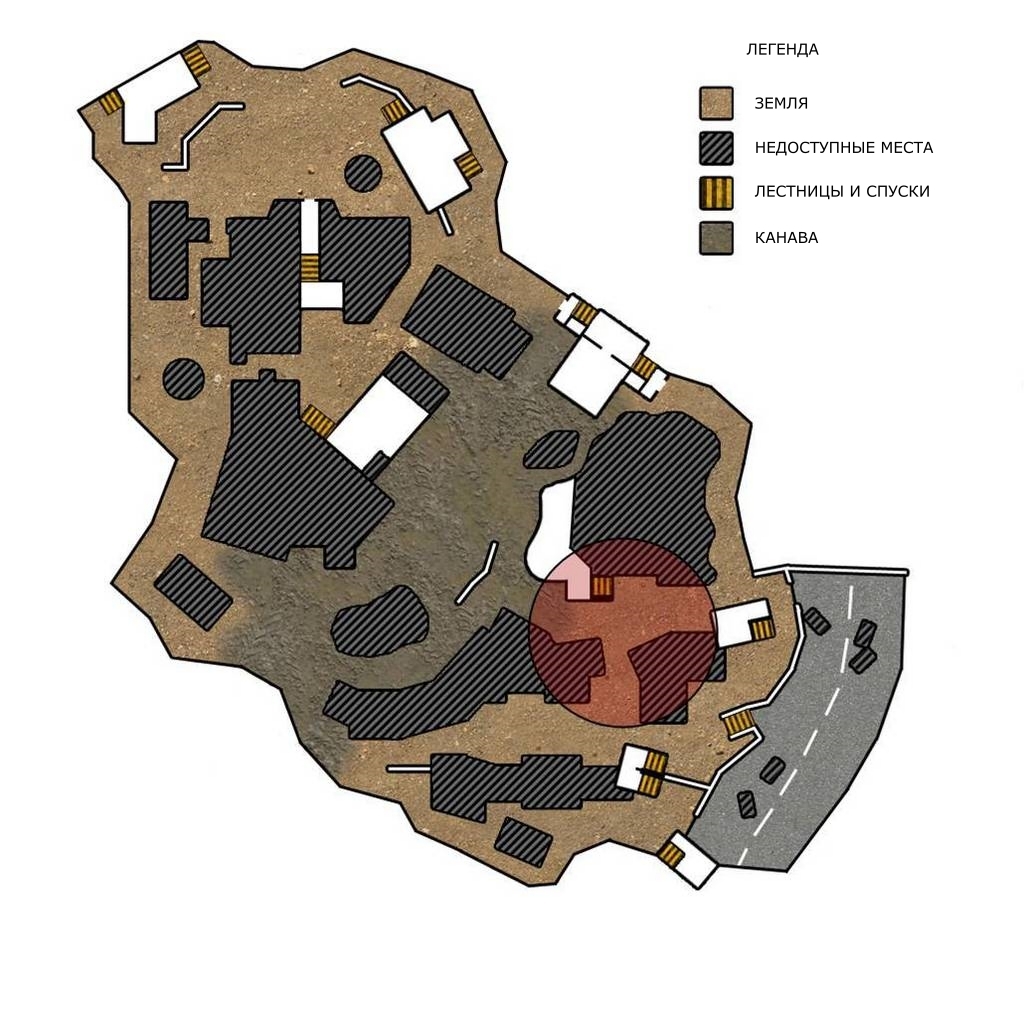
- The point is indicated by a red circle. Three passages intersect here, as well as a critical path.
- The two-story building on the right side of the point can be used by Team A to monitor the critical path.
- Players of the enemy team can go here to the ledge on the left and destroy the players of the friendly team watching the ditch.
- If the enemy controls this point, he can control the ditch and dominance point A.
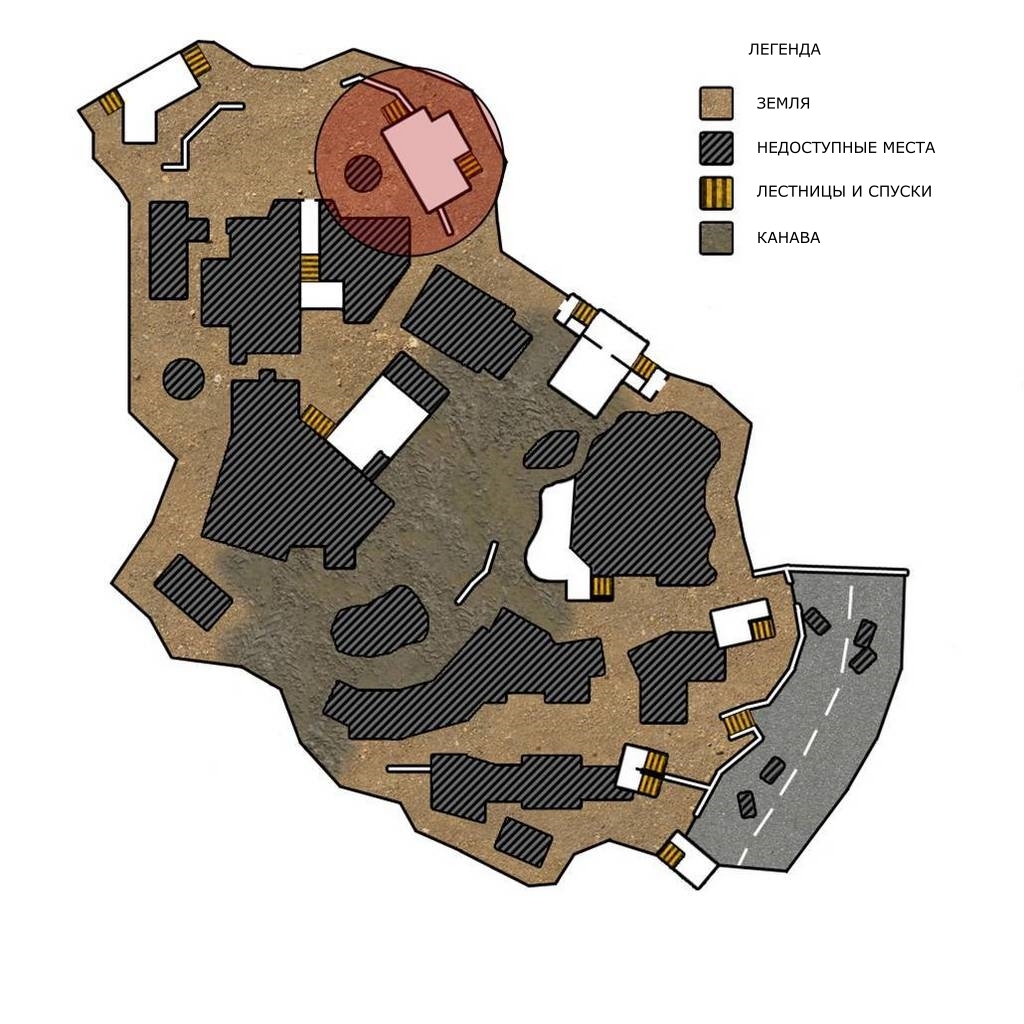
- The point is highlighted in red. From it one can observe the dominance point C and the paths passing from the ditch.
- This is a two-story building, which can be accessed from both sides by stairs. A passage at the rear of the building can provide a safe road for attacking enemy players.
- Team B must hold this point in order to keep track of the paths leading to the base and maintain fire at C's dominance point.
Visibility limits
Visibility limits are very important in multi-player maps, because they determine the capture range and control the location of shelters and AI on the map. For a better understanding, I indicated the limits of visibility in a map view from above.
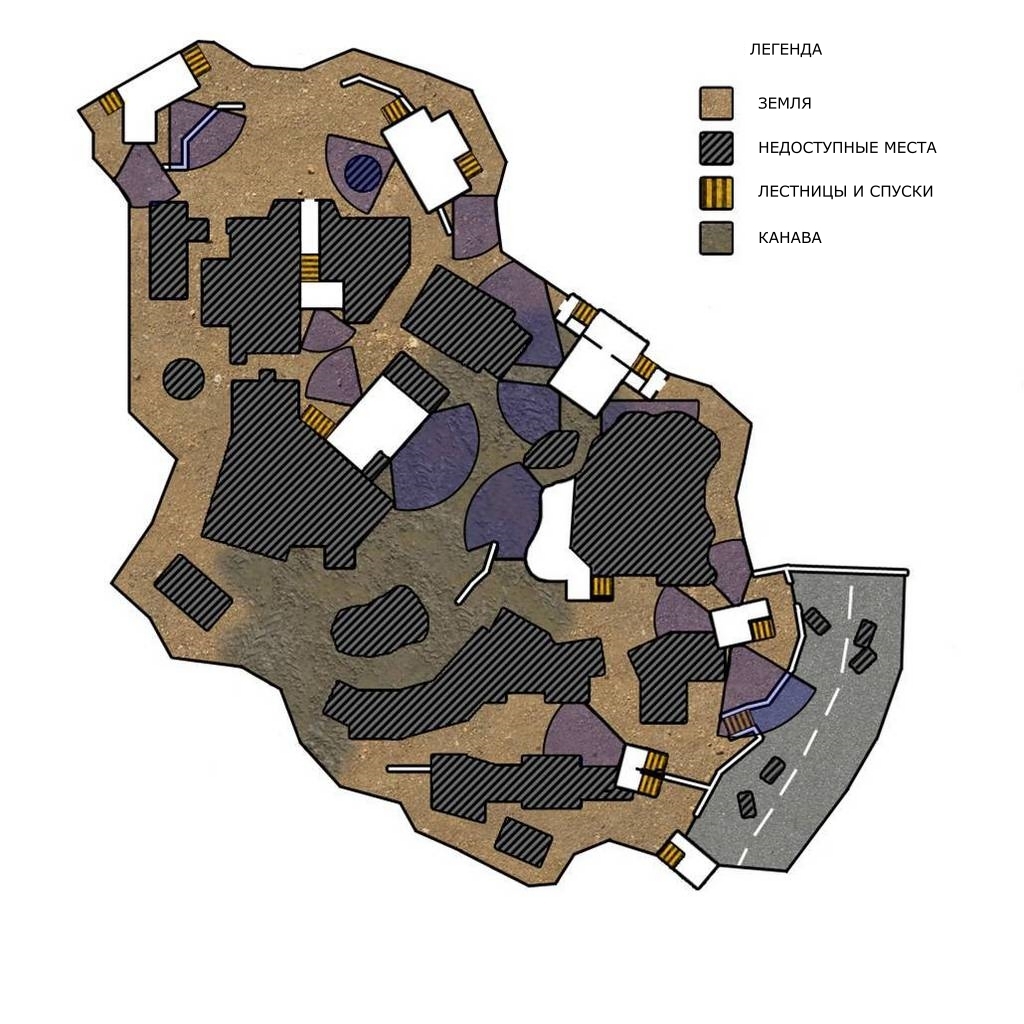
- Blue cones indicate the limits of visibility of players from ledges or from windows of second or third floors.
- The cones are shown small to simply show the angle of view of the player. The real limits of visibility will be much further.
- This helps to understand where windows and other high places are located on the map, and what areas can be observed with their help.
Here are some basic design principles that will help you get started with level design. Later I will consider other design elements, such as the mechanics of shelters, the process of playing at the level, the location of weapons and vehicles.









