October 14, 2016 at 12:33
 Creating Shared Storage Based on CEPH RBD and GFS2
Most software in cluster systems assumes a file system is available from all nodes in the cluster. This file system is used to store software, data, to organize the operation of some cluster subsystems, etc. Performance requirements for such an FS can vary greatly for different tasks, however, the higher it is, the more it is considered that the cluster is more stable and universal. The NFS server on the master node is the minimum version of such an FS. For large clusters, NFS is complemented by the deployment of LustreFS, a high-performance, specialized distributed file system that uses multiple servers as file storage and multiple meta-information servers. However, this configuration has a number of properties that make it very difficult to work with it when clients use independent virtualized clusters.
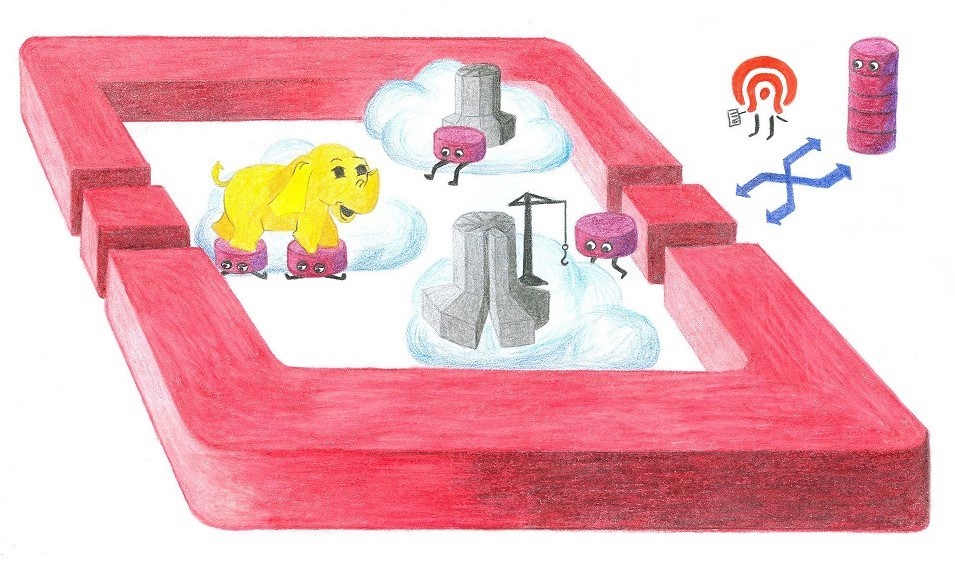
As part of the work on the HPC HUB project, based on OpenStack, the task arose to create fault-tolerant and high-performance shared storage for several groups of virtual machines, each of which is a small virtual HPC cluster. Each such cluster is issued to an individual client, who completely controls it from the inside. Thus, the problem cannot be solved within the framework of the “ordinary” distributed system assembled on physical computers, because Ethernet cluster networks are isolated from each other at L2 level to protect client data and their network traffic from each other. At the same time, data cannot be placed on each of the virtual machines within the framework of the classical shared system because there are not enough capabilities of each of the machines and I want to release valuable processor resources immediately after the calculations are completed, without spending it on “data transfusion”, especially considering the use of the pay-per-use model. Fortunately, not everything is so bad. In light of the fact that it is supposed to use shared storage for HPC calculations, several assumptions about the load can be made:
A peer-to-peer system with nodes on which data is calculated and simultaneously stored is contrary to the HPC paradigm in principle, because two non-synchronized activities appear on the node: counting and recording data from some other node. We had to abandon it initially. It was decided to build a two-level system. There are several approaches to such a storage:
Let's try to analyze the advantages and disadvantages of these approaches.
In option 1), the classical distributed file system (or some subtree) is mounted in the guest OS. In this case, the file system servers are visible from each system and to each other. This violates the isolation of the network by L2 level and potentially allows different users to see each other's traffic with stored data. In addition, for the case of CEPH, only cooperative quotas are possible (i.e., the user can reuse the allowed disk space at the expense of other users) in the mount mode of the file system via FUSE (filesystem in userspace), and not directly in the kernel. When mounted directly in the kernel, quotas are not supported at all.
In option 2) - a virtual file system (virtio-9p in QEMU) on top of a distributed file system mounted on the host - to work, you need to run QEMU on behalf of the superuser without lowering privileges, which reduces the overall security of the system or configure specific ACLs for storing guest identifiers user and guest access rights.
In option 3) in the absence of disk space on physical servers, we can only use remote block devices of some distributed storage. This option is not practical for several reasons:
In option 4) we decided to try a distributed block device based on CEPH and some kind of file system inside the cluster that works with such a device. In fact, the guest, of course, sees the device not as a block CEPH device, but as an ordinary virtual VirtIO SCSI or, optionally, VirtIO block. We chose VirtIO SCSI for a very simple reason - because of the SCSI support for the unmap command, an analogue of the well-known SATA TRIM command, which is sent by the guest system when files are deleted and frees up space in the virtual storage.
Choosing a file system for a guest is also simple. There are only two options:
The installation of CEPH is perfectly described in the documentation docs.ceph.com/docs/master/start and did not cause any special problems. Currently, the system works with one redundant copy of data and without authorization. The CEPH network is isolated from the client network. Creating a block device also did not cause problems. Everything is standard.
Unfortunately, with GFS2, configuration took a lot longer than originally estimated. There are very few explanatory descriptions on the net and they are confusing. The general idea is approximately as follows. The operation of the shared file system in the kernel is controlled by several daemons, the correct configuration of which requires non-trivial efforts or knowledge.
The first and most important thing to know is that you most likely will not succeed in raising this file system on Ubuntu. Or you will have to rebuild many packages that are underutilized outside of RedHat under Ubuntu, resolving a bunch of non-trivial API level conflicts.
Under a RedHat-like system, the sequence is more or less understood. The following are the commands for the CentOS 7 guest system.
First of all, disable SELinux. GFS2 will not work with it. This is official information from the manufacturer.
We put the basic software:
Turn on / off the necessary services:
NTP is necessary for the system to work, all distributed blocking of block device areas is tied to it. The system is configured for a cluster isolated from the outside world, so we turn off firewalls. Next, we put the necessary software binding on each of the cluster nodes:
Please note that there is no need to create the user 'hacluster', it is created by itself during the installation of packages. In the future, you will need his password to create a mutual authorization network between the cluster machines.
Now you can create a distributed repository if this has not been done before. It is done on any CEPH node, that is, in our case, on a physical node:
When formatting the file system, the cluster name is indicated - in our case 'gfs2' and the name of the file system within this cluster 'fs', the number of logs '-j17', which should be equal to the number of nodes (in our case 17) working simultaneously with this the cluster and the locking protocol for allocating disk space (in our case, 'lock_dlm' is distributed locking). The cluster and file system names should be specified when mounting the partition. In an isolated network within a cluster, you can use the same names for different clusters. This is not a problem.
Now it remains only to configure the mount in the guest OS. Configuration is performed from one of the cluster machines once.
Creating a mutual authorization network:
here, master and n01..n04 are virtual hosts on which the shared partition will be available.
Create a default cluster. Please note that the cluster name must match the one used when creating the file system in the previous step.
Running service daemons - clvmd & dlm:
Mounting a GFS2 partition in / shared, shared block device - sdb:
Starting from this moment, you can enjoy the start of the whole system that raises services one by one with the help of the command:
In the end, if everything worked out right for you, you should see that the / shared file system will be available on each node.
For tests, we used a simple script that sequentially reads and writes data from each of the nodes via dd, for example:
The block size is set large, reading is done in the 'direct' mode to test the file system itself, and not the speed of working with the disk cache. The results are as follows:
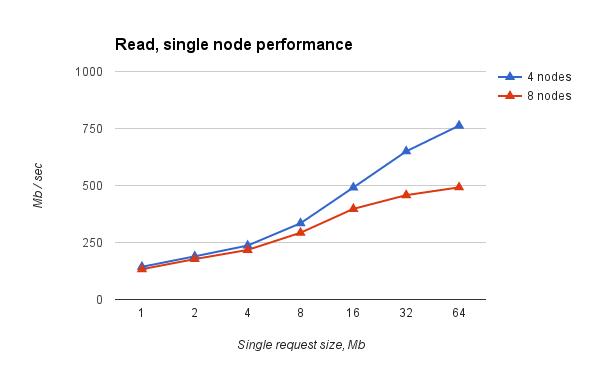
Fig. 1. Simultaneous reading from all nodes of virtual clusters of different sizes. Single node performance.
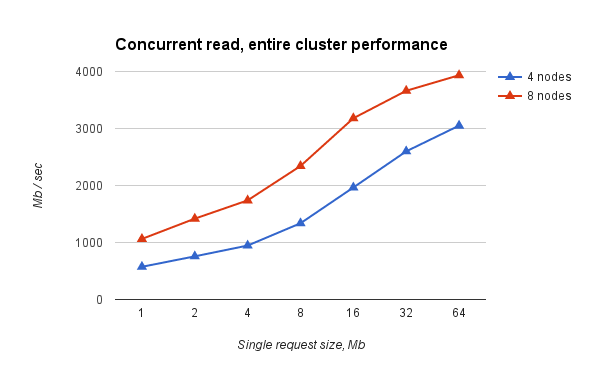
Fig. 2. Simultaneous reading from all nodes of virtual clusters of different sizes. Cumulative performance.
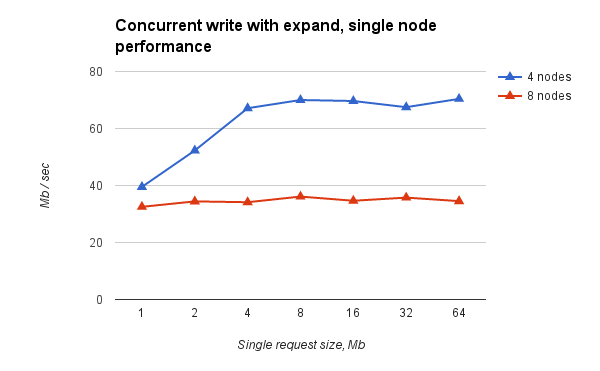
Fig. 3. Simultaneous recording from all nodes of virtual clusters of different sizes. Single node performance.
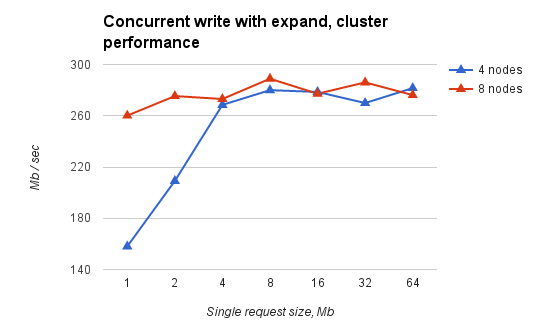
Fig. 4. Simultaneous recording from all nodes of virtual clusters of different sizes. Total performance
What conclusions can be made:
The pitfalls include the need to correctly stop at least the last of all virtual machines using the cluster. Otherwise, the file system may be in a condition requiring recovery. A serious problem is the correct configuration of fencing to disconnect a node from the pcs cluster that has lost synchronization with others. But more on that in the following articles.
The material was prepared by Andrei Nikolaev, Denis Lunev, Anna Subbotina.
As part of the work on the HPC HUB project, based on OpenStack, the task arose to create fault-tolerant and high-performance shared storage for several groups of virtual machines, each of which is a small virtual HPC cluster. Each such cluster is issued to an individual client, who completely controls it from the inside. Thus, the problem cannot be solved within the framework of the “ordinary” distributed system assembled on physical computers, because Ethernet cluster networks are isolated from each other at L2 level to protect client data and their network traffic from each other. At the same time, data cannot be placed on each of the virtual machines within the framework of the classical shared system because there are not enough capabilities of each of the machines and I want to release valuable processor resources immediately after the calculations are completed, without spending it on “data transfusion”, especially considering the use of the pay-per-use model. Fortunately, not everything is so bad. In light of the fact that it is supposed to use shared storage for HPC calculations, several assumptions about the load can be made:
- operations will be carried out in large blocks;
- write operations will not be frequent, but will be interspersed with significant time intervals;
- write operations can start immediately from all nodes almost simultaneously, but even in this case, you want to finish recording as quickly as possible so that the nodes continue counting.
A peer-to-peer system with nodes on which data is calculated and simultaneously stored is contrary to the HPC paradigm in principle, because two non-synchronized activities appear on the node: counting and recording data from some other node. We had to abandon it initially. It was decided to build a two-level system. There are several approaches to such a storage:
- Distributed file system mounted on a virtual node through a specially organized network device to avoid performance losses from OpenStack network virtualization.

- Distributed file system mounted on a physical node and access to it from the guest system through the virtual file system.
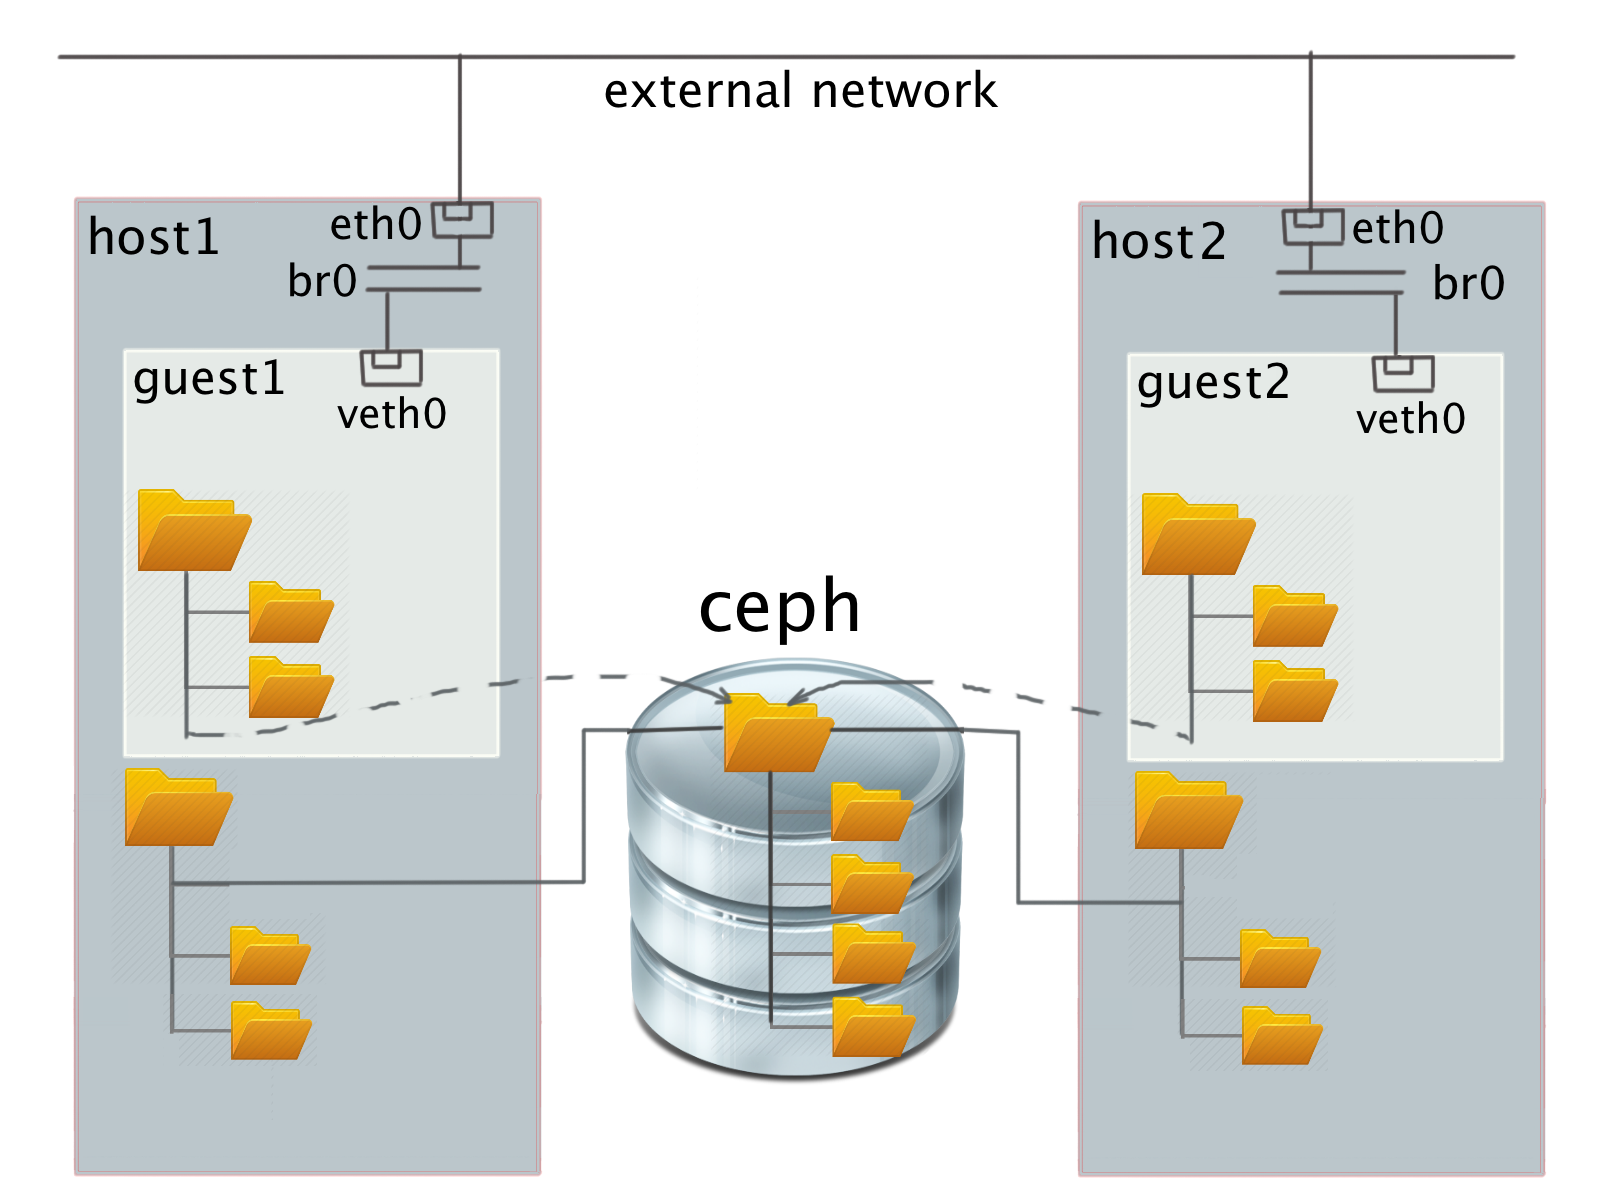
- A classic distributed file system inside a virtual cluster on top of a guest block device.
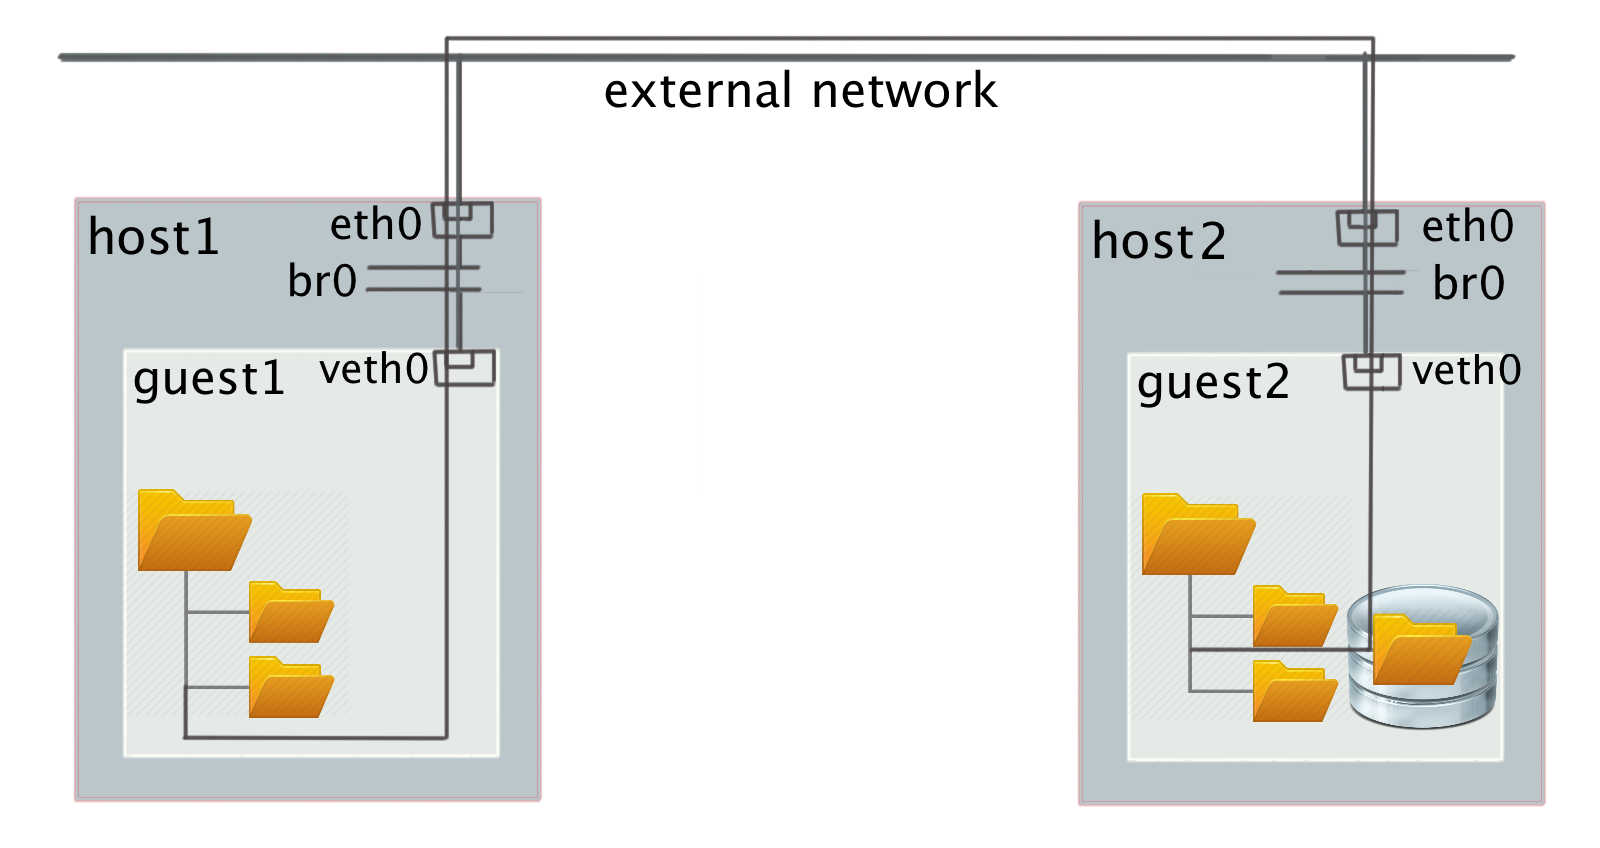
- A distributed block device common to each virtual node and a pre-configured file system inside a virtual cluster that runs on top of this shared device.

Let's try to analyze the advantages and disadvantages of these approaches.
In option 1), the classical distributed file system (or some subtree) is mounted in the guest OS. In this case, the file system servers are visible from each system and to each other. This violates the isolation of the network by L2 level and potentially allows different users to see each other's traffic with stored data. In addition, for the case of CEPH, only cooperative quotas are possible (i.e., the user can reuse the allowed disk space at the expense of other users) in the mount mode of the file system via FUSE (filesystem in userspace), and not directly in the kernel. When mounted directly in the kernel, quotas are not supported at all.
In option 2) - a virtual file system (virtio-9p in QEMU) on top of a distributed file system mounted on the host - to work, you need to run QEMU on behalf of the superuser without lowering privileges, which reduces the overall security of the system or configure specific ACLs for storing guest identifiers user and guest access rights.
In option 3) in the absence of disk space on physical servers, we can only use remote block devices of some distributed storage. This option is not practical for several reasons:
- accessing data will require 2 times the network bandwidth. Data is first transferred from distributed storage to a specific virtual host and only then sent to the final consumer;
- as a rule, all such systems support data redundancy, which is unacceptable. For example, at the default settings for CEPH, the usable storage capacity is already reduced by 4 times of the available disk capacity. All network loads that support distributed FS will also be inside the virtual network space. And, what is most difficult, the latter option will actually require the allocation of physical nodes for storage virtual machines, which leads to a sharp decrease in overall efficiency.
In option 4) we decided to try a distributed block device based on CEPH and some kind of file system inside the cluster that works with such a device. In fact, the guest, of course, sees the device not as a block CEPH device, but as an ordinary virtual VirtIO SCSI or, optionally, VirtIO block. We chose VirtIO SCSI for a very simple reason - because of the SCSI support for the unmap command, an analogue of the well-known SATA TRIM command, which is sent by the guest system when files are deleted and frees up space in the virtual storage.
Choosing a file system for a guest is also simple. There are only two options:
- OCFS2,
- Gfs2.
Shared Storage Configuration
The installation of CEPH is perfectly described in the documentation docs.ceph.com/docs/master/start and did not cause any special problems. Currently, the system works with one redundant copy of data and without authorization. The CEPH network is isolated from the client network. Creating a block device also did not cause problems. Everything is standard.
GFS2 Configuration
Unfortunately, with GFS2, configuration took a lot longer than originally estimated. There are very few explanatory descriptions on the net and they are confusing. The general idea is approximately as follows. The operation of the shared file system in the kernel is controlled by several daemons, the correct configuration of which requires non-trivial efforts or knowledge.
The first and most important thing to know is that you most likely will not succeed in raising this file system on Ubuntu. Or you will have to rebuild many packages that are underutilized outside of RedHat under Ubuntu, resolving a bunch of non-trivial API level conflicts.
Under a RedHat-like system, the sequence is more or less understood. The following are the commands for the CentOS 7 guest system.
First of all, disable SELinux. GFS2 will not work with it. This is official information from the manufacturer.
vi /etc/sysconfig/selinux # надо перезагрузится, но это можно сделать позжеWe put the basic software:
yum -y install ntp epel-release vim openssh-server net-toolsTurn on / off the necessary services:
chkconfig ntpd on
chkconfig firewalld off
NTP is necessary for the system to work, all distributed blocking of block device areas is tied to it. The system is configured for a cluster isolated from the outside world, so we turn off firewalls. Next, we put the necessary software binding on each of the cluster nodes:
yum -y install gfs2-utils lvm2-cluster pcs fence-agents-all
chkconfig pcsd on		# запускаем PaceMaker - сердце RedHat кластера
lvmconf --enable-cluster	# необходимо для работы GFS2 в распределенном режиме
echo  | passwd --stdin hacluster   # пароль для администратора кластера. Выберите свой :)
reboot				# для отключения SELinux и применения настроек LVM
Please note that there is no need to create the user 'hacluster', it is created by itself during the installation of packages. In the future, you will need his password to create a mutual authorization network between the cluster machines.
Now you can create a distributed repository if this has not been done before. It is done on any CEPH node, that is, in our case, on a physical node:
rbd create my-storage-name --image-format 2 --size 6291456 	# размер в Мб!
sudo rbd map rbd/my-storage-name
sudo mkfs.gfs2 -p lock_dlm -t gfs2:fs -j17 /dev/rbd0
sudo rbd unmap /dev/rbd0
When formatting the file system, the cluster name is indicated - in our case 'gfs2' and the name of the file system within this cluster 'fs', the number of logs '-j17', which should be equal to the number of nodes (in our case 17) working simultaneously with this the cluster and the locking protocol for allocating disk space (in our case, 'lock_dlm' is distributed locking). The cluster and file system names should be specified when mounting the partition. In an isolated network within a cluster, you can use the same names for different clusters. This is not a problem.
Now it remains only to configure the mount in the guest OS. Configuration is performed from one of the cluster machines once.
pcs cluster destroy --all # кластер надо уничтожить, если он уже существовалCreating a mutual authorization network:
pcs cluster auth master n01 n02 n03 n04 -u hacluster -p 1q2w3e4r --forcehere, master and n01..n04 are virtual hosts on which the shared partition will be available.
Create a default cluster. Please note that the cluster name must match the one used when creating the file system in the previous step.
pcs cluster setup --name gfs2 master n01 n02 n03 n04
pcs cluster start --all		# стартовать кластер прямо сейчас
pcs cluster enable --all	# стартовать кластер при перезагрузке виртуального хоста
Running service daemons - clvmd & dlm:
pcs property set no-quorum-policy=ignore
pcs stonith create local_stonith fence_kdump pcmk_monitor_action="metadata"
pcs resource create dlm ocf:pacemaker:controld op monitor interval=30s \
	on-fail=fence clone interleave=true ordered=true
pcs resource create clvmd ocf:heartbeat:clvm op monitor interval=30s \
	on-fail=fence clone interleave=true ordered=true
pcs constraint order start dlm-clone then clvmd-clone
pcs constraint colocation add clvmd-clone with dlm-clone
Mounting a GFS2 partition in / shared, shared block device - sdb:
pcs resource create clusterfs Filesystem device="/dev/sdb" \
	directory="/shared" fstype="gfs2" "options=noatime,nodiratime" op \
	monitor interval=10s on-fail=fence clone interleave=true
pcs constraint order start clvmd-clone then clusterfs-clone
pcs constraint colocation add clusterfs-clone with clvmd-clone
Starting from this moment, you can enjoy the start of the whole system that raises services one by one with the help of the command:
pcs status resourcesIn the end, if everything worked out right for you, you should see that the / shared file system will be available on each node.
Performance tests
For tests, we used a simple script that sequentially reads and writes data from each of the nodes via dd, for example:
dd if=/shared/file of=/dev/null bs=32M iflag=direct
dd if=/root/file of=/shared/file bs=32M oflag=direct
The block size is set large, reading is done in the 'direct' mode to test the file system itself, and not the speed of working with the disk cache. The results are as follows:
Fig. 1. Simultaneous reading from all nodes of virtual clusters of different sizes. Single node performance.
Fig. 2. Simultaneous reading from all nodes of virtual clusters of different sizes. Cumulative performance.
Fig. 3. Simultaneous recording from all nodes of virtual clusters of different sizes. Single node performance.
Fig. 4. Simultaneous recording from all nodes of virtual clusters of different sizes. Total performance
conclusions
What conclusions can be made:
- reading practically rests on network bandwidth (~ 9 Gbps, Infiniband, IPoIB) and scales well with increasing number of virtual cluster nodes;
- recording rests on the practical ceiling and does not scale. But taking into account the assumptions made, this suits us so far. The mechanism that caused the presence of such a ceiling has not yet been clear to us.
Underwater rocks
The pitfalls include the need to correctly stop at least the last of all virtual machines using the cluster. Otherwise, the file system may be in a condition requiring recovery. A serious problem is the correct configuration of fencing to disconnect a node from the pcs cluster that has lost synchronization with others. But more on that in the following articles.
The material was prepared by Andrei Nikolaev, Denis Lunev, Anna Subbotina.