How to stop being afraid and love mbed [Part 5]
We continue a series of publications on the use of the ARM mbed environment to create a prototype measuring device.
Today I’m finally finishing the description of the software part - there were questions related to the output of images and Cyrillic letters to the TFT display. We will do everything beautifully.
Content of the publication cycle:
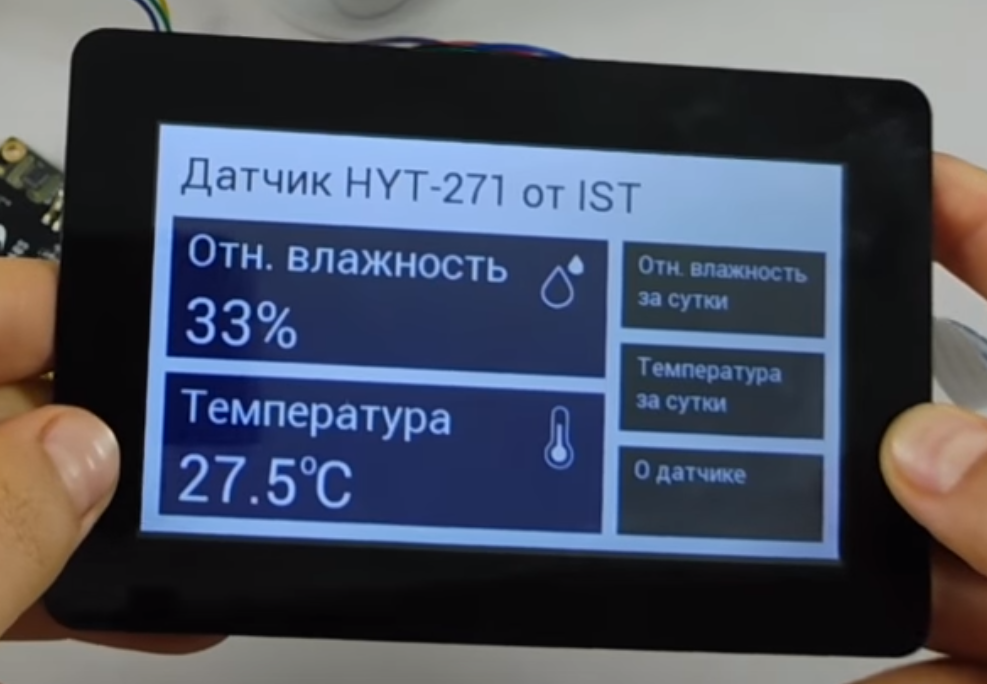
Let me remind you that we are talking about the development of a prototype device with a touch screen, which serves for high-speed measurement of relative humidity and (at the same time) temperature. To write a program for the microcontroller, the online IDE mbed is used, which allows you to create non-volatile code that works the same on debug boards from SiLabs, Atmel, Wiznet, STM32, NXP and other manufacturers.
The general scheme for controlling the TFT display using the FTDI graphics controller has already been described in previous articles . Like other drawing-related procedures, displaying images on a TFT display is hardware implemented on the FT801 graphics controller. The managing host controller only needs to transmit simple control commands and necessary data to the FT801.
FT8xx Series graphics controllers allow you to work with .jpeg or .png images. The image can not only be displayed on the screen, but also transformed - resized, rotated or moved around the screen, and also used as a screensaver. All these operations are performed on the graphics controller upon receipt of the appropriate commands from the manager MK.
Speaking about downloading images to a graphics controller, you should immediately separate the two approaches to working with images.
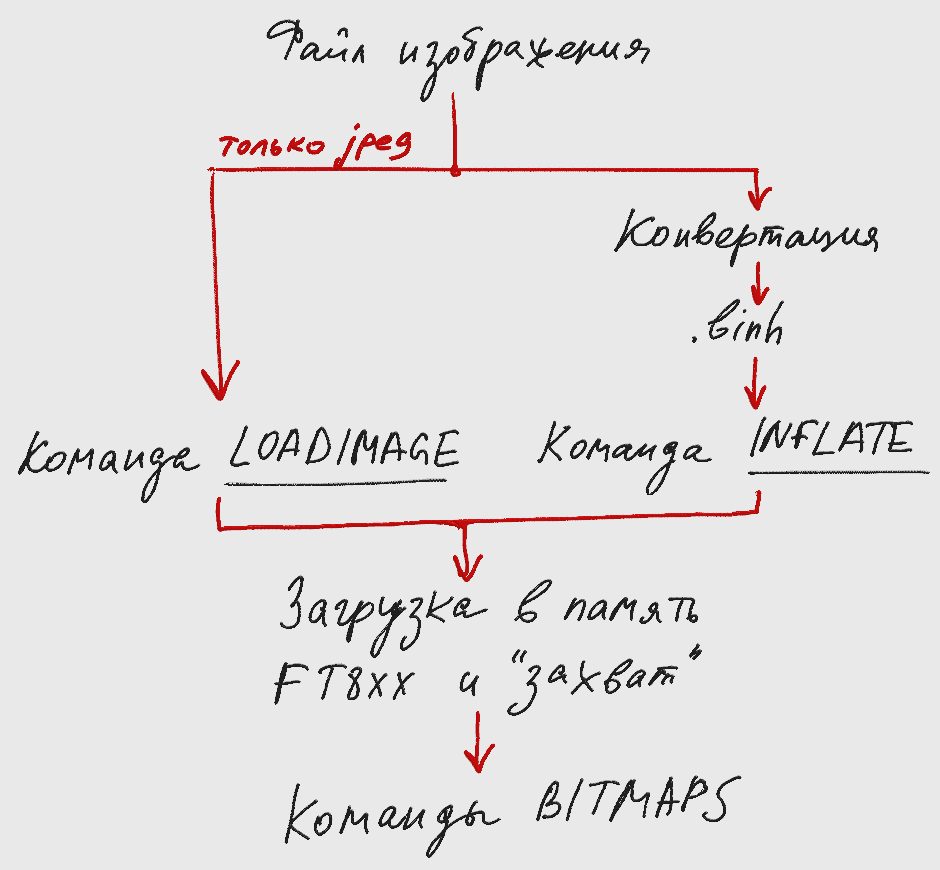
In the first case, the .jpeg file is taken from the memory of the control MK or from an external medium and is immediately written to the memory of the FT8xx graphics controller. In this case, the CMD_LOADIMAGE command is used for loading. After loading the image into the FT8xx's memory, all the functions for working with the image become available - transforming the image and displaying it on the display. This approach is optimal if you have somewhere to store images, that is, you use a USB flash memory or SD card.
In the second case, the image is pre-compressed using the Deflate algorithm. The bitmap obtained as a result of encoding takes up much less space, therefore it can be stored not only on external media, but in the internal memory of the control MK. The image is downloaded to the FT8xx graphics controller in a compressed form, and the data is unpacked by the graphics controller. To load a compressed image, use the CMD_INFLATE command. After the image is unpacked, you can work with it in the same way as in the first case.
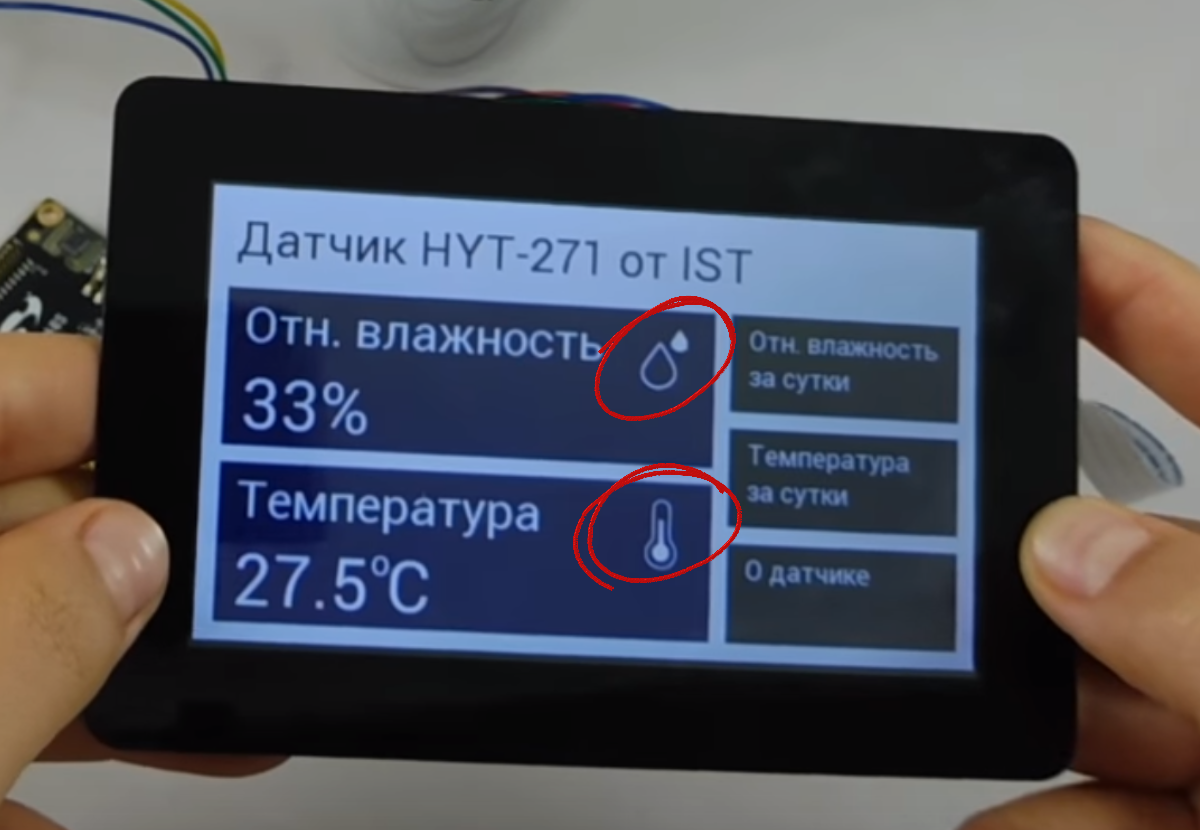
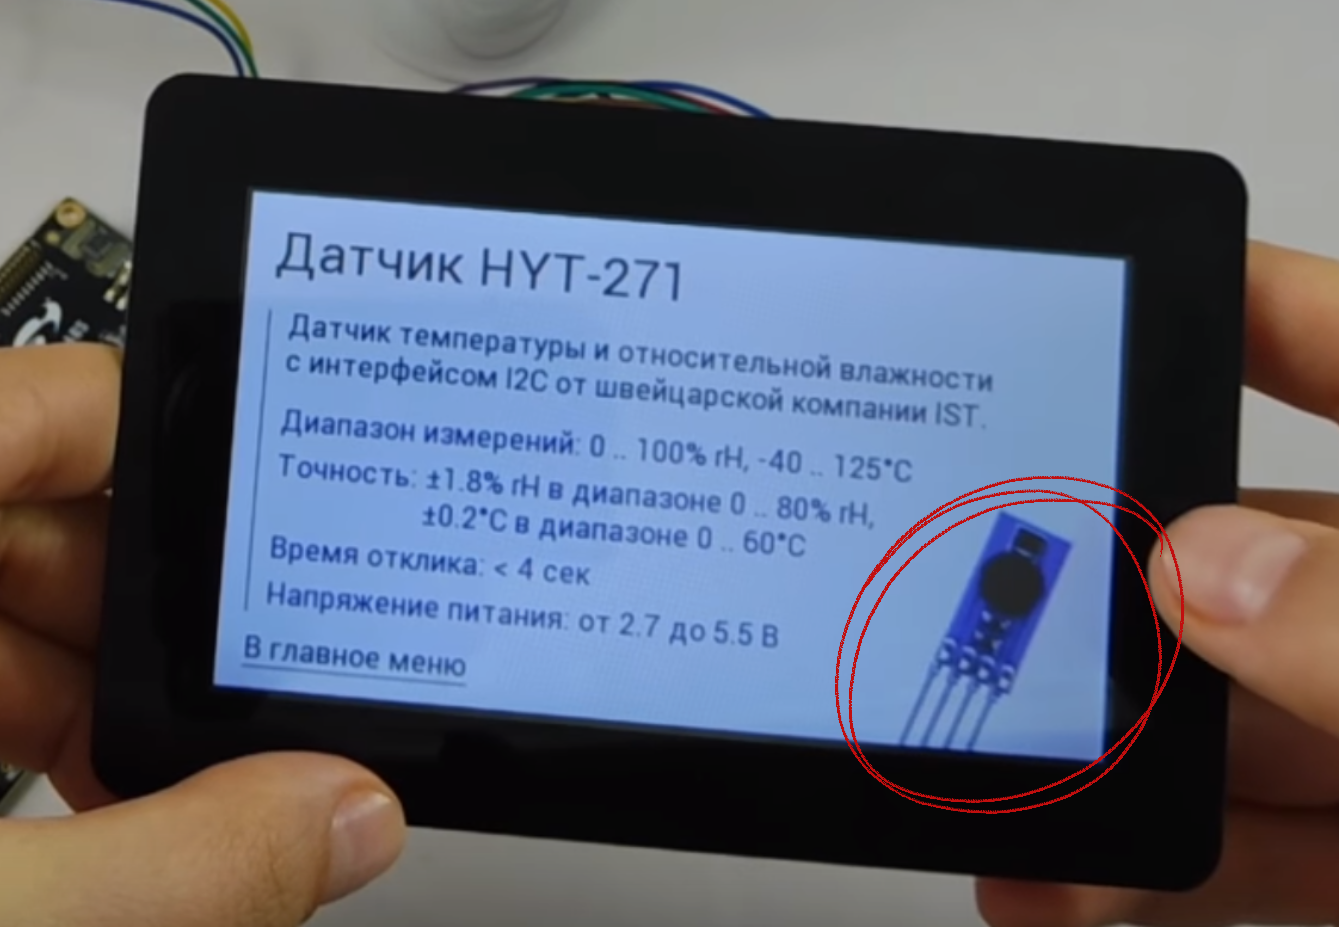
Since the use of external memory is not supposed in my project, we will consider only the first case - work with compressed images stored in the memory of the control microcontroller. As a result, I want to display three images: icons for temperature and relative humidity on the screen with the main menu and a photo of the HYT-271 sensor on the screen with a description of the sensor.
The Deflate algorithm was originally created for zip archives, but due to the lack of patents it has been successfully used for other purposes, including for image compression. Here, by the way, is an excellent article on Deflate and png.
FTDI offers several console utilities for image conversion , for example img_cvt. Also available are graphical shells like the EVE Screen Editor , which not only allow you to convert images, but generally greatly simplify life when creating programs for the graphics controller. Essentially, EVE Screen Editor is an emulator of Riverdi TFT modules.

There is absolutely nothing unusual in the program interface - the future TFT screen is formed in the central window - a field onto which you can drag and drop the desired images and other graphic elements.
The FT801 controller I use allows you to display nine formats on a TFT display: black and white L1, L4 and L8, as well as RGB332, ARGB2, ARGB4, RGB565, PALETTED and ARGB1555, you can read more about them in the manufacturer ’s documentation . Different formats allow you to get a different ratio of image quality and size of a binary file encoding an image.

(L1, L4, L8, RGB332, ARGB2, ARGB4, RGB565, PALETTED, ARGB1555 from left to right)
In theory, the best quality can be obtained using the ARGB1555 format, but in practice it is better to try different options and choose the most suitable one. The photo of the sensor really looks best after conversion to ARGB1555 or RGB565, however at some point I didn’t have enough internal memory MK and I had to abandon these formats in favor of RGB332. It looks more or less decent, and takes 1865 bytes instead of 7067 and 7816 for ARGB1555 and RGB565, respectively.
The icons turned out to be more interesting. The source files are .png with a transparent background of 37x77 and 53x67 pixels. The transparency of the icons can only be saved with encoding of the ARGB type, i.e. you have to choose from the formats ARGB2, ARGB4, and ARGB1555. Of these, the most attractive smoothed image is not provided by ARGB2, and, to my surprise, not by ARGB1555, but by ARGB4.

(In the figure, from left to right ARGB2, ARGB4, ARGB1555)
After you select the appropriate format, you need to save the project in Screen Editor. In the folder where Screen Editor was installed, the images directory will appear, where a .binh file is created for each of the used images. We need him.
Having received the binary representation of the image, we return from the Screen Editor to the mbed IDE, where in the program code we save all the received bitmap as arrays. The humidity icon, for example, looks like this.
To load this image into the memory of the FT801 graphics controller, you need to send three commands from the control MK:
CMD_INFLATE - a command that tells FT801 that an image compressed according to the Deflate algorithm will be written to its memory.
IMAGE_ADDR_HUMIDITY - the starting address in the memory of the RAM_G graphics controller, at which the image will be available.
hum_icon is an array storing the image.
After such an operation, the “Humidity” icon will be available for display on the screen until the memory of the graphics controller is cleared programmatically or as a result of a reset.
The next step after loading is to “capture” the image.
With the BITMAP_HANDLE command, we assign to each image (Bitmap object) a pointer - a number from 0 to 31, by which you can later refer to the image.
The BITMAP_SOURCE command points to the memory address RAM_G of the FT8xx graphics controller (see p. Downloading an Image).
The BITMAP_LAYOUT command tells the graphics controller the image format and size, and the BITMAP_SIZE command determines the size of the output image. By changing its arguments, you can, for example, crop the picture to the right or left.
Capturing an image, as well as loading it into the memory of the graphics controller, is enough to perform it once after initializing the FT8xx. However, it is important to understand that image capture commands, in contrast to the load commands, are the so-called display list commands, that is, they can be used only after the start of the display list and before the end of the display list command.
* You can read about what a display list is and what it is eaten in the second article of this series .
After the image has been loaded and captured, it can be displayed on the TFT display. To do this, use the commands of the BITMAP group, for example, to display the “Humidity” icon on top of one of the buttons on the main menu, I execute three commands:
The first two arguments of the VERTEX2II command indicate the coordinates for displaying, and the third argument is a pointer to the "Humidity" icon, which was set to BITMAP_SOURCE and BITMAP_HANDLE - "0".
A link to the full source code of the project is given below.
In the article on getting started with the FT8xx series graphics controller, reference was made to the support of standard widgets - procedures for displaying relatively complex graphic objects that are hardware-based on FTDI graphics controllers. Among the widgets there is a text string, in the FTB800_2 mbed library, the display of the string corresponds to the Text () function.
The arguments of the function are the coordinates of the first character of the line (22, 67), the number of the font used (27), additional options (0) and, in fact, the text line. Everything is clear with the coordinates, additional options also apply only to the position of the line on the screen, so let's talk about fonts.
The number of the font used is a number from 0 to 31, with numbers from 0 to 15 reserved for custom fonts, and numbers 16 to 31 correspond to sixteen built-in fonts. If in your application it is enough to display only the first 128 ASCII characters and the standard style of these characters is enough for you, then you can stop at this place and not read the article further - just use fonts with numbers 16-31.
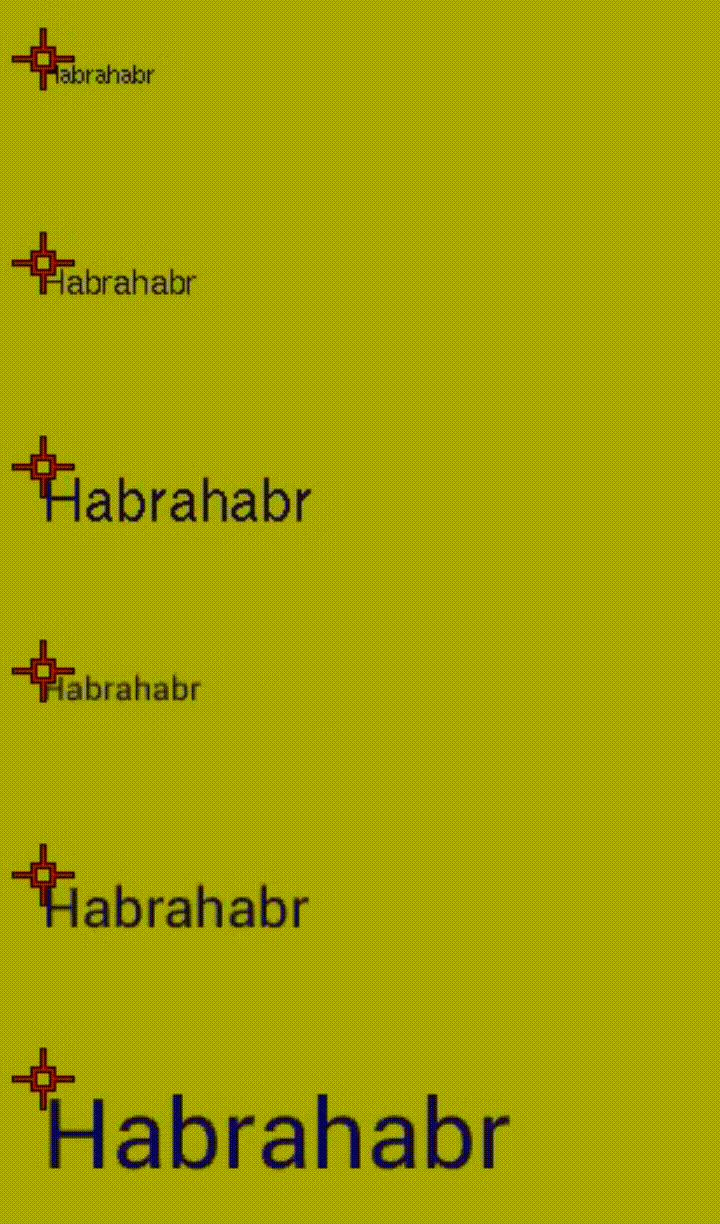
If you need non-standard styles of numbers and Latin letters or you want to output characters that go beyond the standard ASCII set (for example, Cyrillic), you will have to deal with loading your own fonts.
For FT8xx graphics controllers, custom fonts are almost the same bitmap as images, so creating a new font repeats the process of displaying images in many ways.
At the first stage, you need to download or create the desired font (the .ttf format is quite suitable) and get a binary file for upload to the FT8xxx graphics controller. To do this, you can use either the console utility or the same EVE Screen Editor.
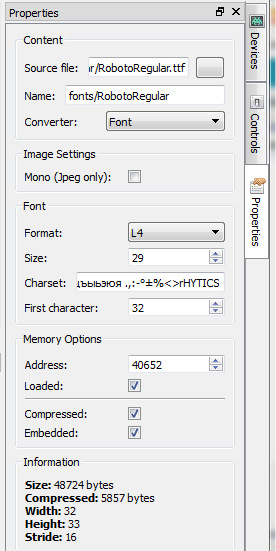
In the Screen Editor, the font is imported in the same way as image files - the font file is added to the Content window, and its compression parameters are set in the Properties window: format, size and charset.
The format is selected from three options - L1, L4 and L8. The difference, as with image conversion, is in the ratio of the rendering quality and the size of the binary file. The font size simply determines the width of the characters in pixels, and the charset field deserves the most attention.
For FTDI graphics controllers, the default fonts are 128 ASCII characters.
If you use only these characters and add a new font just to change their style - fine, convert the font without changing the charset. And if you need to add Cyrillic or some other non-ASCII character, then you will have to replace the charset. In my application you will need all the Cyrillic alphabet, numbers, some punctuation marks and mathematical symbols, signs of degree and percent, as well as several Latin letters. As a result, the modified charset looks like this:
Now, just as when working with the image, save the Screen Editor project, go to the folder where the EVE Screen Editor is installed and in the / fonts directory we find the binary .binh file.
Downloading a new font repeats the image loading process - we save the binary representation of the font as an array and load it onto FT8xx at a predetermined start address in the memory of the graphics controller using the CMD_INFLATE command.
The "capture" of a custom font is performed by the same commands as the image capture, the difference is that after the commands BITMAP_HANDLE, BITMAP_SOURCE, BITMAP_LAYOUT and BITMAP_SIZE, you still need to set a new font through a call to SetFont ().
Now, among custom fonts, number 3 is the Roboto Regular font that we downloaded. If during conversion the charset of this font had not been changed, then to change the built-in font number 27 to Roboto Regular, you would only need to change
on
However, we are going to output characters that are non-standard for the FT8xx controller, so instead of explicitly specifying a line (“Current humidity (rH)”), we will have to sculpt this line each time from separate characters.
Consider the line "Relative humidity". The task is to match each character of this line with its number in charset.
If the compiler supports the Cyrillic alphabet, then each character starting with capital letters ABC and ending with lowercase xyz (with the omission of the letters e and E ) will correspond to the value of 0xC0 to 0xFF. So, to match the characters of a string with the numbers of these characters in a charset, you need to subtract a fixed value from the code of each character. For example, if the letter Ain charlist it occupies the 32nd position (0x20), and the letters following A are in the same order as in table CP1251, then the value of 0xA0 will need to be subtracted from the code for each character of the line “Relative humidity” (except for the space).
However, the compiler may not support Cyrillic, mbed-ovsky just does not support. This means that the compiler does not perceive the Cyrillic alphabet as codes from 0xC0 to 0xFF, so I have no choice but to use Unicode, more precisely UTF-8.
Each character that is not included in the main ASCII table - Cyrillic, signs ° and ± - is represented as a two-byte UTF-8 code. I take the code of each character and match it with the number in my charset.
For Latin letters, which are also in charlist, you also need to replace Unicode with a number in charset, the only difference is that the code of Latin letters and other ASCII characters like dot, comma and percent consists of one, not two bytes.
To perform such a string conversion, a corresponding function has been created.
Thus, to display the line “Relative humidity” (or any other line in Russian) on the TFT display, you must first convert it and then use the standard output of the line, not forgetting to specify the font number as the third argument.
The source code for the finished project is available at developer.mbed.org . The following project files are related to the topic of today's article:
Thus, I finally finish the description of creating a project in the online IDE ARM mbed. We covered everything from writing mbed's Hello Word to a rather large program that uses two libraries of peripheral devices - HYT for the sensor of the same name and FT800_2 for the TFT module from Riverdi.
The magic is that the resulting program can be compiled into working firmware for any of the debug boards supported in mbed .
In the last article of this series, I’ll share the story of creating a case for this device.
In conclusion, I traditionally thank the reader for your attention and remind you that you can safely ask questions about the use of the products about which we write on the Habré email address on my profile.
Today I’m finally finishing the description of the software part - there were questions related to the output of images and Cyrillic letters to the TFT display. We will do everything beautifully.
Content of the publication cycle:
- [Part 1] Overview of used software and hardware solutions.
- [Part 2] Getting Started with the FT800 Graphics Controller. Using ready-made mbed libraries for peripherals.
- [Part 3] Connecting the HYT-271 Sensor. Create and publish in mbed your own library for peripherals.
- [Part 4] Application development: Program structure, work with touch screen.
- [Part 5] Application development: Displaying images, problems of Russification.
- [Part 6] Printing Housing Parts
Let me remind you that we are talking about the development of a prototype device with a touch screen, which serves for high-speed measurement of relative humidity and (at the same time) temperature. To write a program for the microcontroller, the online IDE mbed is used, which allows you to create non-volatile code that works the same on debug boards from SiLabs, Atmel, Wiznet, STM32, NXP and other manufacturers.
1. Output images to TFT
The general scheme for controlling the TFT display using the FTDI graphics controller has already been described in previous articles . Like other drawing-related procedures, displaying images on a TFT display is hardware implemented on the FT801 graphics controller. The managing host controller only needs to transmit simple control commands and necessary data to the FT801.
FT8xx Series graphics controllers allow you to work with .jpeg or .png images. The image can not only be displayed on the screen, but also transformed - resized, rotated or moved around the screen, and also used as a screensaver. All these operations are performed on the graphics controller upon receipt of the appropriate commands from the manager MK.
Speaking about downloading images to a graphics controller, you should immediately separate the two approaches to working with images.
In the first case, the .jpeg file is taken from the memory of the control MK or from an external medium and is immediately written to the memory of the FT8xx graphics controller. In this case, the CMD_LOADIMAGE command is used for loading. After loading the image into the FT8xx's memory, all the functions for working with the image become available - transforming the image and displaying it on the display. This approach is optimal if you have somewhere to store images, that is, you use a USB flash memory or SD card.
In the second case, the image is pre-compressed using the Deflate algorithm. The bitmap obtained as a result of encoding takes up much less space, therefore it can be stored not only on external media, but in the internal memory of the control MK. The image is downloaded to the FT8xx graphics controller in a compressed form, and the data is unpacked by the graphics controller. To load a compressed image, use the CMD_INFLATE command. After the image is unpacked, you can work with it in the same way as in the first case.
Since the use of external memory is not supposed in my project, we will consider only the first case - work with compressed images stored in the memory of the control microcontroller. As a result, I want to display three images: icons for temperature and relative humidity on the screen with the main menu and a photo of the HYT-271 sensor on the screen with a description of the sensor.
1.1. Image formatting, compression
The Deflate algorithm was originally created for zip archives, but due to the lack of patents it has been successfully used for other purposes, including for image compression. Here, by the way, is an excellent article on Deflate and png.
FTDI offers several console utilities for image conversion , for example img_cvt. Also available are graphical shells like the EVE Screen Editor , which not only allow you to convert images, but generally greatly simplify life when creating programs for the graphics controller. Essentially, EVE Screen Editor is an emulator of Riverdi TFT modules.
There is absolutely nothing unusual in the program interface - the future TFT screen is formed in the central window - a field onto which you can drag and drop the desired images and other graphic elements.
The FT801 controller I use allows you to display nine formats on a TFT display: black and white L1, L4 and L8, as well as RGB332, ARGB2, ARGB4, RGB565, PALETTED and ARGB1555, you can read more about them in the manufacturer ’s documentation . Different formats allow you to get a different ratio of image quality and size of a binary file encoding an image.
(L1, L4, L8, RGB332, ARGB2, ARGB4, RGB565, PALETTED, ARGB1555 from left to right)
In theory, the best quality can be obtained using the ARGB1555 format, but in practice it is better to try different options and choose the most suitable one. The photo of the sensor really looks best after conversion to ARGB1555 or RGB565, however at some point I didn’t have enough internal memory MK and I had to abandon these formats in favor of RGB332. It looks more or less decent, and takes 1865 bytes instead of 7067 and 7816 for ARGB1555 and RGB565, respectively.
The icons turned out to be more interesting. The source files are .png with a transparent background of 37x77 and 53x67 pixels. The transparency of the icons can only be saved with encoding of the ARGB type, i.e. you have to choose from the formats ARGB2, ARGB4, and ARGB1555. Of these, the most attractive smoothed image is not provided by ARGB2, and, to my surprise, not by ARGB1555, but by ARGB4.
(In the figure, from left to right ARGB2, ARGB4, ARGB1555)
After you select the appropriate format, you need to save the project in Screen Editor. In the folder where Screen Editor was installed, the images directory will appear, where a .binh file is created for each of the used images. We need him.
1.2. Loading an image into the graphics controller memory
Having received the binary representation of the image, we return from the Screen Editor to the mbed IDE, where in the program code we save all the received bitmap as arrays. The humidity icon, for example, looks like this.
constunsignedchar hum_icon[]={
120,156,165,86,203,109,195,48,12,205,177,40,250,25,193,35,120,4,141,160,17,60,130,71,200,181,55,143,224,123,46,26,193,11,20,208,4,133,54,168,71,96,31,165,248,43,74,145,82,18,8,20,138,79,228,35,41,193,244,73,117,218,86,250,175,250,251,65,243,115,200,203,133,88,236,83,232,153,130,92,171,145,29,109,82,135,108,214,168,44,117,172,29,209,1,59,22,35,21,197,82,91,165,125,100,45,121,254,188,147,33,131,94,110,255,37,17,177,52,248,189,149,209,247,155,136,85,2,82,195,238,124,109,186,213,102,132,156,83,189,80,152,91,222,111,130,213,207,226,94,92,60,93,152,186,137,150,185,185,98,53,193,178,229,51,223,53,194,121,237,217,255,235,133,215,248,229,115,250,195,126,11,109,68,228,33,79,159,63,75,251,184,135,224,228,162,202,247,167,188,83,58,238,251,178,106,156,119,162,51,219,60,36,121,164,59,35,237,113,189,77,6,107,40,121,163,49,85,46,121,110,200,215,194,39,199,199,74,59,152,116,247,176,19,83,34,242,85,172,111,28,57,226,140,76,185,74,185,58,6,117,130,151,46,136,186,100,215,9,54,93,128,85,240,27,78,182,49,83,255,189,54,2,227,255,96,37,30,146,106,33,103,85,88,171,49,142,113,123,45,234,145,191,17,194,228,249,59,138,233,74,34,113,187,172,204,236,254,182,76,194,253,91,170,100,211,188,128,154,252,219,167,197,26,49,39,147,190,41,216,9,239,185,5,131,150,253,192,65,161,7,206,91,135,240,250,101,84,249,232,103,49,197,95,24,13,226,26,68,183,56,103,196,58,91,255,63,65,221,118,198,
};
To load this image into the memory of the FT801 graphics controller, you need to send three commands from the control MK:
#define IMAGE_ADDR_HUMIDITY 29696
...
    (*_TFT).WrCmd32(CMD_INFLATE);
    (*_TFT).WrCmd32(IMAGE_ADDR_HUMIDITY);
    (*_TFT).WrCmdBufFromFlash(hum_icon, sizeof(hum_icon));
CMD_INFLATE - a command that tells FT801 that an image compressed according to the Deflate algorithm will be written to its memory.
IMAGE_ADDR_HUMIDITY - the starting address in the memory of the RAM_G graphics controller, at which the image will be available.
hum_icon is an array storing the image.
After such an operation, the “Humidity” icon will be available for display on the screen until the memory of the graphics controller is cleared programmatically or as a result of a reset.
1.3. Image capture
The next step after loading is to “capture” the image.
StartDL();
...
    (*_TFT).DL(BITMAP_HANDLE(0));
    (*_TFT).DL(BITMAP_SOURCE(IMAGE_ADDR_HUMIDITY));
    (*_TFT).DL(BITMAP_LAYOUT(ARGB4, 60, 38));
    (*_TFT).DL(BITMAP_SIZE(NEAREST, BORDER, BORDER, 30, 38));
...
FinishDL();
With the BITMAP_HANDLE command, we assign to each image (Bitmap object) a pointer - a number from 0 to 31, by which you can later refer to the image.
The BITMAP_SOURCE command points to the memory address RAM_G of the FT8xx graphics controller (see p. Downloading an Image).
The BITMAP_LAYOUT command tells the graphics controller the image format and size, and the BITMAP_SIZE command determines the size of the output image. By changing its arguments, you can, for example, crop the picture to the right or left.
Capturing an image, as well as loading it into the memory of the graphics controller, is enough to perform it once after initializing the FT8xx. However, it is important to understand that image capture commands, in contrast to the load commands, are the so-called display list commands, that is, they can be used only after the start of the display list and before the end of the display list command.
* You can read about what a display list is and what it is eaten in the second article of this series .
1.4. Image output
After the image has been loaded and captured, it can be displayed on the TFT display. To do this, use the commands of the BITMAP group, for example, to display the “Humidity” icon on top of one of the buttons on the main menu, I execute three commands:
StartDL();
...
// отрисовка прямоугольника (кнопки)
...
    (*_TFT).DL(BEGIN(BITMAPS));
    (*_TFT).DL(VERTEX2II(12 + 255, 62 + 10, 0, 0));
    (*_TFT).DL(END());
...
FinishDL();
The first two arguments of the VERTEX2II command indicate the coordinates for displaying, and the third argument is a pointer to the "Humidity" icon, which was set to BITMAP_SOURCE and BITMAP_HANDLE - "0".
Conclusion of the Temperature icon and sensor photos are performed in exactly the same way
StartDL();
...
    (*_TFT).DL(BEGIN(BITMAPS));
    (*_TFT).DL(VERTEX2II(12 + 260, 62 + 93 + 12 + 10, 1, 0));
    (*_TFT).DL(END());
...
FinishDL();
StartDL();
...
    (*_TFT).DL(BEGIN(BITMAPS));
    (*_TFT).DL(VERTEX2II(360, 140, 2, 0));
    (*_TFT).DL(END());
...
FinishDL();
A link to the full source code of the project is given below.
Using custom fonts
In the article on getting started with the FT8xx series graphics controller, reference was made to the support of standard widgets - procedures for displaying relatively complex graphic objects that are hardware-based on FTDI graphics controllers. Among the widgets there is a text string, in the FTB800_2 mbed library, the display of the string corresponds to the Text () function.
(*_TFT).Text(22, 67, 27, 0, "Current humidity (rH)");
The arguments of the function are the coordinates of the first character of the line (22, 67), the number of the font used (27), additional options (0) and, in fact, the text line. Everything is clear with the coordinates, additional options also apply only to the position of the line on the screen, so let's talk about fonts.
The number of the font used is a number from 0 to 31, with numbers from 0 to 15 reserved for custom fonts, and numbers 16 to 31 correspond to sixteen built-in fonts. If in your application it is enough to display only the first 128 ASCII characters and the standard style of these characters is enough for you, then you can stop at this place and not read the article further - just use fonts with numbers 16-31.
If you need non-standard styles of numbers and Latin letters or you want to output characters that go beyond the standard ASCII set (for example, Cyrillic), you will have to deal with loading your own fonts.
For FT8xx graphics controllers, custom fonts are almost the same bitmap as images, so creating a new font repeats the process of displaying images in many ways.
2.1. Font formatting, compression
At the first stage, you need to download or create the desired font (the .ttf format is quite suitable) and get a binary file for upload to the FT8xxx graphics controller. To do this, you can use either the console utility or the same EVE Screen Editor.
In the Screen Editor, the font is imported in the same way as image files - the font file is added to the Content window, and its compression parameters are set in the Properties window: format, size and charset.
The format is selected from three options - L1, L4 and L8. The difference, as with image conversion, is in the ratio of the rendering quality and the size of the binary file. The font size simply determines the width of the characters in pixels, and the charset field deserves the most attention.
For FTDI graphics controllers, the default fonts are 128 ASCII characters.
!"#$%&'()*+,-./0123456789:;<=>?@ABCDEFGHIJKLMNOPQRSTUVWXYZ[\]^_`abcdefghijklmnopqrstuvwxyz{|}~// отсчет не с нулевого, а с 32-го символаIf you use only these characters and add a new font just to change their style - fine, convert the font without changing the charset. And if you need to add Cyrillic or some other non-ASCII character, then you will have to replace the charset. In my application you will need all the Cyrillic alphabet, numbers, some punctuation marks and mathematical symbols, signs of degree and percent, as well as several Latin letters. As a result, the modified charset looks like this:
0123456789АБВГДЕЖЗИЙКЛМНОПРСТУФХЦЧШЩЪЫЬЭЮЯабвгдежзийклмнопрстуфхцчшщъыьэюя.,:-°±%<>rHYTICS
// отсчет не с нулевого, а с 32-го символа
Now, just as when working with the image, save the Screen Editor project, go to the folder where the EVE Screen Editor is installed and in the / fonts directory we find the binary .binh file.
2.2. Loading into the graphics controller memory
Downloading a new font repeats the image loading process - we save the binary representation of the font as an array and load it onto FT8xx at a predetermined start address in the memory of the graphics controller using the CMD_INFLATE command.
#define FONT_ADDR_ROBOTO_REGULAR_30   16992
...
    (*_TFT).WrCmd32(CMD_INFLATE);
    (*_TFT).WrCmd32(FONT_SET_ROBOTO_REGULAR_30);
    (*_TFT).WrCmdBufFromFlash(font_RobotoRegular30, sizeof(font_RobotoRegular30));
2.3. Font capture and installation
The "capture" of a custom font is performed by the same commands as the image capture, the difference is that after the commands BITMAP_HANDLE, BITMAP_SOURCE, BITMAP_LAYOUT and BITMAP_SIZE, you still need to set a new font through a call to SetFont ().
    (*_TFT).DL(BITMAP_HANDLE(3));
    (*_TFT).DL(BITMAP_SOURCE(FONT_ADDR_ROBOTO_REGULAR_30));
    (*_TFT).DL(BITMAP_LAYOUT(L4, 16, 33));
    (*_TFT).DL(BITMAP_SIZE(NEAREST, BORDER, BORDER, 32, 33));
    (*_TFT).SetFont(3, FONT_SET_ROBOTO_REGULAR_30);
2.4. Using font
Now, among custom fonts, number 3 is the Roboto Regular font that we downloaded. If during conversion the charset of this font had not been changed, then to change the built-in font number 27 to Roboto Regular, you would only need to change
(*_TFT).Text(22, 67, 27, 0, "Current humidity (rH)");
on
(*_TFT).Text(22, 67, 3, 0, "Current humidity (rH)"); // выведет на экран ерундуHowever, we are going to output characters that are non-standard for the FT8xx controller, so instead of explicitly specifying a line (“Current humidity (rH)”), we will have to sculpt this line each time from separate characters.
Consider the line "Relative humidity". The task is to match each character of this line with its number in charset.
If the compiler supports the Cyrillic alphabet, then each character starting with capital letters ABC and ending with lowercase xyz (with the omission of the letters e and E ) will correspond to the value of 0xC0 to 0xFF. So, to match the characters of a string with the numbers of these characters in a charset, you need to subtract a fixed value from the code of each character. For example, if the letter Ain charlist it occupies the 32nd position (0x20), and the letters following A are in the same order as in table CP1251, then the value of 0xA0 will need to be subtracted from the code for each character of the line “Relative humidity” (except for the space).
Cyrillic encoding CP1251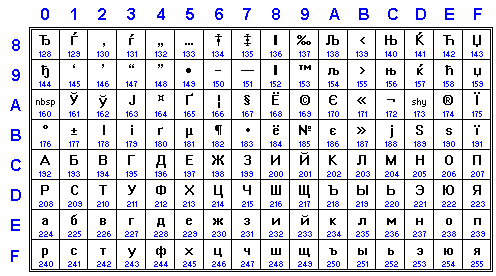
However, the compiler may not support Cyrillic, mbed-ovsky just does not support. This means that the compiler does not perceive the Cyrillic alphabet as codes from 0xC0 to 0xFF, so I have no choice but to use Unicode, more precisely UTF-8.
Each character that is not included in the main ASCII table - Cyrillic, signs ° and ± - is represented as a two-byte UTF-8 code. I take the code of each character and match it with the number in my charset.
For Latin letters, which are also in charlist, you also need to replace Unicode with a number in charset, the only difference is that the code of Latin letters and other ASCII characters like dot, comma and percent consists of one, not two bytes.
| Convert string character | UTF-8 Code | Sequence number in my charset |
| ABV ... nop | 0xD090 ... 0xD0BF | 43 ... 90 |
| rst ... uh | 0xD180 ... 0xD18F | 91 ... 96 |
| ° | 0xC2B0 | 112 |
| ± | 0xC2B1 | 113 |
| space | 0x20 | 32 |
| 0 ... 9 | 0x30 ... 0x39 | 33 ... 43 |
| . | 0x2E | 108 |
| , | 0x2C | 109 |
| : | 0x3A | 110 |
| and so on | ||
To perform such a string conversion, a corresponding function has been created.
CreateStringRussian string conversion function
void Display::CreateStringRussian(conststring rustext)
{
// CHANGED ASCII://  0123456789АБВГДЕЖЗИЙКЛМНОПРСТУФХЦЧШЩЪЫЬЭЮЯабвгдежзийклмнопрстуфхцчшщъыьэюя.,:-°±%<>rHYTICSint len = rustext.length();
    int j = 0;
    for (int i = 0; i < len; i ++) {
        uint16_t res = uint8_t(rustext[i]);
        if (res > 0x7F) {
            res = res << 8 | uint8_t(rustext[i + 1]);
            // АБВ ... нопif ((res >= 0xD090) && (res <= 0xD0BF)) {
                char offset = (char)(res - 0xD090);
                russianStr[j] = 32 + 11 + offset;
            // рст ... эюя
            } elseif ((res >= 0xD180) && (res <= 0xD18F)) {
                char offset = (char)(res - 0xD180);
                russianStr[j] = 32 + 59 + offset;
            }
            // Degree signelseif (res == 0xC2B0) {
                russianStr[j] = 32 + 79;
            }
            // Plus-minus signelseif (res == 0xC2B1) {
                russianStr[j] = 32 + 80;
            }
            i++;
        } else {
            // Spaceif (res == 0x20) {
                russianStr[j] = 32;
            }
            // Numberselseif (res >= 0x30 && res <= 0x39) {
                russianStr[j] = 32 + 1 + (res - 0x30);
            }
            // .elseif (res == 0x2E) {
                russianStr[j] = 32 + 75;
            }
            // ,elseif (res == 0x2C) {
                russianStr[j] = 32 + 76;
            }
            // :elseif (res == 0x3A) {
                russianStr[j] = 32 + 77;
            }
            // -elseif (res == 0x2D) {
                russianStr[j] = 32 + 78;
            }
            // %elseif (res == 0x25) {
                russianStr[j] = 32 + 81;
            }
            // <elseif (res == 0x3C) {
                russianStr[j] = 32 + 82;
            }
            // >elseif (res == 0x3C) {
                russianStr[j] = 32 + 83;
            }
            // "r"elseif (res == 0x72) {
                russianStr[j] = 32 + 84;
            }
            // "H"elseif (res == 0x48) {
                russianStr[j] = 32 + 85;
            }
            // "Y"elseif (res == 0x59) {
                russianStr[j] = 32 + 86;
            }
            // "T"elseif (res == 0x54) {
                russianStr[j] = 32 + 87;
            }
            // "I"elseif (res == 0x49) {
                russianStr[j] = 32 + 88;
            }
            // "C"elseif (res == 0x43) {
                russianStr[j] = 32 + 89;
            }
            // "S"elseif (res == 0x53) {
                russianStr[j] = 32 + 90;
            }
        }
        j++;
    }
    russianStr[j] = 0;
}
Thus, to display the line “Relative humidity” (or any other line in Russian) on the TFT display, you must first convert it and then use the standard output of the line, not forgetting to specify the font number as the third argument.
    CreateStringRussian("Относительная влажность");
    (*_TFT).Text(15, 15, 3, 0, russianStr);
3. The final result
The source code for the finished project is available at developer.mbed.org . The following project files are related to the topic of today's article:
- /pictures.h - converted images and fonts
- /TFT/display.ImagesAndFonts.cpp - download and capture images and fonts, install fonts
- /TFT/display.StringsTransform.cpp - string conversions
- /TFT/display.Draw_MainMenu.cpp - formation of the main menu screen where the Temperature and Humidity icons are displayed
- /TFT/display.Draw_AboutSensor.cpp - forming a screen with a description of the sensor, where his photo is displayed
Thus, I finally finish the description of creating a project in the online IDE ARM mbed. We covered everything from writing mbed's Hello Word to a rather large program that uses two libraries of peripheral devices - HYT for the sensor of the same name and FT800_2 for the TFT module from Riverdi.
The magic is that the resulting program can be compiled into working firmware for any of the debug boards supported in mbed .
In the last article of this series, I’ll share the story of creating a case for this device.
Conclusion
In conclusion, I traditionally thank the reader for your attention and remind you that you can safely ask questions about the use of the products about which we write on the Habré email address on my profile.