September 12, 2016 at 18:05
We write, assemble and launch HelloWorld for Android in Notepad. Java 8 and Android N
- Tutorial

Two and a half years ago, I published an article We write, assemble and launch HelloWorld for Android in Notepad . She became very popular and gained about 80,000 views. With the advent of new tools, such as Jack ToolChain , it became necessary to republish and update the article .
When I started learning Android, I wanted to completely write and compile an Android application manually - without using an IDE. However, this task was not easy and took me quite a lot of time. But as it turned out - this approach was very useful and clarified many of the subtleties that hide the IDE.
Using only notepad, we will write a very small educational Android application. And then we compile it, assemble it and run it on the device - and all through the command line. Interested in? Then please.
Introduction
I was amazed how complex and confusing the template application is in Android Studio. It is simply piled with resources. And to a lesser extent - with code and scripts. Although all it has to do is display HelloWorld! In addition, the books and manuals that I looked through explain how to create IDEA or Eclipse HelloWorld using dialog boxes - and further narration is already coming from it. And what happens "under the hood" - one can only guess.
We will create our own template project, which is ideal for educational purposes. There will be nothing superfluous, only all the most necessary. And then we will analyze in detail how to assemble it and run it on your Android device. At the end of the article there will be a link to download the archive with the final project - if you have any questions - you can check it.
Thus, you will be 100% aware and understand the composition of your project and the process of its assembly. Although this test project is intended for training, with a little refinement, it can be used as a solid foundation for your real projects.
Training
First we need to download and install command line tools. A link to download them is located at the bottom of the Android Studio page ( https://developer.android.com/studio/index.html ).
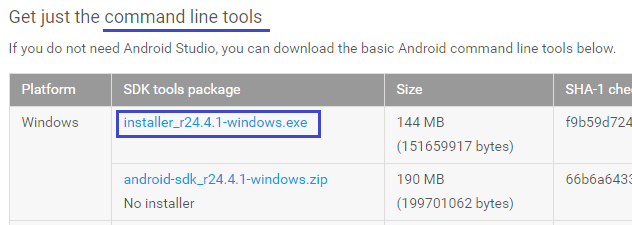
Android SDK 24 is just Android N ( N ougat / 7). We accept the conditions, download the installer, run it. Leave it as default. It will be installed in a directory of the form C: \ Users \ kciray \ AppData \ Local \ Android \ android-sdk . Remember this way, our main tools will be there.
Next, launch the SDK Manager (from the android-sdk folder ) and also set the default set. It has everything you need, including the new Jack compiler. You will also need JDK 8 .
The main requirement before reading this article- in addition to the installed software, you should already be able to run on your device the Helloworld that comes with Eclipse or Android Studio. Those. you must have the usb driver configured, usb debugging enabled on your device, etc ... Or an emulator is created and configured. These are very elementary things, and their consideration is beyond the scope of this article - there is enough information on the network. By the way, reading a couple of chapters from books will also not be superfluous - at least understand how the manifest, resources, and indeed the basics of the Java language are arranged. And in this article I will describe what books are silent about.
Project writing
To get started, create some folder where your project will be. Let's call it testapp . In it, create 3 more folders - bin , res and src .
Create an empty text file in testapp and change its name to AndroidManifest.xml .
Add the following to it:
Everything is simple here. We intend to make an application called TestApp , which at startup starts the MainActivity class . It remains only to write this small class - and the application is ready. If necessary - edit the android: targetSdkVersion property in the uses-sdk tag - put the version that you have.
Next - create the simplest resource - the string Hello test app . In fact, we could do without a resource by inserting this line directly into Java code. But some assembly steps work with resources, and to see interesting points, we will still work with them.
Let's create the values folder in the res folder. All resources should be divided into folders. Next - create an empty strings.xml file in it, and write in it:
Hello test app! That's all the resources we need. Simple, right? Next, create the com folder inside src , the example folder in it , then the testapp folder even lower in the hierarchy - and there is our MainActivity.java class . Add the code there:
package com.example.testapp;
import android.app.Activity;
import android.app.AlertDialog;
import android.os.Bundle;
import android.widget.Button;
import android.widget.Toast;
public class MainActivity extends Activity {
    @Override
    public void onCreate(Bundle savedInstanceState) {
        super.onCreate(savedInstanceState);
        Button button = new Button(this);
        button.setText("Big button");
        button.setOnClickListener(v -> {
            new AlertDialog.Builder(MainActivity.this)
                    .setTitle("From lambda")
                    .setMessage(getString(R.string.hello))
                    .show();
        });
        setContentView(button);
    }
}
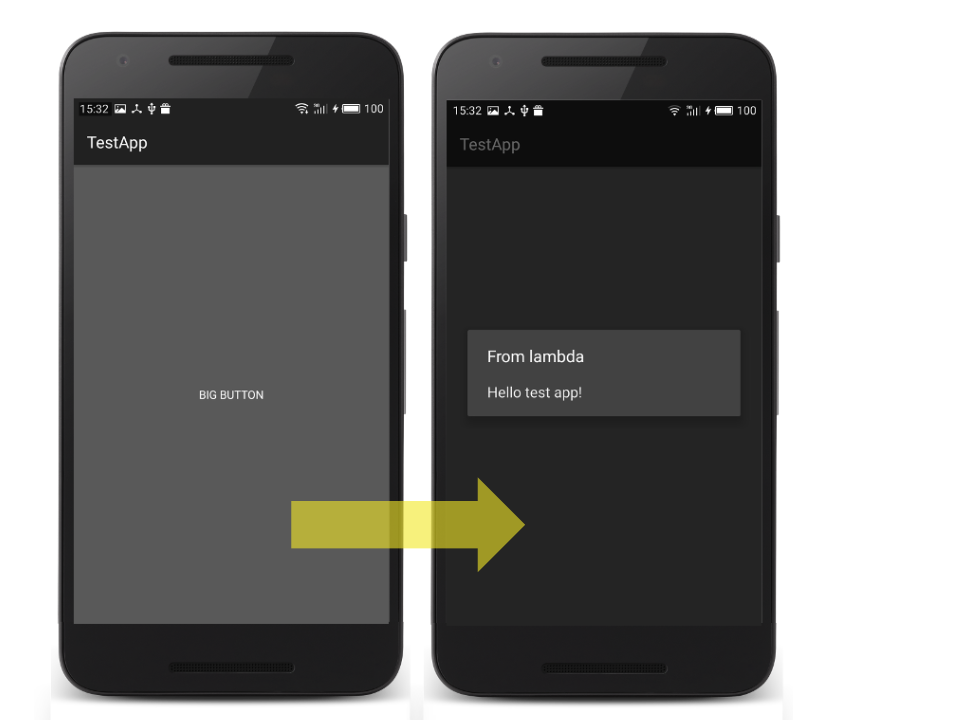
This is the simplest Activity, which contains one button in full screen. When you click on this button, a dialog box is displayed that shows a row of resources. Pay attention to the lambda (construction v -> {...} ). Jack ToolChain allows us to use many features of Java 8 under android. You can read more at developer.android.com and source.android.com .
The directory structure should look like this
│   AndroidManifest.xml
├───bin
├───res
│   └───values
│           strings.xml
│
└───src
    └───com
        └───example
            └───testapp
                    MainActivity.java
And this is actually all that we needed for a simple project. For comparison -
HelloWorld from Android Studio (2.1.3)
│   .gitignore
│   build.gradle
│   gradle.properties
│   gradlew
│   gradlew.bat
│   local.properties
│   MyApplication2.iml
│   settings.gradle
│
├───.gradle
│   └───2.14.1
│       └───taskArtifacts
│               cache.properties
│               cache.properties.lock
│               fileHashes.bin
│               fileSnapshots.bin
│               fileSnapshotsToTreeSnapshotsIndex.bin
│               taskArtifacts.bin
│
├───.idea
│   │   .name
│   │   compiler.xml
│   │   encodings.xml
│   │   gradle.xml
│   │   misc.xml
│   │   modules.xml
│   │   runConfigurations.xml
│   │   workspace.xml
│   │
│   ├───copyright
│   │       profiles_settings.xml
│   │
│   └───libraries
│           animated_vector_drawable_24_2_0.xml
│           appcompat_v7_24_2_0.xml
│           hamcrest_core_1_3.xml
│           junit_4_12.xml
│           support_annotations_24_2_0.xml
│           support_compat_24_2_0.xml
│           support_core_ui_24_2_0.xml
│           support_core_utils_24_2_0.xml
│           support_fragment_24_2_0.xml
│           support_media_compat_24_2_0.xml
│           support_v4_24_2_0.xml
│           support_vector_drawable_24_2_0.xml
│
├───app
│   │   .gitignore
│   │   app.iml
│   │   build.gradle
│   │   proguard-rules.pro
│   │
│   ├───libs
│   └───src
│       ├───androidTest
│       │   └───java
│       │       └───com
│       │           └───example
│       │               └───kciray
│       │                   └───myapplication
│       │                           ApplicationTest.java
│       │
│       ├───main
│       │   │   AndroidManifest.xml
│       │   │
│       │   ├───java
│       │   │   └───com
│       │   │       └───example
│       │   │           └───kciray
│       │   │               └───myapplication
│       │   │                       MainActivity.java
│       │   │
│       │   └───res
│       │       ├───drawable
│       │       ├───layout
│       │       │       activity_main.xml
│       │       │
│       │       ├───mipmap-hdpi
│       │       │       ic_launcher.png
│       │       │
│       │       ├───mipmap-mdpi
│       │       │       ic_launcher.png
│       │       │
│       │       ├───mipmap-xhdpi
│       │       │       ic_launcher.png
│       │       │
│       │       ├───mipmap-xxhdpi
│       │       │       ic_launcher.png
│       │       │
│       │       ├───mipmap-xxxhdpi
│       │       │       ic_launcher.png
│       │       │
│       │       ├───values
│       │       │       colors.xml
│       │       │       dimens.xml
│       │       │       strings.xml
│       │       │       styles.xml
│       │       │
│       │       └───values-w820dp
│       │               dimens.xml
│       │
│       └───test
│           └───java
│               └───com
│                   └───example
│                       └───kciray
│                           └───myapplication
│                                   ExampleUnitTest.java
│
├───build
│   └───generated
│           mockable-android-24.jar
│
└───gradle
    └───wrapper
            gradle-wrapper.jar
            gradle-wrapper.properties
Actually, automation through gradle, working with git and IDE are very important things, but at the stage of learning Android I would really like to ignore them .
Assembly
Now we come to the most important and difficult stage. We will work a lot with the command line, so I recommend that you write all the commands given here in one file and name it Compile.bat . At the end of the file after the commands, you can add pause so that the result and errors are visible - if any.
Track preparation
The first thing we will do for convenience and brevity is to create special variables in which we will store the paths. For starters, let's define our main directories. You need to replace the paths to the JDK and Android SDK with the ones you have.
set JAVA_HOME=C:\Program Files\Java\jdk1.8.0_73
set ANDROID_HOME=C:\Users\kciray\AppData\Local\Android\android-sdk
set DEV_HOME=%CD%
Next - the path directly to the programs. I recommend that you browse the catalogs of your SDKs and make sure everything is in place. Also adjust the versions that are present in the paths.
set JACK_JAR="%ANDROID_HOME%\build-tools\24.0.2\jack.jar"
set AAPT_PATH="%ANDROID_HOME%\build-tools\24.0.2\aapt.exe"
set ANDROID_JAR="%ANDROID_HOME%\platforms\android-24\android.jar"
set ADB="%ANDROID_HOME%\platform-tools\adb.exe"
set JAVAVM="%JAVA_HOME%\bin\java.exe"
Incidentally, in older versions the aapt utility was located in platform-tools - and I do not exclude that it and / or others can sneak somewhere else. So be careful. If you check everything right now, then the rest of the article should go smoothly.
And yet - in a couple of variables we’ll kill our packages and classes. If you go to change them - you do not have to run around the code - all settings are first.
set PACKAGE_PATH=com/example/testapp
set PACKAGE=com.example.testapp
set MAIN_CLASS=MainActivity
Compilation preparation
To begin with, I’ll ask - have you ever wondered how the mysterious class R works ? Actually, he at first embarrassed me because of his supernatural abilities. How at the compilation stage can I access XML files in other directories through the fields of the class? I assumed that the precompiler is operating here - as it turned out.
Actually, there is a special utility AAPT - it goes through the directories of your resources and creates the same R.java . It turns out that everything is very simple - it's just a class, which consists of other static nested classes with integer constants. And that’s it! It looks something like this:
R.java
/* AUTO-GENERATED FILE.  DO NOT MODIFY.
 *
 * This class was automatically generated by the
 * aapt tool from the resource data it found.  It
 * should not be modified by hand.
 */
package com.example.testapp;
public final class R {
    public static final class attr {
    }
    public static final class string {
        public static final int hello=0x7f020000;
    }
}
Now let's create it with you. To do this, use the following commands:
call %AAPT_PATH% package -f -m -S %DEV_HOME%\res -J %DEV_HOME%\src -M %DEV_HOME%\AndroidManifest.xml -I %ANDROID_JAR%Let's figure out what's what. AAPT - Android Asset Packaging Tool - literally “an Android property packer.” Its options:
- package - says that we need to pack resources (and not add or remove)
- -f - overwrite existing R.java , if any
- -m - place R.java in the appropriate packages, and not in the root of the path specified in -J
- -S - after this option we specify the directory with resources
- -J - after this option we indicate where to save the resulting R.java
- -I - after this option, we indicate the path to the connected library - turn on android.jar
After its execution, the same R.java file should appear in the src directory . Check it out.
Now there is no magic in our project and it is completely syntactically correct within Java. And now for the fun part. Remember how classic Java programs are compiled through javac ? Previously, it was also part of the Android application build sequence. We took our sources (* .java) , received from them the JVM bytecode (* .class) and only then from it received the bytecode for Dalvic (* .dex) . With the advent of Jack ToolChain, we have reduced our build sequence by one step. From the source (* .java) we immediately get the bytecode for Dalvic (* .dex) .
Where to get Jack? It is located in the build-tools folder in the form of jack.jar and runs as a regular Java archive.
%JAVAVM% -jar %JACK_JAR% --output-dex "%DEV_HOME%\bin" -cp %ANDROID_JAR% -D jack.java.source.version=1.8 "%DEV_HOME%\src\com\example\testapp\R.java" "%DEV_HOME%\src\com\example\testapp\MainActivity.java" The arguments are as follows:
- -jar - A standard option for the JVM, indicating that you want to run the Java archive. Has nothing to do with jack
- --output-dex - The folder where you want to put the resulting dex file. Let it be in bin
- -D jack.java.source.version = 1.8 - “D” indicates that we are setting the property. jack.java.source.version allows us to indicate that we are using Java 8. Without it, lambdas will not work and there will be errors. You can see the full list of properties with the command % JAVAVM% -jar% JACK_JAR% --help-properties
- [List of * .java files] - Your source. We have only 2 files - R.java and MainActivity.java
You can see the full list of options for Jack with the command % JAVAVM% -jar% JACK_JAR% --help
Make sure that our classes.dex is in the bin folder. Now all that remains is to pack it together with the resources into an APK file. Let's do it:
call %AAPT_PATH% package -f -M %DEV_HOME%/AndroidManifest.xml -S %DEV_HOME%/res -I %ANDROID_JAR% -F %DEV_HOME%/bin/AndroidTest.unsigned.apk %DEV_HOME%/binThe options here are similar to those we used when creating R.java :
- package - says that we need to pack resources (and not add or remove)
- -f - overwrite existing AndroidTest.unsigned.apk , if any
- -M - after this option we specify the path to the manifest file
- -S - after this option we specify the directory with resources
- -I - after this option, we indicate the path to the connected library - turn on android.jar
- -F - after this option we indicate where to save the resulting AndroidTest.unsigned.apk
- the last argument is the path to the folder with dex files
AndroidTest.unsigned.apk should now appear in the bin folder . And we called it for a reason! He does not have a digital signature. Android prohibits installing and running applications without a signature. But creating it is not so difficult as it might seem at first glance
call %JAVA_HOME%/bin/keytool -genkey -validity 10000 -dname "CN=AndroidDebug, O=Android, C=US" -keystore %DEV_HOME%/AndroidTest.keystore -storepass android -keypass android -alias androiddebugkey -keyalg RSA -v -keysize 2048
call %JAVA_HOME%/bin/jarsigner -sigalg SHA1withRSA -digestalg SHA1 -keystore %DEV_HOME%/AndroidTest.keystore -storepass android -keypass android -signedjar %DEV_HOME%/bin/AndroidTest.signed.apk %DEV_HOME%/bin/AndroidTest.unsigned.apk androiddebugkey
Actually, these lines run 2 Java utilities that have nothing to do with the Android SDK - but they are necessary. The first creates the AndroidTest.keystore file (check for its presence), and the second connects this file to AndroidTest.unsigned.apk . It turns out the AndroidTest.signed.apk file . Here is such a wild craft file. But once you have created a bat script, run it - and it will do all this in automatic mode.
I think you should not waste time analyzing the options of these utilities in detail within this article. You just need to get the gist - they take AndroidTest.unsigned.apk , sign it with the AndroidTest.keystore file and save it in AndroidTest.signed.apk . If you wish, you can readin the documentation .
You will most likely have the warning " Warning: No -tsa or -tsacert is provided and this jar ... ", but do not pay attention.
Launch
Now that we have finally compiled our apk file, we can run it. Connect your device via usb, or run the emulator. And then do
call %ADB% uninstall %PACKAGE%
call %ADB% install %DEV_HOME%/bin/AndroidTest.signed.apk
call %ADB% shell am start %PACKAGE%/%PACKAGE%.%MAIN_CLASS%
Actually, the first line deletes the program, if it is already there. For re-launches come in handy. The second - installs the APK on your device or emulator. The third one launches. Let's take a closer look at her arguments:
- shell - we want to execute some commands on our device
- am - use to execute activity manager commands
- start - we want to start some Activity
- the name of the package and the full name of the class (including the package) that we start
Caution - during installation, a confirmation dialog box may appear on the device. If you do not approve it in time, the installation will fail [INSTALL_FAILED_USER_RESTRICTED] . You may also have a question - why do uninstall / install instead of install -r . I did so for the purity of the experiment. The script completely removes all products of its activities and creates them from scratch every time it starts. Even the keys. You can use install -r , but then you should remove the code that is responsible for re-creating the keys. Otherwise, you will encounter the error [INSTALL_FAILED_UPDATE_INCOMPATIBLE] .
If everything went well, you will see something like this:
Conclusion
After assembling all the files, the directory tree should look something like this.
│   AndroidManifest.xml
│   AndroidTest.keystore
│   Clear.bat
│   Compile.bat
│
├───bin
│       AndroidTest.signed.apk
│       AndroidTest.unsigned.apk
│       classes.dex
│
├───res
│   └───values
│           strings.xml
│
└───src
    └───com
        └───example
            └───testapp
                    MainActivity.java
                    R.java
Now you can clearly see and understand how the assembly of the android application at a lower level takes place. When you use the IDE - if the assembly suddenly goes wrong (and this often happens) - you can resolve the situation as it should. Also note that the final apk file takes only about 4 kilobytes .
I post the project archive . Please note that I added another small script there - Clear.bat. It deletes all files created during assembly. And put his launch at the beginning of Compile.bat. Also added comments using Rem - step by step.
Thus, the script performs a complete cleaning and reassembly of the project , including the signature, as well as deleting it on the device, installing and running.
My parameters
PC
OC: Windows 10 Pro x64
JDK: 1.8.0_73
Android SDK: 24
Mobile device
Model: Meizu MX4
Android: 5.1
OS: Flyme 5.6.8.9 beta