Zabbix 3.0.4: Windows Agent with TLS, LLD drives, a simple SMART example and just a command line
We assume that the Zabbix 3.0.4 server is installed. For agent installation scripts, we will use, according to hardcore, only the native Windows command line, without pythons, pearls, etc., i.e. without additional installations to the agent system. Configure encryption using the PSK.
Problem statement:
1) Simplify the installation of agents on Windows systems
2) Configure encryption between the agent and the server.
3) Configure disk detection (names, models, serial numbers, types) using the smartmontools utility, SMART control
4) Create a scalable deployment script template.
5) Set up an alert.
6) Use only the command line.
For some reason, Windows agents do not yet have TLS support, but there are compiled versions that can be downloaded from here . The discussion .
Unpack. We need only the bin directory. We do not need a default config.
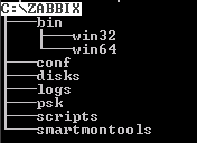
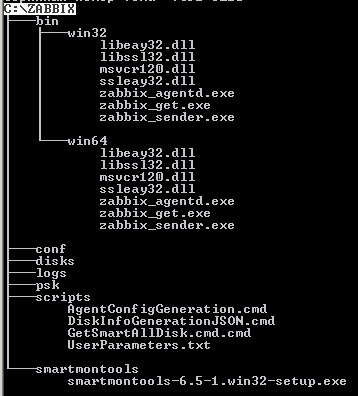
Create the zabbix directory and copy the bin directory into itfrom the unpacked agent. Next, create a directory zabbix subdirectories the conf, disks, logs folder, psk, scripts directory, smartmontools . We will immediately decide that we will be placing the zabbix folder in the root of volume C: \
Immediately prepare the PSK keys and data file. Create the pskgen4ik file on the server:
Save, make executable (chmod + x), run, and copy the result to a data file, I will give an example of Excel for clarity. You can use the database. Something like this:

We will fill in the Host name field after creating the agent config (unless of course there is already a list). We create and add unique PSK IDs. We save the data file, make a backup, strictly restrict access to it and delete the agent_psk file. All we have is a data file with keys and identifiers that we will use.
To obtain information about disks and their SMART, we use the Smartmontools utility . I take the latest version 6.5. In this version, USB passports are normally detected, and new manifests for 10k. About all corrections in the release .
Download and throw in the zabbix \ smartmontools folder
See the list of mapped drives:
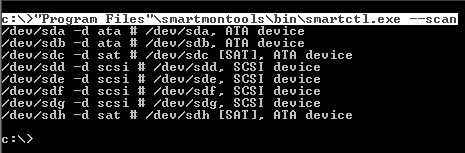
The –d switch indicates the type of disk.
We are interested in the / dev / sda drive. So far he has little to say except that he is ATA-type and most likely bootable.
We look at the information about him:
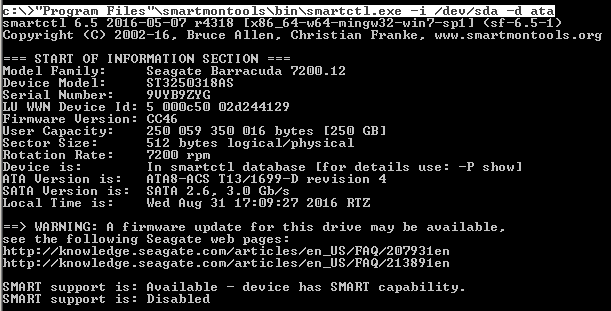
Already more interesting. As you can see, SMART is disabled. Turn it on:
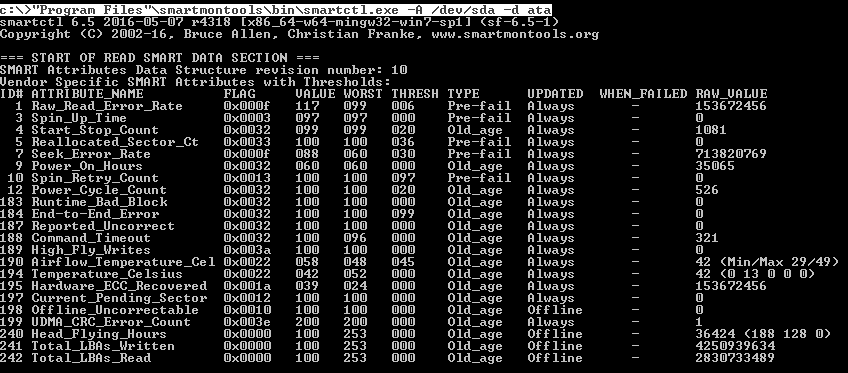
We look at the SMART attribute table .
The RAID smart card will not work, but we can get the health status.
We look at SMART Health:

Now the same thing needs to be done for the remaining 1000 disks) There is no longer any way to create templates for each, moreover, for example, I also need to get the model and serial number of each disk in the report. Zabbix LLD comes to the rescue .
Since Zabbix has the ability to process data using the JSON protocol provided by its API , we will generate the necessary information from smartmontools in the JSON format and passively transmit it to the server.
We begin to create scripts. First, we’ll come up with discovery macros and decide on the data:
In the zabbix \ scripts directory, create the following DiskInfoGenerationJSON.cmd file :
Save DiskInfoGenerationJSON.cmd
I couldn’t simplify the problem of the last comma using cmd (yes, I didn’t start to solve it, because this is crazy stuff), in the line ...
... which violates the JSON syntax. So I just added the line {"{#SMARTV}": "Smartctl 6.5"} , which closes the body without a comma.
When you run the DiskInfoGenerationJSON.cmd file . As a result, we should get the file c: \ zabbix \ disks \ disks.cmd with the following contents:

Create the GetSmartAllDisk.cmd file in the zabbix \ scripts directory of the following content:
Save GetSmartAllDisk.cmd
Generation will be divided into two parts: connection settings and user parameters.
We analyze the future agent configuration file:
Unique to each host are the fields Hostname = and TLSPSKIdentity = in the configuration file. As well as the pre-shared key in the file zabbix \ psk \ Z_agent.psk . Therefore, we define these values in variables.
In the zabbix \ scripts directory, create the AgentConfigGeneration.cmd file :
Everything is simple. At startup, enter the name of the organization, for example, Organization1 and get the Hostname in the config in the form " Organization1.HostName ". Within the network of one organization, the use of identical host names is generally excluded, so we will have unique names. Next, enter the PSK ID from the previously compiled data file and the key. But for now, we are not launching anything.
In the zabbix \ scripts directory , create a UserParameters.txt file that will contain user parameters (UserParameter = <key>,)
Save UserParameters.txt . We came up with keys and loops to get data. And at the end of the AgentConfigGeneration.cmd file , add the following line:
We still need to open the port on the host if the firewall is turned on. Create the file OpenLocalPort.cmd
So, we wrote the scripts. Here's what we get:
Now you need to determine the order of launches of this stuff:
1) Entering variables
2) Installing smartmontools in silent mode
3) Installing the Zabbix Agent service
4) Generating a config with user parameters - AgentConfigGeneration.cmd
5) Generating a list of disks - DiskInfoGenerationJSON.cmd
6) Turning on SMART - GetSmartAllDisk.cmd.cmd
7) Open the port - OpenLocalPort.cmd
8) Start the Zabbix Agent service
Create the INSTALL_AGENT.cmd file in the root of the zabbix directory and combine all the steps of our scripts in it:
We pack the zabbix catalog into the SFX archive and encrypt with a password if necessary
We have a server in the organization "Organization 1". We put zabbix.exe on the server and unpack it to the root of volume C: \
Run INSTALL_AGENT.cmd as the Administrator. Enter the name of the Organization without spaces, copy the PSK identifier and key from the data file:

Enter:
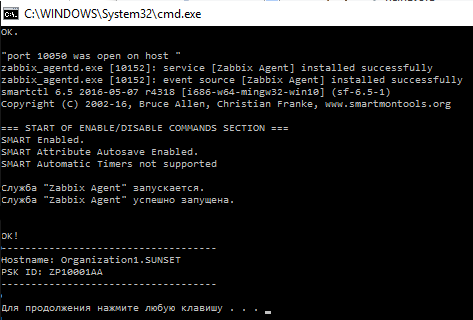
Check the log file C: \ zabbix \ logs \ logs.log:

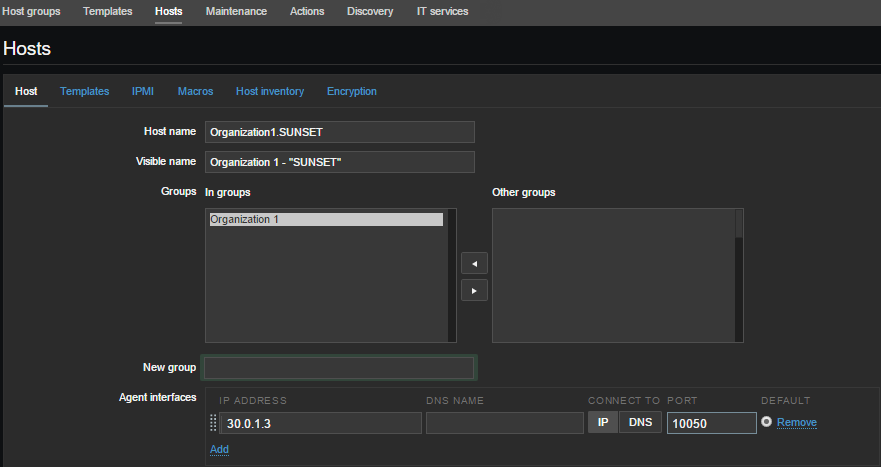
Copy Hostname “Organization1.SUNSET” into the data file:

And so on with each host. After filling out the file, go to the Zabbix office - 10.3.10.1/zabbix - and add groups and nodes from it. In the host encryption settings, mark the PSK and wait online.

We are waiting for a few seconds:

About encryption and restrictions
Russify the cabinet for a change)
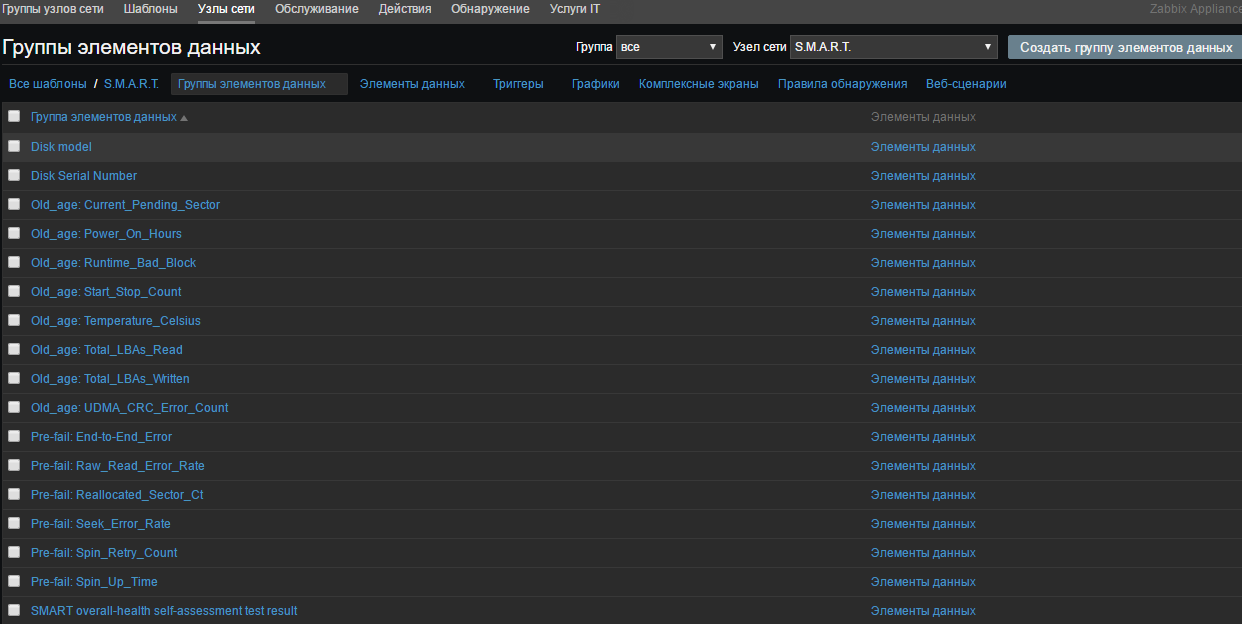
Create a SMART Template and a group of data elements. For example, I created the following groups on the attributes of smart:
Select "Detection Rules" and create a rule:
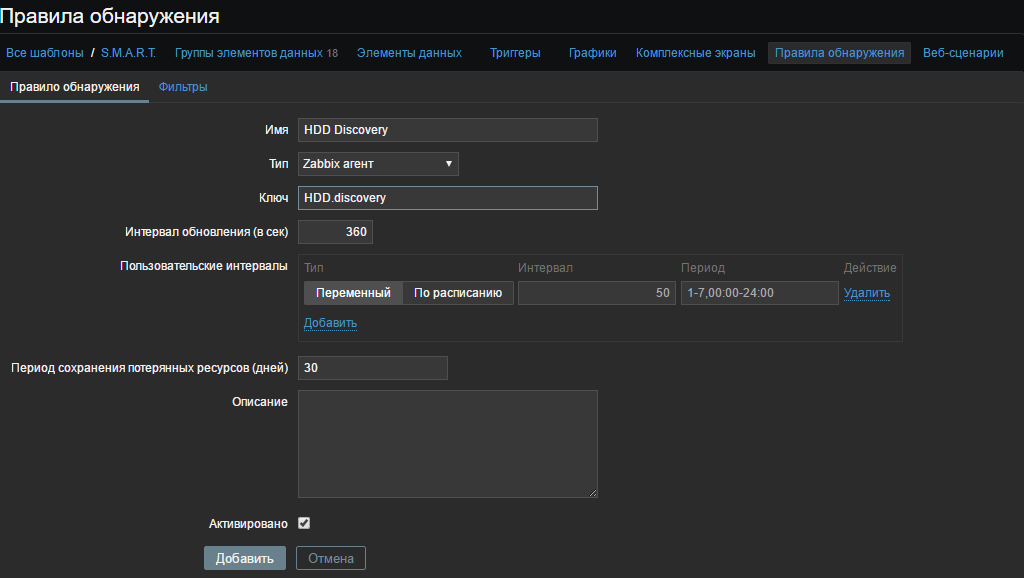
In the "Key" field, specify the same user parameter that we invented from the file C: \ zabbix \ scripts \ UserParameters.txt
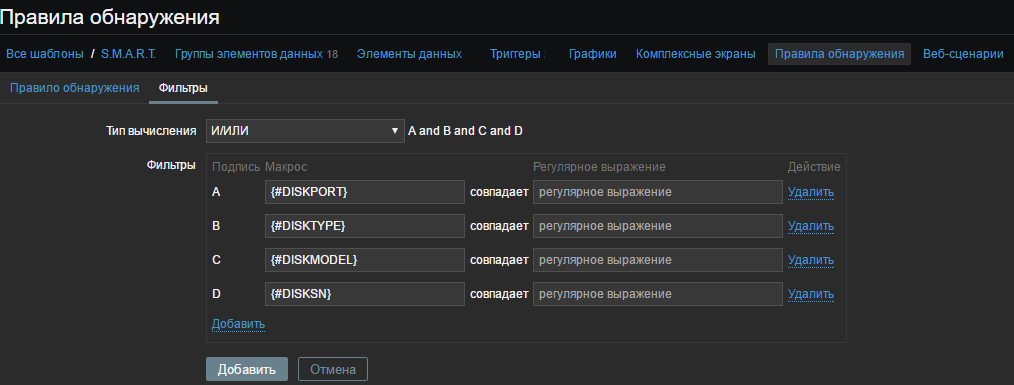
And in the “Filters” tab, we write our macros from the created file c: \ zabbix \ disks \ disks.cmd and click “Add”

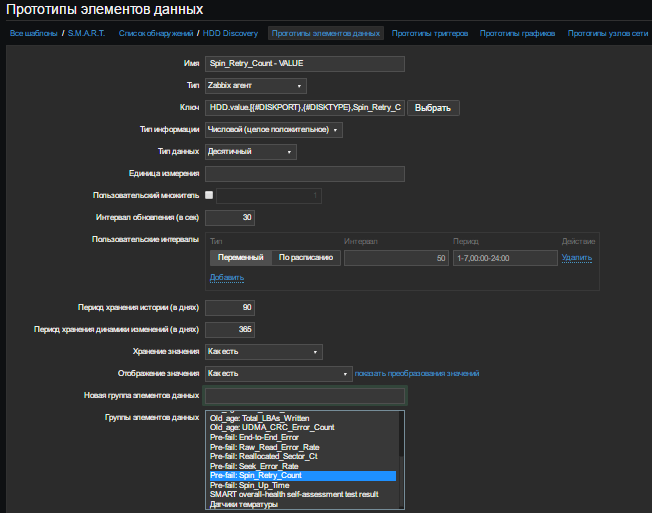
For example, I will create two prototypes of the Spin_Retry_Count attribute and add Pre-fail to the data element group: Spin_Retry_Count. The first one will get a VALUE value, the second THRESHOLD from the smart attribute table for each detected drive.
Let's look again at the file C: \ zabbix \ scripts \ UserParameters.txt (well, or the already created config). And let's see what cycles we get the data we need:
As you can see from the script for the keys HDD.value. [*] And HDD.thresh. [*] We need three arguments $ 1 - disk (/ dev / *), $ 2 - disk type (ata, sat, etc. ), $ 3 - attribute (in our case, Spin_Retry_Count). As a result, the key will receive this format HDD.value. [$ 1, $ 2, $ 3]. For example, for our disk / dev / sda of type “ata”, it will be HDD.value. [/ Dev / sda, ata, Spin_Retry_Count]. But since we created macros for each drive detected, the key format in the prototype data item will be HDD.value. [{# DISKPORT}, {# DISKTYPE}, Spin_Retry_Count] . This key will iterate over each disk by this attribute.
By the way, we can check the key from the server using zabbix_get

And also for Threshold:

So, we create our data prototype for VALUE and use passive verification:
Similarly, we create a prototype for Threshold. As a result, we have:

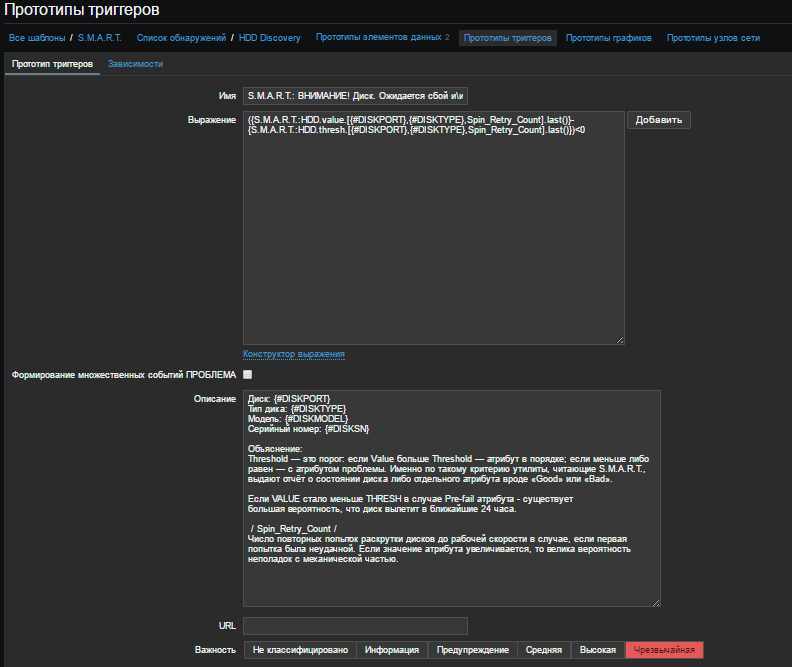
Create a “Trigger Prototype”. Give a name, for example, for clarity:
SMART: ATTENTION! Drive {#DISKMODEL} ({#DISKPORT} - {#DISKTYPE}). Failure and / or complete disk failure in the next 24 hours is expected! The attribute value is worse than the critical threshold.
In the "Field expression" we write the condition:
The point is that if Value is less than Threshold, you need to issue a problem. Last () - shows the last received value ( more about functions). In the field "Description" write, for example:
The importance of putting "Emergency"
We will assume that the alert is configured by EMAIL. If not, then here .
Go to Settings> Actions. Create a report form. Click "Create Action"
Name : Problem Reports
Default Subject: PROBLEMA! [{HOST.NAME}] - {TRIGGER.NAME} ({EVENT.ID})
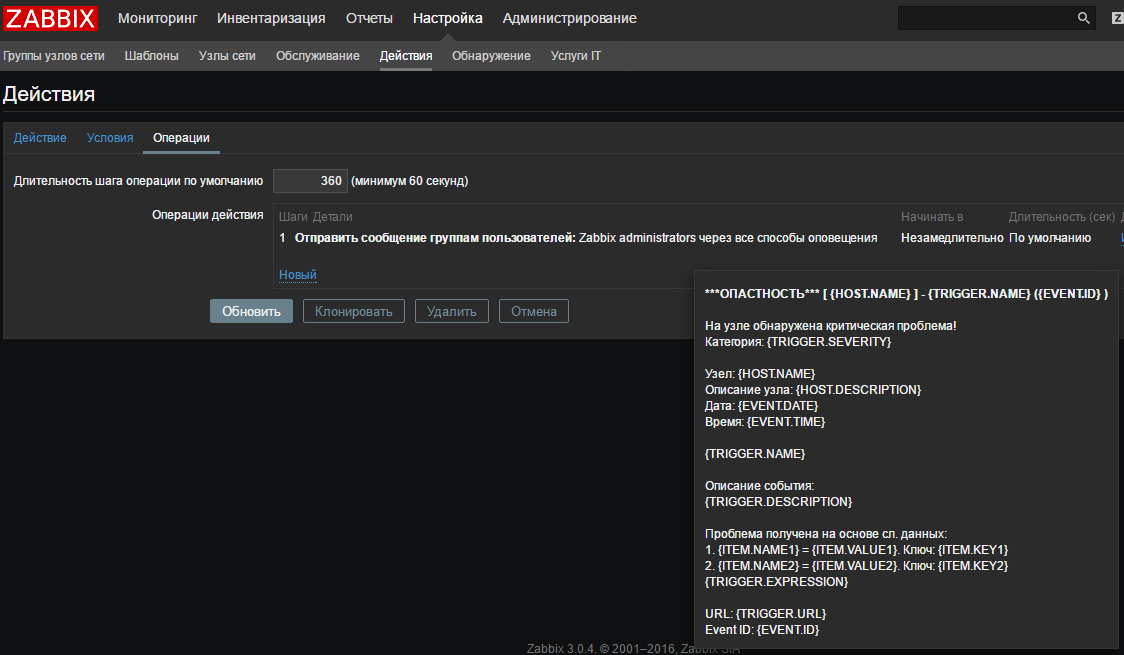
Default message:
Fill in the recovery message:
Recovery topic: OK. [{HOST.NAME}]
Restore message:
Enable “Activate”.
Go to the “Conditions” tab and fill it as shown below:
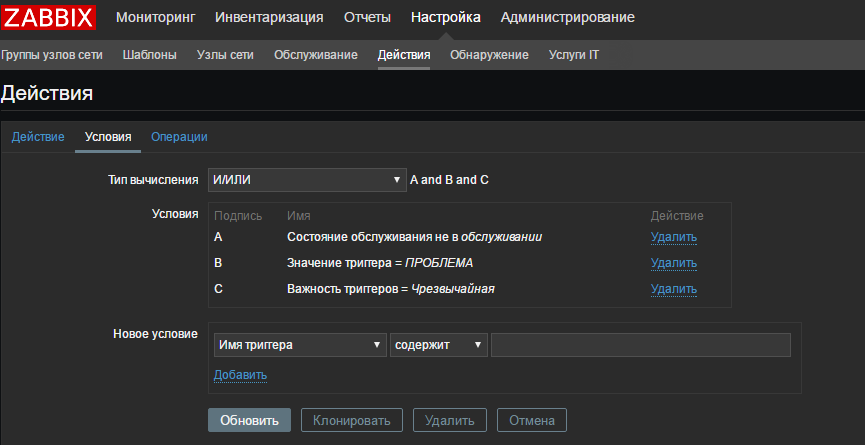
I indicated only "Emergency" problems as an example. Conditions can be set whatever your heart desires.
We go to the tab "Operations" and add either the group of our user, or specify only ourselves. There is basically nothing to comment on.
Now I will simulate a failure. For example, I have all the attributes in order, so I will change the value in the trigger and set it to "greater than zero"
I think I don’t need to explain arithmetic.
We are waiting for some time and get the problem:

And after a couple of seconds a message arrives in the mail:

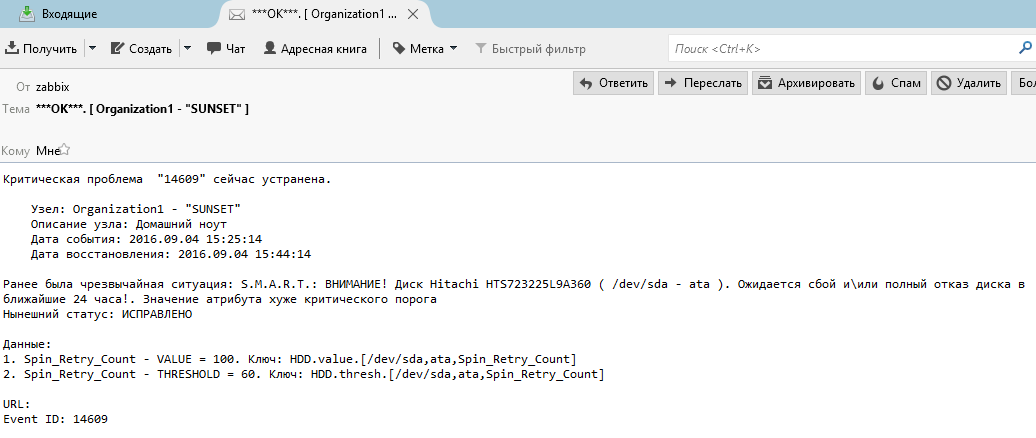
After recovery, we will receive the following message:
If there are errors, or something can be done easier, please let us know! I wrote a topic for a couple of hours with screenshots, like I double-checked it successfully.
Download the ready-made
PS template : It’s especially fire when zabbix sends a message to the supplier asking to invoice a new disk or, for example, when the toner runs out in the printer, it throws a support ticket for refilling the cartridge, but that's another story ...
Let the external IP of Zabbix server be 30.0.1.1
Local IP of Zabbix server 10.3.10.1
Test node address 30.0.1.3
Port forwarding will not be mentioned here. The node in the example will listen to 10050, the server - 10051.
Problem statement:
1) Simplify the installation of agents on Windows systems
2) Configure encryption between the agent and the server.
3) Configure disk detection (names, models, serial numbers, types) using the smartmontools utility, SMART control
4) Create a scalable deployment script template.
5) Set up an alert.
6) Use only the command line.
For some reason, Windows agents do not yet have TLS support, but there are compiled versions that can be downloaded from here . The discussion .
Unpack. We need only the bin directory. We do not need a default config.
Create the zabbix directory and copy the bin directory into itfrom the unpacked agent. Next, create a directory zabbix subdirectories the conf, disks, logs folder, psk, scripts directory, smartmontools . We will immediately decide that we will be placing the zabbix folder in the root of volume C: \
conf - there will be a
disks config file - here information about disks in JSON
logs will be generated -
pks logs - there will be a Z_agent.psk file containing a pre-shared key
scripts -
smartmontools scripts - here we put the SMART program of the same name
Immediately prepare the PSK keys and data file. Create the pskgen4ik file on the server:
#!/bin/bash
echo -n  "Сколько ключей нужно? : "
read LIMIT
a=1
echo \# > /home/appliance/agent_psk
while [ "$a" -le $LIMIT ]
do
  openssl rand -hex 64 >> /home/appliance/agent_psk
  let "a++"
done
less /home/appliance/agent_psk
Save, make executable (chmod + x), run, and copy the result to a data file, I will give an example of Excel for clarity. You can use the database. Something like this:
We will fill in the Host name field after creating the agent config (unless of course there is already a list). We create and add unique PSK IDs. We save the data file, make a backup, strictly restrict access to it and delete the agent_psk file. All we have is a data file with keys and identifiers that we will use.
SMART
To obtain information about disks and their SMART, we use the Smartmontools utility . I take the latest version 6.5. In this version, USB passports are normally detected, and new manifests for 10k. About all corrections in the release .
Download and throw in the zabbix \ smartmontools folder
Acquaintance with the utility.
See the list of mapped drives:
c:\>"Program Files"\smartmontools\bin\smartctl.exe --scan The –d switch indicates the type of disk.
We are interested in the / dev / sda drive. So far he has little to say except that he is ATA-type and most likely bootable.
We look at the information about him:
c:\>"Program Files"\smartmontools\bin\smartctl.exe -i /dev/sda -d ata Already more interesting. As you can see, SMART is disabled. Turn it on:
c:\>"Program Files\smartmontools\bin\smartctl.exe" --smart=on --offlineauto=on --saveauto=on /dev/sdaWe look at the SMART attribute table .
c:\>"Program Files"\smartmontools\bin\smartctl.exe -A /dev/sda -d ataThe RAID smart card will not work, but we can get the health status.
We look at SMART Health:
c:\>"Program Files"\smartmontools\bin\smartctl.exe -H /dev/sda -d ataNow the same thing needs to be done for the remaining 1000 disks) There is no longer any way to create templates for each, moreover, for example, I also need to get the model and serial number of each disk in the report. Zabbix LLD comes to the rescue .
Since Zabbix has the ability to process data using the JSON protocol provided by its API , we will generate the necessary information from smartmontools in the JSON format and passively transmit it to the server.
We begin to create scripts. First, we’ll come up with discovery macros and decide on the data:
Macro {#DISKPORT} - the name of the disk in the system (/ dev / sda, / dev / sdb, etc.),
Macro {#DISKTYPE} - the type of disk (ata, scsi, sat, csmi, etc.),
Macro {#DISKMODEL} - disk model,
Macro {#DISKSN} - serial number.
In the zabbix \ scripts directory, create the following DiskInfoGenerationJSON.cmd file :
@echo off
echo @echo off > c:\zabbix\disks\disks.cmd
echo echo {"data": >> c:\zabbix\disks\disks.cmd
echo echo    [ >> c:\zabbix\disks\disks.cmd
for /F "tokens=1,3" %%a in ('C:\"Program Files"\smartmontools\bin\smartctl.exe --scan') ^
do (for %%s in ("Device Model" "Product") ^
do (for /F "tokens=2*" %%c in ('C:\"Program Files"\smartmontools\bin\smartctl.exe -i %%a -d %%b ^| find %%s ') ^
do (for %%i in ("Serial Number") do (for /F "tokens=3*" %%k in ('C:\"Program Files"\smartmontools\bin\smartctl.exe -i %%a -d %%b ^| find %%i ') ^
do echo echo      {"{#DISKPORT}":"%%a","{#DISKTYPE}":"%%b","{#DISKMODEL}":"%%d","{#DISKSN}":"%%k"},>> c:\zabbix\disks\disks.cmd))))
echo echo      {"{#SMARTV}":"Smartctl 6.5"}>> c:\zabbix\disks\disks.cmd
echo echo    ] >> c:\zabbix\disks\disks.cmd
echo echo } >> c:\zabbix\disks\disks.cmd
Save DiskInfoGenerationJSON.cmd
I couldn’t simplify the problem of the last comma using cmd (yes, I didn’t start to solve it, because this is crazy stuff), in the line ...
{"{#DISKPORT}":"%%a","{#DISKTYPE}":"%%b","{#DISKMODEL}":"%%d","{#DISKSN}":"%%k"},... which violates the JSON syntax. So I just added the line {"{#SMARTV}": "Smartctl 6.5"} , which closes the body without a comma.
When you run the DiskInfoGenerationJSON.cmd file . As a result, we should get the file c: \ zabbix \ disks \ disks.cmd with the following contents:
Create the GetSmartAllDisk.cmd file in the zabbix \ scripts directory of the following content:
rem включаем СМАРТ у всех дисков которые это позволят:
for /F "tokens=1" %%a in ('C:\"Program Files"\smartmontools\bin\smartctl.exe --scan') ^
do "C:\Program Files\smartmontools\bin\smartctl.exe" --smart=on --offlineauto=on --saveauto=on %%a
Save GetSmartAllDisk.cmd
Config Generation
Generation will be divided into two parts: connection settings and user parameters.
Creating a config
We analyze the future agent configuration file:
LogFile=C:\zabbix\logs\logs.log  	# журнал логов
LogFileSize=100 			# ограничение размера файла логов
Server=30.0.1.1			# сервер пассивных проверок
ServerActive=30.0.1.1		# сервер активных проверок
StartAgents=3 			# кол-во пре-форков
Timeout=30 				# не более 30 сек на обработку
Hostname=				# уникальное имя хоста
# TLS
TLSConnect=psk			# тип исходящих подключений (активная проверка)
TLSAccept=psk			# тип входящих подключений (пассивная проверка)
TLSPSKFile=C:\zabbix\psk\Z_agent.psk	# путь к файлу с pre-shared ключом
TLSPSKIdentity=			# уникальный идентификатор
Unique to each host are the fields Hostname = and TLSPSKIdentity = in the configuration file. As well as the pre-shared key in the file zabbix \ psk \ Z_agent.psk . Therefore, we define these values in variables.
In the zabbix \ scripts directory, create the AgentConfigGeneration.cmd file :
@echo off
chcp 866 > nul
set /P CLIENT="Enter Organization name: "
set /P PSKID=" Enter PSKIdentity: "
set /P PSKkey="Enter PSKkey: "
rem Генерация конфига
@echo # zabbix_agent 3.0.1> C:\zabbix\conf\zabbix_agentd.conf
@echo. >>C:\zabbix\conf\zabbix_agentd.conf
@echo %PSKkey%>>C:\zabbix\psk\Z_agent.psk
@echo LogFile=C:\zabbix\logs\logs.log >> C:\zabbix\conf\zabbix_agentd.conf
@echo LogFileSize=100 >> C:\zabbix\conf\zabbix_agentd.conf
@echo Server=30.0.1.1 >> C:\zabbix\conf\zabbix_agentd.conf
@echo ServerActive=30.0.1.1 >> C:\zabbix\conf\zabbix_agentd.conf
@echo StartAgents=3 >> C:\zabbix\conf\zabbix_agentd.conf
@echo Timeout=30 >> C:\zabbix\conf\zabbix_agentd.conf
@echo Hostname=%CLIENT%.%COMPUTERNAME%>> C:\zabbix\conf\zabbix_agentd.conf
@echo. >> C:\zabbix\conf\zabbix_agentd.conf
@echo ##### TLS ###########>> C:\zabbix\conf\zabbix_agentd.conf
@echo TLSConnect=psk>> C:\zabbix\conf\zabbix_agentd.conf
@echo TLSAccept=psk>> C:\zabbix\conf\zabbix_agentd.conf
@echo TLSPSKFile=C:\zabbix\psk\Z_agent.psk>> C:\zabbix\conf\zabbix_agentd.conf
@echo TLSPSKIdentity=%PSKID%>> C:\zabbix\conf\zabbix_agentd.conf
@echo. >> C:\zabbix\conf\zabbix_agentd.conf
Everything is simple. At startup, enter the name of the organization, for example, Organization1 and get the Hostname in the config in the form " Organization1.HostName ". Within the network of one organization, the use of identical host names is generally excluded, so we will have unique names. Next, enter the PSK ID from the previously compiled data file and the key. But for now, we are not launching anything.
Adding custom parameters to the config
In the zabbix \ scripts directory , create a UserParameters.txt file that will contain user parameters (UserParameter = <key>,
##### Обнаружение дисков.
UserParameter=HDD.discovery,for /F "tokens=*" %a in ('C:\zabbix\disks\disks.cmd') do @echo %a
##### S.M.A.R.T.
# RAW_VALUE
UserParameter=HDD.raw[*], for /F "tokens=10" %a in ('C:\"Program Files"\smartmontools\bin\smartctl.exe -A $1 -d $2 ^| find "$3"') do @echo %a
# VALUE
UserParameter=HDD.value.[*], for /F "tokens=4" %a in ('C:\"Program Files"\smartmontools\bin\smartctl.exe -A $1 -d $2^| find "$3"') do @echo %a
# WORST
UserParameter=HDD.worst.[*], for /F "tokens=5" %a in ('C:\"Program Files"\smartmontools\bin\smartctl.exe -A $1 -d $2 ^| find "$3"') do @echo %a
# THRESOLD
UserParameter=HDD.thresh.[*], for /F "tokens=6" %a in ('C:\"Program Files"\smartmontools\bin\smartctl.exe -A $1 -d $2 ^| find "$3"') do @echo %a
# WHEN_FAILED
UserParameter=HDD.when.failed.[*], for /F "tokens=9" %a in ('C:\"Program Files"\smartmontools\bin\smartctl.exe -A $1 -d $2 ^| find "$3"') do @echo %a
# HEALTH Status
UserParameter=HDD.health.[*], for /F "tokens=6" %a in ('C:\"Program Files"\smartmontools\bin\smartctl.exe -H $1 -d $2 ^| find "test"') do @echo %a
Save UserParameters.txt . We came up with keys and loops to get data. And at the end of the AgentConfigGeneration.cmd file , add the following line:
type C:\zabbix\scripts\UserParameters.txt>> C:\zabbix\conf\zabbix_agentd.confWe still need to open the port on the host if the firewall is turned on. Create the file OpenLocalPort.cmd
@echo off
set localportname=10050
set rulename=zabbix
set dirrname=in
set protocolname=TCP
set actionname=allow
netsh advfirewall firewall add rule name=%rulename% dir=%dirrname% action=%actionname% protocol=%protocolname% localport=%localportname%
So, we wrote the scripts. Here's what we get:
Now you need to determine the order of launches of this stuff:
1) Entering variables
2) Installing smartmontools in silent mode
3) Installing the Zabbix Agent service
4) Generating a config with user parameters - AgentConfigGeneration.cmd
5) Generating a list of disks - DiskInfoGenerationJSON.cmd
6) Turning on SMART - GetSmartAllDisk.cmd.cmd
7) Open the port - OpenLocalPort.cmd
8) Start the Zabbix Agent service
Create the INSTALL_AGENT.cmd file in the root of the zabbix directory and combine all the steps of our scripts in it:
@echo off
chcp 866 > nul
set /P CLIENT="Client NAME: "
set /P PSKID="PSKIdentity: "
set /P PSKkey="Enter PSKkey: "
cls
rem Устанавливаем smartmontools в тихом режиме
C:\zabbix\smartmontools\smartmontools-6.5-1.win32-setup.exe /S
rem Открывает порт 10050 в брандмауэре
set localportname=10050
set rulename=zabbix
set dirrname=in
set protocolname=TCP
set actionname=allow
netsh advfirewall firewall add rule name=%rulename% dir=%dirrname% action=%actionname% protocol=%protocolname% localport=%localportname%
echo "port %localportname% was open on host %hostname%"
rem создание конфига
@echo # zabbix_agent 3.0.1> C:\zabbix\conf\zabbix_agentd.conf
@echo. >>C:\zabbix\conf\zabbix_agentd.conf
@echo %PSKkey%>C:\zabbix\psk\Z_agent.psk
@echo LogFile=C:\zabbix\logs\logs.log >> C:\zabbix\conf\zabbix_agentd.conf
@echo LogFileSize=100 >> C:\zabbix\conf\zabbix_agentd.conf
@echo Server=30.0.1.1 >> C:\zabbix\conf\zabbix_agentd.conf
@echo ServerActive=30.0.1.1 >> C:\zabbix\conf\zabbix_agentd.conf
@echo StartAgents=3 >> C:\zabbix\conf\zabbix_agentd.conf
@echo Timeout=30 >> C:\zabbix\conf\zabbix_agentd.conf
@echo Hostname=%CLIENT%.%COMPUTERNAME%>> C:\zabbix\conf\zabbix_agentd.conf
@echo. >> C:\zabbix\conf\zabbix_agentd.conf
@echo ##### TLS ###########>> C:\zabbix\conf\zabbix_agentd.conf
@echo TLSConnect=psk>> C:\zabbix\conf\zabbix_agentd.conf
@echo TLSAccept=psk>> C:\zabbix\conf\zabbix_agentd.conf
@echo TLSPSKFile=C:\zabbix\psk\Z_agent.psk >> C:\zabbix\conf\zabbix_agentd.conf
@echo TLSPSKIdentity=%PSKID%> C:\zabbix\conf\zabbix_agentd.conf
@echo. >> C:\zabbix\conf\zabbix_agentd.conf
rem Добавляем пользовательские параметры
type C:\zabbix\scripts\UserParameters.txt>> C:\zabb\conf\zabbix_agentd.conf
rem Создание списка дисков
@echo off
echo @echo off > c:\zabbix\disks\disks.cmd
echo echo {"data": >> c:\zabbix\disks\disks.cmd
echo echo    [ >> c:\zabbix\disks\disks.cmd
for /F "tokens=1,3" %%a in ('C:\"Program Files"\smartmontools\bin\smartctl.exe --scan') ^
do (for %%s in ("Device Model" "Product") ^
do (for /F "tokens=2*" %%c in ('C:\"Program Files"\smartmontools\bin\smartctl.exe -i %%a -d %%b ^| find %%s ') ^
do (for %%i in ("Serial Number") do (for /F "tokens=3*" %%k in ('C:\"Program Files"\smartmontools\bin\smartctl.exe -i %%a -d %%b ^| find %%i ') ^
do echo echo      {"{#DISKPORT}":"%%a","{#DISKTYPE}":"%%b","{#DISKMODEL}":"%%d","{#DISKSN}":"%%k"},>> c:\zabbix\disks\disks.cmd))))
echo echo      {"{#SMARTV}":"Smartctl 6.5"}>> c:\zabbix\disks\disks.cmd
echo echo    ] >> c:\zabbix\disks\disks.cmd
echo echo } >> c:\zabbix\disks\disks.cmd
rem Включение смарт на всех дисках
for /F "tokens=1" %%a in ('C:\"Program Files"\smartmontools\bin\smartctl.exe --scan') ^
do "C:\Program Files\smartmontools\bin\smartctl.exe" --smart=on --offlineauto=on --saveauto=on %%a
rem Установка службы Zabbix Agent
if DEFINED ProgramFiles(x86) (goto :x64) else (goto :x86)
:x64
C:\zabbix\bin\win64\zabbix_agentd.exe -i -c C:\zabbix\conf\zabbix_agentd.conf
goto :NEXT
:x86
C:\zabbix\bin\win32\zabbix_agentd.exe -i -c C:\zabbix\conf\zabbix_agentd.conf
goto :NEXT
:NEXT
rem Запуск службы Zabbix Agent
net start "Zabbix Agent"
echo.
echo OK!
@echo ------------------------------------
@echo Hostname: %CLIENT%.%COMPUTERNAME%
@echo ------------------------------------
@echo.
Pause
We pack the zabbix catalog into the SFX archive and encrypt with a password if necessary
Example.
We have a server in the organization "Organization 1". We put zabbix.exe on the server and unpack it to the root of volume C: \
Run INSTALL_AGENT.cmd as the Administrator. Enter the name of the Organization without spaces, copy the PSK identifier and key from the data file:
Enter:
Check the log file C: \ zabbix \ logs \ logs.log:
Copy Hostname “Organization1.SUNSET” into the data file:
And so on with each host. After filling out the file, go to the Zabbix office - 10.3.10.1/zabbix - and add groups and nodes from it. In the host encryption settings, mark the PSK and wait online.
We are waiting for a few seconds:
About encryption and restrictions
LLD
Russify the cabinet for a change)
Create a SMART Template and a group of data elements. For example, I created the following groups on the attributes of smart:
Select "Detection Rules" and create a rule:
In the "Key" field, specify the same user parameter that we invented from the file C: \ zabbix \ scripts \ UserParameters.txt
UserParameter=HDD.discovery,for /F "tokens=*" %a in ('C:\zabbix\disks\disks.cmd') do @echo %aAnd in the “Filters” tab, we write our macros from the created file c: \ zabbix \ disks \ disks.cmd and click “Add”
Let's create “Prototypes of data elements”
For example, I will create two prototypes of the Spin_Retry_Count attribute and add Pre-fail to the data element group: Spin_Retry_Count. The first one will get a VALUE value, the second THRESHOLD from the smart attribute table for each detected drive.
Let's look again at the file C: \ zabbix \ scripts \ UserParameters.txt (well, or the already created config). And let's see what cycles we get the data we need:
UserParameter=HDD.value.[*], for /F "tokens=4" %a in ('C:\"Program Files"\smartmontools\bin\smartctl.exe -A $1 -d $2^| find "$3"') do @echo %a
UserParameter=HDD.thresh.[*], for /F "tokens=6" %a in ('C:\"Program Files"\smartmontools\bin\smartctl.exe -A $1 -d $2 ^| find "$3"') do @echo %a
As you can see from the script for the keys HDD.value. [*] And HDD.thresh. [*] We need three arguments $ 1 - disk (/ dev / *), $ 2 - disk type (ata, sat, etc. ), $ 3 - attribute (in our case, Spin_Retry_Count). As a result, the key will receive this format HDD.value. [$ 1, $ 2, $ 3]. For example, for our disk / dev / sda of type “ata”, it will be HDD.value. [/ Dev / sda, ata, Spin_Retry_Count]. But since we created macros for each drive detected, the key format in the prototype data item will be HDD.value. [{# DISKPORT}, {# DISKTYPE}, Spin_Retry_Count] . This key will iterate over each disk by this attribute.
By the way, we can check the key from the server using zabbix_get
root@zabbix:~# zabbix_get -s 30.0.1.3 -k HDD.value.[/dev/sda,ata,Spin_Retry_Count] --tls-connect psk --tls-psk-identity "ZP10001AA" --tls-psk-file /root/Organization1.SUNSET.psk
And also for Threshold:
So, we create our data prototype for VALUE and use passive verification:
Similarly, we create a prototype for Threshold. As a result, we have:
Create a “Trigger Prototype”. Give a name, for example, for clarity:
SMART: ATTENTION! Drive {#DISKMODEL} ({#DISKPORT} - {#DISKTYPE}). Failure and / or complete disk failure in the next 24 hours is expected! The attribute value is worse than the critical threshold.
In the "Field expression" we write the condition:
({S.M.A.R.T.:HDD.value.[{#DISKPORT},{#DISKTYPE},Spin_Retry_Count].last()}-{S.M.A.R.T.:HDD.thresh.[{#DISKPORT},{#DISKTYPE},Spin_Retry_Count].last()})<0The point is that if Value is less than Threshold, you need to issue a problem. Last () - shows the last received value ( more about functions). In the field "Description" write, for example:
Диск: {#DISKPORT}
Тип дика: {#DISKTYPE}
Модель: {#DISKMODEL}
Серийный номер: {#DISKSN}
Объяснение:
Threshold — это порог: если Value больше Threshold — атрибут в порядке; если меньше либо равен — с атрибутом проблемы. Именно по такому критерию утилиты, читающие S.M.A.R.T., выдают отчёт о состоянии диска либо отдельного атрибута вроде «Good» или «Bad».
Если VALUE стало меньше THRESH в случае Pre-fail атрибута - существует большая вероятность, что диск вылетит в ближайшие 24 часа.
 / Spin_Retry_Count /
Число повторных попыток раскрутки дисков до рабочей скорости в случае, если первая попытка была неудачной. Если значение атрибута увеличивается, то велика вероятность неполадок с механической частью.
The importance of putting "Emergency"
We will assume that the alert is configured by EMAIL. If not, then here .
Go to Settings> Actions. Create a report form. Click "Create Action"
Name : Problem Reports
Default Subject: PROBLEMA! [{HOST.NAME}] - {TRIGGER.NAME} ({EVENT.ID})
Default message:
Обнаружена проблема!
Категория: {TRIGGER.SEVERITY}
    Узел: {HOST.NAME}
    Описание узла: {HOST.DESCRIPTION}
    Дата: {EVENT.DATE}
    Время: {EVENT.TIME}
{TRIGGER.NAME}
Описание события:
{TRIGGER.DESCRIPTION}
Проблема получена на основе сл. данных:
1. {ITEM.NAME1} = {ITEM.VALUE1}. Ключ: {ITEM.KEY1}
2. {ITEM.NAME2} = {ITEM.VALUE2}. Ключ: {ITEM.KEY2}
{TRIGGER.EXPRESSION}
Event ID: {EVENT.ID}
Fill in the recovery message:
Recovery topic: OK. [{HOST.NAME}]
Restore message:
Проблема события "{EVENT.ID}" сейчас устранена.
    Узел: {HOST.NAME}
    Описание узла: {HOST.DESCRIPTION}
    Дата и время события: {EVENT.DATE} {EVENT.TIME}
    Дата и время восстановления: {EVENT.RECOVERY.DATE} {EVENT.RECOVERY.TIME}
Ранее была проблема: {TRIGGER.NAME}
Категория: {TRIGGER.SEVERITY}
Нынешний статус: ИСПРАВЛЕНО
Данные:
1. {ITEM.NAME1} = {ITEM.VALUE1}. Ключ: {ITEM.KEY1}
2. {ITEM.NAME2} = {ITEM.VALUE2}. Ключ: {ITEM.KEY2}
URL: {TRIGGER.URL}
Event ID: {EVENT.ID}
Enable “Activate”.
Go to the “Conditions” tab and fill it as shown below:
I indicated only "Emergency" problems as an example. Conditions can be set whatever your heart desires.
We go to the tab "Operations" and add either the group of our user, or specify only ourselves. There is basically nothing to comment on.
Now I will simulate a failure. For example, I have all the attributes in order, so I will change the value in the trigger and set it to "greater than zero"
({S.M.A.R.T.:HDD.value.[{#DISKPORT},{#DISKTYPE},Spin_Retry_Count].last()}-{S.M.A.R.T.:HDD.thresh.[{#DISKPORT},{#DISKTYPE},Spin_Retry_Count].last()})>0I think I don’t need to explain arithmetic.
We are waiting for some time and get the problem:
And after a couple of seconds a message arrives in the mail:
After recovery, we will receive the following message:
If there are errors, or something can be done easier, please let us know! I wrote a topic for a couple of hours with screenshots, like I double-checked it successfully.
Download the ready-made
PS template : It’s especially fire when zabbix sends a message to the supplier asking to invoice a new disk or, for example, when the toner runs out in the printer, it throws a support ticket for refilling the cartridge, but that's another story ...