Sending and receiving SMS using Laravel and Nexmo
- Transfer
- Tutorial
In this short tutorial from Phil Leggetter, we will look at how to send and receive SMS in the Laravel app. We realize this opportunity using Nexmo , a cloud communications platform that offers APIs for initializing phone numbers, sending and receiving SMS (which we will use), as well as for making calls.
Prerequisites
We will need a Nexmo account installed by Nexmo CLI (command line interface), as well as your preinstalled Laravel application. In addition, you will need local tunneling so that the Nexmo service can make an HTTP request to the local web server. We recommend ngrok .
Introduction
First of all, we will create our Laravel SMS application:
composer create-project --prefer-dist laravel/laravel laravel-sms
cd laravel-sms
Next, add the Nexmo Laravel package to composer.json:
"require": {
    ...,
    "nexmo/laravel": "dev-master as 1.0",
    "nexmo/client": "dev-master as 1.0"
},
Note: when these packages come out of beta, you only need to enable the package
nexmo/laravel, and nexmo/clientwill be added automatically as a dependency. Add the Nexmo service provider to your configuration file
app.php:'providers' => [
...,
Nexmo\Laravel\NexmoServiceProvider::class
]
Note: you can also add it in
aliasesif you want to use the facade. Install the packages and copy the Nexmo configuration file:
› composer update
php artisan vendor:publish
Finally, add the Nexmo API Key and API Secret in
/config/nexmo.php, update the API_KEY and API_SECRET values based on the values contained in the API settings in Nexmo Dashboard.'api_key' => 'API_KEY',
'api_secret' => 'API_SECRET',
Note: you can optionally declare values in
.envand env(...).SMS sending
Note: for simplicity we will add all the functionality to
app/Http/routes.php. Add the following route to
app/Http/routes.php:Route::get('/sms/send/{to}', function(\Nexmo\Client $nexmo, $to){
$message = $nexmo->message()->send([
'to' => $to,
'from' => '@leggetter',
'text' => 'Sending SMS from Laravel. Woohoo!'
]);
Log::info('sent message: ' . $message['message-id']);
});
It is worth noting that in the above code
fromcontains a value @leggetter. This will work in the UK, but not in other countries.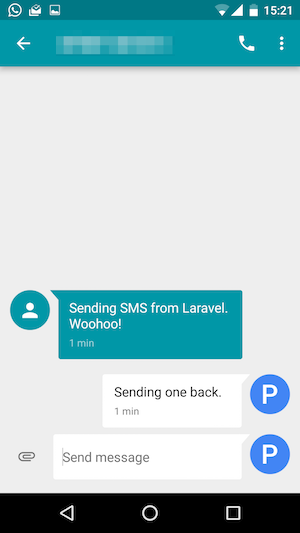
For those of you who need to use a real number, let's look at using an existing number, as well as buying it.
Listing, search and rental of rooms
One of the prerequisites for this lesson was the Nexmo CLI . We can use it for many actions, including working with phone numbers (virtual numbers, to be precise) that are associated with our account. If you have not already done so, you must install and configure the CLI, where
API_KEYand API_SECRETmust be replaced with API credentials that were used in the past:› npm install -g nexmo-cli
nexmo setup API_KEY API_SECRET
Now we can view the available rooms that we have already rented, look for rooms available for rent, as well as rent or cancel a certain room. Let's start by looking at the list of numbers that are already available on our account:
› nexmo number:list
14155550123
In the above example, I have a number. If you do not have a room, you can search for rental numbers. All you need to know for this is two characters of the country code in the ISO 3166-1 alpha-2 format . In fact, this is easier than it sounds. For example, for Great Britain it is GB , and for the United States it is US (approx. Transl .: for Russia - RU ). Let's find a rental number in the USA:
› nexmo number:search US
14155550111
14155550222
14155550333
If you do not have a number, you must buy it, after which you can send and receive SMS in those countries that require a real outgoing number.
› nexmo number:buy 14155550111 --confirm
Number purchased: 14155550111
Sending SMS, finally!
Now you need to update the code to use the number you just bought. To do this, change the value
fromto env('NEXMO_NUMBER'), as in the example below:Route::get('/sms/send/{to}', function(\Nexmo\Client $nexmo, $to){
$message = $nexmo->message()->send([
'to' => $to,
'from' => env('NEXMO_NUMBER'),
'text' => 'Sending SMS from Laravel. Woohoo!'
]);
Log::info('sent message: ' . $message['message-id']);
});
Then start the server:
› php artisan serve
Laravel development server started on http://localhost:8000/
And go to
http://localhost:8000/sms/send/YOUR_NUMBERwhere it YOUR_NUMBERshould be replaced with the real number, including the country code, in E.164 format , i.e. in the same format that was shown in all the above examples. In the file
storage/logs/laravel.logyou will see a log entry related to the message that was just sent, including a unique identifier for the message at the end of the entry, for example:[2016-08-02 13:45:01] local.INFO: sent message: 03000000068F5D97
Receive incoming SMS
In order for our application to receive incoming SMS, we need to perform several actions:
- Make sure the application is visible to Nexmo through the local tunnel
- Create a route to receive SMS
- Disable CSRF for route receiving SMS
- Tell Nexmo which route to call the webhook on when it receives the message.
Let's start by giving the Nexmo platform access to our application through a local tunnel. Assuming you are using ngrok and your Laravel web server is listening on port 8000, you can do this as follows:
› ngrok http 8000
ngrok by @inconshreveable                                                (Ctrl+C to quit)
Tunnel Status                 online
Version                       2.1.3
Region                        United States (us)
Web Interface                 http://127.0.0.1:4041
Forwarding                    http://814882e9.ngrok.io -> localhost:8000
Forwarding                    https://814882e9.ngrok.io -> localhost:8000
Connections                   ttl     opn     rt1     rt5     p50     p90
                              0       0       0.00    0.00    0.00    0.00
You can see above that the subdomain on ngrok has been successfully created and now any requests to it will be tunneled to our local host
localhost:8000. Now you need to create a route to receive SMS in a file
routes.php:Route::post('/sms/receive', function(\Nexmo\Client $nexmo){
});
By default, Laravel will not miss POST requests for this route without a CSRF token . Since a request for this route will be made by Nexmo, which does not have a token, we need to disable CSRF for this route. Add to the
App/Http/Middleware/VerifyCsrfToken.phpfollowing:protected $except = [
'/sms/receive'
];
And finally, let's let Nexmo know which route to make the webhook call when an SMS is received. We can do this with the Nexmo CLI. When executing the following command, you must use the phone number that you rented, as well as your ngrok subdomain:
› nexmo link:sms 14155550111 https://814882e9.ngrok.io/sms/receive
Number updated
When executing this command, the Nexmo service will try to call your route
/sms/receive, and you should see a request in the ngrok terminal:HTTP Requests
-------------
POST /sms/receive 200 OK
The Nexmo PHP client library provides the ability to easily capture the HTTP parameters that were sent from Nexmo to the Laravel application and create an incoming message object
InboundMessagewith which we can work. Update the route code /sms/receiveas follows:Route::post('/sms/receive', function(\Nexmo\Client $nexmo){
$message = \Nexmo\Message\InboundMessage::createFromGlobals();
Log::info('got text: ' . $message->getBody());
});
After that, send an SMS to the rented number and check
storage/logs/laravel.logif the message you sent is in the log.[2016-08-02 13:45:01] local.INFO: sent message: 03000000068F5D97
[2016-08-02 14:20:50] local.INFO: sent message: 0300000006917797
[2016-08-02 14:21:17] local.INFO: got text: Sending one back.
Automatic reply to incoming SMS
And finally, let's create an autoresponder for an incoming message. The Nexmo PHP client provides a good way to do this using the function
InboundMessage->createReply:Route::post('/sms/receive', function(\Nexmo\Client $nexmo){
$message = \Nexmo\Message\InboundMessage::createFromGlobals();
Log::info('got text: ' . $message->getBody());
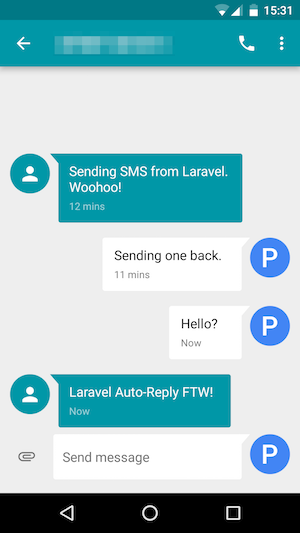
$reply =$nexmo->message()->send($message->createReply('Laravel Auto-Reply FTW!'));
Log::info('sent reply: ' . $reply['message-id']);
});
Send a message to the rented number and you will receive an automatic response. It's almost magic!
Conclusion
In this tutorial, we covered everything you need to know to implement sending and receiving SMS, and even automatic reply to SMS, in the Laravel application using the Nexmo cloud communications platform.
You can find the code for this lesson at github.com/nexmo-community/laravel-sms .