Simple SQL Server Tool in C #
- Transfer
We are publishing a translation of an article that discusses the phased creation of a simple SQL Server Tool.

You can also watch the Easy SQL Tool Using C # tutorial on YouTube.
Introduction
The SQL Server Tool allows you to create and delete databases and tables, load all database names from a selected server, fill tables with data, display them in a grid, export data to .csv format - all without using SQL scripts.
To program databases, tables, and other components of SQL Server, we used SQL Server Management Objects (SMO), SQL Server management objects.
What are SQL Server Management Objects (SMOs)?
SQL Server management objects are a collection of objects for programming all aspects of SQL Server. SMOs allow you to connect to SQL Server, access database name sets, create or restore databases, their backups and tables, view their descriptions, etc.
For more information about SQL Server management objects, see:
• Overview (SMO)
• Create a Visual C # SMO Project in Visual Studio .NET
• Server Class
The main components of the Shanu Easy SQL Server Tool (SESST):

1. Connection to the SQL server;
2. Work with tables;
3. SQL Script tabs (Create Table tab / Insert and Delete Records tab / Select Query tab);
4. The output window.
Next, we will consider each of them in detail.
Step 1. Connecting to the SQL server

We can connect to any SQL server in our network. To do this, enter the server name or its IP address, login ID and password.
Creating a new database
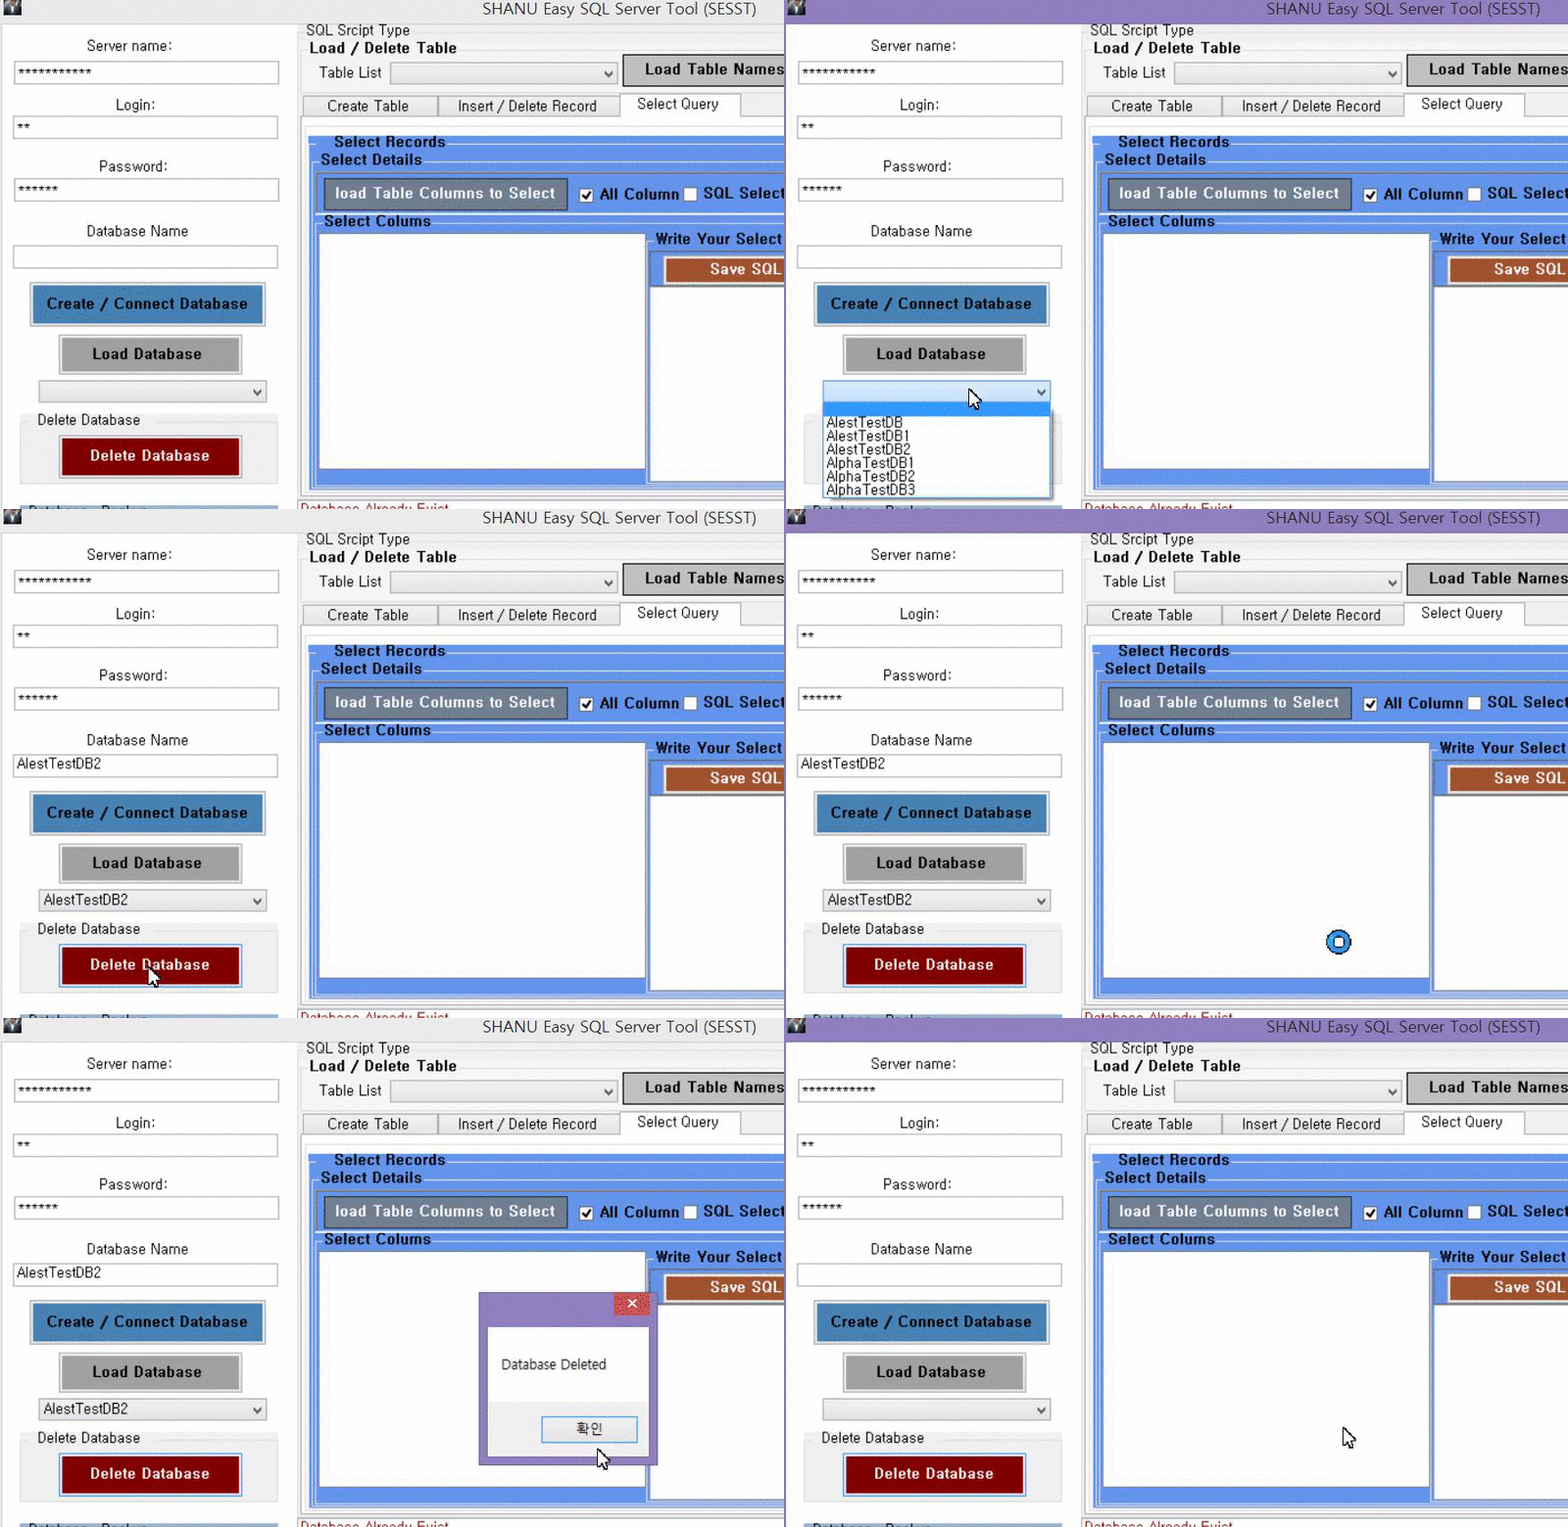
After entering the name of the new database, it is checked for its availability. If the name already exists, you will receive a notification. If the name is free, a new database will be created on the server.

Download Database
Select an existing database name from the combo box.
Deleting a database The
selected database can be deleted from the server. Before deleting, a confirmation window will appear. To continue, click OK.
Creating a database
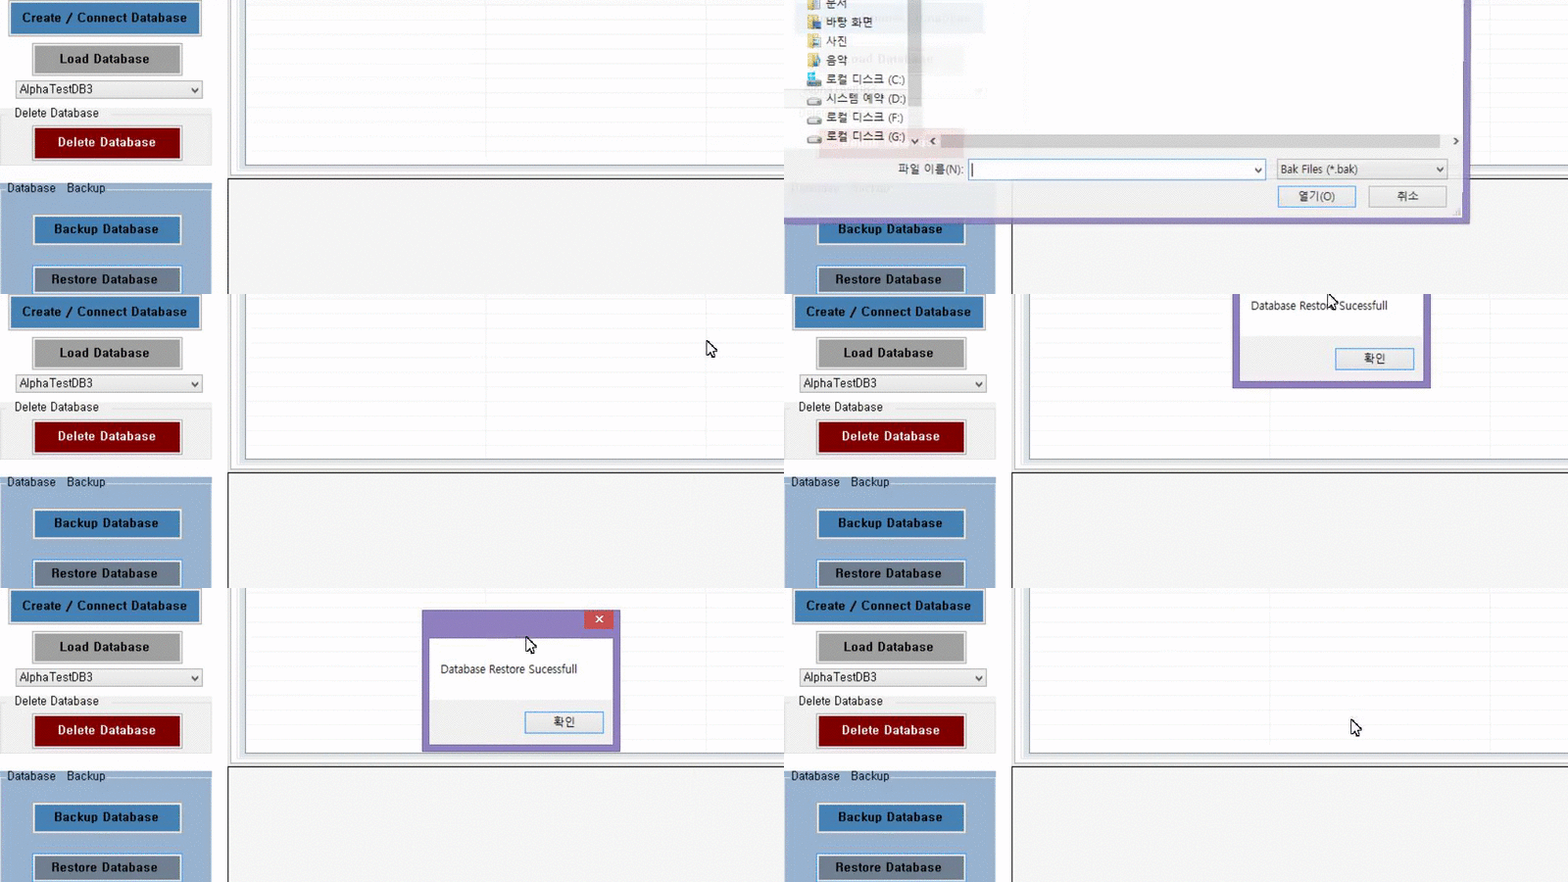
backup A backup of the selected database can be saved to any folder.

Database
recovery To restore the database, select the .bak file in the appropriate folder.
Step 2. Working with tables
Loading a table
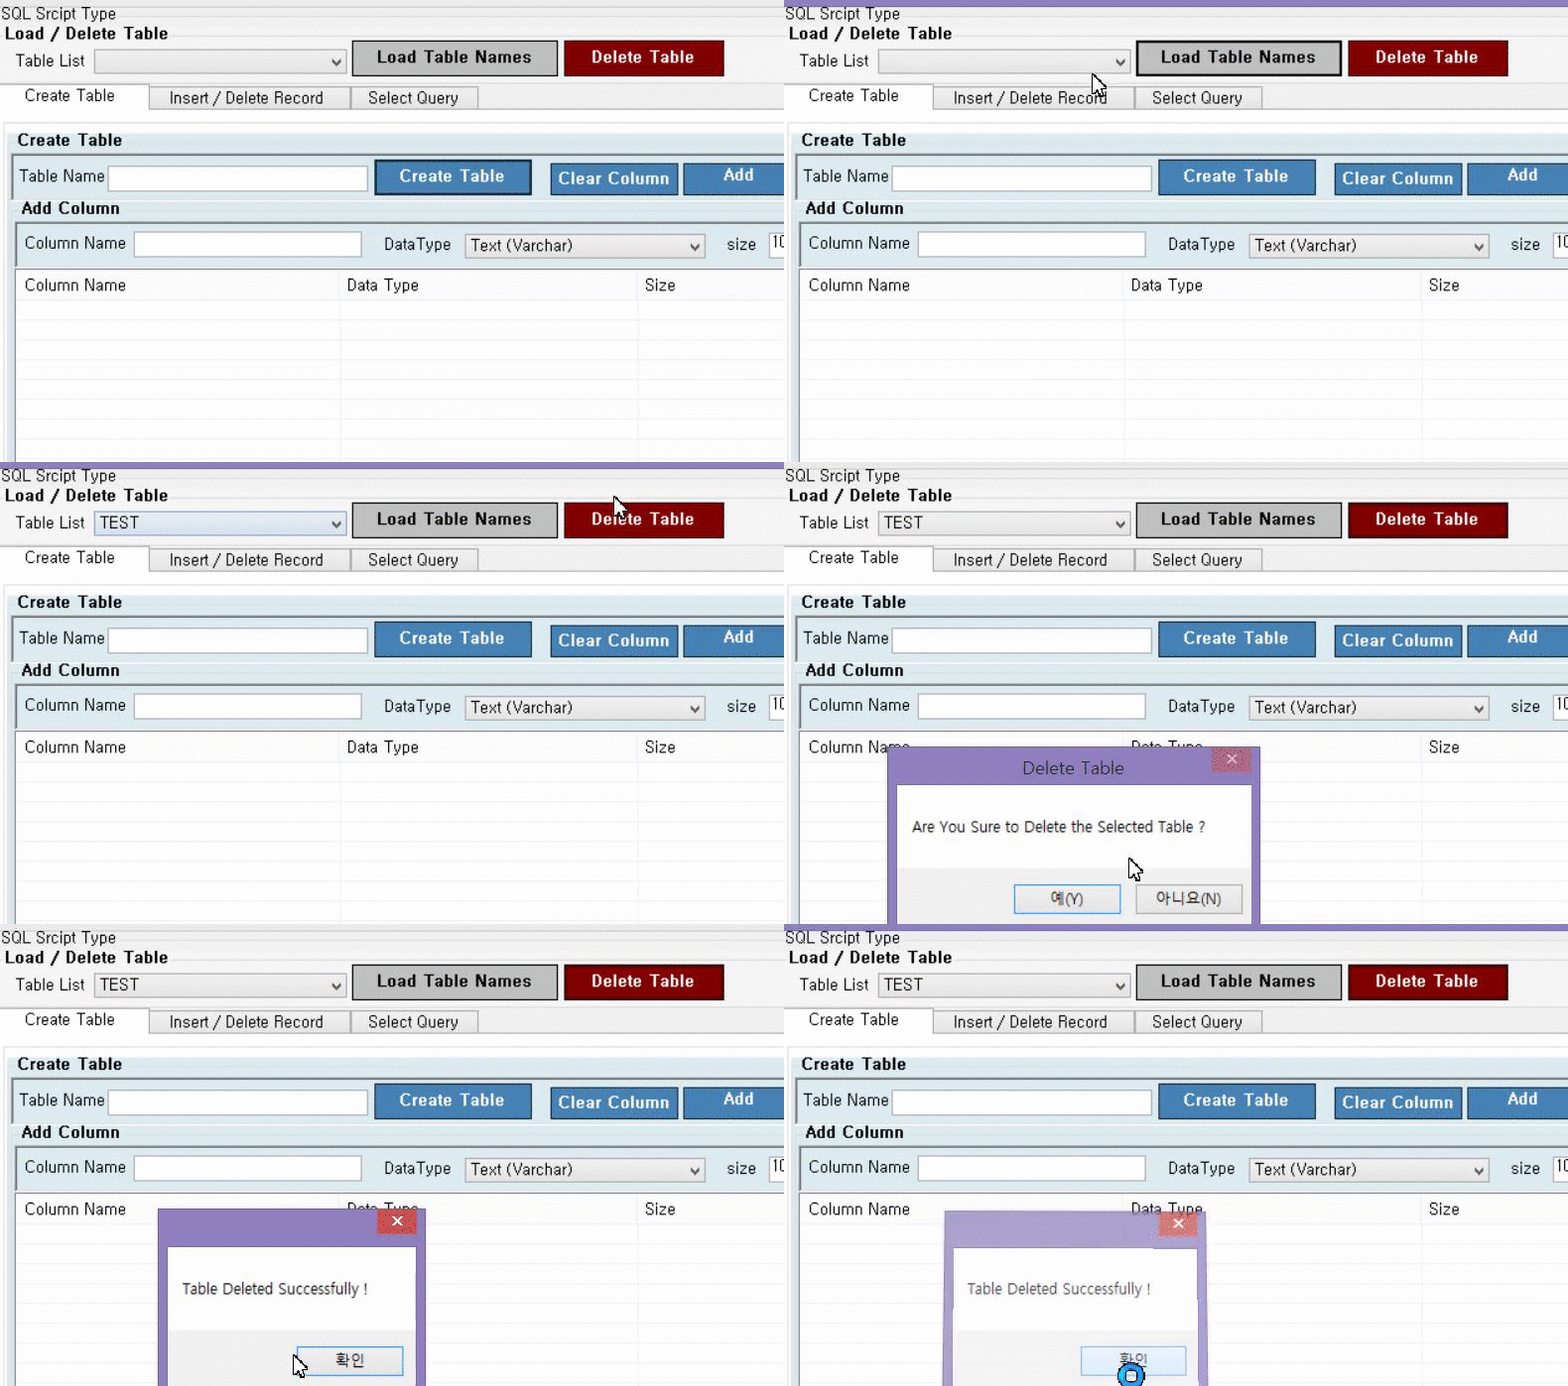
After you select a database and click the Load Table Names button, the names of all tables in this database will be displayed in a combined list.
Deleting a table The
selected table can be deleted from the server. Before deleting, a confirmation window will appear. To continue, click OK.
Step 3. SQL Script Tabs
Here we have 3 tabs: Create Table - to create a table, Insert and Delete Records - to add and delete records, and Select Query - to create queries for a selection.
Creating a table

In this tab, you can create tables without writing an SQL query. To do this, select the database in which the table will be created, enter its name in the text box and add columns. The last step is a must.
Adding Columns

The first step is to add columns to the new table. You can add any number of columns, delete the selected column or all at once (using the Clear Columns button). At this stage, any changes are recorded in the local temporary table and are not saved in the database. After adding columns, click the Create Table button to create a table with the specified parameters.
Data Types:
When adding columns, 3 data types are used:
1. Int (numeric data);
2. varchar (text data);
3. nVarchar (numeric and textual data).
For columns of type varchar and nVarchar, you can also display the size of the data (for the type integer this parameter is not used). In addition, you can set the maximum data size by selecting the Max Size check box.
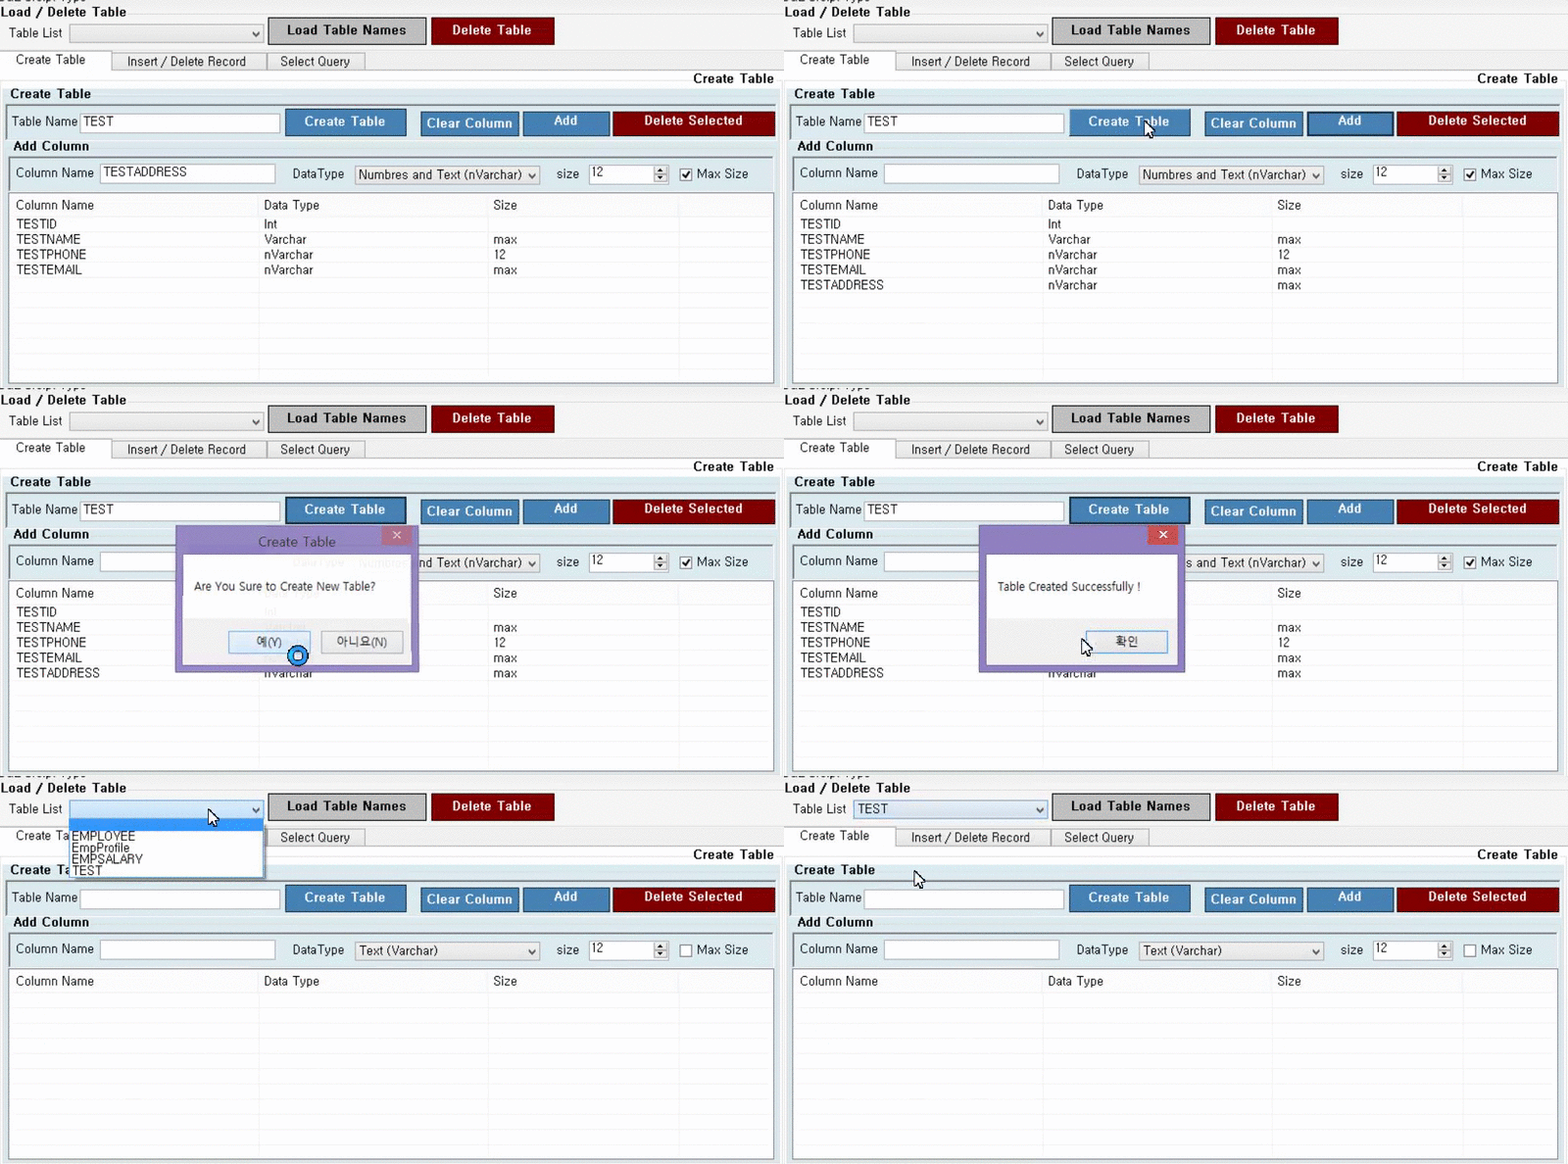
As an example, consider the following gif-animation. Here we have 4 columns to which we add the fifth. Moreover, for each of them, the type and size of data are displayed on the right. After adding the last column, we click the Create Table button. A confirmation message appears. Now our new table can be selected in the combined list Table List.
Adding and removing entries
To demonstrate the addition of entries, we will continue to use the test pattern created in the previous section.

To begin with, select the TEST table from the list. To add a record to the selected table, click the Load Table Details to insert button. So, we see the names of all columns with text fields that need to be filled in accordance with the type and maximum data size. Only integer data can be entered in integer column fields. If the data size for columns of the varchar and nVarchar type is specified as the maximum, the TextBox.MaxLength property must be set to 200, which means that the user can enter no more than 200 characters. If the data size has a certain value, we simply transfer it to the TextBox.MaxLength property.
Addendum:

After loading descriptions of all columns, you can enter their value. After you have entered the data in the text field, click the Insert into Selected Table button - and the record will be added to the table. If you want, you can add more functionality yourself using the code, for example, the function of checking duplicate values before sending, etc.
Delete all records:
All records can be deleted from the selected table. This tool does not support checking conditions before deleting, but you can add it yourself.
Creating a query to select
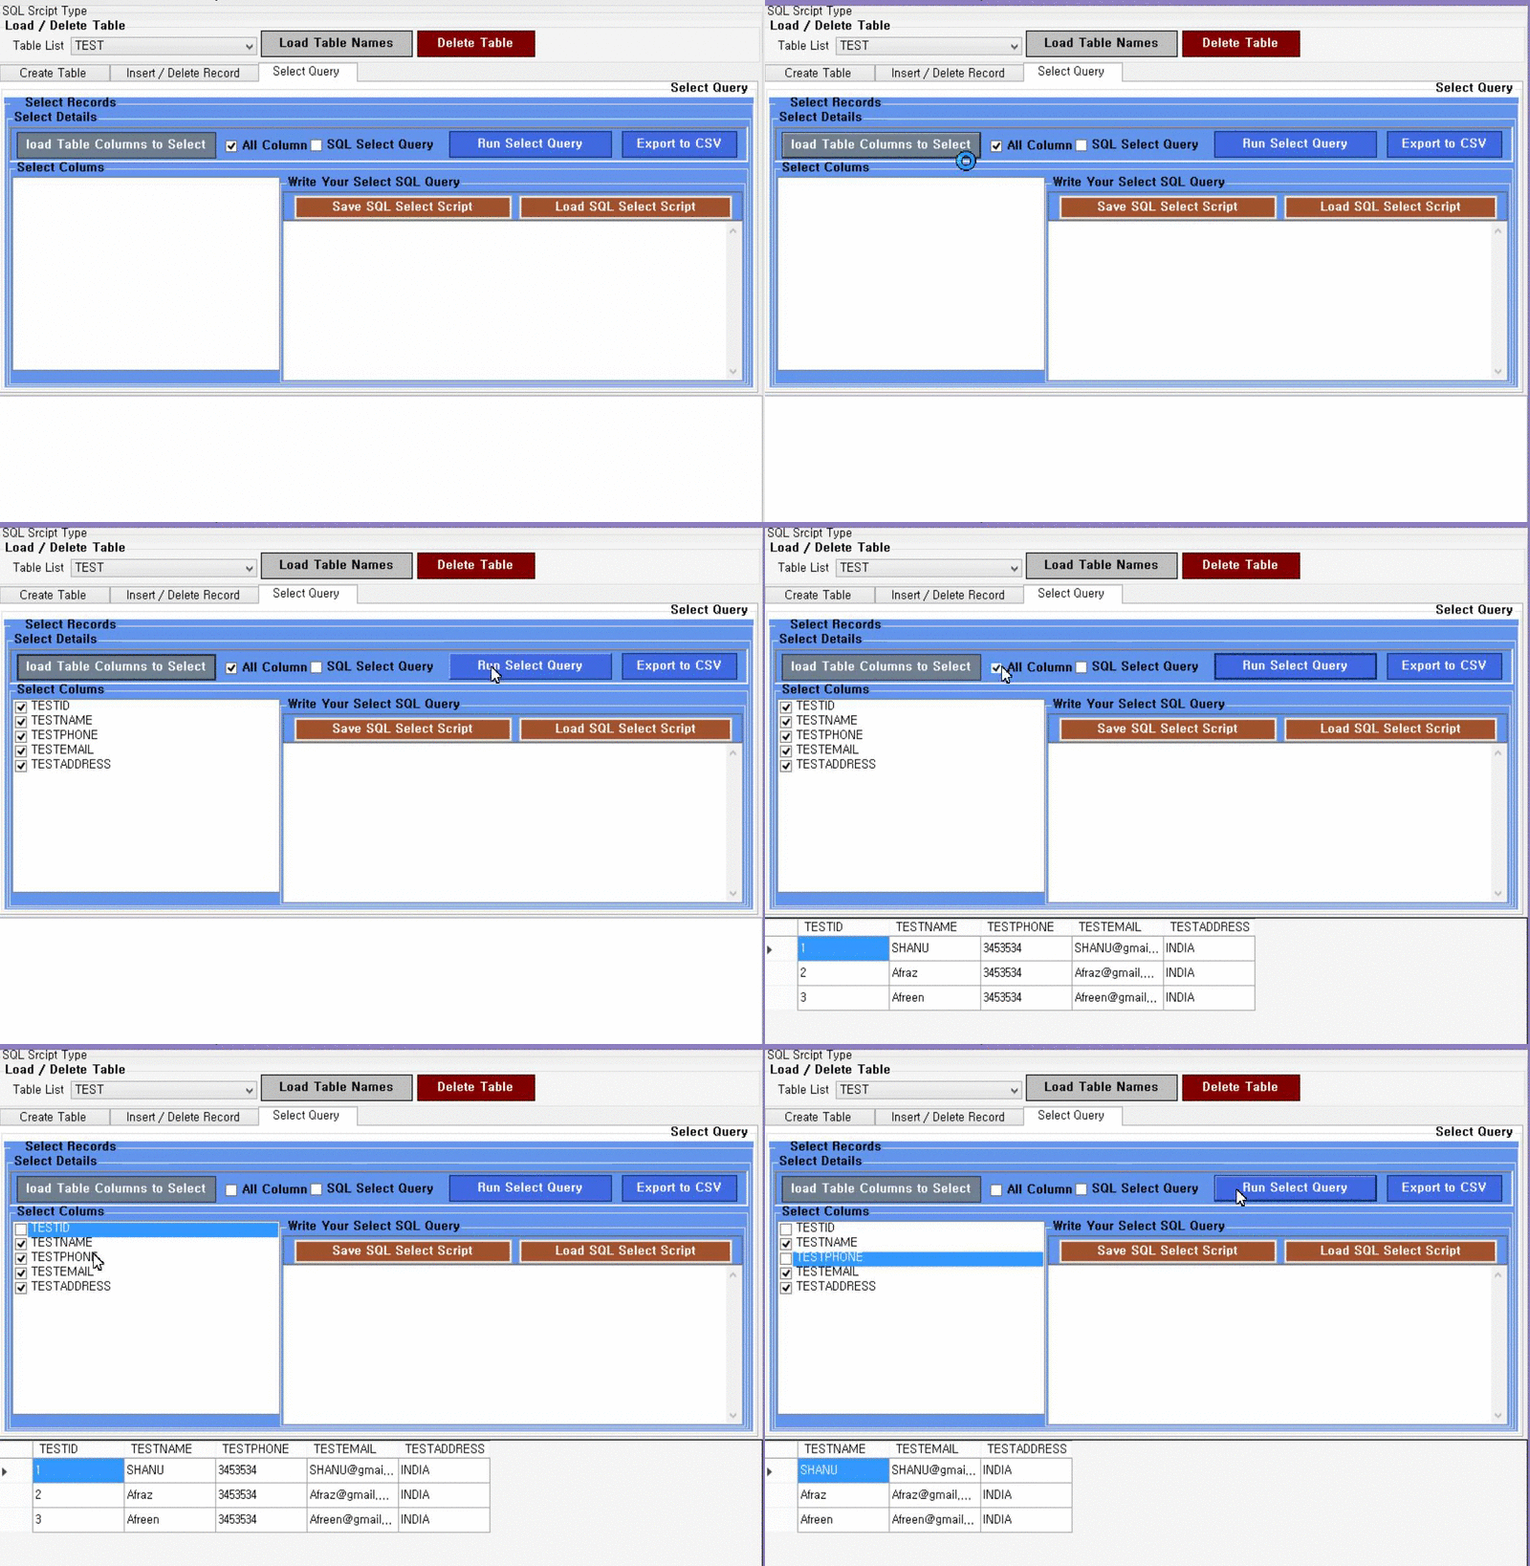
To select records from a database, you need to select the database itself, then a table from the list and create an SQL query.
There are three ways to refine the selection parameters:
1) All columns: if the All Columns check box is selected, all columns are displayed in the output window (note: it is set by default). Thus, by clicking the Run Select Query button, you will get records of all columns.
2) Highlighted columns: if you want to display records of certain columns, click the Load Table Columns to Select button. You will see a list of columns, and all of them are checked by default. Uncheck unnecessary columns and do not forget to uncheck All Columns. As a result, you will get records of selected columns only.
3) Creating a SQL query manually: you can also write an SQL query manually.

Suppose you want to join 3 tables using an SQL query. To do this, select the SQL Select Query check box, write the join query manually, and click the Run Select Query button to display the results.
Checking a user query for SQL injections:
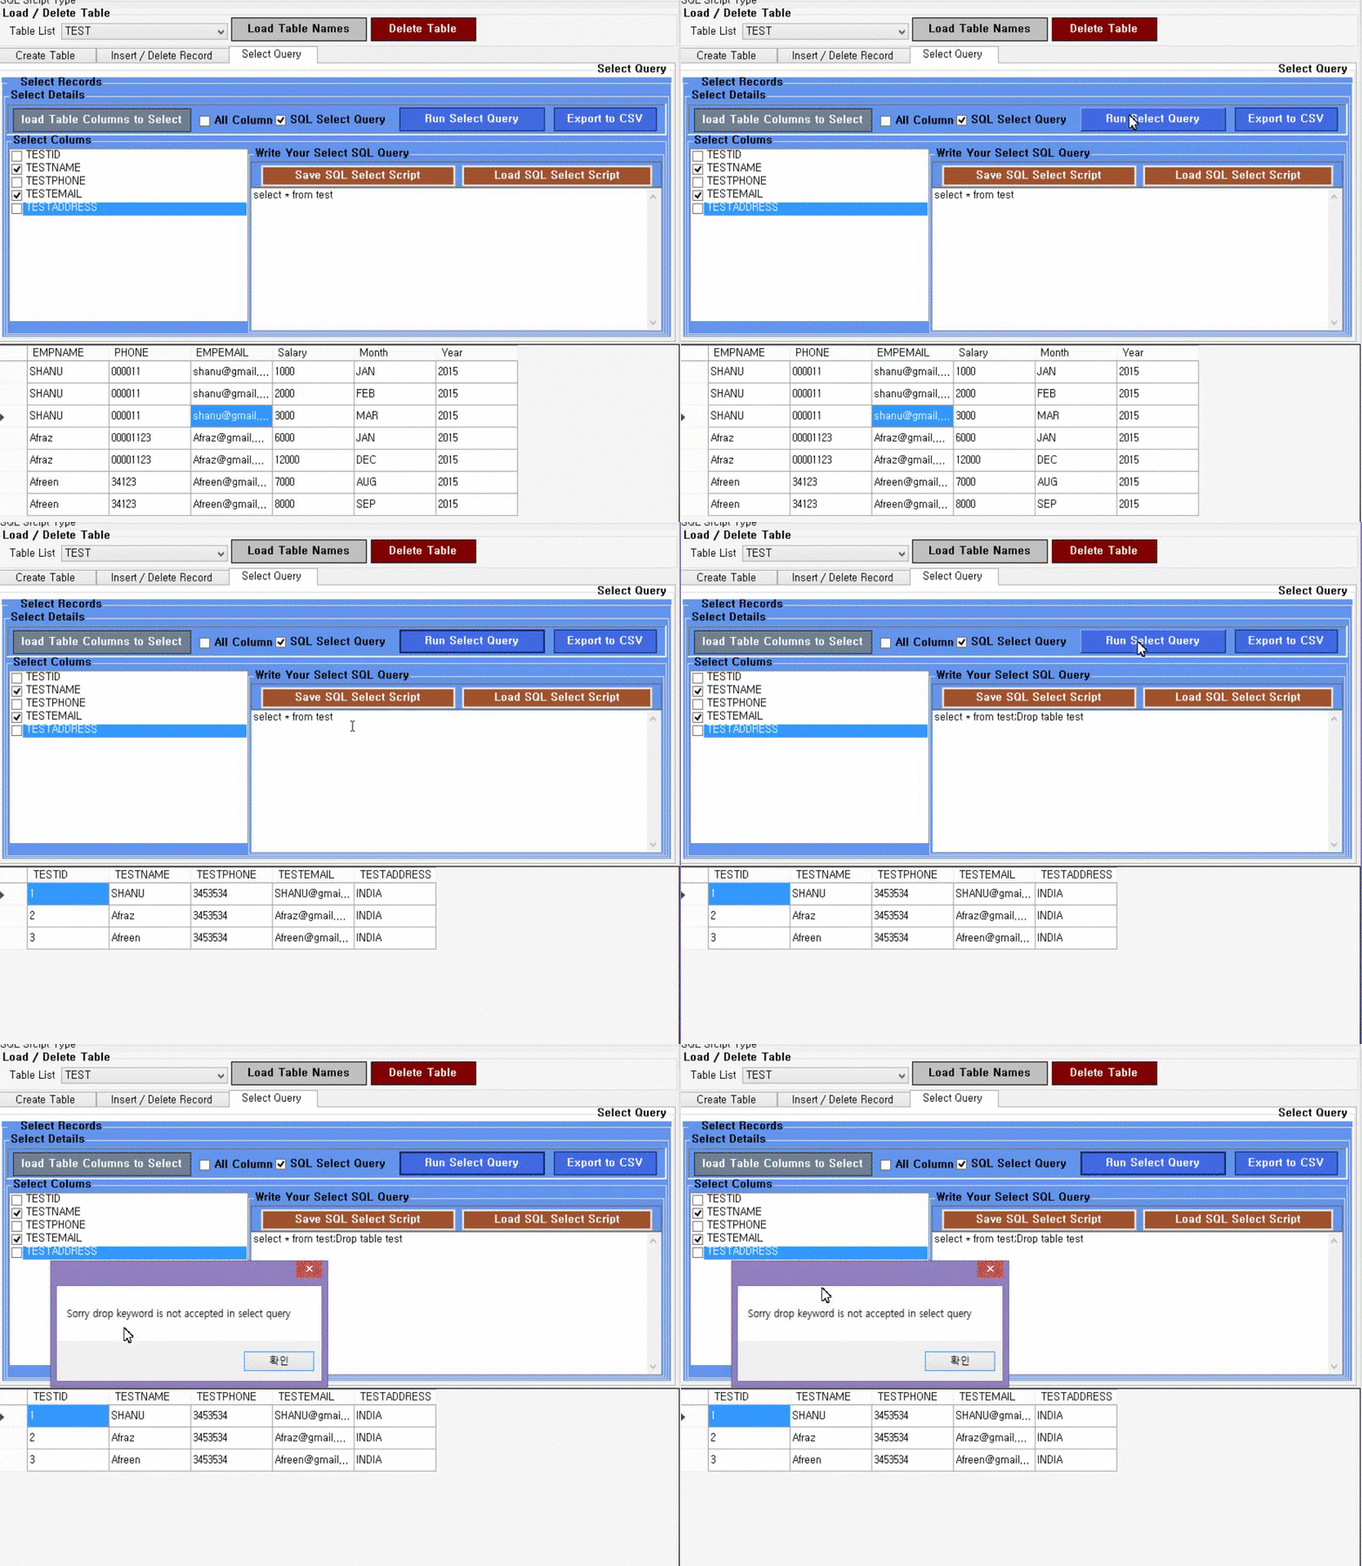
Before executing our query, let's check it for SQL injections. We created a list of arrays with all the strings in order to check that they match the keywords with the user request. As an example, we introduced the keyword drop. As you can see, after clicking the Run Select Query button, a message appears that this keyword is not supported.
Below is a list of keywords that I use to check for SQL injections. You can add or shorten this list as you wish.
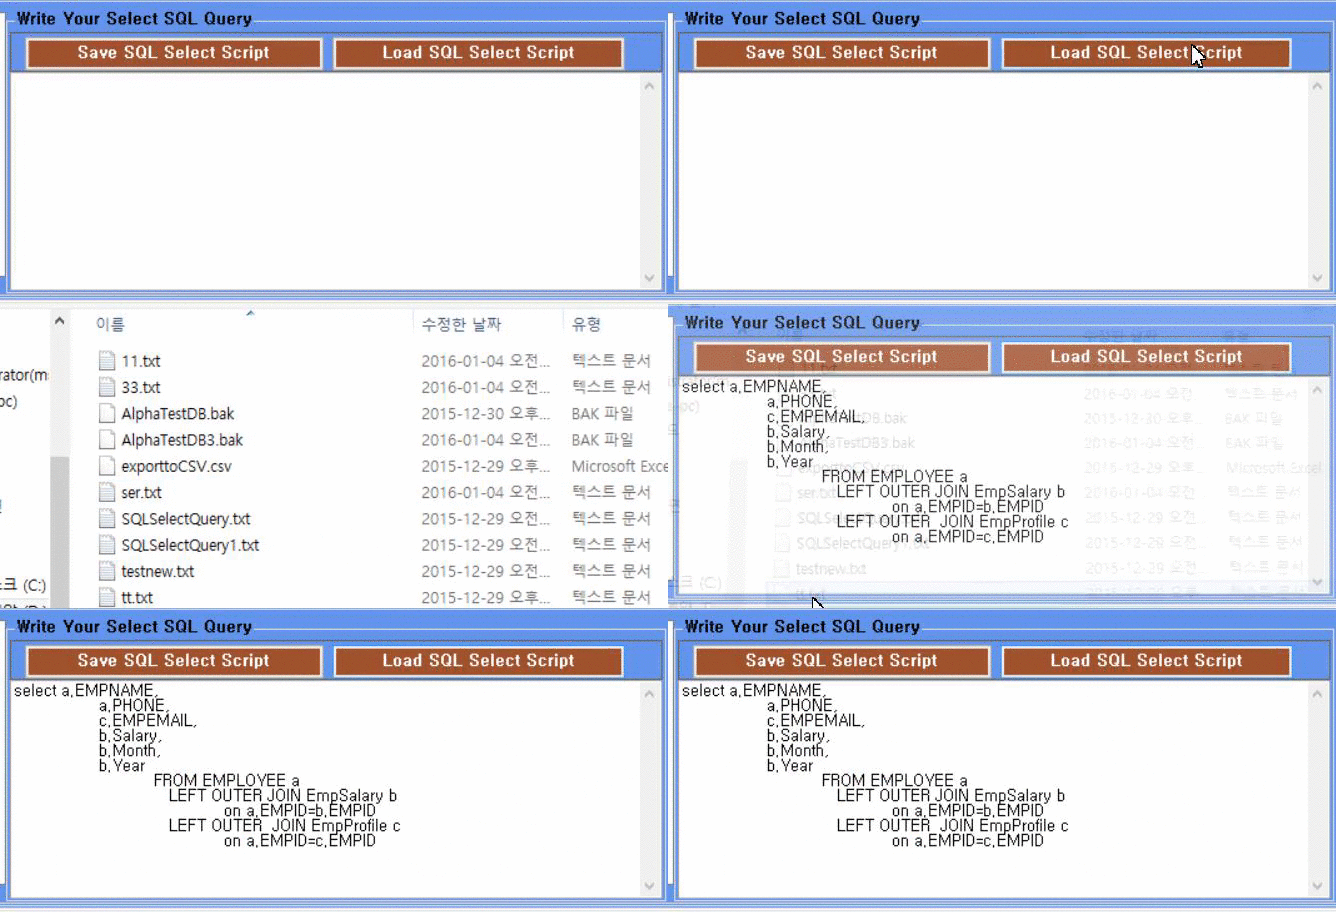
Saving the selection: you can also save the selection results for later use as a text file in the selected folder.

Opening a saved selection: open a saved selection to execute the script.
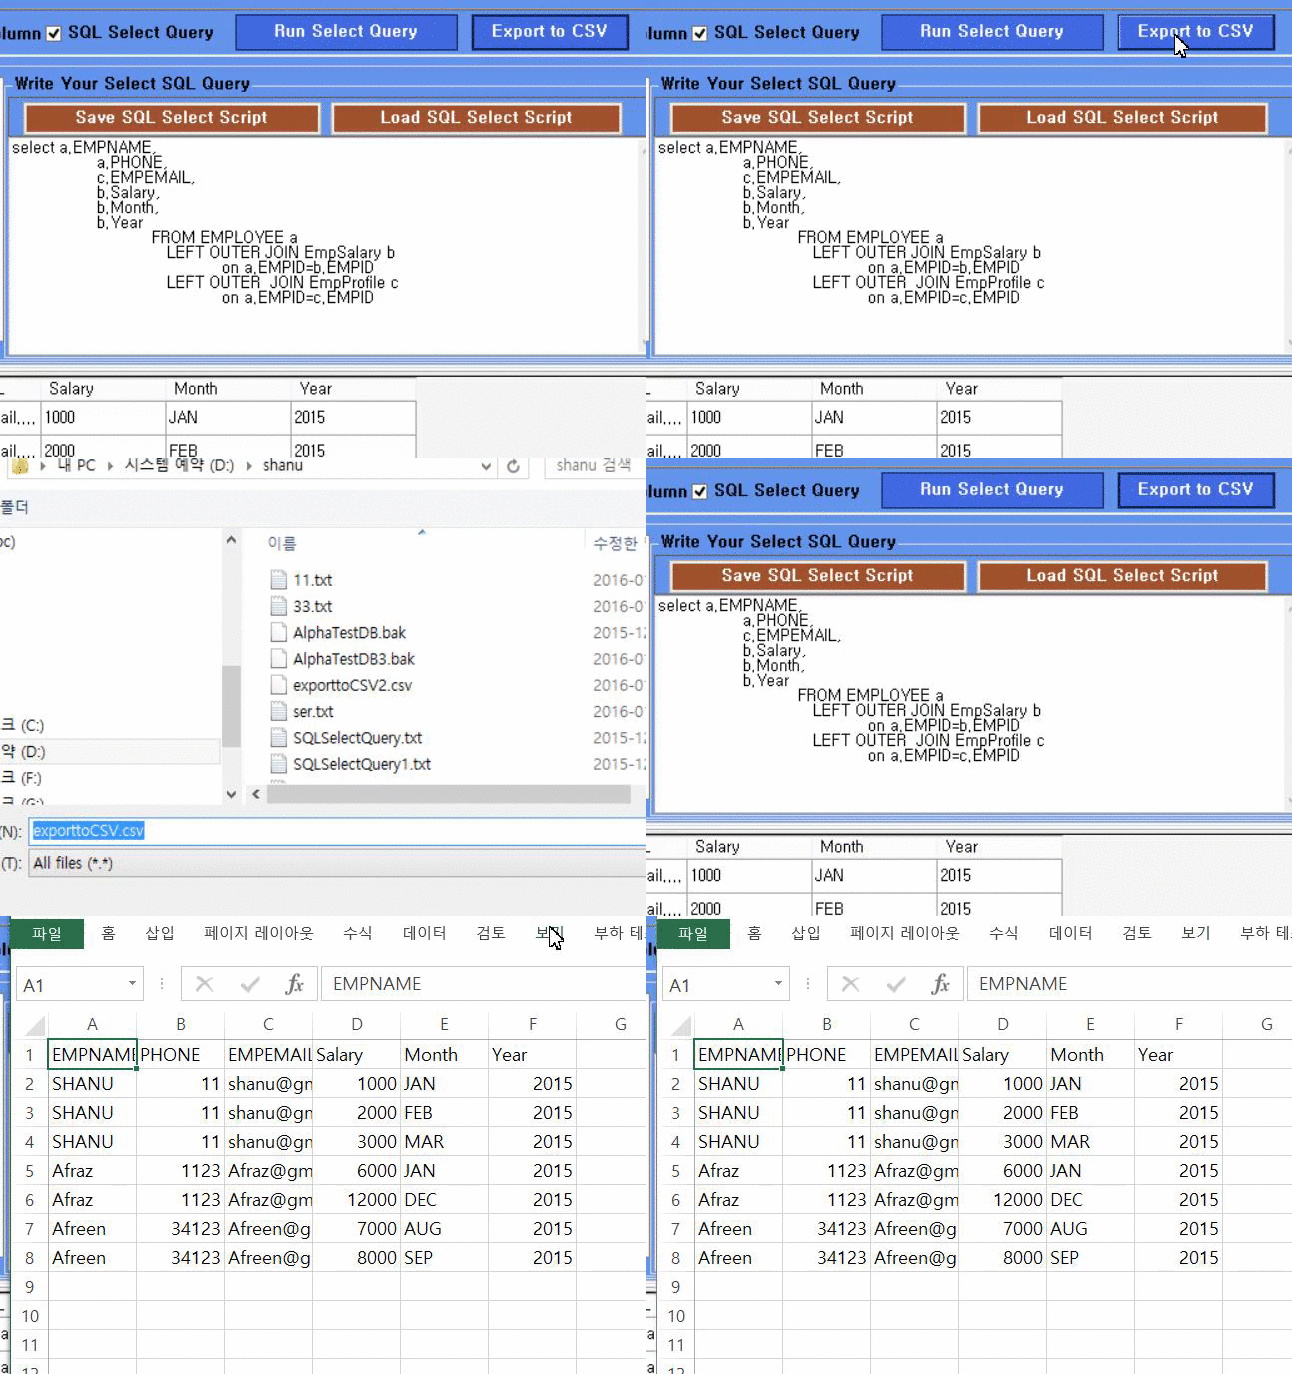
Export a selection to .csv format: The process of exporting a selection of results to a .csv format is shown below.
Prerequisites
Visual Studio 2015 (download link )
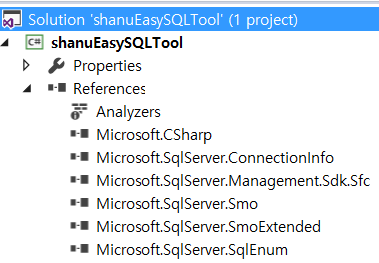
Links SQL Server SMO: to work with the managers of SQL Server objects must be added 4 important links:
• Microsoft.SqlServer.ConnectionInfo.dll;
• Microsoft.SqlServer.Smo.dll;
• Microsoft.SqlServer.Management.Sdk.Sfc.dll;
• Microsoft.SqlServer.SqlEnum.dll.
All these links can be found in the directory (SQL Server 2014):
C: \ Program Files \ Microsoft SQL Server \ 120 \ SDK \ Assemblies \
Before you begin, be sure to add them to the project:
Using the code
Our main goal was to create a simple SQL tool. All functions are added to the main form with several tabs. We made 2 classes:
1. smoSQLServerClass: this class includes the functions of connecting to and disconnecting from the SQL server, creating and deleting a database or its backup copy, adding exceptions to the log text file, creating tables, etc.
2. sqlBizClass: this class is responsible for implementing business logic, namely, creating dynamic queries, controls and pinning them to the panel, linking the names of all tables returned by the smoSQLServerClass class with a combo box, checking for SQL injections, etc. e.
Next, we will look at some of the main code fragments, providing them with detailed comments.
Connect to SQL Server
As noted above, to use control objects, it is important to add 4 references to assemblies. Connection to the SQL server is performed using the ServerConnection object. We set the server name ServerInstance, and also prescribe its identifier and password. After connecting, we check whether the connection to the server is open, and return the logical value of the main function to display the corresponding notification.
Logging exception messages to the log
All exception messages are logged with date and time.
Downloading the database name
When you click the Load Database Name button, the parameters of the combined list are passed to the Biz class method, which calls the SMO class and adds the names of all the databases to the list except the main one (so that the user does not accidentally delete it through the main form). Similarly, you can add additional restrictions on the display of databases in the main form.
The SMO class loads the names of all the databases on the selected server and returns them as a DatabaseCollection object to the calling class.
Creating a database
First, this function checks the availability of the name entered by the user for the database. If the name is free, a new database will be created on the server. If the name already exists, the user will receive a notification.
Creating a table
When you click Create, all data (the name of the selected database, the specified table name, and column parameters) are transferred as a DataTable to the SMO class. This also checks the availability of the name entered by the user. If the name is free, a new table will be created successfully. If the name already exists, the user will receive a notification.
Loading Column Parameters
When we click the Load Column Details button, we pass the control panel parameters to the Biz class to get all the column parameters of the selected table as a ColumnCollection object from the SMO class. Using the foreach operator, we load all the parameters and add a text field for user input. This also checks the type and size of the data in the columns. If the data type is integer, the text field is converted to a number field. If the data type is varchar or nVarchar, the maximum column length is assigned to the TextBox.MaxLength property.
The loadTableColumnDetails method of the SMO class returns all the column parameters of the selected table as a ColumnCollection object to the Biz class to create dynamic user input elements.
Adding records
When you click the Insert button, the data entered by the user, together with the database name and table name, is transferred to the Biz class, which creates a dynamic request for adding new records and passes the SqlCommand command to the insertQuerymethod method of the SMO class.
Creating a
Select Query When you click the Select button, only if the SQL Select Query checkbox is not selected, the column parameters are passed to the Biz class selectRecordsfromTableQuery method to create a dynamic query. If the user selects all columns, “select * from tablename” is used. If the user selects only a few columns, the selection is performed only on them and returns the result as a DataTable.
Conclusion
I hope this article has been helpful to you. Now you can connect to the SQL server, create databases and tables, fill them with data. This tool has some limitations, for example, it supports only 3 types of data. But now that you have the code in front of your eyes, you can expand its functionality yourself.
You can also watch the Easy SQL Tool Using C # tutorial on YouTube.
Introduction
The SQL Server Tool allows you to create and delete databases and tables, load all database names from a selected server, fill tables with data, display them in a grid, export data to .csv format - all without using SQL scripts.
To program databases, tables, and other components of SQL Server, we used SQL Server Management Objects (SMO), SQL Server management objects.
What are SQL Server Management Objects (SMOs)?
SQL Server management objects are a collection of objects for programming all aspects of SQL Server. SMOs allow you to connect to SQL Server, access database name sets, create or restore databases, their backups and tables, view their descriptions, etc.
For more information about SQL Server management objects, see:
• Overview (SMO)
• Create a Visual C # SMO Project in Visual Studio .NET
• Server Class
The main components of the Shanu Easy SQL Server Tool (SESST):
1. Connection to the SQL server;
2. Work with tables;
3. SQL Script tabs (Create Table tab / Insert and Delete Records tab / Select Query tab);
4. The output window.
Next, we will consider each of them in detail.
Step 1. Connecting to the SQL server
We can connect to any SQL server in our network. To do this, enter the server name or its IP address, login ID and password.
Creating a new database
After entering the name of the new database, it is checked for its availability. If the name already exists, you will receive a notification. If the name is free, a new database will be created on the server.
Download Database
Select an existing database name from the combo box.
Deleting a database The
selected database can be deleted from the server. Before deleting, a confirmation window will appear. To continue, click OK.
Creating a database
backup A backup of the selected database can be saved to any folder.
Database
recovery To restore the database, select the .bak file in the appropriate folder.
Step 2. Working with tables
Loading a table
After you select a database and click the Load Table Names button, the names of all tables in this database will be displayed in a combined list.
Deleting a table The
selected table can be deleted from the server. Before deleting, a confirmation window will appear. To continue, click OK.
Step 3. SQL Script Tabs
Here we have 3 tabs: Create Table - to create a table, Insert and Delete Records - to add and delete records, and Select Query - to create queries for a selection.
Creating a table
In this tab, you can create tables without writing an SQL query. To do this, select the database in which the table will be created, enter its name in the text box and add columns. The last step is a must.
Adding Columns
The first step is to add columns to the new table. You can add any number of columns, delete the selected column or all at once (using the Clear Columns button). At this stage, any changes are recorded in the local temporary table and are not saved in the database. After adding columns, click the Create Table button to create a table with the specified parameters.
Data Types:
When adding columns, 3 data types are used:
1. Int (numeric data);
2. varchar (text data);
3. nVarchar (numeric and textual data).
For columns of type varchar and nVarchar, you can also display the size of the data (for the type integer this parameter is not used). In addition, you can set the maximum data size by selecting the Max Size check box.
As an example, consider the following gif-animation. Here we have 4 columns to which we add the fifth. Moreover, for each of them, the type and size of data are displayed on the right. After adding the last column, we click the Create Table button. A confirmation message appears. Now our new table can be selected in the combined list Table List.
Adding and removing entries
To demonstrate the addition of entries, we will continue to use the test pattern created in the previous section.
To begin with, select the TEST table from the list. To add a record to the selected table, click the Load Table Details to insert button. So, we see the names of all columns with text fields that need to be filled in accordance with the type and maximum data size. Only integer data can be entered in integer column fields. If the data size for columns of the varchar and nVarchar type is specified as the maximum, the TextBox.MaxLength property must be set to 200, which means that the user can enter no more than 200 characters. If the data size has a certain value, we simply transfer it to the TextBox.MaxLength property.
Addendum:
After loading descriptions of all columns, you can enter their value. After you have entered the data in the text field, click the Insert into Selected Table button - and the record will be added to the table. If you want, you can add more functionality yourself using the code, for example, the function of checking duplicate values before sending, etc.
Delete all records:
All records can be deleted from the selected table. This tool does not support checking conditions before deleting, but you can add it yourself.
Creating a query to select
To select records from a database, you need to select the database itself, then a table from the list and create an SQL query.
There are three ways to refine the selection parameters:
1) All columns: if the All Columns check box is selected, all columns are displayed in the output window (note: it is set by default). Thus, by clicking the Run Select Query button, you will get records of all columns.
2) Highlighted columns: if you want to display records of certain columns, click the Load Table Columns to Select button. You will see a list of columns, and all of them are checked by default. Uncheck unnecessary columns and do not forget to uncheck All Columns. As a result, you will get records of selected columns only.
3) Creating a SQL query manually: you can also write an SQL query manually.
Suppose you want to join 3 tables using an SQL query. To do this, select the SQL Select Query check box, write the join query manually, and click the Run Select Query button to display the results.
Checking a user query for SQL injections:
Before executing our query, let's check it for SQL injections. We created a list of arrays with all the strings in order to check that they match the keywords with the user request. As an example, we introduced the keyword drop. As you can see, after clicking the Run Select Query button, a message appears that this keyword is not supported.
Below is a list of keywords that I use to check for SQL injections. You can add or shorten this list as you wish.
string[] sqlInjectionArray = { "create", "drop", "delete", "insert", "update", "truncate","grant ","print","sp_executesql ,"objects","declare","table","into",

"sqlcancel","sqlsetprop","sqlexec","sqlcommit","revoke","rollback","sqlrollback","values","sqldisconnect","sqlconnect","user","system_user","use","schema_name","schemata","information_schema","dbo","guest","db_owner","db_","table","@@","Users","execute","sysname","sp_who","sysobjects","sp_","sysprocesses ","master","sys","db_","is_","exec", "end", "xp_","; --", "/*", "*/", "alter", "begin", "cursor", "kill","--" ,"tabname","or","sys"};
Saving the selection: you can also save the selection results for later use as a text file in the selected folder.
Opening a saved selection: open a saved selection to execute the script.
Export a selection to .csv format: The process of exporting a selection of results to a .csv format is shown below.
Prerequisites
Visual Studio 2015 (download link )
Links SQL Server SMO: to work with the managers of SQL Server objects must be added 4 important links:
• Microsoft.SqlServer.ConnectionInfo.dll;
• Microsoft.SqlServer.Smo.dll;
• Microsoft.SqlServer.Management.Sdk.Sfc.dll;
• Microsoft.SqlServer.SqlEnum.dll.
All these links can be found in the directory (SQL Server 2014):
C: \ Program Files \ Microsoft SQL Server \ 120 \ SDK \ Assemblies \
Before you begin, be sure to add them to the project:
Using the code
Our main goal was to create a simple SQL tool. All functions are added to the main form with several tabs. We made 2 classes:
1. smoSQLServerClass: this class includes the functions of connecting to and disconnecting from the SQL server, creating and deleting a database or its backup copy, adding exceptions to the log text file, creating tables, etc.
2. sqlBizClass: this class is responsible for implementing business logic, namely, creating dynamic queries, controls and pinning them to the panel, linking the names of all tables returned by the smoSQLServerClass class with a combo box, checking for SQL injections, etc. e.
Next, we will look at some of the main code fragments, providing them with detailed comments.
Connect to SQL Server
As noted above, to use control objects, it is important to add 4 references to assemblies. Connection to the SQL server is performed using the ServerConnection object. We set the server name ServerInstance, and also prescribe its identifier and password. After connecting, we check whether the connection to the server is open, and return the logical value of the main function to display the corresponding notification.
publicboolSqlServerConnect()
        {
            try
            {
                servConn = new ServerConnection();
                servConn.ServerInstance = serverName;
                servConn.LoginSecure = false;
                servConn.Login = LoginID;
                servConn.Password = password;
                servConn.Connect();
                if(servConn.IsOpen)
                {
                    returntrue;
                }
                else
                {
                    returnfalse;
                }
            }
            catch (Exception ex)
            {
                writeLogMessage(ex.Message.ToString());
            }
            returnfalse;
        }
Logging exception messages to the log
All exception messages are logged with date and time.
publicvoidwriteLogMessage(String logMessage)
        {
            string path = Application.StartupPath + @"\LogFile.txt";
            logMessage = logMessage + " - on " + DateTime.Now.ToString();
            if (!File.Exists(path))
            {
                using (StreamWriter tw = File.CreateText(path))
                {
                    tw.WriteLine(logMessage);
                    tw.Close();
                }
            }
            else
            {
                StreamWriter tr = new StreamWriter(path);
                tr.WriteLine(logMessage);
                tr.Close();
            }
        }
Downloading the database name
When you click the Load Database Name button, the parameters of the combined list are passed to the Biz class method, which calls the SMO class and adds the names of all the databases to the list except the main one (so that the user does not accidentally delete it through the main form). Similarly, you can add additional restrictions on the display of databases in the main form.
publicvoidloaddbNames(ComboBox cbo)
        {
            //return objSQL.loaddbNames();
            DatabaseCollection dbnamesCol = objSQL.loaddbNames();
            cbo.Items.Clear();
            cbo.Items.Add("");
            if (dbnamesCol != null)
            {
                string dbnames = "";
                int ival = 0;
                foreach (Database db in dbnamesCol)
                {
                    if (db.Name != "master")
                    {
                        cbo.Items.Add(db.Name);
                    }                   }
                }
            cbo.SelectedIndex = 0;
        }
The SMO class loads the names of all the databases on the selected server and returns them as a DatabaseCollection object to the calling class.
public DatabaseCollection loaddbNames()
        {
            DatabaseCollection dbNames = null;
            try
            {
                if (SqlServerConnect())
            {
                Server srv = new Server(servConn);
                    dbNames = srv.Databases;
                    SqlServerDisconnect();
                }
            }
            catch (Exception ex)
            {
                writeLogMessage(ex.Message.ToString());
            }
            return dbNames;
        }
Creating a database
First, this function checks the availability of the name entered by the user for the database. If the name is free, a new database will be created on the server. If the name already exists, the user will receive a notification.
publicstringcreateourDatabase(string DatabaseName)
        {
            try
            {
                if (SqlServerConnect())
                {
                    Server srv = new Server(servConn);
                    Database database = srv.Databases[DatabaseName];
                    if (database == null)
                    {
                        database = new Database(srv, DatabaseName);
                        database.Create();
                        database.Refresh();
                        SqlServerDisconnect();
                        return"Database Created Successfully !";
                    }
                    else
                    {
                        SqlServerDisconnect();
                        return"Database Already Exist";
                    }
                }
                else
                {
                    return"Enter valid SQL Connection Details";
                }
            }
            catch (Exception ex)
            {
                writeLogMessage(ex.Message.ToString());
            }
            return"Sorry Error While creating DB";
        }
Creating a table
When you click Create, all data (the name of the selected database, the specified table name, and column parameters) are transferred as a DataTable to the SMO class. This also checks the availability of the name entered by the user. If the name is free, a new table will be created successfully. If the name already exists, the user will receive a notification.
publicstringcreateTable(string DatabaseName, string TableName,DataTable dtColumns)
        {
            try
            {
                if (SqlServerConnect())
                {
                    Server srv = new Server(servConn);
                    Database database = srv.Databases[DatabaseName];
                    if (database != null)
                    {
                        bool tableExists = database.Tables.Contains(TableName);
                        if (tableExists)
                        {
                            SqlServerDisconnect();
                            return"Table Already Exist.kindly Enter Different Table Name";
                        }
                        else
                        {
                            Table tbl = new Table(database, TableName);
                            foreach (DataRow dr in dtColumns.Rows)
                            {
                                string columnName = dr["ColumName"].ToString();
                                string DataType = dr["DataType"].ToString();
                                string dataSize = dr["Size"].ToString();
                                Microsoft.SqlServer.Management.Smo.Column columntoAdd =null;
                                switch (DataType)
                                {
                                    case"Varchar":
                                        if(dataSize=="max")
                                        {
                                            columntoAdd = new Column(tbl, columnName, Microsoft.SqlServer.Management.Smo.DataType.VarCharMax);
                                        }
                                        elseif (dataSize != "")
                                        {
                                            columntoAdd = new Column(tbl, columnName, Microsoft.SqlServer.Management.Smo.DataType.VarChar(Convert.ToInt32(dataSize)));
                                        }
                                        break;
                                    case"Int":
                                            columntoAdd = new Column(tbl, columnName, Microsoft.SqlServer.Management.Smo.DataType.Int);
                                        break;
                                    case"nVarchar":
                                        if (dataSize == "max")
                                        {
                                            columntoAdd = new Column(tbl, columnName, Microsoft.SqlServer.Management.Smo.DataType.NVarCharMax);
                                        }
                                        elseif (dataSize != "")
                                        {
                                            columntoAdd = new Column(tbl, columnName, Microsoft.SqlServer.Management.Smo.DataType.NVarChar(Convert.ToInt32(dataSize)));
                                        }
                                        break;
                                }
                                if(columntoAdd!=null)
                                {
                                tbl.Columns.Add(columntoAdd);
                                }
                            }
                            tbl.Create();
                            SqlServerDisconnect();
                            return"Table Created Successfully !";
                        }
                    }
                }
                else
                {
                    return"Enter valid SQL Connection Details";
                }
            }
            catch (Exception ex)
            {
                writeLogMessage(ex.Message.ToString());
            }
            return"Sorry Error While Creating Table";
        }
Loading Column Parameters
When we click the Load Column Details button, we pass the control panel parameters to the Biz class to get all the column parameters of the selected table as a ColumnCollection object from the SMO class. Using the foreach operator, we load all the parameters and add a text field for user input. This also checks the type and size of the data in the columns. If the data type is integer, the text field is converted to a number field. If the data type is varchar or nVarchar, the maximum column length is assigned to the TextBox.MaxLength property.
publicvoidloadTableColumnDetails(Panel pnControls, string DataBaseName,string TableName)
        {
            ColumnCollection tableColumnDetail = objSQL.loadTableColumnDetails(DataBaseName, TableName);
            pnControls.Controls.Clear();
            if (tableColumnDetail != null)
            {
                string dbnames = "";
                int lableHeight = 20;
                int textboxHeight = 20;
                int lablewidth = 100;
                int lableXVal = 10;
                int lableYVal = 10;
                foreach (Column colName in tableColumnDetail)
                {
                    string s = colName.Name;
                    Random rnd = new Random();
                    int randNumber = rnd.Next(1, 1000);
                    //to add Column name to display as caption
                    Label ctrl = new Label();
                    ctrl.Location = new Point(lableXVal , lableYVal+6);
                    ctrl.Size = new Size(lablewidth , lableHeight);
                    ctrl.Name = "lbl_" + randNumber; ;
                    ctrl.Font = new System.Drawing.Font("NativePrinterFontA", 7F, System.Drawing.FontStyle.Regular, System.Drawing.GraphicsUnit.Point, ((byte)(0)));
                    ctrl.Text = colName.Name;
                    pnControls.Controls.Add(ctrl);
                    //to add textbox for user enter insert text
                    TextBox ctrltxt = new TextBox();
                    ctrltxt.Location = new Point(lableXVal+110, lableYVal);
                    ctrltxt.Size = new Size(lablewidth+40, lableHeight);
                    ctrltxt.Name = "txt_" + randNumber;
                    ctrltxt.Font = new System.Drawing.Font("NativePrinterFontA", 8F, System.Drawing.FontStyle.Regular, System.Drawing.GraphicsUnit.Point, ((byte)(0)));
                    ctrltxt.Text = "";
                    if (colName.DataType.Name== "int")
                    {
                        ctrltxt.MaxLength = 20;
                        ctrltxt.KeyPress += new KeyPressEventHandler(textBox_KeyPress);
                    }
                    else
                    {
                        if(colName.DataType.MaximumLength.ToString()!="-1")
                        {
                            ctrltxt.MaxLength = Convert.ToInt32(colName.DataType.MaximumLength.ToString());
                        }
                        else
                        {
                            ctrltxt.MaxLength =100;
                        }
                    }
                    pnControls.Controls.Add(ctrltxt);
                    //to add Column datatype as hidden field
                    Label ctrllbl = new Label();
                    ctrllbl.Location = new Point(lableXVal + 112, lableYVal + 6);
                    ctrllbl.Size = new Size(1, 1);
                    ctrllbl.Name = "_lblDT_" + randNumber; ;
                    ctrllbl.Font = new System.Drawing.Font("NativePrinterFontA", 7F, System.Drawing.FontStyle.Regular, System.Drawing.GraphicsUnit.Point, ((byte)(0)));
                    ctrllbl.Text = colName.DataType.Name;
                    ctrllbl.Visible = false;
                    pnControls.Controls.Add(ctrllbl);
                    if (lableXVal + 360 < pnControls.Width-110)
                    {
                        lableXVal = lableXVal + 270;
                    }
                    else
                    {
                        lableXVal = 10;
                        lableYVal = lableYVal + 40;
                    }
                }
            }
        }
//for numeric textbox validation  privatevoidtextBox_KeyPress(object sender, KeyPressEventArgs e)
        {
            e.Handled = !char.IsDigit(e.KeyChar) && !char.IsControl(e.KeyChar);
        }
The loadTableColumnDetails method of the SMO class returns all the column parameters of the selected table as a ColumnCollection object to the Biz class to create dynamic user input elements.
public ColumnCollection loadTableColumnDetails(string DatabaseName,string TableName)
        {
            ColumnCollection columnDetails = null;
            try
            {
                if (SqlServerConnect())
                {
                    Server srv = new Server(servConn);
                    Database db = srv.Databases[DatabaseName];
                    bool tableExists = db.Tables.Contains(TableName);
                    if (tableExists)
                    {
                        foreach (Table table in db.Tables)
                        {
                            if (table.Name == TableName)
                            {
                                columnDetails = table.Columns;
                                break;
                            }
                        }
                    }
                    SqlServerDisconnect();
                }
            }
            catch (Exception ex)
            {
                writeLogMessage(ex.Message.ToString());
            }
            return columnDetails;
        }
Adding records
When you click the Insert button, the data entered by the user, together with the database name and table name, is transferred to the Biz class, which creates a dynamic request for adding new records and passes the SqlCommand command to the insertQuerymethod method of the SMO class.
publicstringsaveTableInsertQuery(Panel pnControls, string DataBaseName, string TableName)
        {
            string result = "";
            StringBuilder sqlQuery = new StringBuilder("INSERT INTO " + TableName );
            StringBuilder Insert = new StringBuilder(" (");
            StringBuilder values = new StringBuilder("VALUES (");
            SortedDictionary<string, string> sd = new SortedDictionary<string, string>();
            string columnName = "";
            string colvalue = "";
            string dataType = "";
            int iCount = 0;
            SqlCommand command = new SqlCommand();
            foreach (Control p in pnControls.Controls)
            {
                if (p.Name.ToString().Substring(0, 4) == "lbl_")
                {
                    columnName = p.Text;
                }
                elseif (p.Name.ToString().Substring(0, 4) == "txt_")
                {
                    colvalue = p.Text;
                }
                elseif (p.Name.ToString().Substring(0, 4) == "_lbl")
                {
                    Insert.Append(columnName);
                    Insert.Append(", ");
                    sd.Add(columnName, colvalue);
                    values.Append("@" + columnName);
                    values.Append(", ");
                    if (p.Text == "int")
                    {
                        command.Parameters.Add("@" + columnName, SqlDbType.Int).Value = colvalue;
                    }
                    elseif (p.Text == "varchar")
                    {
                        command.Parameters.Add("@" + columnName, SqlDbType.VarChar).Value = colvalue;
                    }
                    elseif (p.Text == "nvarchar")
                    {
                        command.Parameters.Add("@" + columnName, SqlDbType.NVarChar).Value = colvalue;
                    }
                }
            }
            string sqlresult = Insert.ToString().Remove(Insert.Length - 2) + ") ";
            sqlQuery.Append(sqlresult);
            string valueresult = values.ToString().Remove(values.Length - 2) + ") ";
            sqlQuery.Append(valueresult);
            sqlQuery.Append(";");
                command.CommandText = sqlQuery.ToString();
                command.CommandType = CommandType.Text;
            return objSQL.insertQuery(DataBaseName, sqlQuery.ToString(),  command);
        }
Creating a
Select Query When you click the Select button, only if the SQL Select Query checkbox is not selected, the column parameters are passed to the Biz class selectRecordsfromTableQuery method to create a dynamic query. If the user selects all columns, “select * from tablename” is used. If the user selects only a few columns, the selection is performed only on them and returns the result as a DataTable.
public DataTable selectRecordsfromTableQuery(bool isAllColumns, CheckedListBox chkListBoxCols, string DataBaseName, string TableName)
        {
            string result = "";
            StringBuilder sqlQuery = new StringBuilder("Select * FROM " + TableName);
            string sqlresult = sqlQuery.ToString();
            if (!isAllColumns)
            {
                sqlQuery = new StringBuilder("Select  " );
                foreach (object itemChecked in chkListBoxCols.CheckedItems)
                {
                    string colsName = itemChecked.ToString();
                    sqlQuery.Append(colsName+", ");
                }
                sqlresult = sqlQuery.ToString().Remove(sqlQuery.Length - 2) + " FROM " + TableName;
            }
            SqlCommand command = new SqlCommand();
            command.CommandText = sqlresult;
            command.CommandType = CommandType.Text;
            return objSQL.selectRecordsfromTableQuery(DataBaseName, command);
        }
Conclusion
I hope this article has been helpful to you. Now you can connect to the SQL server, create databases and tables, fill them with data. This tool has some limitations, for example, it supports only 3 types of data. But now that you have the code in front of your eyes, you can expand its functionality yourself.









