March 5, 2016 at 09:35
Chapter 21. Part 2 - Creating objects and outputting data with objects. PowerShell in depth - Don Jones, Richard Siddaway
Here are different ways to create PowerShell objects. Tips and tricks are given. The text is too big. For all learners poshik.
In addition to readability, the number of keystrokes, the requirements for maintaining the order of properties, all these methods essentially do the same. A few subtle differences: technique 1, a hash table. Usually the fastest, Technique 2 is slower, Technique 3 can be significantly slower.
In a good review learn-powershell.net/2010/09/19/custom-powershell-objects-and-performanceMeasured object creation speed performed by MVP Boe Prox. The speed of the three methods is compared, the Add-Member operation is 10 times slower. So this is a plus for Technique 1. We have not tested Technique 4 as Boe did, but our tests show that Technique 4 is 10% faster than Technique 1. Technique 5 should be used when typing properties matters.
Translation itself:
21.2 Syntax for creating custom objects
We often said that there are always several ways to do something in PowerShell, and this is true for custom objects. We will show you all the main ways, because you are likely to come across them in life, we want you to be able to recognize them and use them whenever you want.
Chapter 21.1 Technique number 1. Using hash tables to create custom objects.
Let's start the tricks that we usually use ourselves when we need to create our own object or combine information from different objects into one for further output. We call this path official, or recommended. We use it precisely because it makes it easy to write code, reads well, and ultimately allows us to do our job faster.
This method is shown in Listing 21.2 below.
by executing this code you will get a result similar to this:
Because at the output, you have an object that has more than four properties. PowerShell made a list display. Could you fulfill
to get the table. Please note, the fact is that you created one object by combining information from four objects. You did this by creating a hash table in which you registered the desired property names, the values for them are the property values of other objects. This is what you did in the hash table indicating:
If you put the hash table entries on one line, you will need to separate each property with a semicolon. If you put each property on a separate line, you do not need a semicolon, it is much easier for you to read and edit the code.
The brackets with the @ sign preceding them say that the hash table begins. Because the table is in the $ props variable ; it is easy to pass it in the -property parameters of the new object. A PSObject is specifically provided for this purpose.
The advantage of this approach is that it is easy to build a hash table on the fly and create many user objects from it. You may notice that in the output object the properties are not in the same order as they were defined in the table. One of the possible solutions is to create formatting for a custom object (a special XML file that describes how to display on the screen, in which order, etc.) or, if you use powershell 3 and higher, you can use the ordered property
Everything else is the same. Now the properties of the object will be displayed in the order they were written. If you pass $ obj to Get-Member , you will see that it is PS-CustomObject .
Note PowerShell does not by default track the order of items in a hash table. That is why when you see the final conclusion, its properties are not in the order in which you created them. Starting with PowerShell 3, you can fix this by using the [ordered] attribute . This creates an ordered dictionary (another name is a hash of tables) and maintains the order of elements in it.
21.2.2 Technique 2. Using Select-Object
This method was a favorite in PowerShell v1, and we still see people using it. We do not like it because it is much more difficult to read. The following listing shows the technique where we will create an empty object, and then write the values of these properties in
Listing 21.3. Creating an Object Using Select-Object
Note that $ obj = 1 was made in Listing 21.3 , essentially the value 1 will never be used.
TIP You will see many examples when an empty string is used as an initializer: $ obj = "" | ... the select . This is just a way to define $ obj as an object, drop something into the pipeline to go to Select-Object, which will do all the work.
There is a drawback to this approach. We pass $ obj to Get-Member and look at the result.
Properties are in place, but TypeName can lead to problems or even just confusion, it all depends on what you still intend to do with this object. We recommend avoiding this technique.
21.2.2 Technique 3. Using the Add-Member
This method is considered formal. We believe that he illustrates what is happening in life with formal approaches. It is the most computationally expensive, the slowest of all, so you will not often find people using it in real life. This is the most common PowerShell v1 approach . There are two variations, and first listing with code.
Listing 21.4. Creating an Object Using Add-Member
We created a PSObject and add one property to it at a time. You need to call the method every time you add NoteProperty which contains only a static value. To reduce the code, we used the Add-Member positional parameters. Using the full syntax, each Add-Member statement will look like this
you see that it turns out a lot of code.
A variation on this method is to use the -PassThru (abbreviated -Pass in Listing 21.5) parameter of the Add-Member command. This parameter will put the modified object back into the pipeline, so that you can pass it to the next command and so on.
Let us show an example in
Listing 21.4. Creating an object using Add-Member with the -PassThru parameter
You can come across this approach in life. In fact, from the point of view of exploitation, this is a vital technique, because it is much clearer what is happening. This approach does not follow syntactic labels and is easier to disassemble step by step.
21.2.4 Technique 4. Using a type declaration
This is one of the variations of Technique 1, works only in PowerShell v3 and v4, this method is more compact. You start with the same hash of the table.
You could continue to fill in the $ props variable, the trick of this technique is that the order of the properties in the object will be preserved as if we used the [ordered] Tip directive
. The type that we use is PSCustomObject. You should use this type because in .NET terms you use the PSObject constructor without parameters. Do not try to shorten the code by specifying PSObject instead of PSCustomObject, you will not get the desired result.
You may have noticed that previous methods add properties in a different order than you add them. In technique 1, for example, we did not add Computer_Name first, but it would be displayed first in the list. Do not worry, in the vast majority of cases, PowerShell works with properties in any order. Technique 4 preserves the order of properties, if you need to use it.
21.2.5 Technique 5. Creating a new class.
Not often used technique. It gives some advantages in processing on the conveyor. It can be appreciated as an advanced technique, not all skillers will want to delve into .NET. But the feature is available as an option.
Listing 21.7 Creating an object using the class
Listing 21.7 begins by creating a record containing the C # class description code. The class has a name, MyObj, and makes a number of class property descriptions. In this example, properties are specified as strings, but types can be mixed. Although we are not going to write property settings in the future, class definitions require writing GET and SET, otherwise PowerShell will throw an exception.
Add-Type is used to compile the class, after which we can use it instead of PSObject. To set the properties of an object, the technique presented here and in Listing 21.6 can be used:
let's test get-member
This one is more bulky, but also has its advantages. If you declare a property as a string and try to write a number there, an error message will be generated.
21.2.6 What are the differences ???
In addition to readability, the number of keystrokes, the requirements for maintaining the order of properties, all these methods essentially do the same.
A few subtle differences: technique 1, a hash table. Usually the fastest, especially when you work with several objects, technique 2 is a little slower, technique 3 can be much slower.
In a good review learn-powershell.net/2010/09/19/custom-powershell-objects-and-performanceMeasured object creation speed performed by MVP Boe Prox. The speed of the three methods is compared, the Add-Member operation is 10 times slower. So this is a plus for Technique 1. We have not tested Technique 4 as Boe did, but our tests show that Technique 4 is 10% faster than Technique 1. Technique 5 should be used when typing properties matters.
In addition to readability, the number of keystrokes, the requirements for maintaining the order of properties, all these methods essentially do the same. A few subtle differences: technique 1, a hash table. Usually the fastest, Technique 2 is slower, Technique 3 can be significantly slower.
In a good review learn-powershell.net/2010/09/19/custom-powershell-objects-and-performanceMeasured object creation speed performed by MVP Boe Prox. The speed of the three methods is compared, the Add-Member operation is 10 times slower. So this is a plus for Technique 1. We have not tested Technique 4 as Boe did, but our tests show that Technique 4 is 10% faster than Technique 1. Technique 5 should be used when typing properties matters.
Translation itself:
21.2 Syntax for creating custom objects
We often said that there are always several ways to do something in PowerShell, and this is true for custom objects. We will show you all the main ways, because you are likely to come across them in life, we want you to be able to recognize them and use them whenever you want.
Chapter 21.1 Technique number 1. Using hash tables to create custom objects.
Let's start the tricks that we usually use ourselves when we need to create our own object or combine information from different objects into one for further output. We call this path official, or recommended. We use it precisely because it makes it easy to write code, reads well, and ultimately allows us to do our job faster.
This method is shown in Listing 21.2 below.
# Собираем какието данные, в последующем нам нужно это скомпоновать и вывести
$os = Get-WmiObject –Class Win32_OperatingSystem –comp localhost
$cs = Get-WmiObject –Class Win32_ComputerSystem –comp localhost
$bios = Get-WmiObject –Class Win32_BIOS –comp localhost
$proc = Get-WmiObject –Class Win32_Processor –comp localhost | Select –First 1
# Хэш таблица. Описывает свойства будущего объекта
$props = @{OSVersion=$os.version
Model=$cs.model
Manufacturer=$cs.manufacturer
BIOSSerial=$bios.serialnumber
ComputerName=$os.CSName
OSArchitecture=$os.osarchitecture
ProcArchitecture=$proc.addresswidth}
# Создаем объект из хэш таблицы и выводим
$obj = New-Object –TypeName PSObject –Property $props
Write-Output $obj
by executing this code you will get a result similar to this:
Manufacturer : Microsoft Corporation
OSVersion : 6.3.9600
OSArchitecture : 64-bit
BIOSSerial : 036685734653
ComputerName : RSSURFACEPRO2
Model : Surface Pro 2
ProcArchitecture : 64
Because at the output, you have an object that has more than four properties. PowerShell made a list display. Could you fulfill
Write-Output $obj | ft
to get the table. Please note, the fact is that you created one object by combining information from four objects. You did this by creating a hash table in which you registered the desired property names, the values for them are the property values of other objects. This is what you did in the hash table indicating:
Manufacturer=$cs.manufacturer
If you put the hash table entries on one line, you will need to separate each property with a semicolon. If you put each property on a separate line, you do not need a semicolon, it is much easier for you to read and edit the code.
The brackets with the @ sign preceding them say that the hash table begins. Because the table is in the $ props variable ; it is easy to pass it in the -property parameters of the new object. A PSObject is specifically provided for this purpose.
The advantage of this approach is that it is easy to build a hash table on the fly and create many user objects from it. You may notice that in the output object the properties are not in the same order as they were defined in the table. One of the possible solutions is to create formatting for a custom object (a special XML file that describes how to display on the screen, in which order, etc.) or, if you use powershell 3 and higher, you can use the ordered property
$props = [ordered]@{ OSVersion=$os.version
Model=$cs.model
Manufacturer=$cs.manufacturer
BIOSSerial=$bios.serialnumber
ComputerName=$os.CSName
OSArchitecture=$os.osarchitecture
ProcArchitecture=$proc.addresswidth}
Everything else is the same. Now the properties of the object will be displayed in the order they were written. If you pass $ obj to Get-Member , you will see that it is PS-CustomObject .
Note PowerShell does not by default track the order of items in a hash table. That is why when you see the final conclusion, its properties are not in the order in which you created them. Starting with PowerShell 3, you can fix this by using the [ordered] attribute . This creates an ordered dictionary (another name is a hash of tables) and maintains the order of elements in it.
21.2.2 Technique 2. Using Select-Object
This method was a favorite in PowerShell v1, and we still see people using it. We do not like it because it is much more difficult to read. The following listing shows the technique where we will create an empty object, and then write the values of these properties in
Listing 21.3. Creating an Object Using Select-Object
# Наши четыре неизменные четыре команды
$os = Get-WmiObject –Class Win32_OperatingSystem –comp localhost
$cs = Get-WmiObject –Class Win32_ComputerSystem –comp localhost
$bios = Get-WmiObject –Class Win32_BIOS –comp localhost
$proc = Get-WmiObject –Class Win32_Processor –comp localhost | Select –First 1
# создание объекта через Select-Object
$obj = 1 | Select-Object ComputerName,OSVersion,OSArchitecture, ProcArchitecture,Model,Manufacturer,BIOSSerial
# заполняем поля
$obj.ComputerName = $os.CSName
$obj.OSVersion = $os.version
$obj.OSArchitecture = $os.osarchitecture
$obj.ProcArchitecture = $proc.addresswidth
$obj.BIOSSerial = $bios.serialnumber
$obj.Model = $cs.model
$obj.Manufacturer = $cs.manufacturer
Write-Output $obj
Note that $ obj = 1 was made in Listing 21.3 , essentially the value 1 will never be used.
TIP You will see many examples when an empty string is used as an initializer: $ obj = "" | ... the select . This is just a way to define $ obj as an object, drop something into the pipeline to go to Select-Object, which will do all the work.
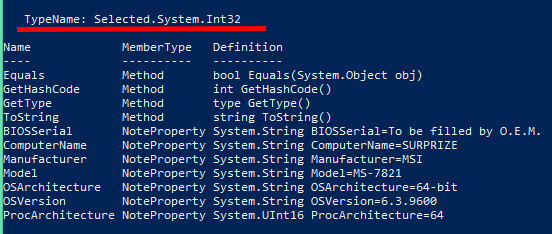
There is a drawback to this approach. We pass $ obj to Get-Member and look at the result.
PS C:\> $obj | Get-Member
TypeName: Selected.System.Int32
Name MemberType Definition
---- ---------- ----------
Equals Method bool Equals(System.Object obj)
GetHashCode Method int GetHashCode()
GetType Method type GetType()
ToString Method string ToString()
BIOSSerial NoteProperty System.String BIOSSerial=
ComputerName NoteProperty System.String ComputerName= WIN-KNBA0R0TM23
Manufacturer NoteProperty System.String Manufacturer= VMware, Inc.
Model NoteProperty System.String Model= VMware Virtual Platform
OSArchitecture NoteProperty System.String OSArchitecture= 64-bit
OSVersion NoteProperty System.String OSVersion= 6.1.7601
ProcArchitecture NoteProperty System.UInt16 ProcArchitecture=64
Properties are in place, but TypeName can lead to problems or even just confusion, it all depends on what you still intend to do with this object. We recommend avoiding this technique.
an insert from a translator
Here is what this means:
we give the Get-Member an example from Listing 21.2 - where we created the hash with the table;
now we feed the GM example from Listing 21.3 - the creation through Select-Object

21.2.2 Technique 3. Using the Add-Member
This method is considered formal. We believe that he illustrates what is happening in life with formal approaches. It is the most computationally expensive, the slowest of all, so you will not often find people using it in real life. This is the most common PowerShell v1 approach . There are two variations, and first listing with code.
Listing 21.4. Creating an Object Using Add-Member
# Наши четыре неизменные четыре команды
$os = Get-WmiObject –Class Win32_OperatingSystem –comp localhost
$cs = Get-WmiObject –Class Win32_ComputerSystem –comp localhost
$bios = Get-WmiObject –Class Win32_BIOS –comp localhost
$proc = Get-WmiObject –Class Win32_Processor –comp localhost | Select –First 1
# создаем объект указав его тип
$obj = New-Object –TypeName PSObject
# добавляем поля указав тип и значение
$obj | Add-Member NoteProperty ComputerName $os.CSName
$obj | Add-Member NoteProperty OSVersion $os.version
$obj | Add-Member NoteProperty OSArchitecture $os.osarchitecture
$obj | Add-Member NoteProperty ProcArchitecture $proc.addresswidth
$obj | Add-Member NoteProperty BIOSSerial $bios.serialnumber
$obj | Add-Member NoteProperty Model $cs.model
$obj | Add-Member NoteProperty Manufacturer $cs.manufacturer
Write-Output $obj
We created a PSObject and add one property to it at a time. You need to call the method every time you add NoteProperty which contains only a static value. To reduce the code, we used the Add-Member positional parameters. Using the full syntax, each Add-Member statement will look like this
Add-Member -MemberType NoteProperty -Name ComputerName -Value $os.CSName
you see that it turns out a lot of code.
A variation on this method is to use the -PassThru (abbreviated -Pass in Listing 21.5) parameter of the Add-Member command. This parameter will put the modified object back into the pipeline, so that you can pass it to the next command and so on.
Let us show an example in
Listing 21.4. Creating an object using Add-Member with the -PassThru parameter
# Наши четыре неизменные четыре команды
$os = Get-WmiObject –Class Win32_OperatingSystem –comp localhost
$cs = Get-WmiObject –Class Win32_ComputerSystem –comp localhost
$bios = Get-WmiObject –Class Win32_BIOS –comp localhost
$proc = Get-WmiObject –Class Win32_Processor –comp localhost | Select –First 1
# создаем объект указав его тип
$obj = New-Object –TypeName PSObject
# создаем свойства
$obj | Add-Member NoteProperty ComputerName $os.CSName –pass |
Add-Member NoteProperty OSVersion $os.version –pass |
Add-Member NoteProperty OSArchitecture $os.osarchitecture –Pass |
Add-Member NoteProperty ProcArchitecture $proc.addresswidth –pass |
Add-Member NoteProperty BIOSSerial $bios.serialnumber –pass |
Add-Member NoteProperty Model $cs.model –pass |
Add-Member NoteProperty Manufacturer $cs.manufacturer
Write-Output $obj
You can come across this approach in life. In fact, from the point of view of exploitation, this is a vital technique, because it is much clearer what is happening. This approach does not follow syntactic labels and is easier to disassemble step by step.
translator insert
means debugging is easier
21.2.4 Technique 4. Using a type declaration
This is one of the variations of Technique 1, works only in PowerShell v3 and v4, this method is more compact. You start with the same hash of the table.
# Наши четыре неизменные четыре команды
$os = Get-WmiObject –Class Win32_OperatingSystem –comp localhost
$cs = Get-WmiObject –Class Win32_ComputerSystem –comp localhost
$bios = Get-WmiObject –Class Win32_BIOS –comp localhost
$proc = Get-WmiObject –Class Win32_Processor –comp localhost | Select –First 1
$obj = [pscustomobject]@{
                         OSVersion=$os.version
                         Model=$cs.model
                         Manufacturer=$cs.manufacturer
                         BIOSSerial=$bios.serialnumber
                         ComputerName=$os.CSName
                         OSArchitecture=$os.osarchitecture
                         ProcArchitecture=$proc.addresswidth
                         }
Write-Output $obj
You could continue to fill in the $ props variable, the trick of this technique is that the order of the properties in the object will be preserved as if we used the [ordered] Tip directive
. The type that we use is PSCustomObject. You should use this type because in .NET terms you use the PSObject constructor without parameters. Do not try to shorten the code by specifying PSObject instead of PSCustomObject, you will not get the desired result.
You may have noticed that previous methods add properties in a different order than you add them. In technique 1, for example, we did not add Computer_Name first, but it would be displayed first in the list. Do not worry, in the vast majority of cases, PowerShell works with properties in any order. Technique 4 preserves the order of properties, if you need to use it.
21.2.5 Technique 5. Creating a new class.
Not often used technique. It gives some advantages in processing on the conveyor. It can be appreciated as an advanced technique, not all skillers will want to delve into .NET. But the feature is available as an option.
Listing 21.7 Creating an object using the class
$source=@"
public class MyObject
{
public string ComputerName {get; set;}
public string Model {get; set;}
public string Manufacturer {get; set;}
public string BIOSSerial {get; set;}
public string OSArchitecture {get; set;}
public string OSVersion {get; set;}
public string ProcArchitecture {get; set;}
}
"@
Add-Type -TypeDefinition $source -Language CSharpversion3
# наши четыре команды
$os = Get-WmiObject –Class Win32_OperatingSystem –comp localhost
$cs = Get-WmiObject –Class Win32_ComputerSystem –comp localhost
$bios = Get-WmiObject –Class Win32_BIOS –comp localhost
$proc = Get-WmiObject –Class Win32_Processor –comp localhost | Select –First 1
$props = @{OSVersion=$os.version
Model=$cs.model
Manufacturer=$cs.manufacturer
BIOSSerial=$bios.serialnumber
ComputerName=$os.CSName
OSArchitecture=$os.osarchitecture
ProcArchitecture=$proc.addresswidth}
$obj = New-Object –TypeName MyObject –Property $props
Write-Output $obj
Listing 21.7 begins by creating a record containing the C # class description code. The class has a name, MyObj, and makes a number of class property descriptions. In this example, properties are specified as strings, but types can be mixed. Although we are not going to write property settings in the future, class definitions require writing GET and SET, otherwise PowerShell will throw an exception.
Add-Type is used to compile the class, after which we can use it instead of PSObject. To set the properties of an object, the technique presented here and in Listing 21.6 can be used:
$obj = [MyObject]@{OSVersion=$os.version
                                   Model=$cs.model
                                   Manufacturer=$cs.manufacturer
                                   BIOSSerial=$bios.serialnumber
                                   ComputerName=$os.CSName
                                   OSArchitecture=$os.osarchitecture
                                   ProcArchitecture=$proc.addresswidth
                                   }
let's test get-member
PS C:\> $obj | get-member
TypeName: MyObject
Name MemberType Definition
---- ---------- ----------
Equals Method bool Equals(System.Object obj)
GetHashCode Method int GetHashCode()
GetType Method type GetType()
ToString Method string ToString()
BIOSSerial Property string BIOSSerial {get;set;}
ComputerName Property string ComputerName {get;set;}
Manufacturer Property string Manufacturer {get;set;}
Model Property string Model {get;set;}
OSArchitecture Property string OSArchitecture {get;set;}
OSVersion Property string OSVersion {get;set;}
ProcArchitecture Property string ProcArchitecture {get;set;}
This one is more bulky, but also has its advantages. If you declare a property as a string and try to write a number there, an error message will be generated.
21.2.6 What are the differences ???
In addition to readability, the number of keystrokes, the requirements for maintaining the order of properties, all these methods essentially do the same.
A few subtle differences: technique 1, a hash table. Usually the fastest, especially when you work with several objects, technique 2 is a little slower, technique 3 can be much slower.
In a good review learn-powershell.net/2010/09/19/custom-powershell-objects-and-performanceMeasured object creation speed performed by MVP Boe Prox. The speed of the three methods is compared, the Add-Member operation is 10 times slower. So this is a plus for Technique 1. We have not tested Technique 4 as Boe did, but our tests show that Technique 4 is 10% faster than Technique 1. Technique 5 should be used when typing properties matters.