January 22, 2016 at 18:45
Using SikuliX in the background on Cloud9
- Tutorial
SikuliX (formerly Sikuli) is a tool that allows you to automate what you see on the screen using visual recognition (pictures). The hub already has enough information on it , but all examples involve the use of a real screen.
Here I will describe my experience using SikuliX in the background on the Cloud IDE Cloud9 . In the process of working with this tool, I got a few cones, so maybe my experience will be useful to someone.
There are many options for using SikuliX, here are some of the actions you can automate:
In my case, it was necessary to automate the routine work with the flash site, log in, select a specific item in the drop-down list and click a few buttons. It took about 1-3 minutes several times a day. After using SikuliX, this can be done through a simple script run, and spend free time on more useful things (for example, learn English).
SikuliX depends on tools such as OpenCV (computer vision) and Tesseract (text recognition). Therefore, we will install them. Let's start with OpenCV.
Installing OpenCV was not very simple, so I used this script to install and build everything you need. Clone it, give execution rights and run.
I must say that the installation of OpenCV “eats” almost all the resources that cloud9 provides in free mode. With a paid plan, it would be easier, but what I have was enough. The build process was 2.15 hours, at this time you can do your own thing, there should not be any problems. After installation, the 3d1fce8dae65e765f7c4 folder can be deleted (it will free up almost all the memory).
Installing Tesseract is simple:
To install SikuliX itself, we still need a real screen (Java restriction). The solution was the launch of X11. To supply the necessary components, we can use this script. The composition includes supervisor, xvfb, fluxbox, x11vnc. To run, we can transfer the files run.sh and supervisord.conf to the root, or correct the path to supervisord.conf in the file run.sh
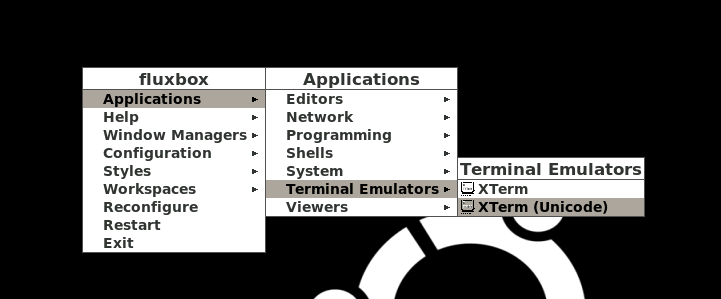
If everything went well, then after running run.sh, the terminal will give a link. Let's go through it in the browser. Something like your-workspace / vnc.html. There, click “Connect” and get into the fluxbox window manager.

For installation, we will need SikuliX 1.1.1 (I have not tried the version above), since in version 1.1.0 there was a bug that did not allow sikuli to run in the background. We need to download sikulixsetup, take it here .
In fluxbox, open the terminal and run the downloaded file to install. I had this:
A window with SikuliX installation options should open.
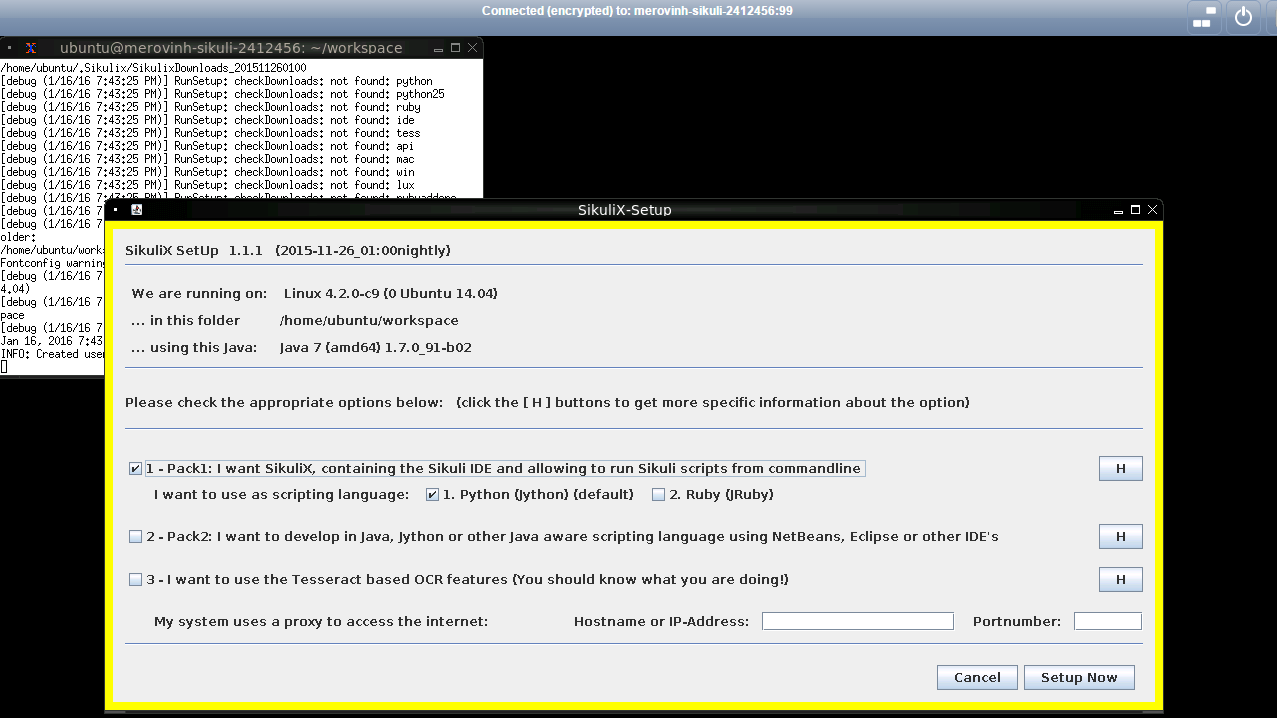
I chose the first option that will install sikulix.jar, which includes the SikuliX IDE. The scripts written in it can then be run in the terminal without having to open the IDE. As a subitem, I chose Python. You can choose a different installation option based on your needs.
At the Jython installation stage, there may be problems with installing Jython 2.7.0 (I had them, the script just did not start). Therefore, it is better to click the “NO” button and install Jython 2.5.4rc1.
If everything went well, then you should see a pop-up window like this:

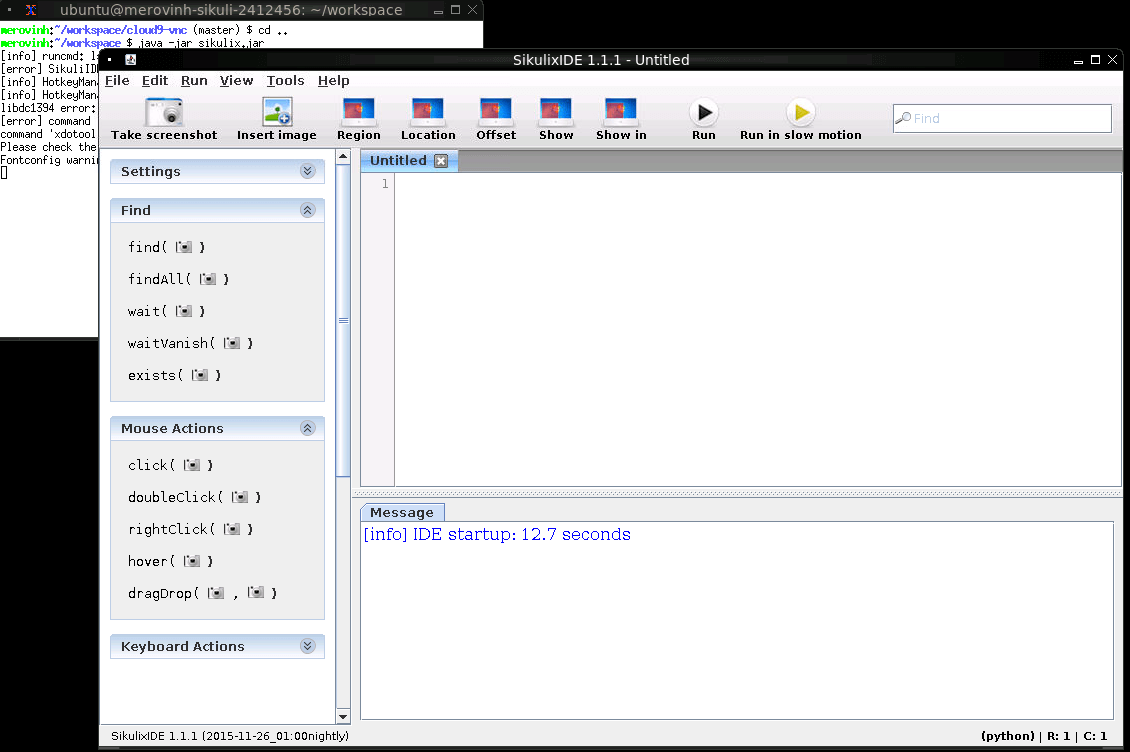
Now we can run the IDE. In it, we will write and debug our scripts for their further launch in the background.
For example, let's write a simple script that checks whether the habr is in the top of Google’s issuance by the query “how to graze cats”. Turn on user logs and write our actions to a file.

The script was written, debugged.
During debugging, some errors were poured into the terminal and the log, such as: Errors are not critical and we can simply ignore them. After visual debugging, we can close fluxbox and go to the IDE Cloud9 terminal. Xvfb (X virtual framebuffer) will help us run the script in the background . This is a virtual X server that performs all the graphic operations in memory. You can read here . We write the parameters of the virtual screen, the path to the saved project, the name of the log file and try to run it.
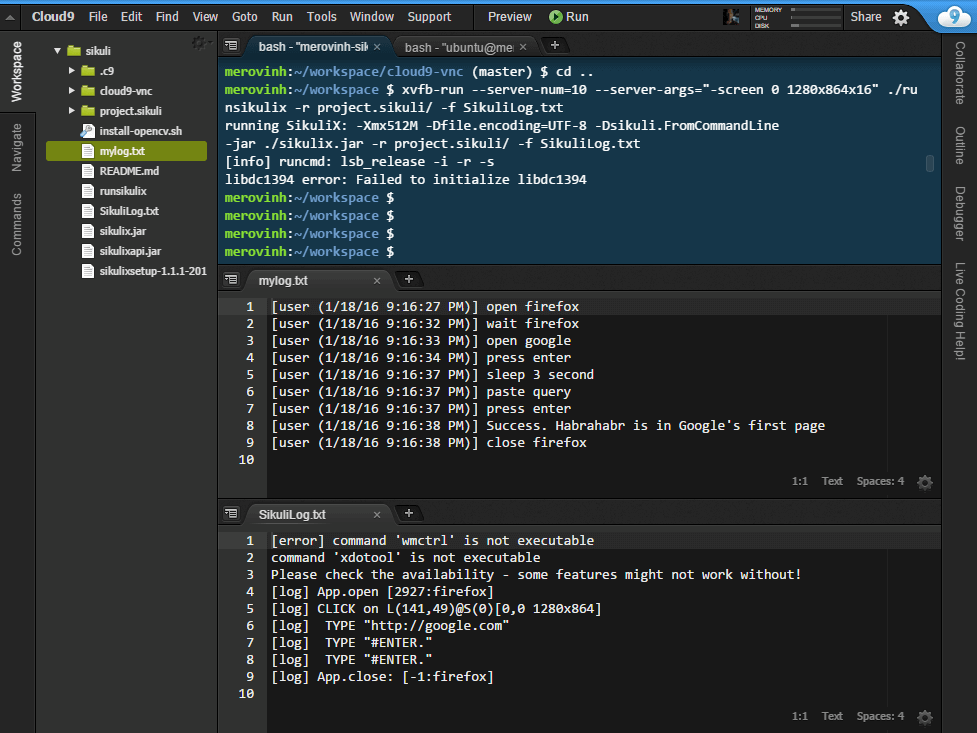
If everything went smoothly, then in our log file you can read “Success. Habrahabr is in Google's first page. " Profit
Then you can write a small API and run our scripts / autotests, for example, from the console of a working computer.
The official site of the project.
Here I will describe my experience using SikuliX in the background on the Cloud IDE Cloud9 . In the process of working with this tool, I got a few cones, so maybe my experience will be useful to someone.
There are many options for using SikuliX, here are some of the actions you can automate:
- Work with flash sites (and any other)
- Automation of browser games (to harvest the farm)
- Work with desktop applications
- Computer settings
- Various bots
- Any kind of routine work with sites / documents
In my case, it was necessary to automate the routine work with the flash site, log in, select a specific item in the drop-down list and click a few buttons. It took about 1-3 minutes several times a day. After using SikuliX, this can be done through a simple script run, and spend free time on more useful things (for example, learn English).
Dependency Installation
SikuliX depends on tools such as OpenCV (computer vision) and Tesseract (text recognition). Therefore, we will install them. Let's start with OpenCV.
Installing OpenCV was not very simple, so I used this script to install and build everything you need. Clone it, give execution rights and run.
git clone [email protected]:3d1fce8dae65e765f7c4.git
cd 3d1fce8dae65e765f7c4
chmod +x install-opencv-2.4.11-in-ubuntu.sh
./install-opencv-2.4.11-in-ubuntu.sh
I must say that the installation of OpenCV “eats” almost all the resources that cloud9 provides in free mode. With a paid plan, it would be easier, but what I have was enough. The build process was 2.15 hours, at this time you can do your own thing, there should not be any problems. After installation, the 3d1fce8dae65e765f7c4 folder can be deleted (it will free up almost all the memory).
Installing Tesseract is simple:
sudo apt-get install tesseract-ocr
To install SikuliX itself, we still need a real screen (Java restriction). The solution was the launch of X11. To supply the necessary components, we can use this script. The composition includes supervisor, xvfb, fluxbox, x11vnc. To run, we can transfer the files run.sh and supervisord.conf to the root, or correct the path to supervisord.conf in the file run.sh
git clone [email protected]:fjakobs/cloud9-vnc.git
cd cloud9-vnc/
./install.sh
./run.sh
If everything went well, then after running run.sh, the terminal will give a link. Let's go through it in the browser. Something like your-workspace / vnc.html. There, click “Connect” and get into the fluxbox window manager.
Install SikuliX
For installation, we will need SikuliX 1.1.1 (I have not tried the version above), since in version 1.1.0 there was a bug that did not allow sikuli to run in the background. We need to download sikulixsetup, take it here .
In fluxbox, open the terminal and run the downloaded file to install. I had this:
java -jar sikulixsetup-1.1.1-20151126.001204-18-forsetup.jar
A window with SikuliX installation options should open.
I chose the first option that will install sikulix.jar, which includes the SikuliX IDE. The scripts written in it can then be run in the terminal without having to open the IDE. As a subitem, I chose Python. You can choose a different installation option based on your needs.
At the Jython installation stage, there may be problems with installing Jython 2.7.0 (I had them, the script just did not start). Therefore, it is better to click the “NO” button and install Jython 2.5.4rc1.
If everything went well, then you should see a pop-up window like this:
Launch Sikuli IDE
Now we can run the IDE. In it, we will write and debug our scripts for their further launch in the background.
java -jar sikulix.jar
Example
For example, let's write a simple script that checks whether the habr is in the top of Google’s issuance by the query “how to graze cats”. Turn on user logs and write our actions to a file.
The script was written, debugged.
During debugging, some errors were poured into the terminal and the log, such as: Errors are not critical and we can simply ignore them. After visual debugging, we can close fluxbox and go to the IDE Cloud9 terminal. Xvfb (X virtual framebuffer) will help us run the script in the background . This is a virtual X server that performs all the graphic operations in memory. You can read here . We write the parameters of the virtual screen, the path to the saved project, the name of the log file and try to run it.
[error] command 'wmctrl' is not executable
command 'xdotool' is not executable
Failed to initialize libdc1394
xvfb-run --server-num=10 --server-args="-screen 0 1280x864x16" ./runsikulix -r project.sikuli/ -f SikuliLog.txt
If everything went smoothly, then in our log file you can read “Success. Habrahabr is in Google's first page. " Profit
What's next:
Then you can write a small API and run our scripts / autotests, for example, from the console of a working computer.
Sources:
The official site of the project.