 December 29, 2015 at 12:09
Build and configure FreeRADIUS 3 with SQLITE support
Good day, dear.
I want to share with you a solution to one creative problem. I hope someone will be helpful.
So,
low-powered hardware with arm processor and built for it and installed Debian 7 wheezy.
install FreeRADIUS 3.0.X, configure it to work with SQLITE database. That is, user accounts (which need to be authenticated) RADIUS must take from the SQLITE database.
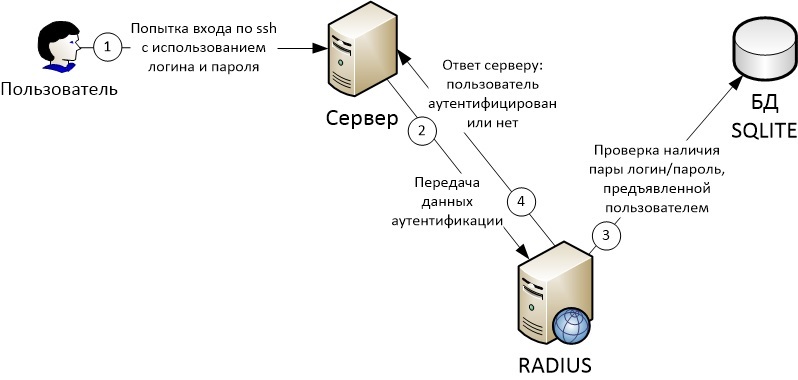
The figure shows a top-level diagram of the interaction of components.
Why did I decide to describe this solution?
Faced with this task and starting to google, I was surprised that there are simply no detailed descriptions for building freeradius, and even more so with SQLITE support. Therefore, I decided to outline for myself and others as a keepsake.
It consists of 3 parts:
1) Build Freeradius 3.0.3 (I chose this version, in later it will look something like this) with SQLite support;
2) Setting up a bunch of Freeradius and SQLite;
3) Configuring the server on which users are authenticated (in the figure above - “server”).
To successfully build radius 3.0.3, you must perform the following steps:
1.1 Download the source code: ftp.freeradius.org/pub/freeradius/old/freeradius-server-3.0.3.tar.gz , unzip it to a separate folder;
1.2 Install the following packages through apt-get: libtalloc2, libtalloc-dev, libssl-dev, libperl-dev, libpam0g-dev, libsqlite3-dev, libgdbm-dev (if you need support for other databases, you must deliver the appropriate dev package, for example mysql -dev);
1.3 Go to the folder with the unpacked archive with the sources and, trivially,
If the first time ./configure does not work, maybe some other packages are missing in the system, carefully read the output and install them.
To configure the freeradius + sqlite bundle, do the following:
2.1.1 Create a sqlite base and a schema in the database with which radius will work:
/etc/raddb/sqlite_rad.db is the path to the database file, you can place it in any convenient place.
2.1.2 Create a user account in the database:
With the above query in the database, we fill out the radcheck table, which stores information about US users with the following information:
Unique user ID = 1; username = user; attribute KM = Cleartext-Password; operator = “: =”; attribute value = “secret”. If in Russian, then we set a password for the UZ user, which will be stored in clear text and its value is “secret”. You can read more about attribute-value pairs (av pair) and comparison operators in the official documentation on radius and unlang. freeradius.org/radiusd/man/unlang.html
2.2.1 The configuration files for all available radius modules are in / etc / raddb / mods-available. To enable them, you need to create a link to the module in the / etc / raddb / mods-enabled folder:
2.2.2 Edit / etc / raddb / mods-enabled / sql, as follows:
The filename variable must point to the database file created in clause 2.1.1.
2.2.3 We register the radius client, i.e. the server (or network equipment) whose users will authenticate through this radius. To do this, add the lines to the /etc/raddb/clients.conf file:
secret in this case is the secret word radius by which it authenticates the client.
shortname - an arbitrary "short name", this value can even be omitted.
2.2.4 Check that in the "authorize" section in the file / etc / raddb / sites-enabled / default there is "-sql":
3.1 On the client, install the pam_radius package:
3.2 In the /etc/pam_radius_auth.conf file on the client add the line:
where other-server is the radius IP address of the server, other-secret is the secret word from the configuration item 2.2.3:
3.3 In the /etc/pam.d/sshd file above the lines
add line
That's all. Launch RADIUS and enjoy PROFIT.
I want to share with you a solution to one creative problem. I hope someone will be helpful.
So,
DANO:
low-powered hardware with arm processor and built for it and installed Debian 7 wheezy.
TASK:
install FreeRADIUS 3.0.X, configure it to work with SQLITE database. That is, user accounts (which need to be authenticated) RADIUS must take from the SQLITE database.
The figure shows a top-level diagram of the interaction of components.
Why did I decide to describe this solution?
Faced with this task and starting to google, I was surprised that there are simply no detailed descriptions for building freeradius, and even more so with SQLITE support. Therefore, I decided to outline for myself and others as a keepsake.
DECISION:
It consists of 3 parts:
1) Build Freeradius 3.0.3 (I chose this version, in later it will look something like this) with SQLite support;
2) Setting up a bunch of Freeradius and SQLite;
3) Configuring the server on which users are authenticated (in the figure above - “server”).
1 Build Freeradius 3.0.3 with SQLite Support
To successfully build radius 3.0.3, you must perform the following steps:
1.1 Download the source code: ftp.freeradius.org/pub/freeradius/old/freeradius-server-3.0.3.tar.gz , unzip it to a separate folder;
1.2 Install the following packages through apt-get: libtalloc2, libtalloc-dev, libssl-dev, libperl-dev, libpam0g-dev, libsqlite3-dev, libgdbm-dev (if you need support for other databases, you must deliver the appropriate dev package, for example mysql -dev);
1.3 Go to the folder with the unpacked archive with the sources and, trivially,
./configure
make
checkinstall
If the first time ./configure does not work, maybe some other packages are missing in the system, carefully read the output and install them.
2 Setting up a bunch of Freeradius and SQLite
To configure the freeradius + sqlite bundle, do the following:
2.1 Create and configure sqlite user databases
2.1.1 Create a sqlite base and a schema in the database with which radius will work:
sqlite3 /etc/raddb/sqlite_rad.db < /etc/raddb/mods-config/sql/main/sqlite/schema.sql/etc/raddb/sqlite_rad.db is the path to the database file, you can place it in any convenient place.
2.1.2 Create a user account in the database:
sqlite3 /etc/raddb/sqlite_rad.db
insert into radcheck values (‘1’,’user’,’Cleartext-Password’,’:=’,’secret’);
With the above query in the database, we fill out the radcheck table, which stores information about US users with the following information:
Unique user ID = 1; username = user; attribute KM = Cleartext-Password; operator = “: =”; attribute value = “secret”. If in Russian, then we set a password for the UZ user, which will be stored in clear text and its value is “secret”. You can read more about attribute-value pairs (av pair) and comparison operators in the official documentation on radius and unlang. freeradius.org/radiusd/man/unlang.html
2.2 Configure freeradius:
2.2.1 The configuration files for all available radius modules are in / etc / raddb / mods-available. To enable them, you need to create a link to the module in the / etc / raddb / mods-enabled folder:
cd /etc/raddb/mods-enabled
ln -s /etc/raddb/mods-available/sql sql
2.2.2 Edit / etc / raddb / mods-enabled / sql, as follows:
sql {
…………
driver = "rlm_sql_sqlite"
…………
	sqlite {
		filename = "/etc/raddb/sqlite_rad.db"
	}
…………
dialect = "sqlite"
………..
The filename variable must point to the database file created in clause 2.1.1.
2.2.3 We register the radius client, i.e. the server (or network equipment) whose users will authenticate through this radius. To do this, add the lines to the /etc/raddb/clients.conf file:
client 192.168.0.4 {
       secret          = testing123
       shortname       = new_server
}
secret in this case is the secret word radius by which it authenticates the client.
shortname - an arbitrary "short name", this value can even be omitted.
2.2.4 Check that in the "authorize" section in the file / etc / raddb / sites-enabled / default there is "-sql":
authorize {
........
-sql
........
3 RADIUS Client Configuration
3.1 On the client, install the pam_radius package:
apt-get install libpam-radius-auth3.2 In the /etc/pam_radius_auth.conf file on the client add the line:
other-server other-secret 3where other-server is the radius IP address of the server, other-secret is the secret word from the configuration item 2.2.3:
192.168.0.2 testing123 33.3 In the /etc/pam.d/sshd file above the lines
# Standard Un*x authentication.
@include common-auth
add line
auth sufficient pam_radius_auth.soThat's all. Launch RADIUS and enjoy PROFIT.









