 December 10, 2015 at 12:34
Raising a complex project on Django using Docker
- Tutorial
Good afternoon, colleagues.
Today I’ll talk about the not-so-simple concept of quick (up to an hour after several workouts) deployment of a project for a team consisting of at least individual front-end and back-end developers.
Our initial data are as follows: development of a project begins, in which a “thin backend” is planned. Those. our back-end consists of cached pages (rendered by any template engine), three-dimensional models with concurrent logic (ORM), and a REST API acting as a controller. In fact, View in such a system is reduced and rendered in JS, since there are various reactions, angulars and other things that allow front-runners to consider themselves “white people”.
Our development environment looks like this: Ubuntu LTS (14.04), PyCharm, Python of any version (we will take 2.7 to launch a virtual environment on which a similar version will be installed). Django (1.8)
We solve the following problems:
For our application we will use Docker . A lot has been said about this tool on Habré. Immediately make a reservation that we do not plan to complicate the Production server yet. It is important for us to build a development environment with a foundation for the subsequent application of the CI concept. But, within the framework of the current article, we will work only with docker-compose and will not touch on the methods of quick deployment. Fortunately, Docker has plenty of those.
Docker can be installed with varying success on Mac and Windows machines. But we will consider installing it on Ubuntu 14.04. There is instructions for installing Docker on this system, but it can cause problems. From the part, you can write them off to a note from this instruction:
Therefore, we do not show off and put as recommended by another instruction :
And we check the installation with the command:
Now create a virtual environment for launching Docker:
Open PyCharm and create a project for work.

We create a project for any interpreter. Let it be a pure python project. In the diagram above you see the minimal composition of the project. Supervisord will be responsible for starting the server. Files .gitignore and .dockerignore will allow you to specify those files that will not be committed to the project repository or will not be mounted in docker containers. The container will be managed by the docker-compose.yml file because it is simple as a stick and effective as a Kalashnikov assault rifle. For the main project, we will additionally create a Dockerfile to install the missing libraries.
The dockerfiles folder has a pgdata subfolder - in it we will have a database from PostgreSQL in case we want to transfer data from one place to another. In dockerfiles / sshdconf we will place the settings for the SSH server. We don’t need it for a direct connection, but for setting up the environment in PyCharm it’s still like that. The id_rsa.pub key will allow PyCharm to connect to the container without dancing around the password. All you need to do is create a bunch of SSH keys and copy (or transfer) the public key to the dockerfiles directory.
The src directory is the root of our project. Our task now is to deploy containers.
The docker-compose.yml file will look like this:
Pay attention to the first container - postgresql. We unambiguously pass .env to it to form the primary data. The ports directive is responsible for port forwarding. The first digit before the colon is the port number on which this database will be available in our ubunt. The second digit is the port number that is forwarded from the container. Default PostgreSQL port
We will collect the second container from the Dockerfile. Therefore, build is worth it. The start command comes with a slight delay - in case we need time to start the database and other tools inside the containers. Here we see all the connected directories and files. When port forwarding, we have port 2225 for SSH and 8005 for the server. In sshd_config, we need to configure these directives for ourselves:
PermitRootLogin without-password
StrictModes no
RSAAuthentication yes
PubkeyAuthentication yes
AuthorizedKeysFile% h / .ssh / authorized_keys
Remember that all this stuff will only work for the development team. We won’t put it on production. Although, in principle, the ssh server will be available only locally.
/home/USERNAME/.pycharm_helpers/:/root/.pycharm_helpers/ - This mount command will allow us to run tests and debug directly from PyCharm. Do not forget to write your USERNAME here
In supervisord.conf, write the following:
[unix_http_server]
file = / opt / project / daemons / supervisor.sock; path to your socket file
[supervisord]
logfile = / opt / project / logs / supervisord.log; supervisord log file
logfile_maxbytes = 50MB; maximum size of logfile before rotation
logfile_backups = 10; number of backed up logfiles
loglevel = info; info, debug, warn, trace
pidfile = / opt / project / daemons / supervisord.pid; pidfile location
nodaemon = false; run supervisord as a daemon
minfds = 1024; number of startup file descriptors
minprocs = 200; number of process descriptors
user = root; default user
childlogdir = / opt / project / logs /; where child log files will live
[rpcinterface: supervisor]
supervisor.rpcinterface_factory = supervisor.rpcinterface: make_main_rpcinterface
[supervisorctl]
serverurl = unix: ///opt/project/daemons/supervisor.sock; use unix: // schem for a unix sockets.
[include]
# Uncomment this line for celeryd for Python
files = djangod.conf
In djangod.conf:
[program: django_project]
command = python /opt/project/manage.py runserver 0.0.0.0:8000
directory = / opt / project /
stopasgroup = true
stdout_logfile = / opt / project / logs /django.log
stderr_logfile = / opt / project / logs / django_err.log
Anyone who carefully reads the configs should pay attention to the fact that we have announced two folders that have not yet been created. So let's create the logs and daemons directories in src. In .gitignore, add / src / logs / * and / src / daemons / * respectively
Note that in django, usually, stdout_logfile is not written. All logs are showered in stderr_logfile. The setting was taken from some ready-made instruction, but I don’t really want to delete the line, because stdout_logfile is a pretty standard directive.
Now, let's not forget our .env file:
POSTGRES_USER = habrdockerarticle
POSTGRES_DB = habrdockerarticle
POSTGRES_PASSWORD = qwerty
POSTGRES_HOST the postgresql =
POSTGRES_PORT = 5432
the PGDATA = / var / lib / the postgresql / data / PGDATA
C_FORCE_ROOT = to true
You can add or not add to .gitignore - values does not have.
At the end, fill in the Dockerfile
FROM python: 2.7
RUN apt-get update && apt-get install -y openssh-server \
&& apt-get purge -y --auto-remove -o APT :: AutoRemove :: RecommendsImportant = false -o APT :: AutoRemove :: SuggestsImportant = false $ buildDeps
COPY ./src/requirements.txt ./requirements.txt
RUN pip install -r requirements.txt The
Docker Hub does not hide from us that our container will be served by Debian Jessie. In Dockerfile, we planned to install the ssh server, clean up the list of packages we do not need, and install requirements. By the way, we have not yet created the dependency file. We need to fix this defect and create requirements.txt in the src folder:
Django == 1.8
psycopg2
supervisor
The project is ready for the first launch! We will start one by one. First, do:
This operation will download the image necessary for us to start the postgresql server. The server will start, the user and the database specified in .env will be created automatically. The command will block us from entering data, but for now we will not stop it. We will verify the presence of the database and login roles by connecting via pgadmin.

As we can see, everything has already been created for work:
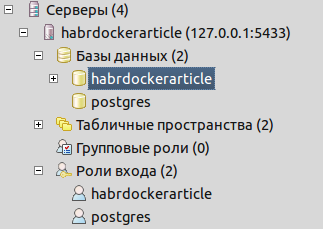
Now , using the ctrl + C keys in the console, we stop the process. We need to collect the image of the project. So do:
This team will collect the project for us, and also, will execute all the commands from the Dockerfile. Those. we will have an ssh server installed, as well as dependencies from requirements.txt are installed. Now we have a question of creating a Django project. There are several ways to create it. The most bulletproof is to put the necessary version of Django in our docker virtualenv on ubunt:
Django from venv can be removed or left for other projects. All that remains for us is to transfer the project internals to the root of the src folder.
Now we should check our project and configure the connection to the database. First, change the settings in settings.py:
Then run the project containers:
And make sure of a positive result:
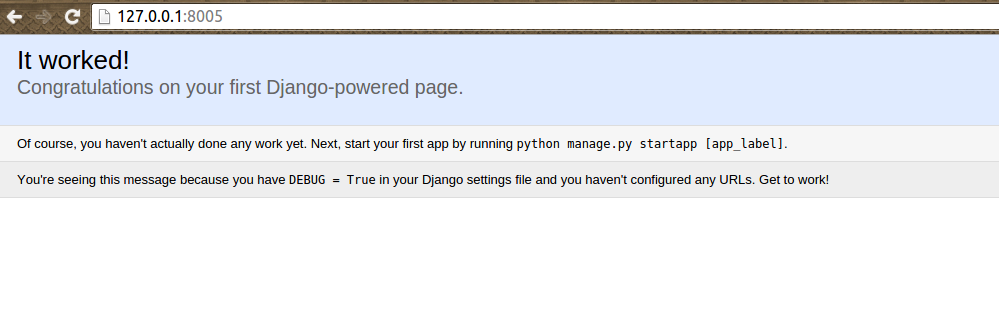
To stop the project and delete temporary files, you can use:
If something changes in requirements.txt, we use the following command to quickly rebuild
Let's check what project structure we got:
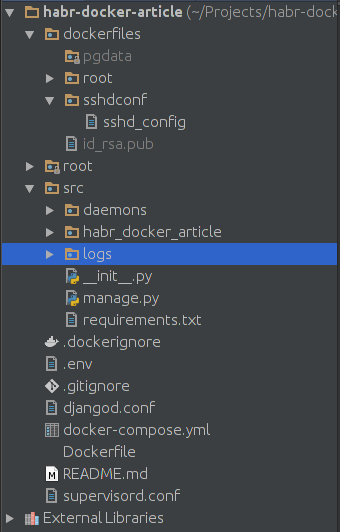
The root folder in my code contains PyCharm’s ready-made helpers.
Now you can do what we started all of this for - connecting Gulp to manage static. The docker-compose.yml file will now look like this:
I added a new container and pointed it in the dependencies to project.
Now I need to create a gulp folder in src for sources and static / scripts for compiled files. In the src / gulp folder, create the package.json file with the following contents:
Create gulpfile.js. in the src / gulp folder. I used my old file for a sample:
As we can see from the config, we should upload some popular libraries to the src / gulp / front folder and create the src / gulp / front / project folder for scripts written by the JS programmer. Also, do not forget about creating a Dockerfile in src / gulp
FROM neo9polska / nodejs-bower-gulp
COPY package.json ./package.json
COPY node_modules ./node_modules
RUN npm install --verbose
Now a pretty important question is node_modules. Without this folder, the container with Gulp will openly crap. Here we have two options for obtaining this folder:
However, changing the rights is not necessary. It’s just that developers will be forced to constantly execute the gulp rebuild command. However, I will post all the code described in the article on Github and you can take node_modules from there. This problem is related to docker-compose. But defeating her is easy.
So, as a result of launching containers
We have to get here is a compiled file
 .
.
Done! You can upload a project to git and start working with it.
The complete reboot reboot command looks like this:
To start a project for a new participant in the process, it is enough to perform:
To view the main container log with the application running:
Django logs from project are written to the src / logs folder.
You can see the source code of the project in my GitHub .
PS Another important aspect is setting up the python interpreter in PyCharm. For this setup, just add a remote interpreter:

And note that PyCharm has a plugin for integration with Docker. We use the SSH connection, because we did not address the issue of deploying a project to docker-machine.
Today I’ll talk about the not-so-simple concept of quick (up to an hour after several workouts) deployment of a project for a team consisting of at least individual front-end and back-end developers.
Our initial data are as follows: development of a project begins, in which a “thin backend” is planned. Those. our back-end consists of cached pages (rendered by any template engine), three-dimensional models with concurrent logic (ORM), and a REST API acting as a controller. In fact, View in such a system is reduced and rendered in JS, since there are various reactions, angulars and other things that allow front-runners to consider themselves “white people”.
Our development environment looks like this: Ubuntu LTS (14.04), PyCharm, Python of any version (we will take 2.7 to launch a virtual environment on which a similar version will be installed). Django (1.8)
We solve the following problems:
- It is necessary to fully emulate the Production space, and even better, to deliver the code to the participants of the development process together with the environment.
- It is necessary to separate the runtime of our project from the environment of the operating system. We don’t need problems with Python versions, node.js settings or database deployment. Let our desktop system be clean and bright.
- It is necessary to automate the deployment of the project, which the JS guru, and, possibly, a cool coder will work on. Yes, so that the project can be raised by both the tester and the manager with initial knowledge in the technical field.
- It is necessary to separate the dev version from production without any special problems. Downtime should be minimal. No one will wait until the lead programmer corrects all the variables in settings and fixes other problems.
- It is necessary to make sure that the development participants do not solve each other's problems. JS developer should not delve into the intricacies of running Celery, merging JS files, etc. The typesetter should not be interested in what his Sass code compiles, etc. This applies to deployment automation, but it’s important to emphasize that these problems can be inconvenient and it will take time to write detailed deployment instructions if it happens in manual mode.
Install Docker
For our application we will use Docker . A lot has been said about this tool on Habré. Immediately make a reservation that we do not plan to complicate the Production server yet. It is important for us to build a development environment with a foundation for the subsequent application of the CI concept. But, within the framework of the current article, we will work only with docker-compose and will not touch on the methods of quick deployment. Fortunately, Docker has plenty of those.
Docker can be installed with varying success on Mac and Windows machines. But we will consider installing it on Ubuntu 14.04. There is instructions for installing Docker on this system, but it can cause problems. From the part, you can write them off to a note from this instruction:
Note: Ubuntu Utopic 14.10 exists in Docker's apt repository but it is no longer officially supported.
Therefore, we do not show off and put as recommended by another instruction :
$ sudo apt-get update
$ sudo apt-get install wget
wget -qO- https://get.docker.com/ | sh
And we check the installation with the command:
$ docker run hello-world
Now create a virtual environment for launching Docker:
$ mkdir ~/venvs
$ virtualenv ~/venvs/docker
$ source ~/venvs/docker/bin/activate
(docker) $ pip install docker-compose
(docker) $ docker-compose -v
Create a project
Open PyCharm and create a project for work.
We create a project for any interpreter. Let it be a pure python project. In the diagram above you see the minimal composition of the project. Supervisord will be responsible for starting the server. Files .gitignore and .dockerignore will allow you to specify those files that will not be committed to the project repository or will not be mounted in docker containers. The container will be managed by the docker-compose.yml file because it is simple as a stick and effective as a Kalashnikov assault rifle. For the main project, we will additionally create a Dockerfile to install the missing libraries.
The dockerfiles folder has a pgdata subfolder - in it we will have a database from PostgreSQL in case we want to transfer data from one place to another. In dockerfiles / sshdconf we will place the settings for the SSH server. We don’t need it for a direct connection, but for setting up the environment in PyCharm it’s still like that. The id_rsa.pub key will allow PyCharm to connect to the container without dancing around the password. All you need to do is create a bunch of SSH keys and copy (or transfer) the public key to the dockerfiles directory.
The src directory is the root of our project. Our task now is to deploy containers.
Create containers
The docker-compose.yml file will look like this:
postgresql:
  image: postgres:9.3
  env_file: .env
  volumes:
    - ./dockerfiles/pgdata:/var/lib/postgresql/data/pgdata
  ports:
    - "5433:5432"
project:
  build: ./
  env_file: .env
  working_dir: /opt/project
  command: bash -c "sleep 3 && /etc/init.d/ssh start && supervisord -n"
  volumes:
    - ./src:/opt/project
    - ./dockerfiles/sshdconf/sshd_config:/etc/ssh/sshd_config
    - ./dockerfiles/id_rsa.pub:/root/.ssh/authorized_keys
    - /home/USERNAME/.pycharm_helpers/:/root/.pycharm_helpers/
    - ./supervisord.conf:/etc/supervisord.conf
    - ./djangod.conf:/etc/djangod.conf
  links:
    - postgresql
  ports:
    - "2225:22"
    - "8005:8000"
Pay attention to the first container - postgresql. We unambiguously pass .env to it to form the primary data. The ports directive is responsible for port forwarding. The first digit before the colon is the port number on which this database will be available in our ubunt. The second digit is the port number that is forwarded from the container. Default PostgreSQL port
We will collect the second container from the Dockerfile. Therefore, build is worth it. The start command comes with a slight delay - in case we need time to start the database and other tools inside the containers. Here we see all the connected directories and files. When port forwarding, we have port 2225 for SSH and 8005 for the server. In sshd_config, we need to configure these directives for ourselves:
PermitRootLogin without-password
StrictModes no
RSAAuthentication yes
PubkeyAuthentication yes
AuthorizedKeysFile% h / .ssh / authorized_keys
Remember that all this stuff will only work for the development team. We won’t put it on production. Although, in principle, the ssh server will be available only locally.
/home/USERNAME/.pycharm_helpers/:/root/.pycharm_helpers/ - This mount command will allow us to run tests and debug directly from PyCharm. Do not forget to write your USERNAME here
In supervisord.conf, write the following:
[unix_http_server]
file = / opt / project / daemons / supervisor.sock; path to your socket file
[supervisord]
logfile = / opt / project / logs / supervisord.log; supervisord log file
logfile_maxbytes = 50MB; maximum size of logfile before rotation
logfile_backups = 10; number of backed up logfiles
loglevel = info; info, debug, warn, trace
pidfile = / opt / project / daemons / supervisord.pid; pidfile location
nodaemon = false; run supervisord as a daemon
minfds = 1024; number of startup file descriptors
minprocs = 200; number of process descriptors
user = root; default user
childlogdir = / opt / project / logs /; where child log files will live
[rpcinterface: supervisor]
supervisor.rpcinterface_factory = supervisor.rpcinterface: make_main_rpcinterface
[supervisorctl]
serverurl = unix: ///opt/project/daemons/supervisor.sock; use unix: // schem for a unix sockets.
[include]
# Uncomment this line for celeryd for Python
files = djangod.conf
In djangod.conf:
[program: django_project]
command = python /opt/project/manage.py runserver 0.0.0.0:8000
directory = / opt / project /
stopasgroup = true
stdout_logfile = / opt / project / logs /django.log
stderr_logfile = / opt / project / logs / django_err.log
Anyone who carefully reads the configs should pay attention to the fact that we have announced two folders that have not yet been created. So let's create the logs and daemons directories in src. In .gitignore, add / src / logs / * and / src / daemons / * respectively
Note that in django, usually, stdout_logfile is not written. All logs are showered in stderr_logfile. The setting was taken from some ready-made instruction, but I don’t really want to delete the line, because stdout_logfile is a pretty standard directive.
Now, let's not forget our .env file:
POSTGRES_USER = habrdockerarticle
POSTGRES_DB = habrdockerarticle
POSTGRES_PASSWORD = qwerty
POSTGRES_HOST the postgresql =
POSTGRES_PORT = 5432
the PGDATA = / var / lib / the postgresql / data / PGDATA
C_FORCE_ROOT = to true
You can add or not add to .gitignore - values does not have.
At the end, fill in the Dockerfile
FROM python: 2.7
RUN apt-get update && apt-get install -y openssh-server \
&& apt-get purge -y --auto-remove -o APT :: AutoRemove :: RecommendsImportant = false -o APT :: AutoRemove :: SuggestsImportant = false $ buildDeps
COPY ./src/requirements.txt ./requirements.txt
RUN pip install -r requirements.txt The
Docker Hub does not hide from us that our container will be served by Debian Jessie. In Dockerfile, we planned to install the ssh server, clean up the list of packages we do not need, and install requirements. By the way, we have not yet created the dependency file. We need to fix this defect and create requirements.txt in the src folder:
Django == 1.8
psycopg2
supervisor
First start
The project is ready for the first launch! We will start one by one. First, do:
(docker) $ docker-compose run --rm --service-ports postgresql
This operation will download the image necessary for us to start the postgresql server. The server will start, the user and the database specified in .env will be created automatically. The command will block us from entering data, but for now we will not stop it. We will verify the presence of the database and login roles by connecting via pgadmin.
As we can see, everything has already been created for work:
Now , using the ctrl + C keys in the console, we stop the process. We need to collect the image of the project. So do:
(docker) $ docker-compose build project
This team will collect the project for us, and also, will execute all the commands from the Dockerfile. Those. we will have an ssh server installed, as well as dependencies from requirements.txt are installed. Now we have a question of creating a Django project. There are several ways to create it. The most bulletproof is to put the necessary version of Django in our docker virtualenv on ubunt:
(docker) $ pip install django==1.8
(docker) $ cd ./src
(docker) $ django-admin startproject projectname
(docker) $ cd ../
Django from venv can be removed or left for other projects. All that remains for us is to transfer the project internals to the root of the src folder.
Now we should check our project and configure the connection to the database. First, change the settings in settings.py:
DATABASES = {
    'default': {
        'ENGINE': 'django.db.backends.postgresql_psycopg2',
        'NAME': os.getenv('POSTGRES_DB'),
        'USER': os.getenv('POSTGRES_USER'),
        'PASSWORD': os.getenv('POSTGRES_PASSWORD'),
        'HOST': os.getenv('POSTGRES_HOST'),
        'PORT': int(os.getenv('POSTGRES_PORT'))
    }
}
Then run the project containers:
(docker) $ docker-compose up -d
And make sure of a positive result:
To stop the project and delete temporary files, you can use:
(docker) $ docker-compose stop && docker-compose rm -f
If something changes in requirements.txt, we use the following command to quickly rebuild
(docker) $ docker-compose stop && docker-compose rm -f && docker-compose build --no-cache project && docker-compose up -d
Let's check what project structure we got:
The root folder in my code contains PyCharm’s ready-made helpers.
We connect the container for the JS programmer
Now you can do what we started all of this for - connecting Gulp to manage static. The docker-compose.yml file will now look like this:
...
gulp:
  build: ./src/gulp
  command: bash -c "sleep 3 && gulp"
  volumes:
    - ./src/gulp:/app
    - ./src/static/scripts:/app/build
project:
  ...
  links:
    - postgresql
    - gulp
  ...
I added a new container and pointed it in the dependencies to project.
Now I need to create a gulp folder in src for sources and static / scripts for compiled files. In the src / gulp folder, create the package.json file with the following contents:
{
  "name": "front",
  "version": "3.9.0",
  "description": "",
  "main": "gulpfile.js",
  "scripts": {
    "test": "echo \"Error: no test specified\" && exit 1"
  },
  "author": "",
  "license": "BSD-2-Clause",
  "devDependencies": {
    "gulp": "~3.9.0",
    "gulp-uglify": "~1.4.2",
    "gulp-concat": "~2.6.0",
    "gulp-livereload": "~3.8.1",
    "gulp-jade": "~1.1.0",
    "gulp-imagemin": "~2.3.0",
    "tiny-lr": "0.2.1"
  }
}
Create gulpfile.js. in the src / gulp folder. I used my old file for a sample:
/**
 * Created by werevolff on 18.10.15.
 */
var gulp = require('gulp'),
    uglify = require('gulp-uglify'),
    concat = require('gulp-concat'),
    refresh = require('gulp-livereload'),
    lr = require('tiny-lr'),
    server = lr();
/**
 * Mainpage
 */
gulp.task('mainpage', function () {
    gulp.src(['./front/jquery/*.js', './front/bootstrap/*.js', './front/angularjs/angular.min.js',
        './front/angularjs/i18n/angular-locale_ru-ru.js', './front/project/**/*.js'])
        .pipe(uglify())
        .pipe(concat('mainpage.js'))
        .pipe(gulp.dest('./build'))
        .pipe(refresh(server));
});
/**
 * Rebuild JS files
 */
gulp.task('lr-server', function () {
    server.listen(35729, function (err) {
        if (err) return console.log(err);
    });
});
/**
 * Gulp Tasks
 */
gulp.task('default', ['mainpage', 'lr-server'], function () {
    gulp.watch('./front/**/*.js', ['mainpage']);
});
As we can see from the config, we should upload some popular libraries to the src / gulp / front folder and create the src / gulp / front / project folder for scripts written by the JS programmer. Also, do not forget about creating a Dockerfile in src / gulp
FROM neo9polska / nodejs-bower-gulp
COPY package.json ./package.json
COPY node_modules ./node_modules
RUN npm install --verbose
Now a pretty important question is node_modules. Without this folder, the container with Gulp will openly crap. Here we have two options for obtaining this folder:
- Build the project on the local machine and transfer the module folder from it
- Remove everything below the FROM directive from the Dockerfile, run docker-compose run --rm gulp npm install --verbose, and then change the directory permissions with node_modules and return what was below FROM back.
However, changing the rights is not necessary. It’s just that developers will be forced to constantly execute the gulp rebuild command. However, I will post all the code described in the article on Github and you can take node_modules from there. This problem is related to docker-compose. But defeating her is easy.
So, as a result of launching containers
(docker) $ docker-compose up -d
We have to get here is a compiled file
. Done! You can upload a project to git and start working with it.
The complete reboot reboot command looks like this:
(docker) $ docker-compose stop && docker-compose rm -f && docker-compose build --no-cache gulp && docker-compose build --no-cache project && docker-compose up -d
To start a project for a new participant in the process, it is enough to perform:
(docker) $ docker-compose build --no-cache gulp && docker-compose build --no-cache project && docker-compose up -d
To view the main container log with the application running:
(docker) $ docker-compose logs CONTAINER NAME
Django logs from project are written to the src / logs folder.
You can see the source code of the project in my GitHub .
PS Another important aspect is setting up the python interpreter in PyCharm. For this setup, just add a remote interpreter:
And note that PyCharm has a plugin for integration with Docker. We use the SSH connection, because we did not address the issue of deploying a project to docker-machine.









