Docker images and containers in pictures
Translating a Visualizing Docker Containers and Images post , from beginner to beginner, the author explains basic entities and processes in using docker with simple examples.
If you don’t know what Docker is or don’t understand how it relates to virtual machines or configuration management tools, this post may seem a bit complicated.
The post is intended for those who are trying to master docker cli, to understand how the container and the image differ. In particular, the difference between a simple container and a running container will be explained.
In the development process, you need to imagine some underlying details, for example, the layers of the UnionFS file system. Over the last couple of weeks I have been studying technology, I am new to the docker world, and the docker command line has seemed to me quite difficult to master.
In my opinion, understanding how the technology works from the inside is the best way to quickly learn a new tool and use it correctly. Often, a new technology develops new models of abstractions and introduces new terms and metaphors that might seem to be clear at the beginning, but without a clear understanding make it difficult to use the tool later.
A good example is Git. I could not understand Git until I understood its basic model, including trees, blobs, commits, tags, tree-ish and more. I think that people who do not understand the internals of Git cannot expertly use this tool.
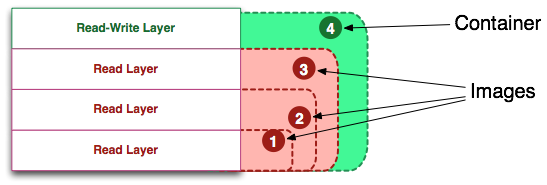
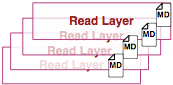
Image Definition (Image)
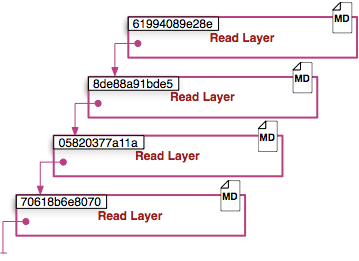
Visualization of the image is presented below in two ways. An image can be defined as an “entity” or “union view” of a read-only layer stack.
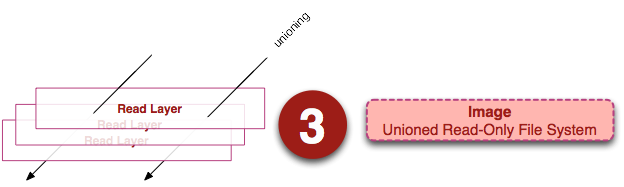
On the left we see a stack of layers for reading. They are shown only for understanding the internal device, they are accessible outside the running container on the host system. The important thing is that they are read-only (immutable), and all changes occur in the top layer of the stack. Each layer can have one parent, the parent also has a parent, etc. The top-level layer can be used as UnionFS (AUFS in my case with docker) and is presented as a single read-only file system in which all layers are reflected. We see this “essence” of the image in the figure on the right.
If you want to look at these layers in their original form, you can find them in the file system on the host machine. They are not visible directly from the running container. On my host machine, I can find the images in / var / lib / docker / aufs.
# sudo tree -L 1 /var/lib/docker/
/var/lib/docker/
├── aufs
├── containers
├── graph
├── init
├── linkgraph.db
├── repositories-aufs
├── tmp
├── trust
└── volumes
7 directories, 2 files
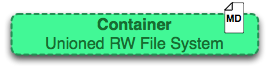
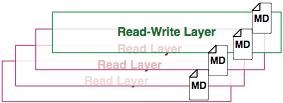
Container Definition
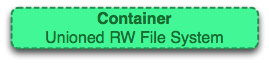
A container can be called the “essence” of a layer stack with a top layer for recording.
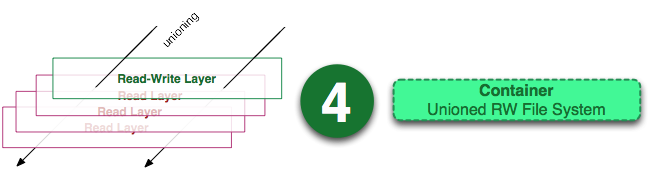
The image above shows about the same as the image on the image, except that the top layer is writable. You may have noticed that this definition does not say anything about whether the container is running or not, and this is no accident. Separating containers into running and not running eliminated the confusion in my understanding.
A container defines only a layer for writing at the top of the image (a stack of layers for reading). It is not running.
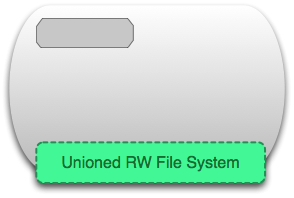
Defining a running container
A running container is a “general view” of a read-write container and its isolated process space. Below is a container in its process space.
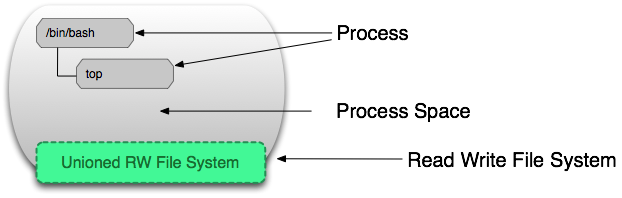
Isolation of the file system is provided by core-level technologies, cgroups, namespaces and others, allow docker to be such a promising technology. Processes in container space can modify, delete, or create files that are stored in the top layer for recording. See image:
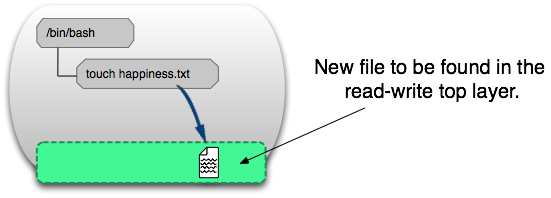
To verify this, run the command on the host machine:
docker run ubuntu touch happiness.txt
You can find a new file in the recording layer on the host machine, even if the container is not running.
# find / -name happiness.txt
/var/lib/docker/aufs/diff/860a7b...889/happiness.txt
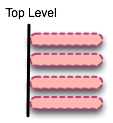
Defining an image layer
Finally, we define the image layer. The image below represents the image layer and makes it clear that the layer is not just changes in the file system.

Metadata - additional information about the layer, which allows the docker to save information at run time and during assembly. Both types of layers (for reading and writing) contain metadata.

In addition, as we mentioned earlier, each layer contains a pointer to the parent using id (in the image, the parent layers are below). If the layer does not point to the parent layer, then it is at the top of the stack.
Metadata Location
At the moment (I understand that docker developers can change their implementation later), the image layer metadata (for reading) is located in a file with the name “json” in the folder / var / lib / docker / graph / id_layer:
/var/lib/docker/graph/e809f156dc985.../json
where "e809f156dc985 ..." is the truncated id of the layer.
We will knit everything together
Now, let's look at the commands illustrated with clear pictures.
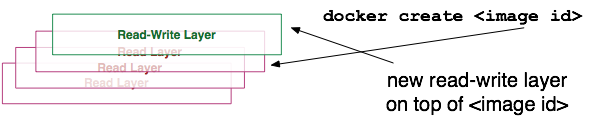
docker create
Before:

After:
The 'docker create' command adds a layer to write to the top of the layer stack found by
docker start
Before:
After:
The 'docker start' command creates a process space around the container layers. There can only be one process space per container.
docker run
Before:
After:
One of the first questions people ask (I also asked): “What is the difference between 'docker start' and 'docker run'?” One of the initial goals of this post is to explain this subtlety.
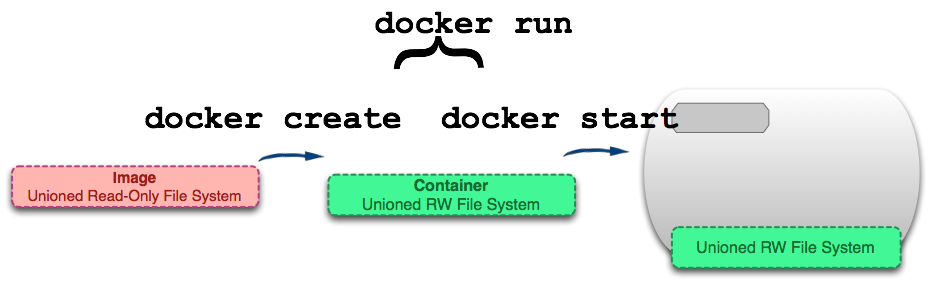
As we can see, the docker run command finds the image, creates a container on top of it and starts the container. This is done for convenience and hides the details of the two teams.
Continuing the comparison with mastering Git, I will say that 'docker run' is very similar to 'git pull'. Just like git pull (which combines git fetch and git merge), the docker run command combines two commands that can be used independently. This is convenient, but at first it can be misleading.
docker ps
The 'docker ps' command lists the running containers on your host machine. It is important to understand that this list includes only running containers, non-running containers are hidden. To see a list of all containers, you need to use the following command.
docker ps -a

The command 'docker ps -a', where 'a' is the abbreviation for 'all' displays a list of all containers, regardless of their status.
docker images
The 'docker images' command displays a list of top-level images. In fact, nothing special distinguishes an image from a reading layer. Only those images that have attached containers or those obtained using pull are considered top-level images. This distinction is needed for convenience, since behind each image of the top level there can be many layers.
docker images -a

The command 'docker images -a' displays all the images on the host machine. This is actually a list of all reading layers in the system. If you want to see all layers of one image, use the 'docker history' command.
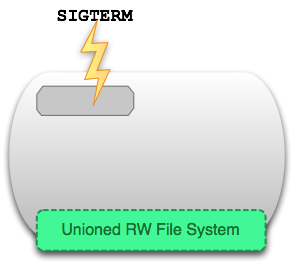
docker stop
Before:
After:
The 'docker stop' command sends a SIGTERM signal to the running container, which gently stops all processes in the container's process space. As a result, we get a container that is not running.
docker kill
Before:

After:
The 'docker kill' command sends a SIGKILL signal, which immediately terminates all processes in the current container. This is almost the same as pressing Ctrl + \ in the terminal.
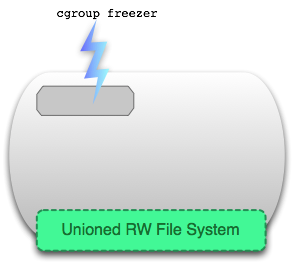
docker pause
Before:
After:
Unlike docker stop and docker kill, which send real UNIX signals to container processes, the docker pause command uses the special cgroups feature to freeze the running process space. Details can be read here , if in short, sending the signal Ctrl + Z (SIGTSTP) is not enough to freeze all the processes in the container space.
docker rm
Before:

After:
The 'docker rm' command removes the recording layer that defines the container on the host system. Must be running on stopped containers. Deletes files.
docker rmi
Before:

After:

The 'docker rmi' command removes the read layer, which defines the “essence” of the image. It removes the image from the host system, but the image can still be obtained from the repository via 'docker pull'. You can use 'docker rmi' only for top-level layers (or images), to remove intermediate layers you need to use 'docker rmi -f'.
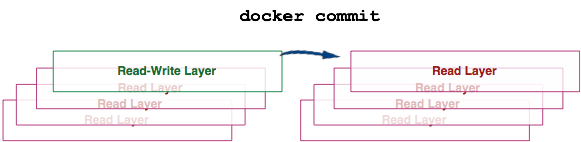
docker commit
Before:
 or
or 
After:

The 'docker commit' command takes the top level of the container, the one for writing and turns it into a layer for reading. This actually turns the container (regardless of whether it is running) into an immutable image.
docker build
Before:
Dockerfile
 and
and After:
With many other layers.
The 'docker build' command is interesting in that it launches a number of commands:
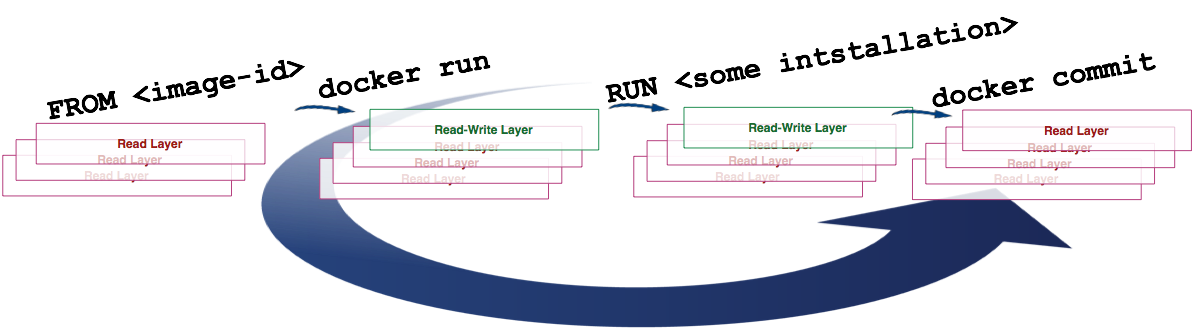
In the image above, we see how the build command uses the value of the FROM instruction from the Dockerfile as a base image and then:
1) launches the container (create and start)
2) changes the layer for recording
3) does commit
At each iteration, a new layer. When 'docker build' is executed, many layers can be created.
docker exec
Before:
After:

The 'docker exec' command is applied to a running container, starts a new process inside the container's process space.
docker inspect |
Before:
 or
or 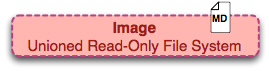
After:

The 'docker inspect' command gets the metadata of the top layer of the container or image.
docker save
Before:
After:
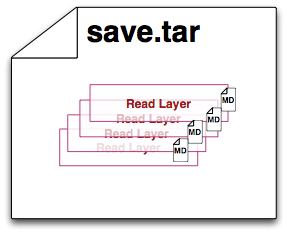
The 'docker save' command creates one file that can be used to import the image to another host system. Unlike the export command, it saves all layers and their metadata. Can only be applied to images.
docker export
Before:
After:

The 'docker export' command creates a tar archive with the contents of the container files, resulting in a folder suitable for use outside docker. The team removes layers and their metadata. It can be applied only to containers.
docker history
Before:

After:

The 'docker history' command accepts
Total
I hope you enjoyed this visualization of containers and images. There are many other commands (pull, search, restart, attach, and others) that may or may not be explained by my comparisons.