October 5, 2015 at 17:32
Metaballs without shaders + fluid physics
 Once I had a dispute with the ZimM habrayuzer about the 2D shaderless engine: I argued that shaders are not necessary for simple 2D games, almost all effects can be made sprites, his position was the opposite. More than once in my mind I returned to this debate and came up with tasks that could not be realized at first glance without shaders, and it was the solution to one such problem that led to the creation of a game where the player controls the liquid by tilting the phone.
Theory
As you might guess from the title, the task was to draw fluids using metaballs. The essence of this technology is to find many points that are no further than a certain distance from the center of any of the meta-balls - “drops” that make up the liquid (more precisely, look at the wiki ). There are many different options for rendering them, including CSS . The simplest and most effective method is to draw circles with inverse quadratic transparency and discard zones with transparency less than 0.5 in the resulting image, and paint the remaining ones with one color.
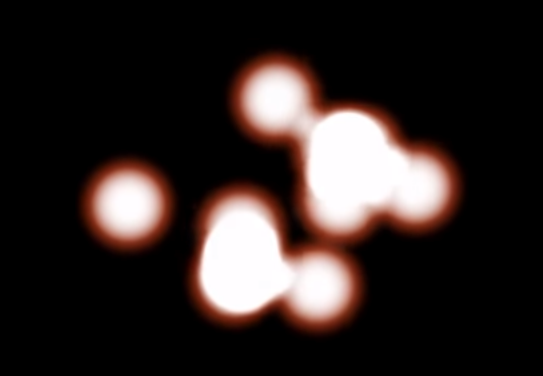
In this screenshot from XScreenSaverMetaBalls shows that intersecting circles form quite high-quality “adhesions” and look organically in places of multiple overlapping. In this screensaver, zone filtering was not performed, but modern equipment can quite cope with this.
First of all, I started thinking how I would do metaballs on the shaders: first we pass four vertices for each Metaball to the vertex shader, form a square with texture coordinates from them, then in the pixel shader we draw either the finished texture or the result of the inverse square function:
vec2 pos = texCoord.xy - vec2(0.5,0.5);
color.a = 0.25/dot(pos,pos);
We write the result of the work to the buffer and process it again with a pixel shader with discard if alpha is less than 0.5 and painting or texture for other values. Of course, it will be necessary to select the coefficients and maybe a bit of “decorations” in the final shader.
Practice
But without the shaders, the same approach, but it looks doubtful on the CPU: create a buffer in memory, for example, 1024x1024xRGBA, go through an array with “drops” of liquid and for each squared with sides R * 2 + 1 we put the coefficients according to the inverse square of the distance formula from the center. Well, then we run through the finished buffer and clean out the RGBA values, simulating discard, fill in the solid zones, and then send this buffer to the video card. It turns out that with a radius of R = 20 and 40 “drops”, it is necessary to do 67240 calculations + 1048576 iterations over an array of pixels with additional processing each frame. This is not to mention the transfer of texture in 4MB to video memory and the hope of a frequency of 60fps on mobile devices.
For the sake of experiment, I implemented such a scheme and got brakes even on a desktop computer. Moreover, the result looked frankly weak: stepped edges, uniform fill color, too geometrically reliable “adhesions”. At the same time, I made a classic premature optimization error - I tried to do all operations with integer coordinates, which may have given a speed increase, but it had a bad effect on quality and added “twitching” to the fluid motion.
It was the thoughts about integer calculations that made me think that I had gone the wrong way: I put too much on the CPU, although part of the work could be transferred to the GPU. It turned out to be the right decision ... texture reduction by several times! But now I decided to use the same effect that Valve uses for fonts and graffiti -Signed Distance Field Alpha Magnification . For those who have not encountered this technology, in a nutshell the principle is this: enlarging the picture does not affect the quality of the zones with gradients, i.e. if there is a smooth transition from a value of 0.0 to 1.0 then the gap inside it will retain its shape at any scale, as in this picture: You
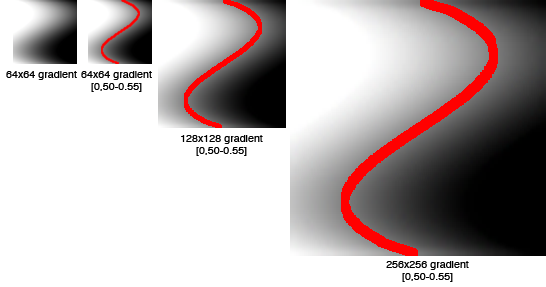
can read more details here .
In the case of liquids, I made a 256x256 buffer and left the gradient on the border of each “drop”, scaling alpha a little - simplified, everything below the original value of 0.4 is discarded, above 0.6 it is filled with solid color, and where there was a transition from 0.4 to 0.6, now the transition from 0.0 to 1.0 (in fact, a cubic function is used there, see the code below). I reduced the radius of each “drop” to 5 pixels, so there were 4840 calculations and 65536 pixels in a 256Kb buffer per frame. This reduction in load allowed us to switch to floating-point operations with rather high accuracy - for each “drop” a region of 11x11 pixels is processed and for each pixel the distance to the exact coordinate of the “drop” is calculated, and not to the pixel in the center of the region. The result is sent to the video card through glTexSubImage2D with ALPHA_TEST at 0.5.

Here is the processing code with which the picture above was received:
The code
for (int i = 0; i < m_metaballs.Length; i++)
{
    int minX = (int)Math.Floor(m_metaballs [i].Position.X - s_radius);
    int minY = (int)Math.Floor(m_metaballs [i].Position.Y - s_radius);
    int maxX = (int)Math.Ceiling(m_metaballs [i].Position.X + s_radius);
    int maxY = (int)Math.Ceiling(m_metaballs [i].Position.Y + s_radius);
    for (int y = minY; y < maxY; y++)
        for (int x = minX; x < maxX; x++)
        {
            float dist =
                        (x - m_metaballs[i].Position.X) * (x - m_metaballs[i].Position.X) +
                        (y - m_metaballs[i].Position.Y) * (y - m_metaballs[i].Position.Y);
            if (dist < s_radiusSqrd)
            {
                dist = 1.0f - (dist * s_iradiusSqrd);
                int value = (int)(dist * dist * 256.0f);
                int index = (x + y * s_fieldWidth) * 4;
                m_field[index + 3] = (byte)NormalizeInt(m_field[index + 3] + value, 0, 255);
                // shift from top left
                int v = (int)((Math.Abs(x - minX) + Math.Abs(y - minY)) * 32.0f);
                // middle value
                m_field[index + 1] = (byte)NormalizeInt((m_field[index + 0] + v) /2, 0, 255);
                // max value
                m_field[index + 0] = (byte)NormalizeInt(Math.Max(m_field[index + 0], v), 0, 255);
                // metaball index
                m_field[index + 2] = (byte)(i + 1);
            }
        }
}
for (int i = 0; i < m_field.Length; i += 4)
{
    int a = m_field [i + 3];
    if (a > 40)
    {
        float na = a / 255.0f + 0.4f;
        na = (na * na * na);
        if (na > 0.8f)
            na = 0.8f;
        float nx = m_field [i + 0] / 32.0f;
        if (nx > 4)
            nx = 4;
        float ny = m_field [i + 1] / 32.0f;
        if (ny > 4)
            ny = 4;
        m_field [i + 0] = (byte)(25 * na + 30 * nx + 5 * ny);
        m_field [i + 1] = (byte)(100 * na + 30 * nx + 10 * ny);
        m_field [i + 2] = (byte)(150 * na + 30 * nx + 5 * ny);
        m_field [i + 3] = (byte)(255 * na);
    }
}
A little more shamanism was needed to give the liquid a more "voluminous" appearance with blackout in the upper left corner and to draw a contour. This is how the final version looks, with blending GL_ONE / GL_ONE_MINUS_SRC_ALPHA:
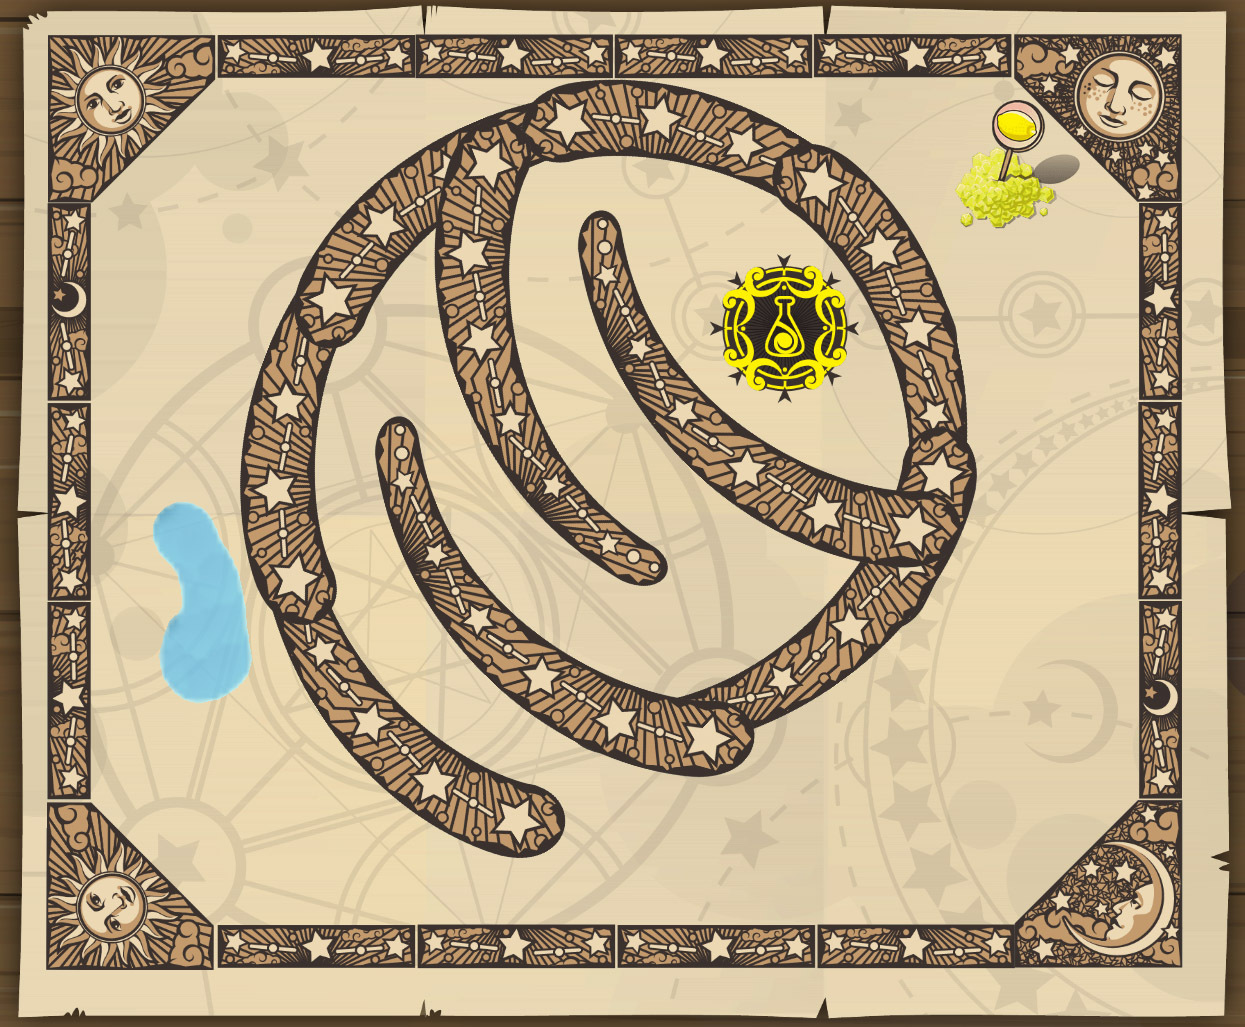
If you look closely, closer to the edge you can see not ideal shading quality due to the low resolution of the texture. This could be corrected by making the entire liquid monochrome, but I decided to leave this effect to get a more dynamic picture.
Physics
In general, the fluids turned out to be visually more or less normal, and then I wanted to make a puzzle out of the game, similar to Teeter. I sometimes use the Farseer engine (Box2D port in C #) in games , because when I found the comrade blog. QuantumYetiI was very happy and after some time I was able to run his code. Everything would be fine, but liquids seeped through the smallest gaps between the objects and flowed off the screen. As a quick fix, I sketched a patch for the engine, which adds a slight offset along the normal vector to each vertex of the convex polygon. This solved most of the problems, because I gave the prototype level to the designer and waited for the result. A few weeks later, the level designer began to complain that simple elements are processed relatively normally, but on complex curves and sharp corners, the liquid may get stuck forever.
This did not seem to be a big problem and was just like a temporary bug. I dug a little into Comrade Code. QuantumYeti realized that everything was pretty bad there, because it was more of a proof of concept, and not a working engine for liquids: dubious execution logic, constants in code, storing temporary variables in a class with public fields, and other shoals. But most importantly, the logic of collisions with objects was very arbitrary and was not suitable for our task - when liquid particles got inside the object, their speed was zeroed and they teleported in the direction of the normal vector to the surface. If the particle fell into another object, it would hang forever and the external forces and viscosity of the liquid would no longer act on it. Particles were also considered point bodies and the TestPoint method was used for collisions, so they could seep into the slots.
The choice fell on liquidfun , or rather, on its full C # port sharpbox2d. This engine is made by the guys from Google, it’s quite good inside, it gives a pleasant speed and dynamics of the movement of fluids. The port in C # turned out to be a little worse and generally not finished - it compiled, but did not work, because the Java approach was often used, when a function changes an instance of a class, but it is not marked with the words ref or out and if it turned into a struct when porting, then the logic of work is violated. I undertook to fix these problems and a day later had a working version of the engine (ps I can put it in git if someone needs it), and then I adapted the whole game to work with it. Everything would be fine, but the designer described the level of fluid behavior in the new engine as “a piece of dough crawling along the oiled walls”. For a while I played with the parameters until I realized
At this point, I was already pretty good at fluid physics and could conditionally understand how collisions should work and why the previous version didn't work. The basis was the ray casting method during particle motion. It took several days to rework one small method, but in general, the final version suited me - liquids no longer leak out, do not stick to walls and do not stop internal movements when they come into contact with objects.
            RayCastInput input = new RayCastInput();
            input.Point1 = particle.oldPosition;
            input.Point2 = newPosition;
            input.MaxFraction = 1.0f;
            RayCastOutput output = new RayCastOutput();
/// ... skipped ...
            if (fixture.RayCast(out output, ref input, c))
            {
                Vector2 n = output.Normal;
                Vector2 p = (1 - output.Fraction) * input.Point1 + output.Fraction * input.Point2 + PUSHBACK * n;
                Vector2 v = (p - particle.position);
                float ax = moveVector.X - v.X;
                float ay = moveVector.Y - v.Y;
                float fdn = ax * n.X + ay * n.Y;
                antiGravity -= n * fdn;
            }
In the course of enumerating all the figures with which there are (or will be in the next frame) intersections, I form the antiGravity vector, which is opposite to the motion vector.
My FluidSystem.cs code with some cleanup, but with the namespace, logic and comments of the first author is available here: runserver.net/temp/FluidSystem.cs
Maybe someone wants to use it in their projects or just bring it to mind and add to which any engine.
The last touch in physics was the addition of moving objects - they can begin to intersect with the liquid themselves, and not as a result of particle movement, because ray casting does not quite fit here and I had to use the original approach of the author with the TestPoint method and point checks. Some bugs appeared here, but for this project they were already not significant.
In general, we can say that the whole project will be born out of crutches and rests on them - shader graphics without shaders, fluid physics without a fluid engine, patches and patches instead of refactoring. But on the other hand, if something good came out of a funny argument and a desire to do something that is not feasible with conventional methods - pourquoi pas?