Planning resources for Veeam Backup & Replication 8.0: calculating the required repository space
- Transfer
So that when planning resources for Veeam Backup & Replication, people can figure out how much space is needed in the repository to backup the virtual machine, the Restore Point Simulator (RPS) calculator-simulator of recovery points was created at one time .
But since I occasionally hear from users, “Why \ why is this value here?”, Today I will give some explanations about the input parameters and tell you where the default values came from.
For details, welcome to cat.
The formula that is used to calculate the size of the backup obtained in one pass of the backup job is:
Backup Size = C x (F x Data + R x D x Data)
Here:
The parameters of this formula and the RPS calculator are related as follows:
We still have two more parameters of the formula - the F and the R . These values indicate how much you want to have full backups (Fulls) or incremental backups (incRements). With the Reverse incremental / Forever incremental modes, everything is obvious - for them it will be:
F = 1
and
R = rps (total number of recovery points) - F
And if you need weekly synthetics or active fulls? Here everything becomes a little more complicated, because you need to take into account the storage policy settings. For example, if you need to build an incremental chain forward incremental, doing weekly full once a week, and at the same time the policy prescribes to store 2 restore points, then at some point you may have 9 points - and everything for dependencies between increments and full backups. The concept of a “recovery point” needs to be interpreted literally (which Veeam Backup & Replication does) - this is the point from which you can recover. If there is no complete backup - the "foundation", from which the chain of increments - "floors" is built, then it will not be possible to restore the machine ("house") from any increment - "floors".
The simulator calculator also illustrates this dependence: after you select a mode, enter the number of points prescribed by the policy in the Retention points field and specify other parameters, and then click Simulate , then in the results section in the Retention column you will see a pair of numbers N1 (N2) . This means that the recovery point number N1 will be stored (will not be deleted), because another point (N2) depends on it.
If you take it on a piece of paper or on a regular calculator, then the formula will look like this:
F = (number of weeks) + 1
R = (F x 7 x number of daily backups - F)
For example, if you need to store 14 points and start a backup daily, then it turns out:
F = 2 + 1 = 3
R = 3 x 7 x 1 - 3 = 21 - 3 = 18
Another subtlety is understanding how much space a weekly backup will take, and how much a monthly one. Remember that a monthly backup can have a chain of 30 points. If you configure weekly weekly full, the chain will be a maximum of 7 days, i.e. less storage space needed. However, if you configure the policy to store, say, 60 points, then a monthly monthly full may be more profitable than a weekly one.
As you already noticed, some fields of the calculator correspond to the fields of the Veeam Backup & Replication 8; both UIs are shown in the pictures for clarity and even more persuasiveness.
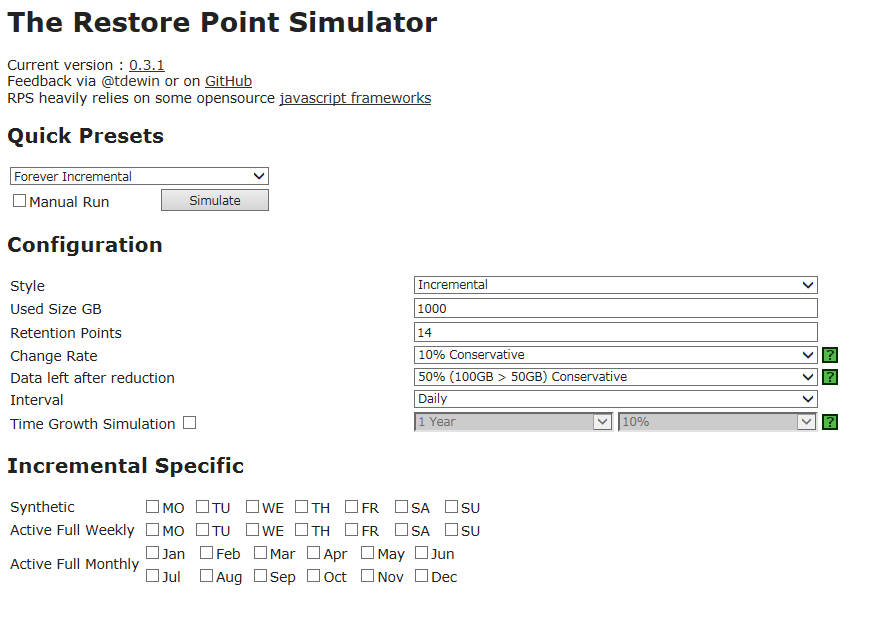
So, we decide on a policy for storing recovery points. If you need to store daily backups (one per day) in the amount of 14 pieces, then specify 14 in the Retention points field and specify Daily in the Interval field . Important!
Remember that at certain points in time there will be more stored points than you indicated - since not only the value you set is taken into account, but also the dependencies between increments and full backups. Therefore, do not rush to edit these values just because you think it is redundant - but rather, carefully re-read the previous section about F and R. Once again, the
number of parameters you set also depends on the fact that our calculator is called Style (style, or a way to create a recovery point for which you need to perform evaluative calculations). Everything is similar to the Veeam Backup & Replication console. For example, take the “style” of Backup Copy Job.- it is obvious that if you want to make a calculation for this option, then the same settings will be used that you set when configuring Backup Copy Job in the Veeam console:
For other “styles” called Incremental and Reverse , the calculation parameters will correspond to the job settings Backup Job (excluding Retention Points ):
Note: If you select Incremental without any full backups (active fulls or synthetic fulls), you will get an endless chain of increments.
I draw your attention to the differences in the UI:

In this case, the settings should be similar to those in this picture (on the left is what you would indicate in the Veeam console, on the right is what you need to specify in the calculator):
Note: the “Transform” option does not play the calculator for one simple reason - for now that no one asked for an author about her :).
To calculate according to the scenario with a monthly active full, the settings should be as in this picture:

Important! Remember that there is no GFS storage scheme for setting the Backup Job backup - such a scheme can only be set in the Backup Copy Job backup transfer jobs. (One user tried to check in January only in the backup task, because he dreamed of “having an annual backup for the archive” - of course, he was very surprised to see what happened as a result of his settings. Of course, a chain was calculated for a whole year, with creating the next full backup in January).
To calculate by Reverse incremental, the settings should be as follows:
It remains to explain only oneowl option - simulation of the growing amount of data Time Growth Simulator . This is a recent and, in my opinion, quite useful invention. Its essence is that if you want, say, to calculate the growth of the data volume for 3 years in advance, and at the same time it is known that the data volume at the input is growing by 10% per year, then you just need to check the box next to Time Growth Simulator and specify this period and these% by selecting the desired values from the drop-down lists.
The calculator takes the value of Used Size GB (discussed above) and calculates the daily increase in data volume using the formula:
Future Used Data = Used Size x (1 + 10%) ^ (Day N / 365)
Thus, on the last calculated day (after 3 years) it will turn out:
Future Used Data = Used Size x (1 + 10%) ^ (1095/365)
Suppose you chose the Reverse incremental backup method, you want to calculate the required volume 3 years in advance, taking into account the annual growth of the data volume by 10%, and the initial volume of Used Size you have is 1000GB (for simplicity we will not take into account the compression ratio).
We calculate according to the formula Future Used Data after 3 years:
Future Used Data = 1000 x (1 + 10%) ^ (1095/365) = 1000 x (110%) ^ 3 = 1000 x (1.10) ^ 3 = 1000 x 1.10 x 1.10 x 1.10 = 1331
Let's check our calculation using a calculator-simulator:

By the way, notice that the incremental backup, which represents the recovery point created 2 days before the expiration of the 3-year period, is Future Used Data will be smaller - according to the same formula:
Future Used Data = 1000 x (1 + 10%) ^ (1093/365) = ~ 1330.30
For standard backup jobs, the difference is not very large, but if you make calculations, say, for a Backup Copy Job job with a GFS storage policy, you can see a more significant increase.

Well, in conclusion, a few words about Quick Presets are typical scenarios that are most often taken for calculation. For example, the script Incremental Monthly Active Full will calculate everything exactly the same as if you selected Incremental in the Style list and checked all 12 months in Active Full Monthly . That's all.

Thanks for attention!
Habr article about backup methods Habr
article about testing storage systems performance for backups
But since I occasionally hear from users, “Why \ why is this value here?”, Today I will give some explanations about the input parameters and tell you where the default values came from.
For details, welcome to cat.
Calculation formula on paper and in calculator
The formula that is used to calculate the size of the backup obtained in one pass of the backup job is:
Backup Size = C x (F x Data + R x D x Data)
Here:
- Data - the total size of all virtual machines processed by a specific backup task (actually occupied space, not allocated)
- C is the average compression / deduplication coefficient (in fact, it depends on a number of factors, it can be very high, but we will take the minimum one - 50%; about the details a bit later)
- F - the number of full backups (VBK) in the chain, according to the storage policy (we take 1, unless the mode with periodic creation of full backups is used, which I will also discuss)
- R - the number of incremental backups (VRB or VIB) in the chain, according to the storage policy (by default it is 14)
- D (delta) - the average number of changes to the VM disk in the interval from one pass of the backup task to another (in the current version of the calculator, this value is 10%, but perhaps in the future it will change by 5% according to the feedback from users ... actually for the bulk of VMs is 1-2%, but for Exchange and SQL, the value reaches 10-20% due to the large number of transactions and, accordingly, log entries, so 5% will be quite reasonable).
The parameters of this formula and the RPS calculator are related as follows:
- Data is what you need to enter in the Used Size GB calculator field .
This is the size of the actual used space, i.e. if you have a VM with one VMDK, then this value is equal to the number of blocks that were written to. Say, if it was a 50GB thick provisioned drive, and you used 20GB on the guest, then in the Used Size GB field you need to enter a value close to 20GB. We can say that Used Size GB is the place that the VM would really occupy if it had a “thin provisioned” disk, because since Veeam copies data at the block level, it’s just a “thin” disk (i.e. . real place taken) would correspond to the amount of data that needs to be processed when creating a full backup (well, plus a little metadata). - D , or delta, is the size of the data that changes between runs of the backup job. In the calculator, this is the Change rate field . Two things affect the choice of its value: how often the task starts (usually once a day) and which application runs on the VM.
Underestimating this value is not recommended. Again, Veeam copies data at the block level, and a tiny change can cause a larger scale change at the block and disk level - more than what you put in the calculator. If writing to a disk is sequential, as in the case of, for example, a file server, then this will most likely not be so noticeable, because 10 consecutive changes may well fall into one block. But if the application makes many even very small random changes in different places, the value can quickly grow. From what I have observed, a value of 5% is a rather optimistic estimate, and 10% is a rather conservative one.
Useful: If you have a Veeam ONE solution deployed, then you can generate a report to evaluate the changes in% specifically for your infrastructureVM Change Rate Estimation from the Infrastructure Assessment Report Set . - C , it is compression (compression) - in the calculator is the Data left after reduction field . As for its interpretation, there are different opinions among the audience, but I suggest looking at our formula, which can be written as follows:
Backup Size = C x (Total Data In)
That is, speaking in Russian: Backup
size = C x (total amount of data on input)
It can be seen from it that when multiplied by C, the value of Total Data In changes proportionally, giving us Backup Size . Hence, the compression ratio Cshows how much (in%) the volume of incoming data has decreased, more precisely, how much is left of the original volume after compression. So, for example, if you set it to 40% (40/100) and take the amount of incoming data as 100 units, then the backup size will obviously be (40/100) * 100 = 40 units. If you set it to 60%, it turns out that you expect less compression effect, because according to the formula it turns out that the backup size will be (60/100) * 100 = 60 units . Bottom line: the lower the compression ratio, the better the compression.
This will seem intuitive to some, but it’s more common for someone to see a “2x” or “3x” compression ratio. It’s easy to convert - you get 1 / N x 100% , that is, for “double” it will be1/2 x 100% = 50% .
Substitute this value in our formula and get: 50 backup size = 50% x (100 total data in)
That's right, the incoming data volume has doubled. Similarly, for compression "3 times": 1/3 x 100% = 33% .
Note: If you plan to completely disable data compression, set this ratio to 100%.
About recovery points and storage policies
We still have two more parameters of the formula - the F and the R . These values indicate how much you want to have full backups (Fulls) or incremental backups (incRements). With the Reverse incremental / Forever incremental modes, everything is obvious - for them it will be:
F = 1
and
R = rps (total number of recovery points) - F
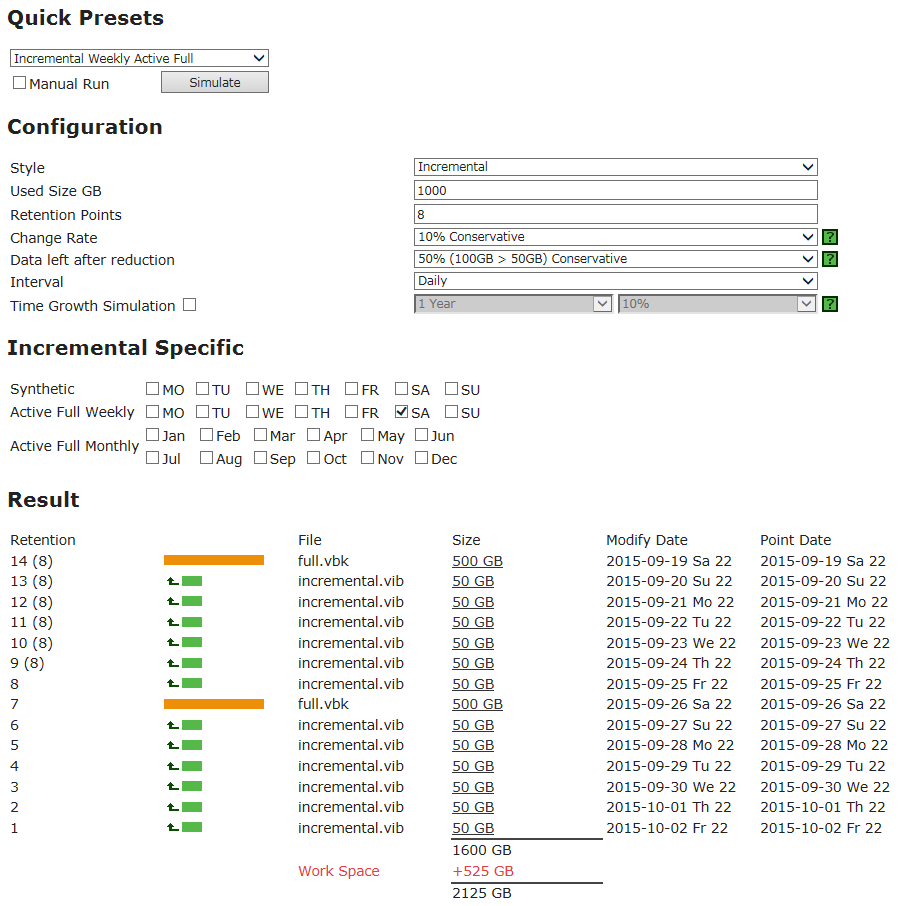
And if you need weekly synthetics or active fulls? Here everything becomes a little more complicated, because you need to take into account the storage policy settings. For example, if you need to build an incremental chain forward incremental, doing weekly full once a week, and at the same time the policy prescribes to store 2 restore points, then at some point you may have 9 points - and everything for dependencies between increments and full backups. The concept of a “recovery point” needs to be interpreted literally (which Veeam Backup & Replication does) - this is the point from which you can recover. If there is no complete backup - the "foundation", from which the chain of increments - "floors" is built, then it will not be possible to restore the machine ("house") from any increment - "floors".
The simulator calculator also illustrates this dependence: after you select a mode, enter the number of points prescribed by the policy in the Retention points field and specify other parameters, and then click Simulate , then in the results section in the Retention column you will see a pair of numbers N1 (N2) . This means that the recovery point number N1 will be stored (will not be deleted), because another point (N2) depends on it.
If you take it on a piece of paper or on a regular calculator, then the formula will look like this:
F = (number of weeks) + 1
R = (F x 7 x number of daily backups - F)
For example, if you need to store 14 points and start a backup daily, then it turns out:
F = 2 + 1 = 3
R = 3 x 7 x 1 - 3 = 21 - 3 = 18
Another subtlety is understanding how much space a weekly backup will take, and how much a monthly one. Remember that a monthly backup can have a chain of 30 points. If you configure weekly weekly full, the chain will be a maximum of 7 days, i.e. less storage space needed. However, if you configure the policy to store, say, 60 points, then a monthly monthly full may be more profitable than a weekly one.
The introductory part is finished, go to the input
As you already noticed, some fields of the calculator correspond to the fields of the Veeam Backup & Replication 8; both UIs are shown in the pictures for clarity and even more persuasiveness.
So, we decide on a policy for storing recovery points. If you need to store daily backups (one per day) in the amount of 14 pieces, then specify 14 in the Retention points field and specify Daily in the Interval field . Important!
Remember that at certain points in time there will be more stored points than you indicated - since not only the value you set is taken into account, but also the dependencies between increments and full backups. Therefore, do not rush to edit these values just because you think it is redundant - but rather, carefully re-read the previous section about F and R. Once again, the
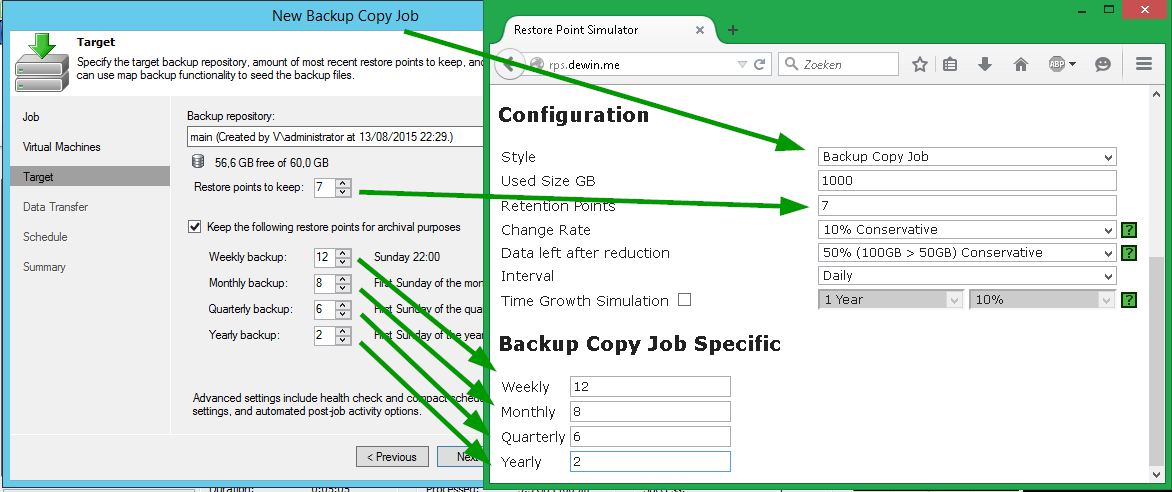
number of parameters you set also depends on the fact that our calculator is called Style (style, or a way to create a recovery point for which you need to perform evaluative calculations). Everything is similar to the Veeam Backup & Replication console. For example, take the “style” of Backup Copy Job.- it is obvious that if you want to make a calculation for this option, then the same settings will be used that you set when configuring Backup Copy Job in the Veeam console:
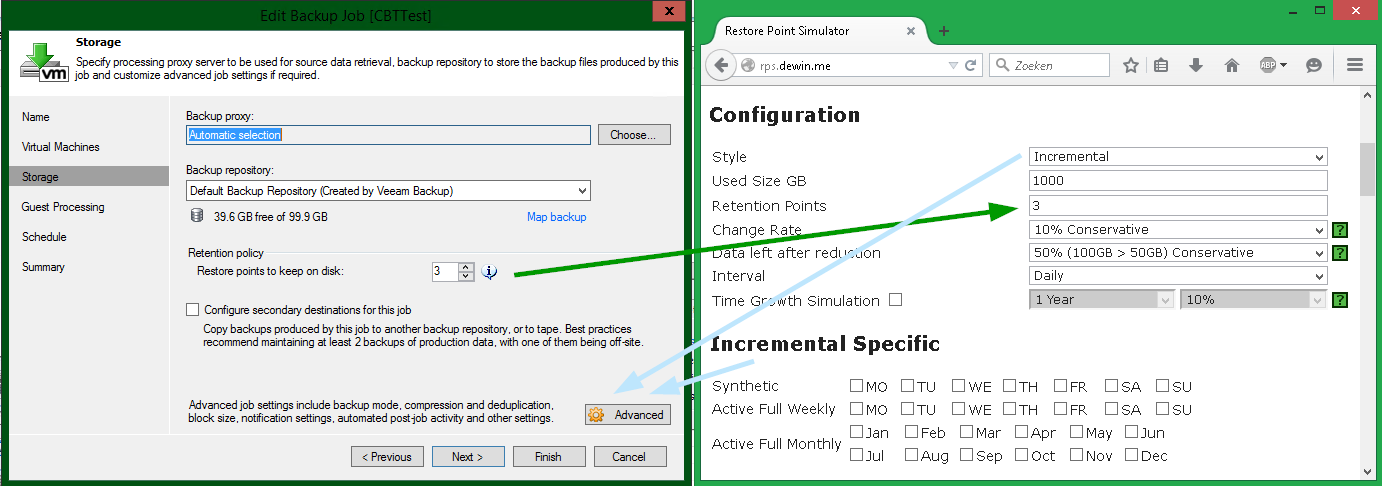
For other “styles” called Incremental and Reverse , the calculation parameters will correspond to the job settings Backup Job (excluding Retention Points ):
Note: If you select Incremental without any full backups (active fulls or synthetic fulls), you will get an endless chain of increments.
I draw your attention to the differences in the UI:
- In the Veeam interface, the corresponding settings are opened by pressing the Advanced button in the Storage step (of course) the backup task wizard. The parameters of the schedule by which a full backup should be created are opened in Advanced Settings by pressing the Days and Months buttons .
- In the calculator of the “Enable Active” or “Enable Synthetic” checkbox as such, you will not see it, however, ticking any daw in the Incremental Specific section will lead to the choice of Active Full or Synthetic Full.
- Well, in addition, in the calculator, the Monthly option takes precedence over the Weekly option - in the Veeam GUI you can select only one of them, but here both, but if Monthly is selected , Weekly will be ignored.
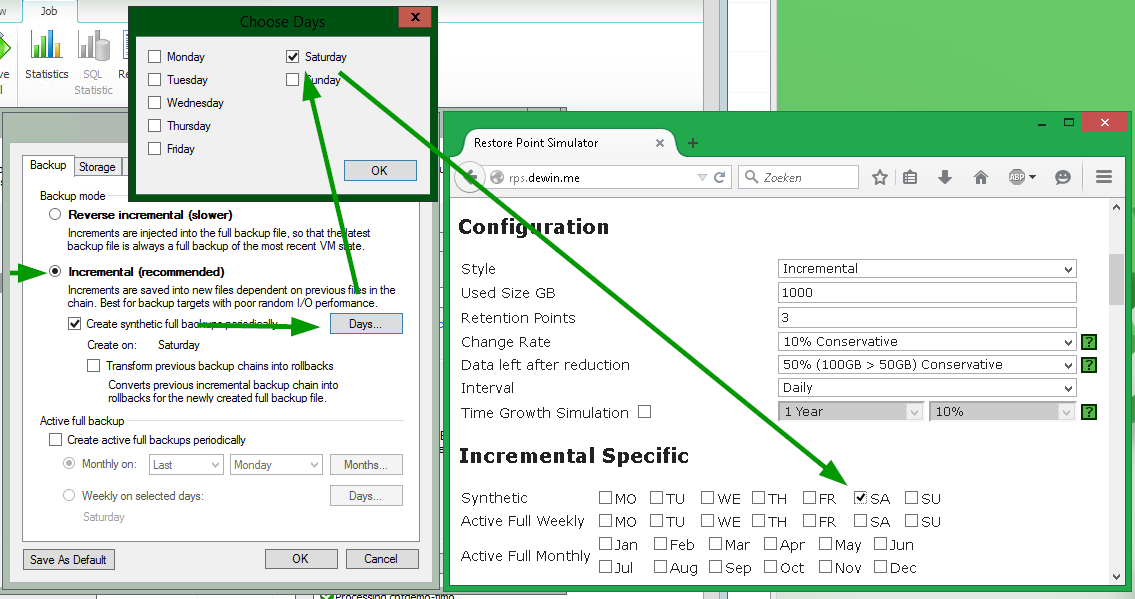
Example No. 1: incremental backup with weekly synthetic full
In this case, the settings should be similar to those in this picture (on the left is what you would indicate in the Veeam console, on the right is what you need to specify in the calculator):
Note: the “Transform” option does not play the calculator for one simple reason - for now that no one asked for an author about her :).
Example No. 2: incremental backup with monthly active full
To calculate according to the scenario with a monthly active full, the settings should be as in this picture:
Important! Remember that there is no GFS storage scheme for setting the Backup Job backup - such a scheme can only be set in the Backup Copy Job backup transfer jobs. (One user tried to check in January only in the backup task, because he dreamed of “having an annual backup for the archive” - of course, he was very surprised to see what happened as a result of his settings. Of course, a chain was calculated for a whole year, with creating the next full backup in January).
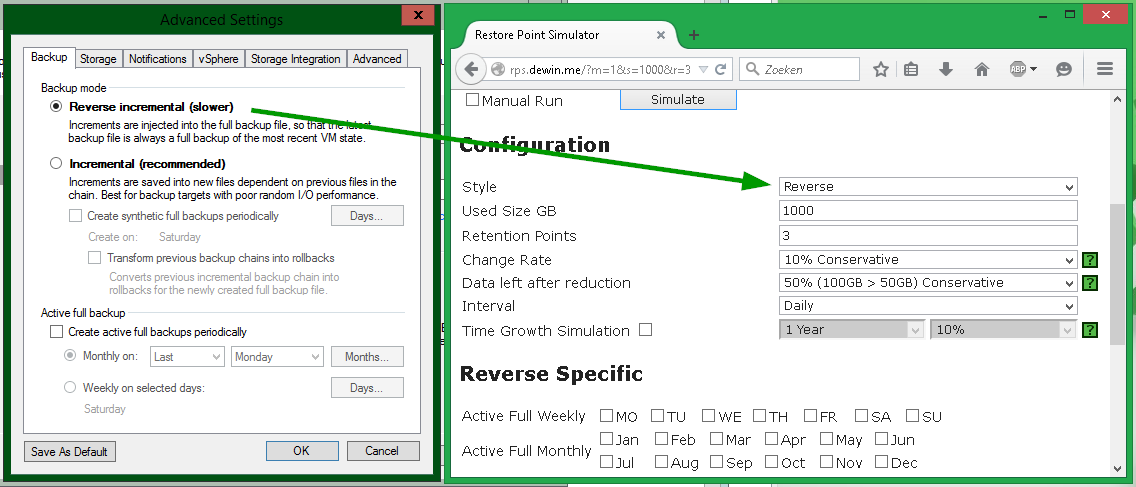
Example No. 3: reverse incremental backup
To calculate by Reverse incremental, the settings should be as follows:
Do you make long-term forecasts?
It remains to explain only one
The calculator takes the value of Used Size GB (discussed above) and calculates the daily increase in data volume using the formula:
Future Used Data = Used Size x (1 + 10%) ^ (Day N / 365)
Thus, on the last calculated day (after 3 years) it will turn out:
Future Used Data = Used Size x (1 + 10%) ^ (1095/365)
Example No. 4
Suppose you chose the Reverse incremental backup method, you want to calculate the required volume 3 years in advance, taking into account the annual growth of the data volume by 10%, and the initial volume of Used Size you have is 1000GB (for simplicity we will not take into account the compression ratio).
We calculate according to the formula Future Used Data after 3 years:
Future Used Data = 1000 x (1 + 10%) ^ (1095/365) = 1000 x (110%) ^ 3 = 1000 x (1.10) ^ 3 = 1000 x 1.10 x 1.10 x 1.10 = 1331
Let's check our calculation using a calculator-simulator:
By the way, notice that the incremental backup, which represents the recovery point created 2 days before the expiration of the 3-year period, is Future Used Data will be smaller - according to the same formula:
Future Used Data = 1000 x (1 + 10%) ^ (1093/365) = ~ 1330.30
For standard backup jobs, the difference is not very large, but if you make calculations, say, for a Backup Copy Job job with a GFS storage policy, you can see a more significant increase.
Well, in conclusion, a few words about Quick Presets are typical scenarios that are most often taken for calculation. For example, the script Incremental Monthly Active Full will calculate everything exactly the same as if you selected Incremental in the Style list and checked all 12 months in Active Full Monthly . That's all.
Thanks for attention!
PS: What else to read
Habr article about backup methods Habr
article about testing storage systems performance for backups