HP Flexible Thin Clients - Practice
The HP Flexible Thin Clients range offers several thin clients with varying configurations and performance. Thin clients use several operating systems: HP ThinPro, HP Smart Zero Core, Windows Embedded .
Next, I will describe the process of setting up thin clients based on the HP Smart Zero Core OS with recommendations.
Part 1
The main range of t5565 / t5565z and t5570 / t5570e are one device, thin clients differ in their basic OS, the size of the flash drive and RAM. After the advent of t510 , they abandoned the previous marking, and thin clients can be distinguished only by their part number.
t520 differs from its predecessors. An AMD processor is installed, a connector is used for the power supply as in the Probook / ElitBook line of laptops, and there are no PS / 2 ports.
The documentation for t5565 / t5570 / t510 can be downloaded here , and for t520 here .
HP ThinPro and HP Smart Zero Core are based onThe Linux ubuntu .
Starting with version 5.0, HP ThinPro and HP Smart Zero Core have merged, now version 5.2 is available for download.
Windows t5570 / t5570e is more expensive than its Linux counterparts, but you can install HP ThinPro or HP Smart Zero Core if you wish.
If you go to the t5565 / t5565z software download page, you will only be asked to download the HP Smart Zero Core 4.4. You can safely download the version 5.2 image for t510 and install.
Windows cannot be installed on t5565 / t5565z, the flash drive is small. Replacing a flash drive in practice is not economically viable; it will exceed the cost of a thin client.
Part 2 - HP Smart Zero Client Service
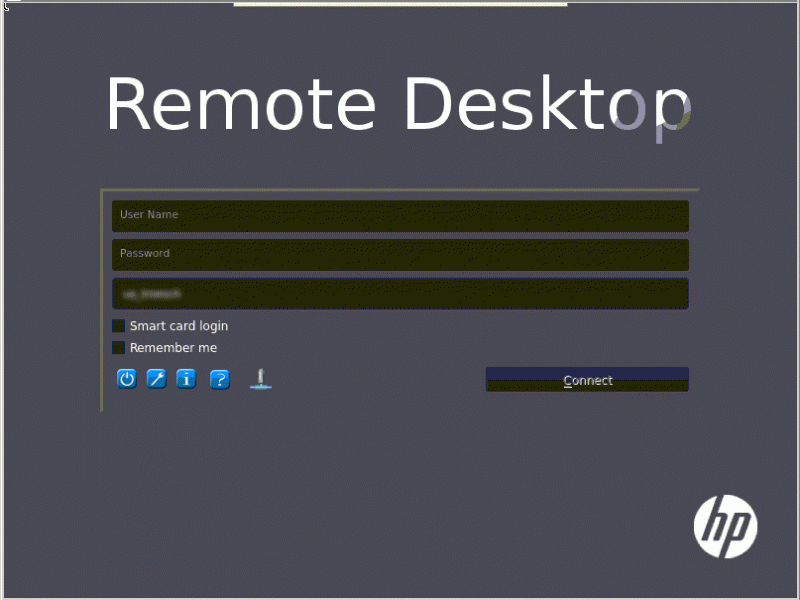
To manage the fleet of thin clients it is proposed to use the HP Smart Zero Client Service .
The mechanism for distributing updates and settings is very simple: a thin client accesses an http server and downloads a profile or updates for OS components. A DHCP server or broadcast is used to detect the http server.

Installation
Download the 19 mb distribution kit here . To install, you need a “server” with Windows XP and higher, you also need to install Internet Information Services (IIS) and .NET Framework 3.5.
Install Profile Editor and Automatic Intellidgence. I do not use Intellidgence Delivery Service.
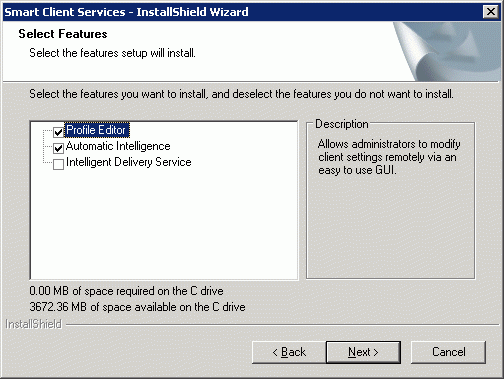
The Automatic Intellidgence installation process creates the HP Automatic Update Web site.

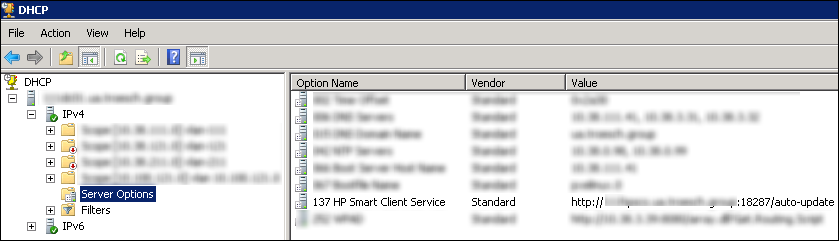
Create a “link” to the DHCP Automatic Update on the DHCP server, String parameter 137 is responsible for this.
Default profile
Launch the Profile Editor and create a default profile.
Pay attention to the presence of a tick “show all parameters”.
All your options will be highlighted in green.
If you have just started working with HP Smart OS:
1 - Specify the version of your image.
2 - Specify the protocol (RDP, Citrix, VMware View, WEB Browser).
3 - Specify a host.

Individual profile
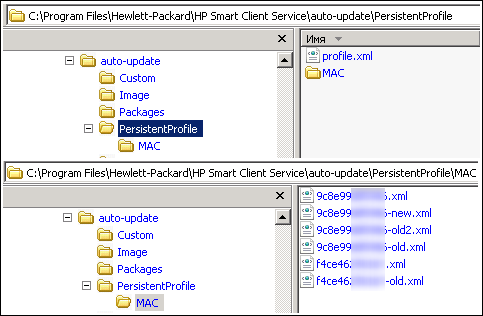
To create an individual profile, put the file in the MAC folder, use the MAC address of the thin client in the name.
Troubleshooting
The mechanism for distributing updates and settings is very simple, if you do not download updates or a new profile, check the file permissions on the http server. I could not understand why updates are not loading, it turned out that there are no rights to read files.
Part 3 - HP Smart Zero Core 4.4
HP Smart Zero Core 4.4 Administrator Guide
Users currently have approximately 100 installed. t5565 / t5570 / t510. All thin clients have the HP Smart Zero Core 4.4 OS installed. All thin clients are used to connect to Windows Server 2008 R2 RDSH.
Installation
Latest Version of Smart Zero Core Image Z6X44017 Rev. 1 (13 Jun 2014) can be downloaded here .
1 - Create an installation flash drive.
2 - Connect the USB flash drive and reboot the thin client.
3 - After the reboot, the thin client will check the availability of the HP Automatic Update server, download the profile and updates, and if it is not there, start the wizard and prompt you to select the protocol and host.
Each protocol has its own design style. After choosing RDP, you will see the next desktop.
Installing updates I
recommend updating the client that will be used:
1 - FreeRDP Client 1.1 Rev. 1 (26 Mar 2014) .
2 - VMware Horizon Client 3.2.1 (15 Dec 2014) .
3 - Citrix Receiver with True Graphics 13.1.3 Rev.1 (30 Apr 2015) .
4 - Together with the new packages, you must install MultiMedia Service Pack 1.0 .
Updates can also be downloaded here . On this ftp server you can find test builds of packages.
Unzip the archive and place the xar file in the packages directory on the HP Automatic Update server. To install the package on all thin clients, use the auto-update \ Packages directory.
To install the package only on t510 thin clients, use the auto-update \ t510 \ Packages directory, do the same with other models.

After rebooting, downloading and installation will begin.
Profile Recommendations
1 - If the host is running Windows Audio, in the absence of a headset, the thin client will play sound using the internal speaker. I recommend that you turn off the sound, if necessary, users can turn it on.
The mute keys are responsible for the root / Audio / OutputMute and root / Audio / RecordMute keys.
2 - Users are blocked after the first entry of the wrong password, this happens if SSL encryption is used (TLS 1.0). When using RDP Security Layer there are no such blocking problems.
To force RDP Security Layer encryption, use the freerdp client help .
Add the / sec: rdp argument to the following root / ConnectionType / freerdp / connections / {UUID} / ExtraArgs key.
You can read more about encryption levels here .
3 - The host server certificate verification can be disabled, the root / ConnectionType / freerdp / connections / {UUID} / certificateCheck is responsible for this.
4 - Set the time, the root / time branch is responsible for this.
5 - Set the administrator password, the root / users / root / password key is responsible for this.
6 - Configure the VNC server, the root / vncserver branch is responsible for this.
7 - Specify the default domain, root / zero-login / defaultCredentials / domain is responsible for this.
Part 4 - HP Smart Zero Core 5.2
HP ThinPro 5.2 Administrator Guide
Installation
Download the T6X52011 Rev.1 image (5 Jun 2015) here .
You can record the installation flash drive, or use the HP Automatic Update server.
Update
Using HP Automatic Update to upgrade OS 4.4 to version 5.x, you must install the ThinPro Upgrade to 5.x Prerequisite Thinstate Addon for 4.x package . If you do not install Prerequisite Addon, the thin client will stop loading and the OS will have to be restored using a USB flash drive.
Place the image T6X52011.dd.gz in the auto-update \ Images folder to update all thin clients, or in the auto-update \ t510 \ Images folder to update only t510, do the same with other models.
If you want to update only one thin client
1 - Create an individual profile, and in the root / auto-update branch, configure the following keys:
ManualUpdate = "1".
ServerURL = "server-name-or-ip: 18287".
path = "auto-update / Custom / Z6X52011".
protocol = "http".
2 - In the auto-update / Custom / Z6X52011 directory, create the necessary directory and file structure:
Image directory with the OS image.
Packages catalog with updates.
PersistentProfile directory and profile.xml file.
place index.txt file in the root.
Reboot the thin client, the new image will be downloaded and installed.
Design HP Smart Zero Core 5.x for RDP.
Differences from 4.4
These are just my observations:
1 - 5.x loads noticeably longer.
2 - Changed the design style, added a "task bar".
3 - Using the DVi-HDMI adapter, I can’t connect an HDMI monitor if OS 4.4 is installed, in 5.2 this was fixed.
4 - If you click on the power button, in cases 4.4 and the RDP protocol, disconnect of the session is performed. In cases 5.2, when you click on the power button, thin clients will turn off, if you need to work with several accounts, the innovation is very inconvenient.
If you decide to return version 4.4
Copy the 44017 image back to the Image folder, after rebooting, downloading and installation will begin.

Part 5 - HP Velocity
If thin clients are installed in remote offices and the communication channels do not differ in quality, HP comes to your aid and offers the HP Velocity tool.
HP Velocity Technology Overview
HP Velocity Version 2.1.0 Administrator Guide
HP Velocity looks very interesting in its marketing videos.
Installation
1 - Update the Velocity package on thin clients.
2 - Install Velocity on the host machine.
The package with update 2.1 for the thin client can be downloaded here , and the server part for the terminal server or virtual desktops here . The host package includes msi distributions for x86 and x64, documentation, and an adm template for group policies.
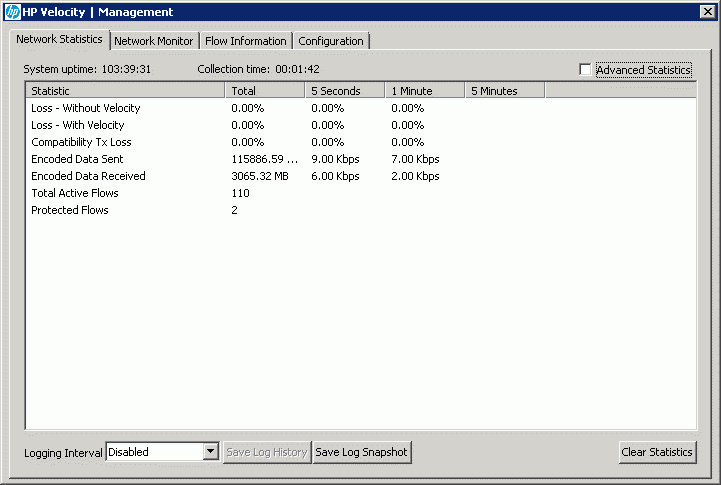
After installation, on the host you can start HP Velocity Management.
Practice
At the enterprise where I work, thin clients connect to servers on the same site, and there are no bad communication channels by default. I installed HP Velocity on all terminal servers with default settings, I do not use templates for group policies.
Question: Why did I install HP Velocity?
Answer: Using HP Velocity Management, on the Flow Information tab, you can observe the processor load of the thin client.

Part 6 - USB Printer
I believe that a local printer is evil for support services and extra costs for business.
Slowly but surely, they began to change to network printers.
I really did not want to connect the printer to thin clients, but the desire to replace old PCs won.
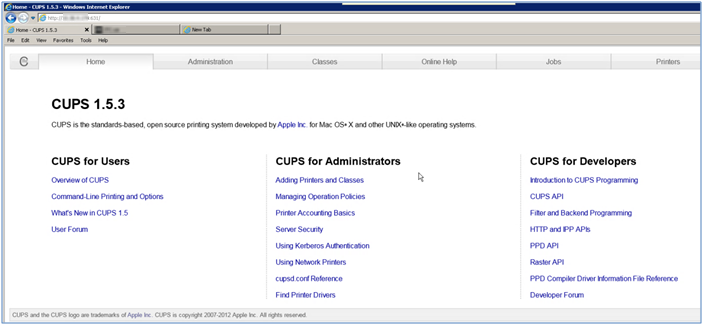
The print service uses the Common UNIX Printing System .
The printers that I could connect: HP 1022, HP 1102, HP 1160, HP 2015, Samsung 2171N.
Printers that refused to print: HP 1320, Samsung SCX-4200, Canon LBP 2900/3000.
Connecting a printer
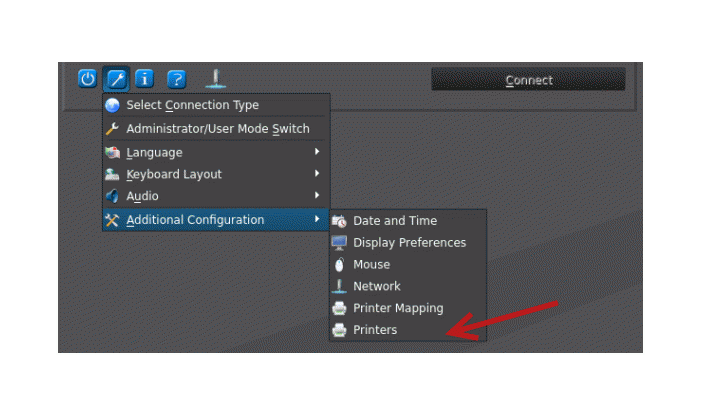
To connect a USB printer to a thin client, you must install the CUPS Printer Support package .
HP Smart Zero Core 5.x contains this package by default.
After installing the CUPS package, a new Printers item will appear in the Additional Configuration menu.
Launch the wizard and add your printer.
Printer Redirection (High-level redirection)
By default, redirection is enabled. If you need to disable redirection, use the root / ConnectionType / freerdp / connections / {UUID} / printerMapping key.
After connecting to your host, you will find a printer in the devices.
Pay attention to the redirected printer driver. It is recommended that the driver name be set in the printer settings; the driver must be installed on the host in advance.

Print server
In order for multiple users to print to the same printer, you must configure the print server on the thin client.
Open the print server settings and enable printing from the Internet.

Reboot your thin client and open the web service of the print service, http: // server-name-or-ip: 631.
Connecting printer CUPS to Windows
To view a list of shared printers, go to http: // server-name-or-ip: 631 / printers.
1 - Install the Internet Printing Client component on the Windows machine.
2 - Connect the network printer using the printer address http: // server-name-or-ip: 631 / printers / printername.
If the printer does not want to print with the native driver, try slipping the MS Publisher Imagesetter driver into it.
Part 7 - Customizing
In the manual for version 4.4 on page 48, you can find a section on desktop design, and for version 5.2 on page 73. Personally, I didn’t understand anything, the ice broke after reading this publication.
The design style consists of 3 files: bgConfig.rtf, zero-login.rtf, desktop.qss. The configuration files are located here / etc / hptc-zero-login / styles /, this directory contains several styles: default, firefox, freerdp, rdesktop, view, xen. Copy these files to yourself, so it will be easier for you to figure it out. Switch to administrator mode, start the X terminal, and copy the contents to the USB flash drive.
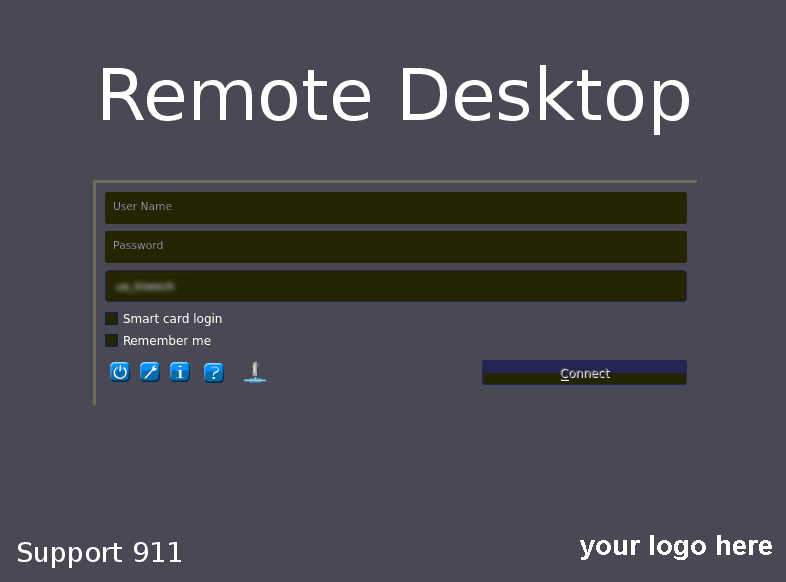
I decided to add the company logo and support contacts to the desktop
1 - I changed the bgConfig.rtf file from freerdp style.
bgConfig.rtf
2 - Made a logo with a transparent background in png format. global {
color: 515151;
}
text {
name: Remote Desktop text;
text: Remote Desktop;
color: white;
font: DejaVuSans-ExtraLight;
max-height: 200;
max-width: 600;
alignment: left vcenter;
font-size: 200;
position: 100,100;
}
text {
name: Support text;
text: Support 911;
color: white;
font: DejaVuSans-ExtraLight;
font-size: 20;
max-width: 70%;
position: 0%, 100%;
alignment: left bottom;
padding: 20;
}
image {
name: Logo;
source: /etc/hptc-zero-login/styles/demo/logo.png;
size: 200x50;
proportional: true;
position: 100%, 100%;
alignment: right bottom;
padding: 20;
}
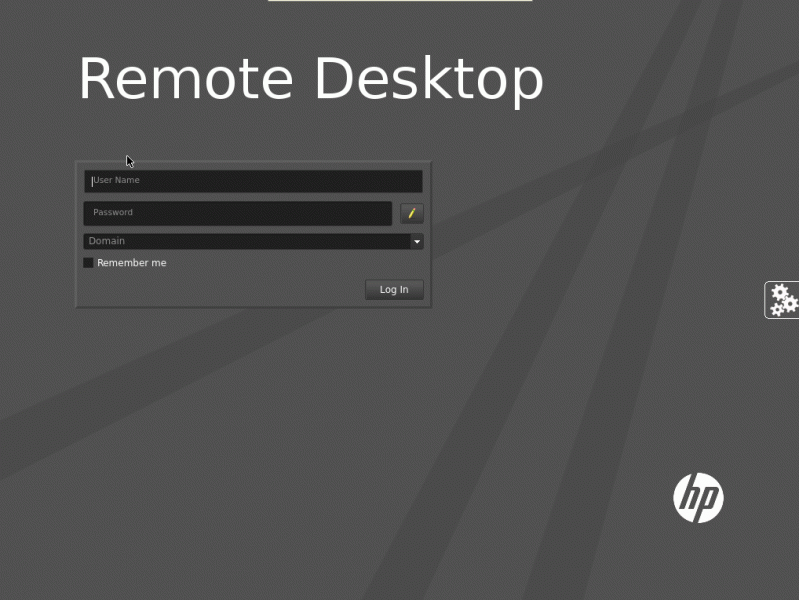
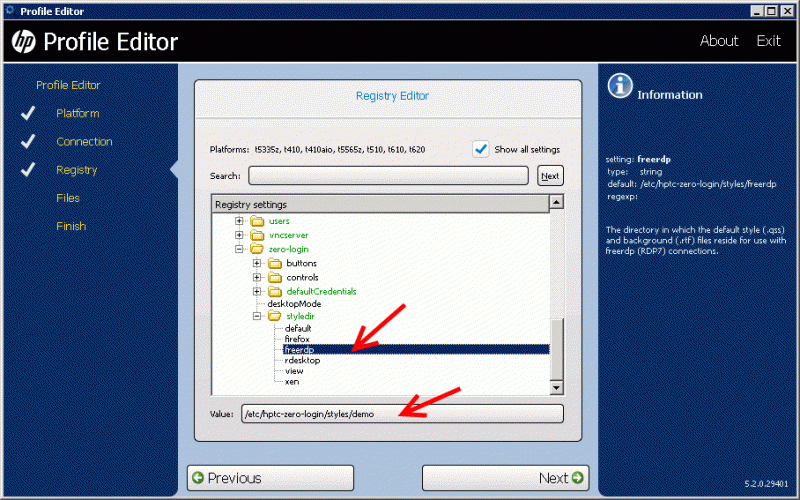
3 - I created a new profile for thin clients, I imported the logo and style files into the profile, the new files are saved on the thin client in the etc / hptc-zero-login / styles / demo / directory. In the registry key root / zero-login / styledir / freerdp, you must specify the new style directory.
After applying the new profile, this is what happened. Caliper contacts on the left, logo on the right.
If you do not want to stop there, and want to install additional software on a thin client.
Use the X terminal and the command “sudo mount -o rw, remount /” to remount the file system with write permissions, then use dpkg or apt-get to install the packages.
For apt-get to work, you need to edit the /etc/apt/sources.list file; by default, package repositories are commented out.
The sources.list file will take the following form:
the deb us.archive.ubuntu.com/ubuntu the Precise main universe multiverse restricted directive
the deb us.archive.ubuntu.com/ubuntu the Precise-updates main universe multiverse restricted directive
the deb ports.ubuntu.com/ubuntu-ports the Precise main universe multiverse restricted directive
the deb ports. ubuntu.com/ubuntu-ports precise-updates main restricted universe multiverse
To configure apt-get through a proxy server, create the /etc/apt/apt.conf file with the following contents:
Acquire :: http :: proxy "http: // server-name-or-ip: port";
Midnight Commander installation example:
sudo apt-get update
sudo apt-get install mc
Part 8 - Smart Cards Redirection over RDP
Page 18 (manual 4.4) and page 44 (manual 5.2)
By default, smart cards will be redirected using high-level redirection, allowing them to be used to log in to the session and other remote applications.
This technology requires drivers for the smart card reader driver to be installed on the client. By default, the CCID and Gemalto drivers are installed, which adds support for the majority of smart card readers available. Additional drivers can be installed by adding them to / usr / lib / pkcs11 /.
They promised to work out of the box, but in practice, nothing worked
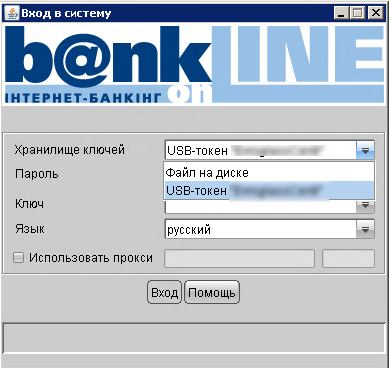
for me. For a long time I could not configure the forwarding of the BIFIT iBank 2 Key token until I added the / smartcard: "*" argument to the root / ConnectionType / freerdp / connections / { UUID} / ExtraArgs. The key acquired the following form / sec: rdp / smartcard: "*".
The token started working with bank No. 1, did not want to work with bank No. 2
Diagnostics
The pcscd service is responsible for the operation of smart cards ; version 1.7.4 is included in SmartOS 4.4 and 5.2.
To check the operation of the token, you must:
1 - stop the service /etc/init.d/pcscd stop
2 - start the service in debug mode pcscd -d -f
After connecting the token, you will see the process of loading it.
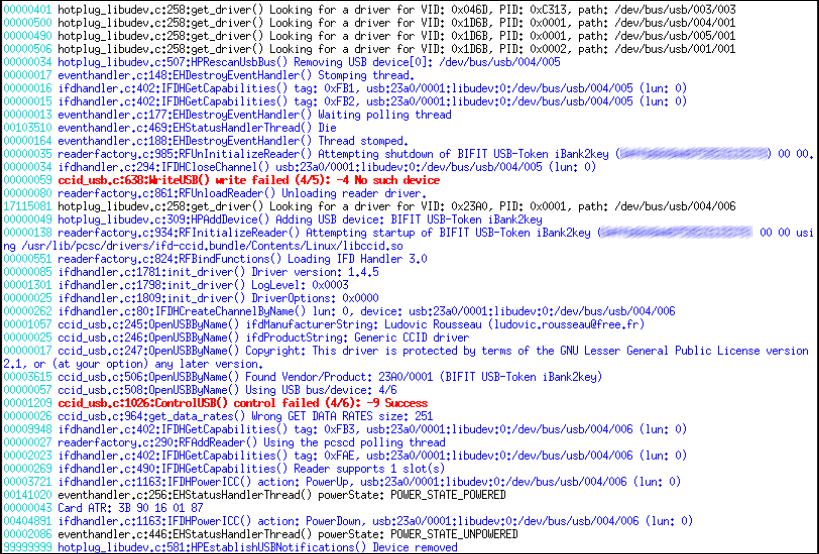
For some reason, the token does not load periodically, I did not manage to identify the pattern.
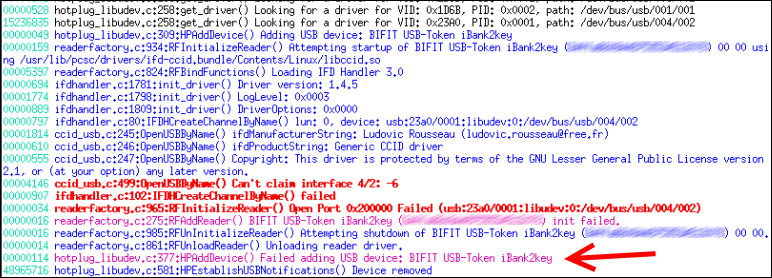
Driver installation
Token for bank No. 2 and No. 3 is not defined in the system until drivers are installed.

The driver must be downloaded on the bank’s website or on the iBank2.RU portal , at the time of writing, version 1.08 was available for download.
example:
sudo mount -o rw, remount /
sudo apt-get remove pcscd
sudo apt-get update
sudo iBank2Key-Driver-Linux-x86-1.08.sh
Without first removing the pcscd service, tokens will not be detected. Also, to be safe, I deleted the directories / usr / lib / pcsc / and / usr / lib / pkcs11 /.
Part 9 - Performance
VIA Nano u3500 (1 GHz) processor is installed in thin clients 5565/5570, VIA Eden X2 U4200 (1 GHz, 2 cores) processor is installed in t510.
Connecting to RDSH Windows Server 2008 R2
RemoteFX protocol is active on the server, I wrote about RemoteFX here .
RemoteFX Configuration:
Screen capture rate = Highest (best quality).
Screen Image Quality = Highest (best quality).
VIA Nano u3500 is noticeably inferior to VIA Eden X2 U4200, this is clearly visible when working in Autocad LT 2012.
More details about Autocad LT 2012
Autocad LT 2012 необходим для редактирования плоских фигур.
Некоторые пользователи работают на терминальном сервере ws2008R2 и используют RemoteApp Autocad LT 2012.
Autocad LT 2012 установлен на отдельный виртуальный сервер ws2012R2, в этом случаи можно запустить две копии приложения.
Чтобы создать нагрузку на сервер и клиент, я начинал рисовать круг и менял ему радиус по горизонтали несколько минут.
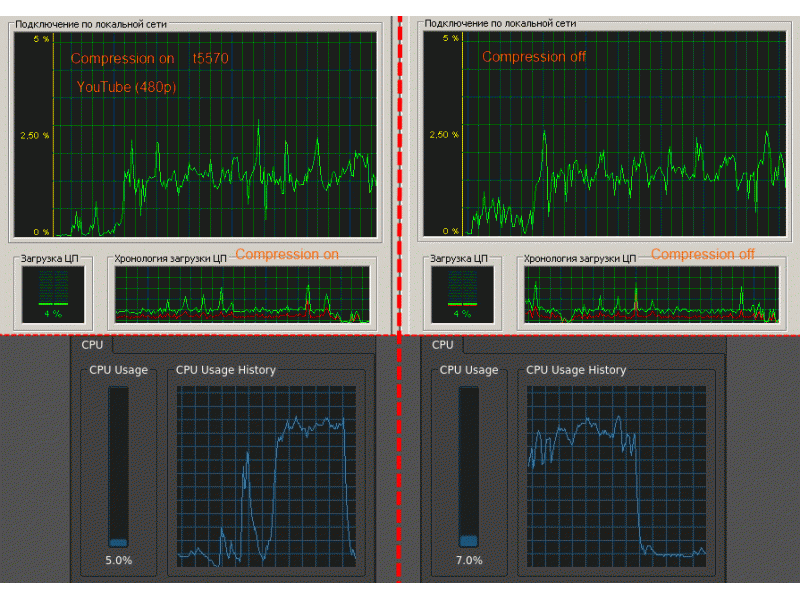
To reduce the load from the processor of the server and client, you can and should disable RDP Compression.
In the root / ConnectionType / freerdp / connections / {UUID} / compression key, set the value to 0.
Disabling compression gives a noticeable effect, but it's too early to talk about reducing the load on the server processor.
Connecting to RDSH Windows Server 2012 R2
VIA Nano u3500 pleasantly surprised, in comparison with connecting to ws2008R2, the load of the thin client processor is noticeably lower.
When working in Autocad LT 2012, everything is smooth and fast, unlike ws2008R2.

Part 10 - Cost
t510 and earlier models HP no longer ships.
t520 J9A27EA HP ThinPro
$ 320 - Russia
$ 346 - Ukraine
$ 362 - Moldova
t520 G9F08AA Windows Embedded Standard
$ 7 425 - Russia
$ 433 - Ukraine
This is the retail price for 1 pc, and the price is not the most interesting.
To get an interesting price from HP, I need a project, I was voiced a condition of 60 pcs.
If you are not pulling on a project or just want to save some money, you can consider buying a control unit for thin clients t5570 / t510, the cost of a control unit t510 is about $ 120 for 1 pc.
The company where I work more than half of thin clients has acquired BU. The delivery package is a minimal, thin client and power supply. Separately, I had to buy DVI-VGA adapters. One thin client was repaired under warranty.
Conclusion
After 2 years, I am satisfied with HP thin clients, there are more pluses than minuses.
The lineup is changing slowly, slowly over several years, you can replace problematic PCs, and as a result you get the same fleet of devices.
Afflicted with pricing, it’s hard to explain to management the need to purchase thin clients at a price comparable to the price of some laptops.