 July 10, 2015 at 19:33
Deploying Qt Applications on Windows
Introduction
Good afternoon, dear readers! Most recently, I completed the development of one of my Qt applications, and I wanted to create a professional installation program so that everything was “like adults”. As it turned out, this is not easy to do, given that there is almost no deployment information on the official website of the toolkit. This article discusses some stages of preparing programs on Qt version 5.2 or higher for distribution to other users' computers. So, here is a leadership plan:
- Preparing a Qt Project for Deployment
- Program distribution layout
- Code Signing and Installer Creation
We will not lose time and get to work.
1. Preparing the Qt project for deployment
To make it easier to follow the instructions, create a simple Qt Widgets project. All subsequent operations will relate to this project. The following is the contents of the application source files:
HelloWorld.pro
QT          += core gui widgets
TARGET      = HelloWorld
TEMPLATE    = app
SOURCES     += main.cpp
main.cpp
#include
#include
int main(int argc, char *argv[])
{
    QApplication a(argc, argv);
    QLabel label("Hello, world!");
    label.setAlignment(Qt::AlignCenter);
    label.resize(200, 50);
    label.show();
    return a.exec();
}
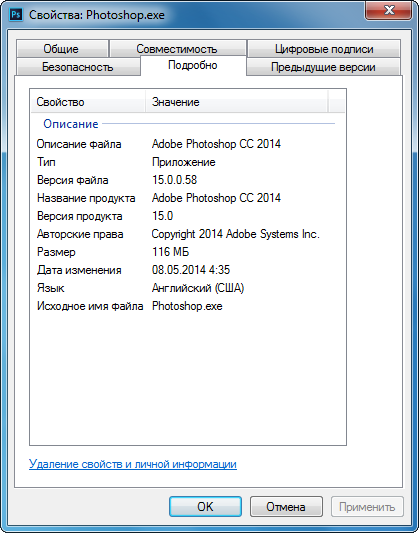
Programs look especially high-quality and professional if they carry with them metadata about the developer, software version, copyright, language and much more. For an example, we will address to properties of a file Photoshop.exe to all known system Adobe Photoshop. The figure below shows the properties window for this file:
You can add similar information using the resource file . The resource file has a .rc extensionand carries a text code that describes the resources used in the application. Such scripts are used in WinAPI-based Visual Studio projects and contain various descriptors for icons, strings, identifiers, and more. In Qt projects, all this makes little sense, but the inclusion of general information about the program is still necessary. Below is the source code of the resource file and the contents of the project file, which will also need to be changed:
resources.rc
IDI_ICON1 ICON "icon.ico"
#include
#define VER_FILEVERSION             1,0,0,0
#define VER_FILEVERSION_STR         "1.0.0.0\0"
#define VER_PRODUCTVERSION          1,0,0
#define VER_PRODUCTVERSION_STR      "1.0.0\0"
#define VER_FILEDESCRIPTION_STR     "HelloWorld"
#define VER_INTERNALNAME_STR        "Sensor"
#define VER_LEGALCOPYRIGHT_STR      "Copyright (C) 2015, MyCompany"
#define VER_ORIGINALFILENAME_STR    "HelloWorld.exe"
#define VER_PRODUCTNAME_STR         "Hello World"
VS_VERSION_INFO VERSIONINFO
FILEVERSION     VER_FILEVERSION
PRODUCTVERSION  VER_PRODUCTVERSION
BEGIN
    BLOCK "StringFileInfo"
    BEGIN
        BLOCK "040904E4"
        BEGIN
            VALUE "FileDescription",    VER_FILEDESCRIPTION_STR
            VALUE "FileVersion",        VER_FILEVERSION_STR
            VALUE "InternalName",       VER_INTERNALNAME_STR
            VALUE "LegalCopyright",     VER_LEGALCOPYRIGHT_STR
            VALUE "OriginalFilename",   VER_ORIGINALFILENAME_STR
            VALUE "ProductName",        VER_PRODUCTNAME_STR
            VALUE "ProductVersion",     VER_PRODUCTVERSION_STR
        END
    END
    BLOCK "VarFileInfo"
    BEGIN
        VALUE "Translation", 0x409, 1252
    END
END
HelloWorld.pro
QT          += core gui widgets
TARGET      = HelloWorld
TEMPLATE    = app
SOURCES     += main.cpp
RC_FILE     = resources.rc
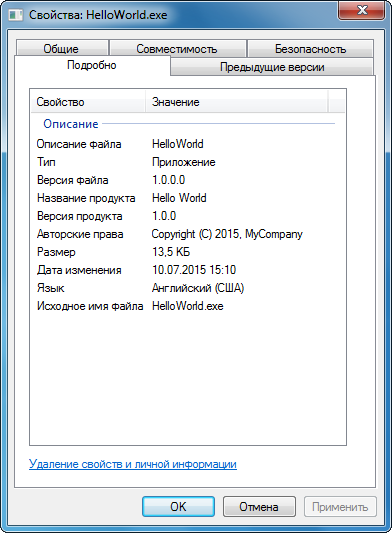
In this example, it is important not to forget to add the resources.rc and icon.ico files to the folder with the project source files. The figure below shows the program properties window after assembly:
Sometimes it may be necessary for a program to run with administrator privileges. Within Qt, this can be achieved by using simple instructions in the project file. Below is the code that allows the program to request administrator privileges at startup:
HelloWorld.pro
QT          += core gui widgets
TARGET      = HelloWorld
TEMPLATE    = app
SOURCES     += main.cpp
RC_FILE     = resources.rc
win32
{
    CONFIG += embed_manifest_exe
    QMAKE_LFLAGS_WINDOWS += /MANIFESTUAC:"level='requireAdministrator'"
}
It should be noted that all of the above instructions will be guaranteed to work only when using the Visual Studio build kit. Detailed information about resource files can be found on the MSDN portal in the About Resource Files section .
2. The layout of the distribution package
Creating an application distribution package, taking into account all of its files that should be installed on users' computers, is probably the most difficult stage of deployment. It is necessary to carefully analyze the program executable file for dependencies, take care of the translation files, and not forget about the application resources. Windeployqt.exe utility , which comes with the build kit, will help solve some of these problems . This tool runs on the command line and supports some configuration options. The figure below shows the command prompt window with the running utility:
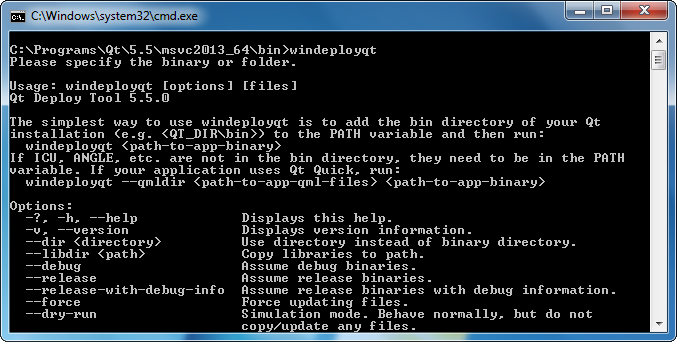
The last parameter must specify the path to the binary files of the compiled application or the names of these files. The table below lists the utility parameters that can be used when working with it:
| Parameter | Description |
| - ?, -h, --help | Help output |
| -v, --version | Display Version Information |
| --dir < directory > | Use specified directory instead of file directory |
| --libdir < path > | The directory to which the libraries will be copied |
| --debug | Use debug versions of files |
| --release | Use files for release |
| --release-with-debug-info | Use release files for debugging information |
| --force | Replace existing files |
| --dry-run | Carry out work to verify |
| --no-plugins | Skip copying plugins |
| --no-libraries | Skip library copying |
| --qmldir < directory > | Scan QML import starting from the specified directory |
| --no-quick-import | Skip Qt Quick |
| --no-translations | Skip copying translation files |
| --no-system-d3d-compiler | Skip copying Direct3D compiler |
| --compiler-runtime | Copy Compiler Dependencies |
| --no-compiler-runtime | Skip compiler dependencies |
| --webkit2 | Copy WebKit2 Files |
| --no-webkit2 | Skip WebKit2 |
| --json | Print JSON Output |
| --angle | Copy ANGLE Files |
| --no-angle | Skip ANGLE |
| --list < mode > | Print only the names of the copied files. Modes: source , target , relative , mapping |
| --verbose < level > | Debug level |
| - < library name > | Add specified library |
| --no- < library name > | Do not add the specified library |
After starting the utility, various libraries and utility files should appear near the executable file of the program, which will allow the application to start and work correctly on many computers. The figure below shows the Windows Explorer window with the distribution structure:
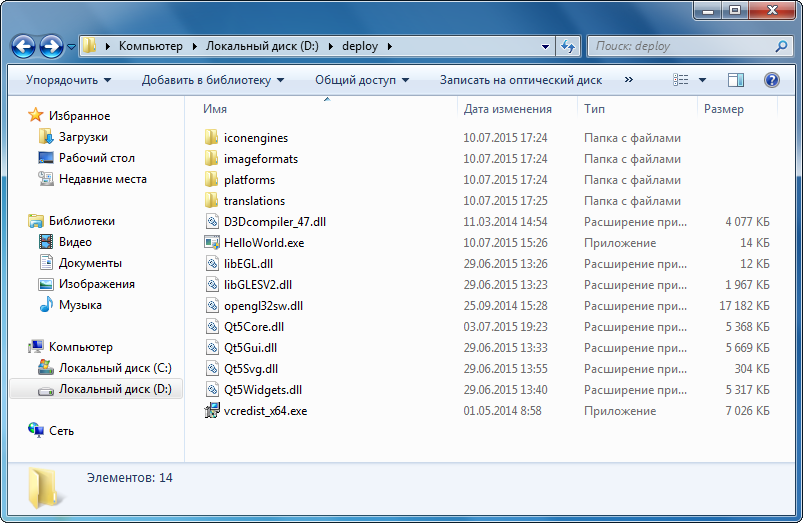
It should be noted that before using windeployqt.exe, you must add the path to this file to the PATH environment variable, otherwise this tool will not work.
3. Signing the code and creating the installer
After compiling the distribution package, try to run the application as administrator. The figure below shows a message from the User Account Control (UAC) system service with a warning about the launch of an unknown publisher application:

This warning scares users off and creates an bad reputation for the application. To correct the situation, you need to sign the program files using a special certificate. By signing their programs, developers provide additional guarantees for the reliability of applications in terms of information security. Open source software developers can get certificates for their projects for free, for example, on the Certum website. To use the certificate, you need a special program that will sign the application files. You can use the convenient DigiCert Certificate Utility tool for this . The figure below shows the window of this program with a list of certificates for signing the code:
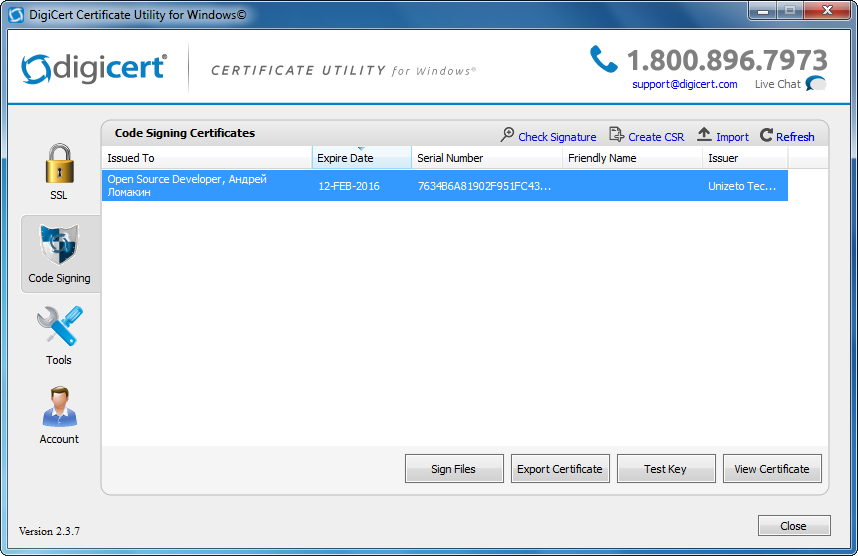
After using this utility, it is worth trying again to run the application as administrator. The following is a UAC message displaying information about the publisher of the program:

After the work has been done, it's time to think about choosing the installer creation system for the prepared application. There are both paid and free products for this task. The table below lists some tools for creating setup programs:
| Paid | Free |
| InstallShield | Qt Installer Framework |
| Setup factory | NSIS |
| SetupBuilder | Inno setup |
| Smart install maker | WiX |
It is difficult to give any recommendations regarding the choice of a particular system. Open source software developers are likely to opt for free tools, while paid products are often used by commercial companies.
Conclusion
In conclusion, I must say that the preparation of applications for release should be approached with great responsibility. Before using the program, the user goes through the installation phase of the product on the computer. The information that he receives at the same time should make a favorable impression.









