Coffee with Cucumbers (Espresso + Cucumber)

Relatively recently, a wonderful Espresso library for testing UI Android applications appeared. Its advantages over analogues have been reviewed more than once. In short, they consist in the fact that this is Google’s development for their own OS (previously they themselves used Robotium), as well as in laconic syntax and speed. So, we decided to keep up to date and use Espresso. But we don’t have the pluses that we already have, we want BDD ( http://en.wikipedia.org/wiki/Behavior-driven_development ), we want screenshots and reports in json and html, we want to run it all in CI, in Eventually! But first things first. I will tell you how to make friends Cucumber ( http://habrahabr.ru/post/62958/ ) and Espresso ( http://habrahabr.ru/post/212425/) on a small example. Anyone who is tired of Appium, who wants to get away from Robotium and those who care about Android testing, I ask for cat.
Connection
We will use Gradle as a tool for building and resolving dependencies for our project. I highly recommend for those who have not yet seen the site http://gradleplease.appspot.com/ . We tell him the name of the module you are looking for, and he returns a string for connecting it to Gradle.
Let's create a project and connect Espresso and the necessary Cucumber modules for our task, for this we add the dependency block of the build.gradle file as follows:
dependencies {
    androidTestCompile('com.jakewharton.espresso:espresso-support-v4:1.1-r3')
    androidTestCompile 'info.cukes:cucumber-core:1.1.8'
    androidTestCompile 'info.cukes:cucumber-java:1.1.8'
    androidTestCompile 'info.cukes:cucumber-html:0.2.3'
    androidTestCompile ('info.cukes:cucumber-android:1.2.2')
    androidTestCompile ('info.cukes:cucumber-junit:1.1.8')
    {
        exclude group: 'org.hamcrest', module: 'hamcrest-core'
        exclude group: 'org.hamcrest', module: 'hamcrest-integration'
        exclude group: 'org.hamcrest', module: 'hamcrest-library'
    }
}
In order for us to use the Espresso tools, we need to run the tests through the GoogleInstrumentationTestRunner. So to connect Cucumber, you need to inherit from this class, inside which we will give it all control.
public class CucuRunner extends GoogleInstrumentationTestRunner{
    private CucumberInstrumentationCore helper;
    public CucuRunner() {
        helper = new CucumberInstrumentationCore(this);
    }
    @Override
    public void onCreate(Bundle arguments) {
        helper.create(arguments);
        super.onCreate(arguments);
    }
    @Override
    public void onStart() {
        helper.start();
    }
}
Do not forget to specify our freshly created instrumentation test runner in build.gradle
defaultConfig {
    ...
    testInstrumentationRunner 'habrahabr.ru.myapplication.test.CucuRunner'
    ...
}
Steps
Now we need to create the steps that will be used in our test scenarios. In our case, they will be small tests combined into one case. To do this, create the appropriate class, which is inherited from the standard set of tests for Espresso, in order to have access to all the necessary things. We add an annotation to this class, where we indicate that these are Cucumber tests, and the result of their work should be placed in reports of the corresponding formats, in the directories we need. Please note that Espresso tests are executed on the device, and therefore we do not have access to computer directories. So we put everything in the directory of our application:
@CucumberOptions(format = {"pretty","html:/data/data/habrahabr.ru.myapplication/html", "json:/data/data/habrahabr.ru.myapplication/jreport"},features = "features")
public class CucumberActivitySteps extends ActivityInstrumentationTestCase2 {
Now we can deal directly with the implementation of the steps. To do this, it is necessary to divide the methods according to their purpose in accordance with the BDD, that is, Given, When and Then. To do this, we use annotations containing a string for finding matches in the script file based on regular expressions, groups in which play the role of input arguments, and in the body of the steps we will use Espresso calls:
    @Given("^Счетчик попыток входа показывает (\\d)$")
    public void givenLoginTryCounter(Integer counterValue) {
        String checkString = String.format(getActivity().getResources().getString(R.string.login_try_left), counterValue);
        onView(withId(R.id.lblCounter)).check(matches(withText(checkString)));
    }
    @When("^Пользователь нажимает кнопку назад$")
    public void clickOnBackButton() {
        ViewActions.pressBack();
    }
    @When("^Пользователь '(.+)' авторизуется в системе с паролем '(.+)'$")
    public void userLogin(String login, String password) {
        onView(withId(R.id.txtUsername)).perform(ViewActions.clearText());
        onView(withId(R.id.txtPassword)).perform(ViewActions.clearText());
        onView(withId(R.id.txtUsername)).perform(ViewActions.typeText(login));
        onView(withId(R.id.txtPassword)).perform(ViewActions.typeText(password));
        onView(withId(R.id.btnLogin)).perform(ViewActions.click());
    }
    @Then("^Счетчик попыток входа должен показывать (\\d)$")
    public void checkLoginTryCounter(Integer counterValue) {
        givenLoginTryCounter(counterValue);
    }
    @Then("^Кнопка входа стала неактивной$")
    public void checkLoginButtonDisabled() {
        onView(withId(R.id.btnLogin)).check(matches(not(isEnabled())));
    }
Screenshots
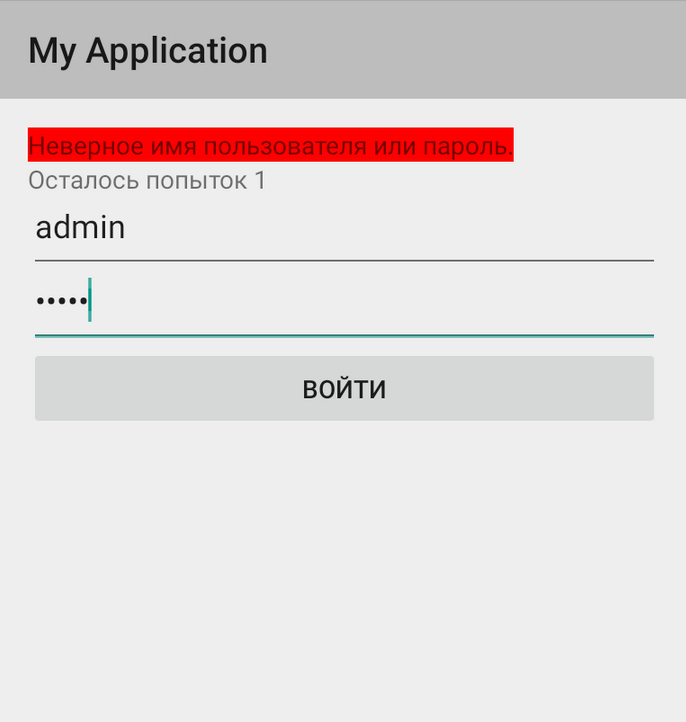
In case of unsuccessful completion of the last step, we will take a screenshot and add the resulting image to the report. Cucumber will do the rest for us, and we will be able to see the status of the screen at the time of the error. The following method is not suitable, for example, for taking a picture with a dialogue, but this is a topic for another discussion.
@After
public void embedScreenshot(Scenario scenario) {
    if(scenario.isFailed()) {
        Bitmap bitmap;
        final Activity activity = getActivity();
        View view = getActivity().getWindow().getDecorView();
        view.setDrawingCacheEnabled(true);
        bitmap = Bitmap.createBitmap(view.getDrawingCache());
        view.setDrawingCacheEnabled(false);
        ByteArrayOutputStream stream = new ByteArrayOutputStream();
        bitmap.compress(Bitmap.CompressFormat.PNG, 100, stream);
       scenario.embed(stream.toByteArray(), "image/png");
    }
}
Scenarios
The nicest part remains. Having in hand the steps described in CucumberActivitySteps, we can write the tests themselves in human language, which will be available not only to developers, but also to all other interested parties:
    Feature: Авторизация
    Scenario: Пользователь пытается авторизоваться, используя неверные логин и пароль
    Given Счетчик попыток входа показывает 3
    When Пользователь 'RandomName' авторизуется в системе с паролем 'wrongPassword'
    Then Счетчик попыток входа должен показывать 2
    And Появилось сообщение 'Неверное имя пользователя или пароль.'
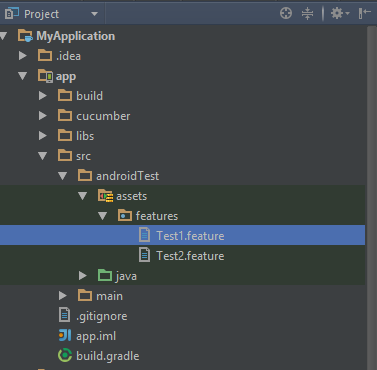
We save these scripts to the features directory in which our executing class will search for them (see the CucumberOptions annotation).
Removing reports from the device
If we run the tests, they will pass, but the reports will remain on the device. So, upon completion of testing, they must be taken from there. We go to the build.gradle file and write the corresponding task, which, using the adb utility and the pull command, will copy the report files to the specified directory.
task afterTests(type: Exec, dependsOn:runCucuTests) {
    commandLine "${android.sdkDirectory}" + "/platform-tools/adb", 'pull', '/data/data/habrahabr.ru.myapplication/html', System.getProperty("user.dir") + "/cucumber_reports"
}
Now you can run everything through the IDE, you just need to create the appropriate launch configuration, and after the tests are completed, execute our task to retrieve the reports.

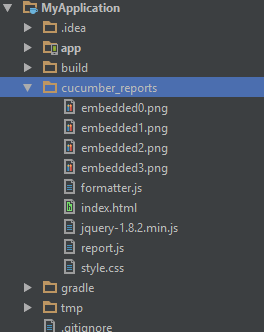
The reports will be saved to the above directory
Launch on CI.
But we do not want to run tests through the IDE, we want to run them from the console, and connectedCheck does not suit us. So we are writing a new task. And here, unfortunately, we didn’t come up with anything better than building an application and installing it on a device, and then sending a command to start testing through adb. And after all this, pick up the reports with the task described above.
task runCucuTests(type: Exec, dependsOn:'installDebugTest'){
    commandLine "${android.sdkDirectory}" + "/platform-tools/adb", 'shell', 'am', 'instrument', '-w', 'habrahabr.ru.myapplication.test/.CucuRunner', 'echo', 'off'
    finalizedBy('afterTests')
}
In principle, this is already enough to run tests on CI.
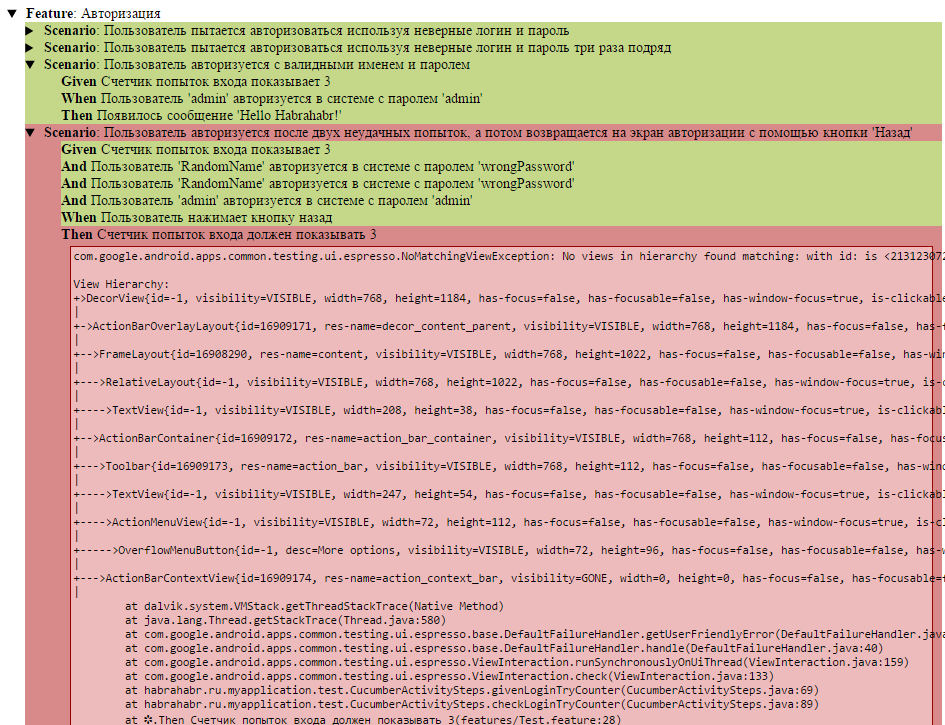
At the output, we get these reports:
And for each scenario that failed, we will have a screenshot attached: We’ll
stop there, for that. Here, I still want to improve a lot, for example, get a normal output to the console during the execution of the tests, containing information about the progress, I want to make the report file beautiful and much more. I hope there will be such an opportunity. For all interested, the project itself is posted on Github: https://github.com/Stabilitron/espresso-cucumber-example
Thank you for your attention. Stable releases to you!