About some aspects of repairing a hard drive electronics board
Hello, dear habravchane! This is the first publication on the recently opened corporate blog of Hardmaster, a company specializing in professional data recovery from storage devices. And with you, I, a leading engineer Artyom Makarov aka Robin. In this blog, my colleagues and I will try our best to post materials that can really help everyone who wants to cope independently with the tasks of repairing failed devices and restoring information from them.
One of the common causes of hard drive failure is problems with the electronics board.
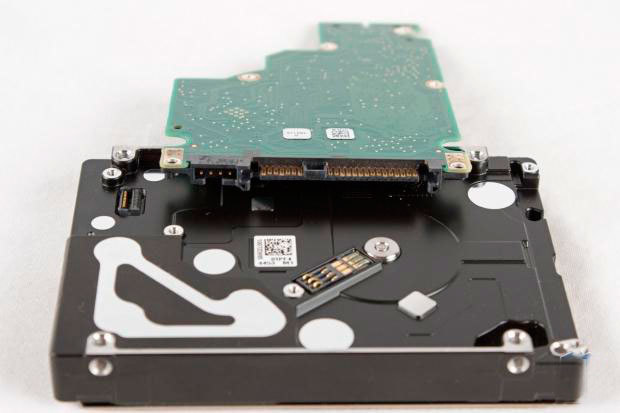
(in common people this is called the HDD controller, which of course is incorrect)
And we begin a series of publications on the review of HDD board failures and methods for their elimination. Subscribe and stay tuned!
Board failures can be divided into electromechanical and logical. We will talk about logical ones later, but the undisputed leader of the first is the burn-out protective elements in the power circuit, which is caused by the so-called thyristor effect of the power supply, a situation when the upper and lower keys are unlocked when the power is turned on / off and a sharp increase in the consumption current occurs, which leads to to “breakdown” of the protective elements of the hard drive, after which they either “ring” on the short circuit, or go “into the cliff”.

Such a malfunction may occur as follows:
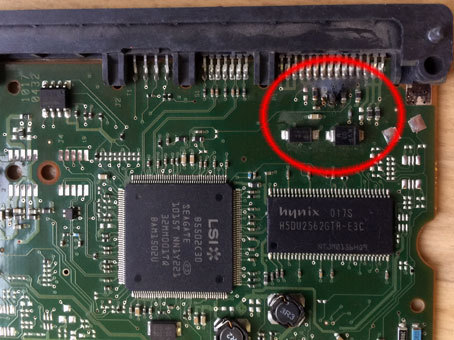
Finding a “weak link” is not difficult. Even if you have never seen one or another board, they are all arranged according to similar principles and TVS diodes, as well as protective SMD fuses, will nest near the power connector. Using a multimeter, you can ring these elements and identify a faulty one.

TVS-protective diodes: when a pulse hits them more than a given one, the anode and cathode are sintered and the dark side of the force goes to ground.
Further, if we are talking about TVS-protective diodes, then revealing a “burnt” element, it can be replaced. It’s better, and in Orthodox, to take the same, obviously serviceable. But such an opportunity is not always there. In our long-term practice, we are guided by a simple rule for this kind of replacement - to take an arbitrary board from Seagate 3,5 ”7200.7-12, WD 3,5” (any SATA) or Samsung 3,5 ”SATA \ IDE. Find the required circuit (+5 or +12 V) that looks similar and change to it.
In most cases, the disk will work even without these elements! Soldered, and if the soldering iron is not at hand, then bitten with wire cutters, the short circuit was eliminated and the drive worked. But! Doing this is strongly discouraged, unless the information on the disk is important and the disk itself is not really needed. For without immunity at the entrance, when the present arrives to the hard drive next time, the consequences may be worse.
In addition, soldering the necessary elements instead of the burned ones before screwing the board to the Hermoblock and applying power, it is strongly recommended that you make a call through the "+5 - ground" and "+12 - ground" circuits, as well as carefully examine the remaining elements on the HDD board for visual traces of the hellish flame. Otherwise, the newly sealed parts, when turned on, will at least burn themselves and, as a maximum, the processor or switch will burn out in the pressurized zone. By the way, for additional familiarization with the subject of publication, anyone can read a brief overview of the hard disk device in order to better understand the terminology.
We check not only the protective diodes near the power connector (above) but also the remaining elements
Here is an example of a Samsung HDD board, where the user decided to fix the breakdown by soldering a jumper and burned the processor to the PCB.
If the drive can be started without diodes at your own risk, then the drive will not work without SMD fuses. You can take a replacement from another board, and Westerns are great for these purposes - there are a lot of tasty and healthy SMD little things “without GMOs” on their shawls. Most often, such protection is found on motherboards from 2.5 "form factor hard drives, the so-called" laptop "ones:
Security elements on Toshiba PCB HDDs are noted.
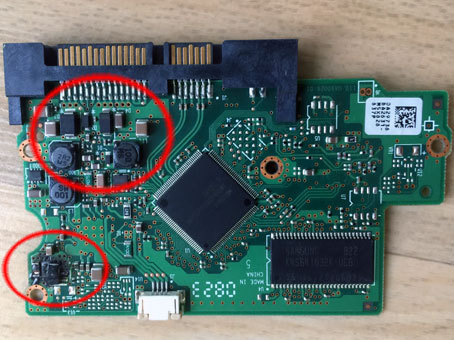
The next problem is the burnout of the so-called“ twist ”, it’s also“ twist-stirrer ” it’s a preamplification / switching chip, here are some examples:

Identify the cause visually no problem. And if someone is unlucky with vision, then such a breakdown and the characteristic smell can be found. The problem is poorer than the burned transil. To eliminate it, in some cases, you can re-solder m \ s by taking it from a donor disk, but often mikruha burns out, burning conductors around itself, fusing the SMD strapping, etc.
Therefore, both for repair and for pulling out the archive of pictures of Barsik’s beloved cat, it’s easier, and perhaps more correct, to change the entire electronics board. How to do this, what pitfalls can be expected at this stage from different manufacturers and families, we will tell you in one of the following publications.
One of the common causes of hard drive failure is problems with the electronics board.
(in common people this is called the HDD controller, which of course is incorrect)
And we begin a series of publications on the review of HDD board failures and methods for their elimination. Subscribe and stay tuned!
“He said,“ Let's go! ” (from)
Board failures can be divided into electromechanical and logical. We will talk about logical ones later, but the undisputed leader of the first is the burn-out protective elements in the power circuit, which is caused by the so-called thyristor effect of the power supply, a situation when the upper and lower keys are unlocked when the power is turned on / off and a sharp increase in the consumption current occurs, which leads to to “breakdown” of the protective elements of the hard drive, after which they either “ring” on the short circuit, or go “into the cliff”.
Such a malfunction may occur as follows:
- When you turn on the PC with the “burned out” HDD connected to it, the computer does not turn on, either not responding at all to the press of the power button, or briefly starting and immediately shutting down. The same is true when a separate power connector from an external power supply is connected to such a drive
- When power is supplied to the hard drive, it does not show any signs of intelligent life. The spindle motor does not rotate, and if you attach a simple human ear to the germoblock, you will not hear any noise, squeaks, etc. And if you connect such a disk to the ATA terminal (the functionality is available in the popular diagnostic products mhdd and victoria) and apply power, then the registers will not be active.
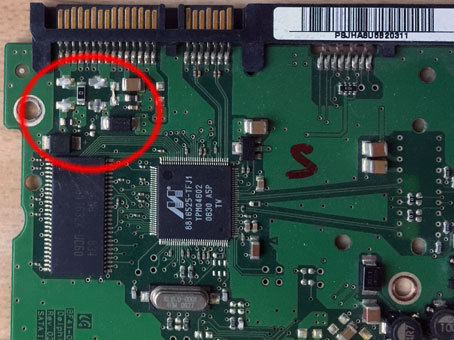
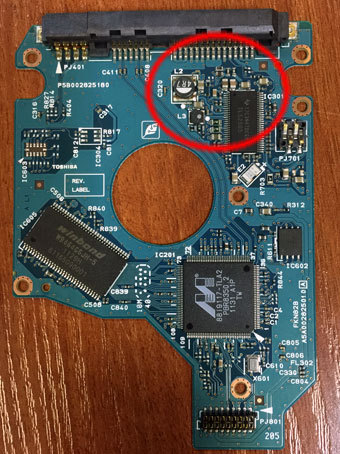
Finding a “weak link” is not difficult. Even if you have never seen one or another board, they are all arranged according to similar principles and TVS diodes, as well as protective SMD fuses, will nest near the power connector. Using a multimeter, you can ring these elements and identify a faulty one.
TVS-protective diodes: when a pulse hits them more than a given one, the anode and cathode are sintered and the dark side of the force goes to ground.
Further, if we are talking about TVS-protective diodes, then revealing a “burnt” element, it can be replaced. It’s better, and in Orthodox, to take the same, obviously serviceable. But such an opportunity is not always there. In our long-term practice, we are guided by a simple rule for this kind of replacement - to take an arbitrary board from Seagate 3,5 ”7200.7-12, WD 3,5” (any SATA) or Samsung 3,5 ”SATA \ IDE. Find the required circuit (+5 or +12 V) that looks similar and change to it.
In most cases, the disk will work even without these elements! Soldered, and if the soldering iron is not at hand, then bitten with wire cutters, the short circuit was eliminated and the drive worked. But! Doing this is strongly discouraged, unless the information on the disk is important and the disk itself is not really needed. For without immunity at the entrance, when the present arrives to the hard drive next time, the consequences may be worse.
In addition, soldering the necessary elements instead of the burned ones before screwing the board to the Hermoblock and applying power, it is strongly recommended that you make a call through the "+5 - ground" and "+12 - ground" circuits, as well as carefully examine the remaining elements on the HDD board for visual traces of the hellish flame. Otherwise, the newly sealed parts, when turned on, will at least burn themselves and, as a maximum, the processor or switch will burn out in the pressurized zone. By the way, for additional familiarization with the subject of publication, anyone can read a brief overview of the hard disk device in order to better understand the terminology.
We check not only the protective diodes near the power connector (above) but also the remaining elements
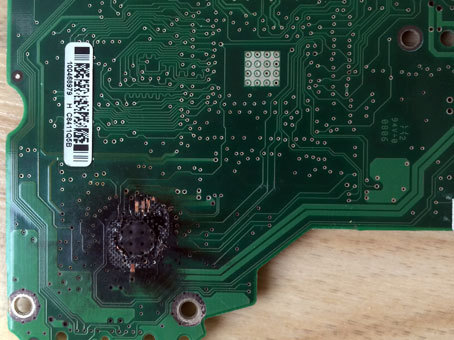
Here is an example of a Samsung HDD board, where the user decided to fix the breakdown by soldering a jumper and burned the processor to the PCB.
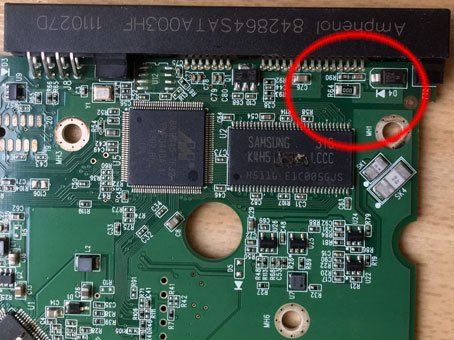
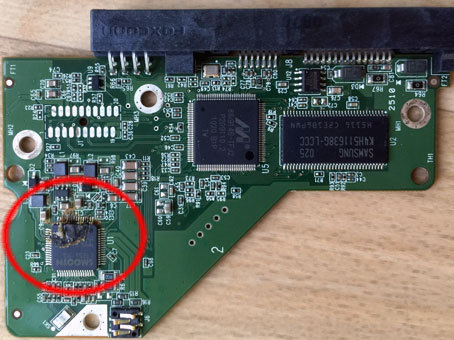
If the drive can be started without diodes at your own risk, then the drive will not work without SMD fuses. You can take a replacement from another board, and Westerns are great for these purposes - there are a lot of tasty and healthy SMD little things “without GMOs” on their shawls. Most often, such protection is found on motherboards from 2.5 "form factor hard drives, the so-called" laptop "ones:
Security elements on Toshiba PCB HDDs are noted.
The next problem is the burnout of the so-called“ twist ”, it’s also“ twist-stirrer ” it’s a preamplification / switching chip, here are some examples:
Identify the cause visually no problem. And if someone is unlucky with vision, then such a breakdown and the characteristic smell can be found. The problem is poorer than the burned transil. To eliminate it, in some cases, you can re-solder m \ s by taking it from a donor disk, but often mikruha burns out, burning conductors around itself, fusing the SMD strapping, etc.
Therefore, both for repair and for pulling out the archive of pictures of Barsik’s beloved cat, it’s easier, and perhaps more correct, to change the entire electronics board. How to do this, what pitfalls can be expected at this stage from different manufacturers and families, we will tell you in one of the following publications.